Table of Contents >> Show >> Hide
- What Exactly Is a “Winter Wreath”?
- Supplies Checklist (Pick Your Adventure)
- Prep Like a Pro (This Is Where “Long-Lasting” Happens)
- Method 1: Classic Full Winter Wreath (Wire Frame + Bundles)
- Method 2: Beginner-Friendly Winter Wreath (Grapevine Base)
- Three Winter Wreath “Recipes” That Always Look Expensive
- Common Mistakes (And How to Fix Them Fast)
- How to Keep a Fresh Winter Wreath Looking Great
- Hanging Tips (So Your Door Doesn’t Hate You)
- Quick FAQ
- Real-Life DIY Winter Wreath Experiences (The Fun Part)
Winter wreaths are basically the front-door equivalent of saying, “Yes, I have my life together,” even if your kitchen is
currently 40% coffee mugs. The good news: making a DIY winter wreath is genuinely beginner-friendly, wildly customizable,
and way cheaper than buying a designer oneplus you get to feel like a festive woodland wizard for an afternoon.
In this guide, you’ll learn two foolproof methods (wire frame and grapevine), how to design your wreath so it looks
intentional (not “I wrestled a pine tree and lost”), and how to keep fresh greenery looking good through winter.
What Exactly Is a “Winter Wreath”?
A winter wreath is a seasonal wreath that works beyond the “red-and-green-only” holiday window. Think evergreens, pinecones,
berries, eucalyptus, dried citrus, neutral ribbons, and metallic accents. The vibe is “cozy cabin” or “frosty forest,” not
necessarily “Santa is watching.”
Supplies Checklist (Pick Your Adventure)
Wreath bases (choose one)
- Wire wreath frame (best for fresh evergreen bundles and a full, lush look)
- Grapevine wreath (best for beginners; easy to tuck stems into the twigs)
- Foam ring (best for faux stems; not ideal for fresh, heavy greenery unless reinforced)
Greenery options (fresh or faux)
- Classic evergreens: pine, fir, spruce, cedar
- Texture boosters: juniper, eucalyptus, boxwood, bay leaf
- Optional fillers: magnolia leaves, dried grasses, faux snowy picks
Decor accents (choose 2–4 so it doesn’t get chaotic)
- Pinecones (small + medium sizes look most natural)
- Berries (real or faux)
- Dried orange slices or apple slices
- Cinnamon sticks or star anise (smells amazing, looks classy)
- Ornaments (keep them minimal for a winter, not “tree exploded,” look)
- Ribbon (wired ribbon is easiest to shape)
- Jingle bells (because joy should have sound effects)
Tools you’ll actually use
- Hand pruners or clippers
- Floral wire (green blends in) or paddle wire (continuous spool wire)
- Wire cutters
- Hot glue gun (mainly for pinecones, ornaments, and ribbonuse sparingly on fresh greenery)
- Work gloves (evergreens are pokier than they look)
- Wreath hanger or sturdy hook
Prep Like a Pro (This Is Where “Long-Lasting” Happens)
If you’re using fresh greenery, spend five extra minutes prepping it. Future-you will be thrilled when your
wreath still looks fabulous weeks later.
- Trim stems to manageable lengths. Aim for 6–10 inches for most wreath sizes so the finished circle looks even.
-
Hydrate your greens. A quick soak in cool water (bathtub, storage bin, or big bucket) helps fresh-cut greenery
drink up before it becomes “decor” and stops having a root system to rely on. -
Sort by texture. Make little piles (pine here, cedar there, eucalyptus over there looking fancy). This makes
design decisions much easier. -
Decide your “feature zone.” Many winter wreaths look best with a heavier cluster at the bottom or lower-left,
leaving some greenery visible so it doesn’t feel like a crowded craft-store aisle.
Method 1: Classic Full Winter Wreath (Wire Frame + Bundles)
This is the traditional “evergreen shop” method: you make small bundles and attach them around a wire frame with continuous
floral wire. It creates a lush, professional look and hides mechanics beautifully.
Step 1: Anchor your wire
Tie floral wire securely onto the wire frame. Keep the wire attached to the spool (don’t cut after each bundle). Continuous
wire is faster, stronger, and less likely to unravel.
Step 2: Make mini bundles (the secret to a neat wreath)
Build bundles about the size of your palm: 3–6 stems mixed for texture (for example: pine + cedar + eucalyptus). Keep stem ends
aligned. If your bundles look like they’re auditioning for a chaos award, trim them until they behave.
Step 3: Wire the first bundle to the frame
Place the first bundle on the frame with tips pointing clockwise (or counterclockwisejust commit). Wrap wire tightly around the
stems and frame 2–4 times. Tight matters here: if you can wiggle the bundle easily, add another wrap.
Step 4: Overlap like shingles
Lay the next bundle so it covers about half the stems of the previous one. Wrap again. Repeat. This overlapping pattern is how
your wreath becomes full and seamless instead of “you can see my wire frame from space.”
Step 5: Finish the circle cleanly
When you return to the starting point, lift the first bundle’s tips and tuck the final bundle’s stems underneath so the join
disappears. Wrap wire a few extra times, cut, and twist the end into the frame so it can’t poke you later. (Your fingers deserve peace.)
Step 6: Add your accents
- Pinecones: Hot glue the base and also wire them in if they’re heavy or you live somewhere windy.
- Berries + picks: Insert stems into bundles and secure with wire where needed.
- Ribbon: Make a bow and wire it into the thickest part of your feature zone.
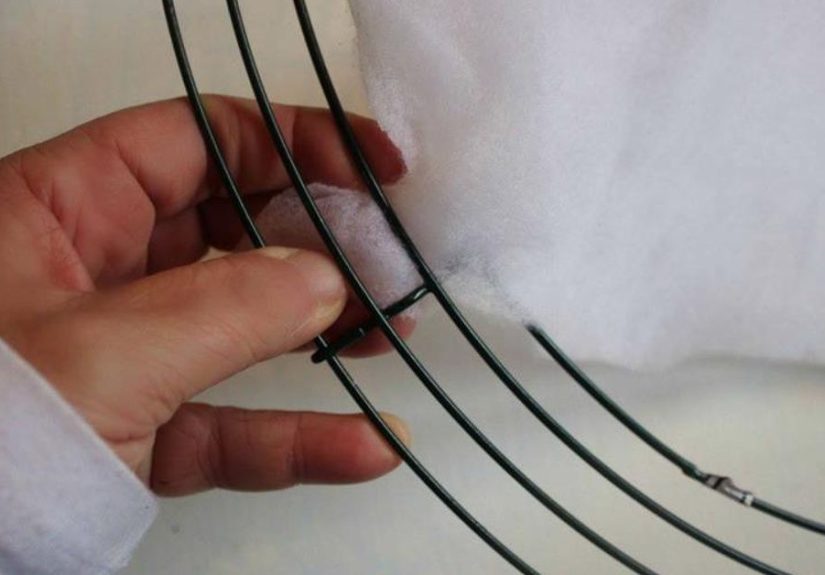
Method 2: Beginner-Friendly Winter Wreath (Grapevine Base)
If you want “easy mode,” grapevine is your best friend. The twiggy structure gives you natural tuck points, so you can build
your wreath without feeling like you need an apprenticeship at a florist shop.
Step 1: Choose your focal area
Pick where the “moment” will bebottom, lower-left, or side. Mark it with a clip or a temporary twist tie if that helps.
Step 2: Start with a base layer
Tuck evergreen sprigs into the grapevine at a slight angle so tips flow in the same direction. Use short pieces of floral wire
to secure anything that feels loose.
Step 3: Build depth with texture
Add cedar, juniper, eucalyptus, or magnolia leaves for contrast. Rotate between soft and structured textures so it looks rich,
not flat.
Step 4: Add accents last
Pinecones, berries, and ribbon go on top. If you glue, glue sparinglytoo much hot glue can look shiny and can also pop off in
cold weather. Wire is less dramatic and more reliable.
Three Winter Wreath “Recipes” That Always Look Expensive
1) The Classic Cozy Cabin
- Base: wire frame (full) or grapevine (airy)
- Greenery: pine + cedar
- Accents: red berries + pinecones + a simple bow
- Bonus: add small jingle bells for subtle sparkle and sound
2) The Frosted Woodland
- Base: wire frame
- Greenery: fir + juniper + eucalyptus
- Accents: dried orange slices + cinnamon sticks + tiny pinecones
- Bonus: a light dusting of faux snow spray (test first so it doesn’t yellow)
3) The Minimalist Winter Chic
- Base: grapevine
- Greenery: eucalyptus or bay leaf
- Accents: one metallic pick cluster (gold/silver) + a narrow ribbon tail
- Bonus: leave negative space so it feels modern and intentional
Common Mistakes (And How to Fix Them Fast)
“My wreath looks lopsided.”
Step back 6–8 feet and look at the outer edge (the silhouette). If one side sticks out, trim that side. If one side looks thin,
add one more bundle or a few extra sprigs in that area.
“I can see the wire frame.”
Your bundles are either too small or not overlapping enough. Add a few “patch bundles” and angle them to cover exposed mechanics.
Also, don’t be shy about fluffing: evergreen tips are basically meant to be styled.
“My pinecones keep falling off.”
Hot glue alone can fail outdoors (cold + moisture + gravity = betrayal). Wire pinecones through the frame or wrap wire around
the cone scales and anchor it into the base.
“The wreath is shedding everywhere.”
Some shedding is normal for fresh-cut greens as they dry. To reduce it, keep the wreath cool and shaded, mist the backside, and
avoid blasting it with indoor heat.
How to Keep a Fresh Winter Wreath Looking Great
Fresh greenery lasts much longer when it stays cool, shaded, and lightly hydrated. Translation: your wreath
wants to vacation in a crisp forest, not sit next to your heating vent like it’s trying to become potpourri.
- Hang it in shade (direct sun speeds browning).
- Mist the backside every couple of days so moisture reaches the cut stems.
- Keep it away from heat sources (fireplaces, vents, sunny indoor windows).
- Use LED lights if you add lights; they generate less heat than traditional bulbs.
- Consider anti-desiccant spray for outdoor wreaths in dry, windy weather (follow label directions).
Hanging Tips (So Your Door Doesn’t Hate You)
- Wreath hanger: easiest, no tools. Add felt pads where metal touches the door to prevent scratches.
- Command-style hooks: great for lighter wreaths; check weight ratings and clean the surface first.
- Ribbon hanger: loop a long ribbon around the wreath and hang it over the top of the doorsimple and pretty.
Quick FAQ
Can I use foraged greenery?
Yesif it’s legal where you live and you harvest responsibly. Take small amounts, don’t strip one tree, and use clean cuts so
plants can recover. If you’re unsure, buy inexpensive clippings from a garden center or tree lot.
Fresh or faux: which is better?
Fresh wreaths smell amazing and look naturally layered. Faux wreaths last for years and require zero maintenance. If your door
gets full sun or you keep your home very warm, faux may save your sanity.
How long will a fresh evergreen wreath last?
With good care (cool temps, shade, and occasional misting), fresh evergreen wreaths can look great for weeks and sometimes longer,
depending on climate and greenery type.
Real-Life DIY Winter Wreath Experiences (The Fun Part)
The first time I made a DIY winter wreath, I had a very confident plan: “I will make it look like a magazine cover.”
The second part of my plan“I will do this without learning anything first”was where things got spicy.
I started with a wire frame because I wanted that full, lush evergreen look. I cut a giant pile of greenery and immediately felt
like I’d won a small survival contest. Ten minutes later, I realized my “giant pile” was actually a “medium pile” once I started
making bundles. Bundles are greedy. They eat greenery like it’s their job.
My first bundle was… how do I put this politely… a hedgehog wearing a cape. The stems were uneven, the tips went in three
directions, and I tried to fix it by adding more pieces. This is the crafting version of adding more words to a text message
you already regret sending. The moment I trimmed stems to a consistent length and limited each bundle to a few textures, the
wreath instantly looked cleaner. Lesson #1: neat bundles make a neat wreath.
Next came wiring. I wrapped the floral wire like I was loosely tying a present bag, and my bundles shifted. Then I tightened the
wire like I meant it, and suddenly everything stayed put. Lesson #2: tight wire is kind wire. You’re not being
aggressive; you’re being structurally supportive.
Halfway through, I stepped back and noticed a bald spot where the wire frame showed through. My instinct was to panic and start
over (very relatable). Instead, I made two “patch bundles” and overlapped them like shingles. Bald spot solved in five minutes.
Lesson #3: overlap is your best optical illusion.
Then the pinecones happened. I hot-glued a few and felt prouduntil one fell off when I lifted the wreath. Another fell off when
the door closed. A third fell off out of pure disrespect. I switched to wiring pinecones in place, and suddenly the wreath could
survive wind, door slams, and my questionable life choices. Lesson #4: wire beats glue outdoors.
My favorite moment was styling the “feature zone.” I clustered berries, added a soft bow, and tucked in dried orange slices for
that wintery, slightly old-world look. That’s when it clicked: a wreath doesn’t need a hundred decorations; it needs
two or three strong textures and a focal point. Too many accents and it stops looking like winter decor and
starts looking like you lost a craft store fight.
Finally, I hung it on the front door and immediately learned Lesson #5: sunlight is not your wreath’s friend. The door got a
surprising amount of afternoon sun, and the greenery dried faster than expected. After moving it to a shadier spot and misting
the backside every couple of days, it held up much better. Now, when I make a fresh winter wreath, I treat it like a tiny
outdoor arrangement: cool, shaded, lightly hydrated, and absolutely not placed near anything that blows hot air.
The best part? Even if your wreath is a little imperfect up close, it almost always looks beautiful from “normal human distance.”
So make the wreath. Enjoy the process. And if one pinecone drops dramatically onto your porch… just call it rustic charm.