Table of Contents >> Show >> Hide
- What Is String Art (and Why Does It Look So Fancy)?
- Supplies You’ll Need (Plus the “Nice-to-Haves”)
- Step-by-Step: How to Make Your Own String Art
- Step 1: Pick a simple design (your future self will thank you)
- Step 2: Prep the board (optional, but it levels up the look)
- Step 3: Attach the template and mark nail placement
- Step 4: Hammer in nails (the “tap” phase)
- Step 5: Remove the template cleanly
- Step 6: Start the string (anchor it so it doesn’t betray you)
- Step 7: Outline first, then fill
- Step 8: Add color effects that look expensive
- Step 9: Finish and hang
- Beginner Project Ideas You Can Actually Finish
- Troubleshooting: Fixes for the Most Common String Art Problems
- Safety Notes (Especially If Kids Are Helping)
- How to Display Your String Art Without Regret
- Real-World Experiences: What I Learned Making String Art (So You Don’t Have To)
- Conclusion
String art is the craft equivalent of a magic trick: you hammer a bunch of nails into a board, wrap thread around them like you’re tying tiny
shoes for ants, and somehow it turns into a crisp heart, a bold monogram, or a geometric design that looks suspiciously like you paid for it.
The best part? You don’t need to be “artsy.” You just need patience, a template, and the ability to not glue your sleeve to your project.
In this guide, you’ll learn how to make DIY string art from scratchchoosing the right board, picking nails and thread, transferring a pattern,
wrapping clean lines, fixing common mistakes, and finishing it like a pro. I’ll also share hands-on lessons at the end (the “things I learned so
you don’t have to” section), because string art is amazing… and also very good at teaching humility.
What Is String Art (and Why Does It Look So Fancy)?
String art (sometimes called nail-and-string art) is a design built by stretching thread, yarn, or twine between nails or pins. Your nails become
“anchor points,” and the string becomes your pencilexcept your pencil is made of 30 yards of embroidery floss and refuses to stay untangled.
There are a few common styles:
- Outline string art: Wrap string around adjacent nails to define letters or shapes (great for beginners).
- Filled string art: Crisscross back and forth to “shade in” areas (more texture, more drama).
- Geometric string art: Straight lines that create optical illusions (math class finally pays rent).
- Portrait/line string art: A more advanced style that uses many connection steps to form an image.
Supplies You’ll Need (Plus the “Nice-to-Haves”)
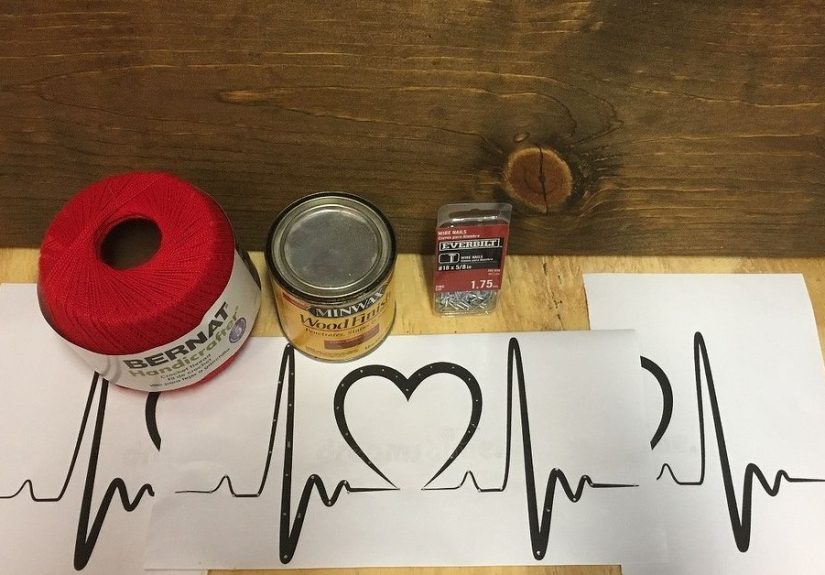
Basic supplies
- Board: wood plaque, pine board, plywood panel, or sturdy cardboard (more on this below).
- Nails: small wire nails or panel pins, typically 1/2 inch to 1 inch long.
- String: embroidery floss, crochet thread, thin yarn, or twine.
- Hammer: a small hammer is easier to control than a “construction-site hero” hammer.
- Pattern/template: printed design, traced drawing, or cut-out letters.
- Tape: painter’s tape (easy removal) or masking tape.
- Scissors: sharp enough to cut floss cleanly.
Optional upgrades that make life easier
- Pliers or tweezers: for holding tiny nails while you tap them in (saves fingers and your vocabulary).
- Awl or pushpin: to pre-mark nail holes for straighter placement.
- Sandpaper + paint or stain: for a polished background.
- Glue: a tiny dab of craft glue can lock knots in place.
- Hanging hardware: sawtooth hangers, picture wire, or heavy-duty adhesive strips.
- Felt pads: protect walls and keep the back from scratching surfaces.
Choosing the right board
For classic string art, a wood board is the easiest: nails bite well, designs look clean, and it feels “real” when you hang it up.
Look for something at least about 1/2 inch thick so nails feel stable. Pre-cut plaques are perfect for beginners because they’re smooth,
flat, and already sized like wall art.
Want a quieter, kid-friendlier version? Use thick cardboard and glue instead of hammering. A star on cardboard (or a simple geometric shape)
can look surprisingly sharpand you won’t annoy your entire household with “tap tap tap” for two hours.
Picking nails and spacing
Small nails (wire nails or panel pins) are common for DIY string art. Length matters: too short and they wobble; too long and they look like
a tiny medieval fence. Most beginner projects work well with nails in the 1/2-inch to 1-inch range. For spacing, aim for consistent gapsoften
around 1/4 to 1/2 inch apartso your lines look intentional instead of “I placed these while sneezing.”
Thread, floss, yarn: which string should you use?
Embroidery floss is a fan favorite because it’s smooth, comes in a million colors, and wraps neatly. Crochet thread
gives crisp lines and less fuzz. Yarn is thicker and more forgiving for big, bold designs. Twine looks rustic but can be
harder to keep tidy on detailed patterns. If you’re new, floss or crochet thread is usually the easiest to control.
Step-by-Step: How to Make Your Own String Art
Step 1: Pick a simple design (your future self will thank you)
Start with a shape you can “read” quickly: a heart, star, cactus silhouette, triangle mountain line, or a single letter. Detailed designs are fun,
but they multiply nail count fast. (And nail count = time. This is just craft physics.)
Print your design to the size of your board. If you’re doing letters, you can print a bold font, cut it out, or trace it. If you’re drawing your own,
keep curves smooth and corners clear.
Step 2: Prep the board (optional, but it levels up the look)
If you want a finished feel, lightly sand the surface and edges. Then paint or stain. A matte background makes bright thread pop. If you paint, let it
dry completely before adding a templatewet paint and paper are best friends, and not in a helpful way.
Step 3: Attach the template and mark nail placement
Center your template on the board and tape it down. Then decide where your nails will go:
- For outlines: place nails around the edge of the shape.
- For filled designs: add nails along the outline plus a few inside points (only if the pattern needs it).
You can pre-poke tiny guide marks with an awl or pushpin so nails go in straighter and faster.
Step 4: Hammer in nails (the “tap” phase)
Put a folded towel under the board to protect your table and soften noise. Hold each nail straight, tap it in, and stop when all nails are roughly the
same height above the surface. Consistent height matters: it keeps string tension even and prevents the floss from slipping off random nails.
Pro move: use pliers or tweezers to hold nails while you start them. Your fingers will stay un-smushed, and your nails will go where you wanted them,
not where your hand flinched.
Step 5: Remove the template cleanly
Once nails are secure, tear away the paper slowly. If it’s stubborn, use tweezers to pull paper bits out from under nail heads. Don’t rush thispaper
confetti stuck under floss can make your lines look messy later.
Step 6: Start the string (anchor it so it doesn’t betray you)
Tie your string to a starting nail with a firm knot (a double knot helps). If you want extra security, add a tiny dab of craft glue to the knot and let
it dry. Trim the tail close so it doesn’t peek out.
Step 7: Outline first, then fill
If you want a clean design, start by defining the outline:
- Outline method: loop the thread around each neighboring nail in order, following the shape like a connect-the-dots.
- Double-outline method: go around once, then repeat a second time for a bolder edge.
Then fill the shape using one of these approaches:
- Zigzag fill: jump across the shape randomly, wrapping nail-to-nail. This creates a woven, “shaded” look.
- Structured fill: alternate nail connections in a pattern (great for triangles, diamonds, and geometric designs).
- Negative-space fill: fill around an inner space (like the inside of an “O”) and keep the center clean.
Keep the thread taut, but not so tight you pull nails sideways. Think “guitar string,” not “trying to win a tug-of-war against wood.”
Step 8: Add color effects that look expensive
Want that “how did you DO that?” look? Try:
- Ombre effect: use 2–4 shades of the same color and switch thread as you move across the design.
- Two-tone outline + fill: outline in a dark color, fill in a lighter one.
- Metallic accents: add a few wraps of metallic thread for highlight lines (especially on stars or holiday designs).
Step 9: Finish and hang
When you love the look (or when you realize you’ve wrapped the same nail 47 times and it’s time to stop), tie off on the back or around a nail near the
edge. Double-knot, trim, and optionally glue.
For hanging, use sawtooth hangers or picture wire for heavier wood pieces. For lighter plaques, sturdy adhesive strips can work if the surface is clean
and the weight rating matches your board.
Beginner Project Ideas You Can Actually Finish
If you’re staring at a blank board like it just challenged you to a duel, pick one of these:
- Heart on a 10-inch square board: classic, forgiving, and looks great in one color or two-tone.
- Monogram letter: bold letter + tight outline wraps = instant custom wall decor.
- Cactus silhouette: fun shape, easy outline, and it practically demands a little pink “flower” detail.
- Cardboard star: great for kids or classroomsglue + string + paint, no hammer required.
- Mini ornaments: small wood shapes + twine for a quick holiday win.
Troubleshooting: Fixes for the Most Common String Art Problems
“My nails are bending.”
Use a softer wood or pre-drill tiny starter holes. Start nails gently. If you’re using very small nails, hold them with pliers so you can tap more
accurately.
“My thread keeps slipping off nails.”
Your nail height may be too low, or your thread tension is uneven. Leave enough nail head exposed to catch the floss. Wrapping each nail once before
moving on can also help lock the line in place.
“It looks messy, not crisp.”
Do a clean outline pass first. Messiness usually comes from starting with random fills before your shape is defined. Also, trim knot tails close and
keep paper bits fully removed before stringing.
“My string is tangling nonstop.”
Work with a manageable length (often 2–4 yards at a time for floss) and re-tie when needed. Keep your skein or ball in a bowl so it doesn’t roll away
like it has places to be.
“There’s a blank area I accidentally covered.”
If you need negative space (like inside letters), slow down near those areas and plan your jumps. If it’s already covered, you can carefully unwind the
last few wraps and redo them. It’s annoying, but it’s also the closest string art gets to time travel.
Safety Notes (Especially If Kids Are Helping)
String art is a great family craft, but nails and hammers are not toys. If kids are participating:
- Have an adult handle hammering nails.
- Let kids do the stringing (it’s the fun part anyway).
- Use safety glasses if you’re worried about flying nails (rare, but not impossible).
- Keep sharp tools and loose nails out of reach when not in use.
- Consider cardboard + glue + pins for a safer, quieter beginner version.
How to Display Your String Art Without Regret
String art looks best where light can create little shadows from the threadnear a window, on a gallery wall, or above a desk. If you made a set, hang
them as a trio: same size boards, same color palette, different shapes. It looks intentional and “designed,” even if you made it in sweatpants while
watching TV.
To keep it looking sharp, dust lightly with a soft brush. Avoid damp cloths on floss unless you’re sure the thread color won’t bleed.
Real-World Experiences: What I Learned Making String Art (So You Don’t Have To)
My first attempt at DIY string art had big “this will be easy” energy. I picked a cute design, grabbed whatever wood was nearby, and started hammering.
Thirty minutes later, I learned my first lesson: not all boards want to be string art boards. The wood was too thin, and every nail felt like it was
one good tug away from escaping. The fix was simpleuse a thicker boardbut the experience was valuable. String art is basically a relationship between
wood, nails, and tension, and all three need to agree to be there.
Lesson two came from nail spacing. I thought, “More nails = more detail = better art,” which is technically true the same way “more tabs open = more
productivity” is technically true. Too many nails too close together made the string crowd and the outline look fuzzy. When I tried again with slightly
wider spacing, the lines instantly looked cleaner. If you’re making a letter or a bold shape, fewer nails often gives a stronger, more readable design.
Save the nail army for intricate patterns.
Then there was the Great Tangle Incident. I used a super long length of floss because I wanted to avoid tying off. The floss had other plans. It twisted,
looped, and knotted itself into what can only be described as a tiny, angry bird’s nest. Now I work in shorter lengthsenough to make progress, not
enough to start a thread-based soap opera. If I’m filling a big shape, I tie off, start again, and accept that knots are part of the process (especially
if they’re on the back where no one sees them).
Another “wish I knew” moment: outlining first is not optional if you want the design to pop. When I jumped straight into random crisscrossing, the shape
looked muddy, like it was hiding. The moment I did a clean outline passwrapping nail-to-nail around the edgethe whole piece snapped into focus. After
that, the fill lines looked like texture instead of confusion. It’s the same logic as drawing: you sketch the shape before shading.
My favorite upgrade has been color planning. Ombre string art looks fancy, but you don’t need a degree in “Color Theory Drama.” Pick three shades in the
same family (light, medium, dark). Outline in the darkest shade, fill with medium, add a few highlight lines in the lightest. The effect is subtle but
polishedlike your project put on shoes before leaving the house.
Finally: don’t underestimate finishing touches. The first time I hung a piece, I didn’t add felt pads, and the back nails scratched the wall like a
tiny raccoon had moved in. Now I add pads, check the hanger rating, and do a quick “shake test” before mounting. That little extra minute saves a lot
of sighing later.
If you take nothing else from my string art adventures, take this: start simple, keep nail spacing consistent, outline first, use manageable thread
lengths, and don’t be afraid to redo a section. String art is surprisingly forgivingmost “mistakes” just turn into texture, and texture is basically
what people pay extra for.
Conclusion
Making your own string art is equal parts relaxing and satisfying: a few basic materials turn into real decor you’ll actually want to keep. Start with
a simple template, hammer nails at a consistent height, outline your shape, then fill with intentional crisscrossing. Add color effects if you want to
flex a little, and finish with proper hanging hardware so your masterpiece doesn’t take an unexpected gravity test.
Pick one beginner design and go for it. Worst case, you learn something and end up with abstract art. Best case, you create a piece that makes people
say, “Wait… you MADE that?”