Table of Contents >> Show >> Hide
- Why Elastic Waistbands Are Trickier Than They Look
- Tools You’ll Need (No, Not a NASA Lab)
- Step 1: Decide What You’re Measuring (Body vs. Garment)
- Step 2: Measure Elastic Width (So It Actually Fits)
- Step 3: Choose the Right Elastic Type (Because Not All Stretch Is Created Equal)
- Step 4: Calculate Elastic Length (The Part Everyone Googles)
- Step 5: Pre-Stretch, Join, and Insert (So It Doesn’t “Relax” Later)
- Shorts-Specific Measuring Scenarios
- More Than Shorts: Measuring Elastic for Other Projects
- Troubleshooting: When the Waistband Misbehaves
- Quick Checklist Before You Cut
- FAQ: Fast Answers to Common Waistband Questions
- Conclusion: Measure Once, Stretch Twice, Live Happily Ever After
- Real-World Experience: What Actually Happens When You Measure Elastic Waistbands
Elastic waistbands are the sweatpants of the sewing world: cozy, forgiving, and somehow still capable of starting arguments. (“I swear I measured rightwhy does this waistband feel like it’s filing a restraining order against my ribs?”) The good news: measuring elastic for shorts (and basically anything with a stretchy waist) is not complicated once you know what, exactly, you’re measuringand why.
This guide walks you through how to measure an elastic waistband for shorts and beyond, including how to pick the right elastic width, calculate a comfortable elastic length, and avoid the classic waistband crimes: rolling, twisting, sagging, and “why is this suddenly a belt?”
Why Elastic Waistbands Are Trickier Than They Look
Elastic waistbands work because of negative easemeaning the elastic is intentionally shorter than the body or waistband opening so it can stretch and hug you (politely) instead of falling down (rudely). But the “right” amount of negative ease depends on:
- Elastic type (braided, knit, woven/non-roll) and how it behaves when stretched.
- Garment weight (linen shorts need more support than featherweight rayon).
- Design (casing, exposed elastic, stitched-down elastic, drawstring combo).
- Comfort preference (snug for running vs. relaxed for brunch).
Tools You’ll Need (No, Not a NASA Lab)
- Soft measuring tape (a ruler works in a pinch, but it’s grumpier around curves)
- Elastic (the actual kind you plan to usedifferent elastics behave differently)
- Safety pin or bodkin (for threading elastic through a casing)
- Marker/chalk and scissors
- Optional but helpful: seam ripper, pins/clips, a scrap of paper for quick math
Step 1: Decide What You’re Measuring (Body vs. Garment)
A. Measuring the body (best for new projects)
If you’re sewing shorts from scratch, start with a body measurement. Stand naturallyno “I’m about to be photographed by paparazzi” postureand wrap the tape around where the waistband will sit. If you’re not sure where your natural waist is, the easy trick is to bend to the side; the spot that creases is usually your waist.
Write down two numbers:
- Waist placement: the circumference where the elastic will sit (natural waist, high waist, or hips).
- Hip circumference (especially important if the shorts have no zipper/buttons): the waistband must stretch enough to go over the widest point.
B. Measuring the garment (best for replacements or copying a favorite)
If you’re replacing elastic in an existing pair of shorts:
- Measure the waistband casing opening: Lay the shorts flat, smooth (don’t stretch), measure straight across the top edge, then multiply by 2. That’s the waistband circumference of the fabric casing.
- Check max stretch: Gently stretch the waistband until it feels like its “reasonable limit” (not the “I’m about to pop a seam” limit). Measure across again and multiply by 2. This is your practical stretch circumference.
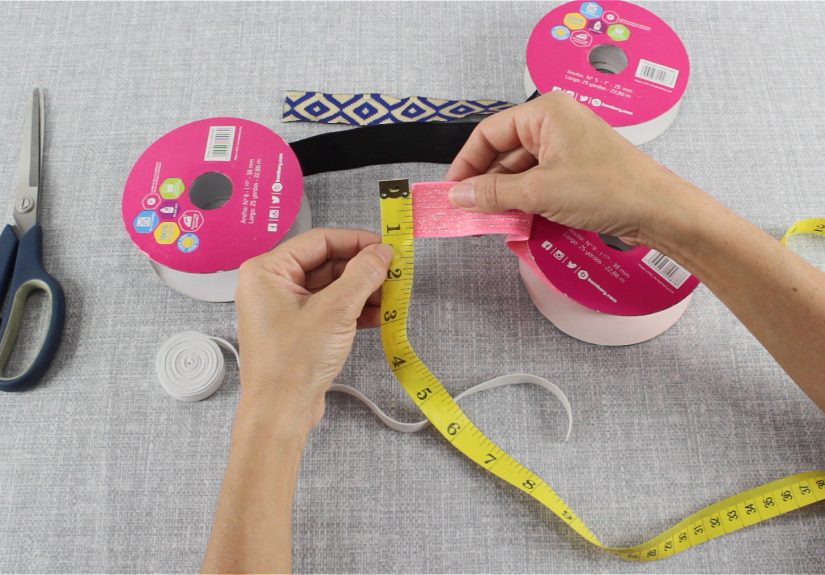
Step 2: Measure Elastic Width (So It Actually Fits)
Elastic width is the “will this physically go through the tunnel?” part of the operation. If you’re sewing a casing (a folded-over tunnel), your casing needs a little extra room so the elastic can slide and gather nicely.
A solid rule: make your casing depth at least 1/4 inch wider than the elastic width. For example, if you’re using 1-inch elastic, aim for a casing that’s about 1 1/4 inches deep inside. (Then add your seam allowance/hem fold on top of that.)
Common elastic widths for shorts:
- 3/8" to 1/2": lightweight lounge shorts, kids shorts, gathered waists (less support)
- 3/4" to 1": everyday shorts and PJ bottoms (great all-around)
- 1 1/4" to 2": athletic shorts, heavier fabrics, “please don’t roll” waistbands
Step 3: Choose the Right Elastic Type (Because Not All Stretch Is Created Equal)
The three common families:
- Braided elastic: has lengthwise ribs, tends to narrow when stretched. Fine for light uses, but can lose oomph over time in demanding waistbands.
- Knit elastic: soft, doesn’t narrow as much when stretched, usually comfy in casings and good for many garments.
- Woven (often “non-roll”): sturdier, more stable, great for waistbands that need support and less twisting/rolling.
Translation: if your shorts are heavier or your waistband loves doing barrel rolls, consider a wider knit or woven/non-roll elastic. If your fabric is light and flowy, softer knit elastic often feels nicer against the skin.
Step 4: Calculate Elastic Length (The Part Everyone Googles)
Here’s the honest truth: elastic length is part math, part fit test, and part “humans are not identical cylinders.” Many sewing references suggest cutting elastic a few inches smaller than the waist measurement as a starting point, then adjusting for comfort.
The quickest, most accurate method: the wrap test
- Wrap your elastic around your waist where the shorts will sit.
- Pull snug until it feels secure but not spicy.
- Mark where the ends overlap comfortably.
- Add overlap allowance (usually 1/2" to 1") for sewing the elastic into a loop.
This method automatically accounts for the exact elastic you’re using (soft vs. firm), your comfort level, and whether you want “lounge” or “jog.”
The reliable math method: negative ease percentage
If you need a formula (making shorts for someone else, mass-producing matching family beach shorts, etc.), start here:
- Light to medium shorts (most casings): Elastic length = waist measurement × 0.85 to 0.95
- Heavier fabric or no drawstring: closer to 0.85 to 0.90 (more support)
- Super soft comfort fit: closer to 0.92 to 0.95
Then add your overlap allowance (typically 1/2" to 1" total, depending on how you join the ends).
Concrete examples (because numbers deserve friends)
Example 1: Casual cotton shorts
Waist placement measurement: 32"
Choose 0.90 negative ease: 32" × 0.90 = 28.8"
Add 1" overlap for joining: 29.8" → cut 30" elastic, test fit, adjust if needed.
Example 2: Linen shorts that need support
Waist: 30"
Choose 0.87 negative ease: 30" × 0.87 = 26.1"
Add 1" overlap: 27.1" → cut 27", then do a quick wrap test before stitching permanently.
Example 3: Shorts with no closure must stretch over hips
Waist: 29", hips: 40"
Your elastic must stretch comfortably to pass the 40" hip measurement. If your elastic is very firm, you may need a slightly longer cut (or a softer elastic) so it can stretch over hips without feeling like a slingshot.
Step 5: Pre-Stretch, Join, and Insert (So It Doesn’t “Relax” Later)
A. Pre-stretch the elastic
Before cutting your final length, gently stretch the elastic a few times. This helps prevent the “it fit yesterday, why is it loose today?” surprise.
B. Join the ends securely
Overlap the elastic ends about 1/2" (or follow your pattern’s guidance), then stitch using a zigzag, triple zigzag, or a reinforced “box” stitch pattern. You want this seam strong because it gets stretched every time you breathe, sit, or exist.
C. Insert into the casing
- Leave a 1–2" opening in the casing seam.
- Attach a safety pin to the elastic end and feed it through the casing.
- Keep a firm grip on the trailing end so it doesn’t vanish inside like a magician’s assistant.
- Join the ends, then distribute gathers evenly.
Shorts-Specific Measuring Scenarios
1) Athletic shorts (movement + sweat + gravity)
Athletic shorts need security. If there’s no drawstring, lean slightly snugger (more negative ease), and consider wider elastic (1"–2") for comfort and stability. If you’re stitching elastic directly to fabric (exposed or partially exposed), you’ll usually quarter-mark the elastic and waistband, then stretch to sew evenly.
2) Swim shorts (chlorine, salt, sunscreenaka the Elastic Hunger Games)
If the shorts will see pools or ocean water often, look for elastic intended for swimwear applications. Some elastics are designed to handle chlorine/saltwater better than standard waistband elastic. (If you’ve ever had swimwear elastic turn sad and limp, you already know why this matters.)
3) Paperbag or heavily gathered waists
With extra fabric at the waist, you’re relying on the elastic to control bulk. Wider elastic helps distribute pressure and keeps gathers looking intentional (instead of “I accidentally sat on a curtain”).
More Than Shorts: Measuring Elastic for Other Projects
The same principles apply, but your comfort target changes depending on the item:
- Pajama pants: comfort-first. Often slightly less negative ease.
- Skirts: depends on fabric weight. Heavy skirts need firmer/wider elastic.
- Kids’ clothing: mobility matters. Start less tight, then fit-test because kids are basically professional wigglers.
- Boxers/underwear waistbands: softness matters; consider plush-back or softer knit elastic.
- Exposed elastic waistbands: choose elastic designed to be seen and stitched through (often with channels).
Troubleshooting: When the Waistband Misbehaves
Problem: Rolling or twisting
- Use non-roll or wider elastic.
- Stitch the elastic down at side seams (or “stitch in the ditch”) to discourage flipping.
- Make sure the casing isn’t too tight; elastic needs a little room to move.
Problem: Too tight (aka “Why can’t I enjoy nachos?”)
- Lengthen elastic by 1/2"–1" and retest.
- Switch to a softer elastic type or a wider elastic to distribute pressure.
- Confirm you measured the right waist placement (high waist and low waist are not the same neighborhood).
Problem: Too loose or sagging
- Shorten elastic by 1/2"–1" and retest.
- For heavier shorts, choose firmer elastic or add a drawstring as backup support.
- Pre-stretch elastic before cutting next time, especially with very soft elastics.
Problem: The elastic disappears into the casing opening
Pin the elastic end to the fabric near the opening before you start threading. One pin. Big drama prevented.
Quick Checklist Before You Cut
- Measured waist placement (and hips if there’s no closure).
- Picked elastic type and width appropriate for fabric weight and comfort.
- Confirmed casing depth: elastic width + about 1/4" room (plus seam/hem allowances).
- Calculated elastic length (formula) and/or performed the wrap test.
- Added overlap allowance for joining ends.
- Pre-stretched elastic a few times.
FAQ: Fast Answers to Common Waistband Questions
How do I measure elastic length if I’m sewing for someone else?
Use their waist placement measurement and start with 0.90 (10% negative ease) plus overlap. If there’s no closure, ensure the elastic can stretch comfortably over their hip measurement. If you can, send them the wrap-test instructionsit’s the most personal-fit-friendly method.
Should I copy the old elastic length when replacing a waistband?
Treat old elastic like old memories: sometimes it’s reliable, sometimes it’s stretched out and dramatic. If it’s worn, it may measure longer than it should. Use it as a reference, but do a wrap test with the new elastic before committing.
How much shorter should elastic be than the waist measurement?
A common starting range is a few inches shorter (often 2–4"), but the best answer depends on elastic firmness, garment weight, and comfort preference. Start with a conservative cut, test-fit, then adjust by small increments.
Conclusion: Measure Once, Stretch Twice, Live Happily Ever After
Measuring an elastic waistband for shorts isn’t about finding one magic numberit’s about matching your project’s fabric, elastic, and comfort goal. Use the casing width rule so the elastic glides smoothly, start with a sensible negative ease range, and whenever possible, do the wrap test because your waist is the world’s best “pattern piece.”
Once you’ve done this a couple times, elastic waistbands stop feeling like a mystery and start feeling like a superpower. (A superpower that involves safety pins, but still.)
Real-World Experience: What Actually Happens When You Measure Elastic Waistbands
Let me paint you a picture from the land of real sewing, where perfection is a myth and the seam ripper is an emotional support tool. The first time I made elastic-waist shorts, I did what many confident beginners do: I measured my waist, cut elastic “a bit smaller,” and assumed the universe would handle the rest. The shorts came out… wearable. But the waistband had the personality of an overcaffeinated rubber band: snug in the front, slightly gappy in the back, and somehow trying to migrate upward every time I sat down. It wasn’t a total disasterit was just the kind of mildly annoying fit that makes you avoid wearing something even though you spent hours making it.
The fix taught me more than the original project. First, I realized I’d measured my natural waist, but I actually wore the shorts closer to my high hip. That difference can be several inches, and elastic doesn’t politely adjust itself when you change your mind. Second, my fabric was a midweight linen blend, which sounds breezy and chill until you remember linen has structureand structure has opinions. The waistband needed firmer support than the soft knit elastic I’d grabbed because it “felt comfy.” Comfort matters, but so does holding up the garment’s weight. Third, I hadn’t pre-stretched the elastic, so after a couple wears it relaxed just enough to turn my shorts into a slow-motion slide.
On my second attempt, I did the wrap test with the exact elastic I planned to use. I wrapped it around where the shorts would sit, tugged until it felt secure, then walked around for a minute like a suspicious mannequin. I sat. I stood. I did a dramatic lunge in my living room because apparently I’m training for the Elastic Waistband Olympics. When it felt right, I marked the overlap and added a bit for joining. That tiny “live test” saved me from guessing.
I also switched to a wider elastic1" instead of 3/4"and made sure my casing had enough room so the elastic could move without bunching up. Wider elastic spreads pressure across more surface area, so the waistband feels gentler even if it’s doing a better job supporting the garment. I stitched the elastic down at the side seams (just a quick tack through the casing) to prevent twisting. That one step was the difference between a waistband that stayed civilized and one that tried to turn into a spiral staircase.
The funniest part? The final shorts felt so much better that I caught myself thinking, “Wow, elastic waistbands are easy.” That’s how you know you’ve leveled up: not when you never make mistakes, but when you know exactly which small adjustment fixes the problem. Now, when I measure elastic for anythingshorts, skirts, PJ bottomsI start with a sensible formula, but I trust the wrap test to finalize it. Elastic has stretch, but your patience shouldn’t have to.