Table of Contents >> Show >> Hide
- Table of Contents
- Why Under-Sink Cabinets Get Messy So Fast
- Why a Tension Rod Works So Well
- What You’ll Need
- Step-by-Step: Organize Your Under-Sink Cabinet Using a Tension Rod
- Step 1: Empty everything (yes, everything)
- Step 2: Do a quick safety and leak check
- Step 3: Sort into categories (keep it brutally practical)
- Step 4: Measure your cabinet (and the “clearance reality”)
- Step 5: Install the tension rod
- Step 6: Hang spray bottles by the trigger
- Step 7: Create a “grab-and-go” zone with bins
- Step 8: Use the cabinet door (the secret bonus wall)
- Step 9: Label like you live with other humans (or future-you)
- Layout Examples You Can Copy
- Safety Rules (Because Chemicals Don’t Play Nice)
- How to Keep It Organized (Without Becoming an Organizing Influencer)
- FAQ
- Real-Life Experience: My Week With the Under-Sink Tension Rod (500+ Words)
- Conclusion
The cabinet under your sink is basically a tiny, dark theme park ride called “The Cleaning Supplies Cyclone.”
You open the door, a rogue sponge tumbles out, you briefly lock eyes with a half-empty bottle of mystery spray from 2019,
and thensomehowyou still can’t find the dishwasher pods you bought yesterday.
The good news: you don’t need a custom built-in or a spreadsheet labeled “Sink Inventory, Q1.” You need one humble hero:
the tension rod. Yepthe same thing that holds up shower curtains can also turn the under-sink chaos portal into a tidy,
easy-to-use storage zone. In this guide, you’ll learn exactly how to do it, step by step, with real-world examples and a few
laughs (because you deserve them after wrestling with that cabinet).
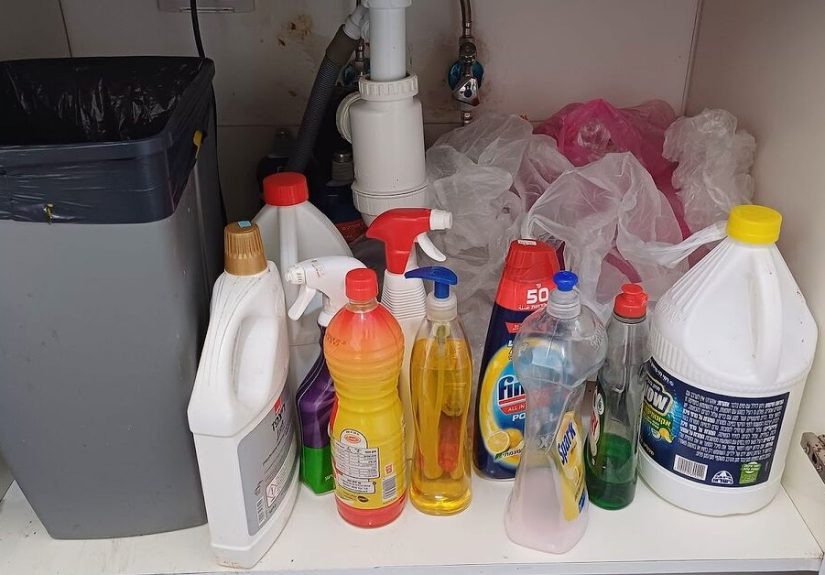
Why Under-Sink Cabinets Get Messy So Fast
Under-sink cabinets are the Bermuda Triangle of home organization for three annoying reasons:
they’re oddly shaped, they’re dark, and they’re full of “awkward items” (spray bottles, refills, scrubbers, gloves, trash bags,
dishwasher pods, drain cleaner, and that one screwdriver you swear belongs somewhere else).
1) Plumbing steals your best real estate
Pipes create dead zones and weird corners. Standard bins don’t sit nicely around a P-trap, shutoff valves, or a garbage disposal.
So we stack things “temporarily”… and then the temporary stack becomes your personality.
2) Moisture and leaks are always a possibility
Even if your plumbing is perfect today, under-sink areas can be humid and occasionally leaky. That’s rough on cardboard packaging,
paper products, and anything that absorbs moisture. It’s also why a good system needs to keep items visible and off the floor when possible.
3) It’s a “dump zone” because it’s hidden
When a space is out of sight, it becomes the default storage for random stuffextra candles, batteries, a lint roller, and somehow a single sock.
A better setup isn’t just about containers; it’s about creating categories and making the “right” spot easier than the “meh, toss it in” spot.
Why a Tension Rod Works So Well
A tension rod uses pressure to stay put between two vertical surfaces. Translation: it installs in seconds, usually without tools,
and it’s renter-friendly. But its real superpower under the sink is this:
it turns unused vertical space into a hanging zone.
The signature move: hanging spray bottles by their triggers
Most spray bottles have a trigger handle that can hook over a rod. When you hang them, you free up the cabinet floor for bins,
drawers, and bigger itemswithout sacrificing access. It’s like giving your cabinet a second story.
It’s modular (aka forgiving if you’re not “naturally organized”)
If you try a layout and hate it, you can move the rod in 60 seconds. No drilling, no commitment, no emotional damage.
This is organization with an undo button.
What You’ll Need
- 1 tension rod sized for your cabinet width (spring tension style is common).
- Measuring tape (or a phone + a calm guess, but let’s aim higher).
- Cabinet liner or a washable mat to protect the base.
- 2–4 bins or caddies (preferably wipeable plastic; clear bins help you see what you have).
- Labels (optional but powerfulespecially for households with multiple people).
- Optional upgrades: adhesive hooks, a small lazy Susan, a narrow pull-out drawer unit, or an over-the-door basket.
What you don’t need: A complicated tiered contraption that blocks your pipes and requires a PhD in cabinet geometry.
Start simple. You can always level up later.
Step-by-Step: Organize Your Under-Sink Cabinet Using a Tension Rod
Step 1: Empty everything (yes, everything)
Take it all out. This isn’t busywork; it’s the only way to see duplicates, half-used products, and things that should not be living
under a sink (like paper towels, food, or electronics). Wipe down the cabinet. If you spot moisture, swelling wood, or sticky residue,
address that first.
Step 2: Do a quick safety and leak check
Look for drips, corrosion, or dampness. Make sure you can clearly access shutoff valves. Under-sink organization should never block
the ability to turn off water quickly. If you’ve ever had a leak, you know this is not the moment to get “creative.”
Step 3: Sort into categories (keep it brutally practical)
Make piles like:
Daily Use (dish soap, dishwasher pods),
Cleaning Sprays,
Tools (brushes, scrubbers, gloves),
Refills/Backups,
and Trash Bags.
Toss expired or unwanted items and recycle empties. If it doesn’t belong in a kitchen/bath cleaning zone, relocate it.
Step 4: Measure your cabinet (and the “clearance reality”)
Measure the inside width where the rod will sit. Also measure the height of your tallest spray bottle and note where the pipes sit.
You want the rod high enough that bottles can hang without hitting the cabinet floor, but not so high that triggers can’t hook securely.
If your cabinet has a center divider or weird framing, you may need two shorter rodsone on each side.
Step 5: Install the tension rod
Place the rod left-to-right across the cabinet, usually a few inches below the top frame and above the “pipe zone.”
Twist/extend until snug. Then do a gentle tug test.
If the rod slides easily, tighten it.
If the cabinet walls are slick, you can improve grip with small rubber pads or grippy shelf liner pieces at each end.
Step 6: Hang spray bottles by the trigger
Hook bottle triggers over the rod. Space them so labels face forward (you’re not playing “guess the liquid” at 10 p.m.).
Keep the most-used sprays toward the front. If a bottle won’t hang securely, move it to a bin insteadno drama.
Step 7: Create a “grab-and-go” zone with bins
Now that the floor is less crowded, use bins to prevent the classic under-sink avalanche. Good bin categories include:
- Dishwasher + Dishwashing (pods, rinse aid, sponges, brush refills)
- Surface Cleaning (wipes, microfiber cloths, extra gloves)
- Backstock (refills and duplicatesonly if you truly use them)
- Trash + Recycling (bags, small rolls, compost liners)
Step 8: Use the cabinet door (the secret bonus wall)
Many organizing pros recommend using door space for small, lightweight items:
adhesive hooks for gloves,
a slim over-the-door basket for sponges,
or a small pouch for dishwasher samples and scrubber heads.
Keep it light so the door still closes cleanly.
Step 9: Label like you live with other humans (or future-you)
Labels reduce “where does this go?” hesitation. Even simple labels like Wipes, Sprays, and Trash Bags
make the system easier to maintain. Waterproof labels are your friend in a humid space.
Layout Examples You Can Copy
Example A: Small apartment kitchen (one cabinet, one door)
- Rod: hang 4–6 spray bottles.
- Floor left: one bin for dishwashing essentials.
- Floor right: one bin for wipes + cloths.
- Back corner: a small lazy Susan for small bottles (rinse aid, extra soap).
- Door: 2 hooks for gloves + a small brush.
Why it works: you’ve created zones without buying a mini warehouse of organizers. And you can see what you ownso you stop buying your fifth bottle of glass cleaner.
Example B: Family home with kids or pets (safety-first setup)
- Rod: hang only low-risk sprays (or hang all sprays but add a childproof lock to the cabinet).
- Top priority: install a childproof latch if hazardous products are stored here.
- Bins: use lidded bins; keep dangerous items toward the back and upright.
- Door: avoid hanging anything sharp or heavy on hooks.
Why it works: organization is useless if it increases risk. A tidy cabinet plus a simple safety lock is a practical win.
Example C: Bathroom vanity (toiletries + cleaning)
- Rod: hang cleaning sprays or hair tools in heat-safe sleeves (only if cords are managed safely and moisture is controlled).
- Bins: one for toiletries backups, one for cleaning supplies, one for first-aid basics (if humidity allows).
- Upgrade: a narrow pull-out drawer unit for makeup wipes, cotton pads, and small items.
Why it works: vertical storage prevents the “everything tips over” problem, and pull-out access saves your back and your patience.
Safety Rules (Because Chemicals Don’t Play Nice)
Under-sink cabinets often become chemical storage by default. A few best-practice rules keep your home safer and your products more effective:
- Keep products in original containers with labels intact. Don’t decant chemicals into cute jarsthis isn’t iced coffee.
- Use childproof locks if kids are in the home or frequently visiting.
- Don’t store food under the sink. Humidity and chemicals are not a seasoning.
- Avoid storing paper products (paper towels, napkins) under the sink where they can absorb moisture.
- Never mix cleaners and don’t store incompatible products in a way that encourages “DIY chemistry experiments.”
- Ventilation matters: if strong fumes build up, consider relocating harsh chemicals to a better-ventilated, cooler area.
- Keep the floor clear when possible so small leaks are visible quickly (and not hidden by a mountain of bottles).
How to Keep It Organized (Without Becoming an Organizing Influencer)
The 2-minute reset
Once a week (or whenever the cabinet starts to look suspicious), do a fast reset:
re-hang sprays, slide bins forward, toss empties, and wipe up any drips. Two minutes now beats 45 minutes later.
Monthly “shop your stash” check
Before buying more cleaners, look at what you already have. If you keep backups, keep them in one labeled bin so you can see duplicates.
This is how you stop accidentally becoming the proud owner of 11 bottles of bathroom spray.
Seasonal wipe-down
Every few months, pull bins out, wipe surfaces, and check for leaks. Under-sink spaces stay nicer when they’re routinely cleaned,
not only when they become a biohazard documentary.
FAQ
Will a tension rod really hold spray bottles?
In many cabinets, yesif the rod is properly sized and tightened, and you’re hanging typical household spray bottles by their triggers.
Always follow the rod’s packaging guidance and do a tug test. If the rod slips, tighten it or reduce the load.
What if my cabinet walls are slippery?
Add grip: small rubber pads, a bit of shelf liner, or grippy cabinet liner at both rod ends can help prevent sliding.
You can also position the rod where the cabinet frame provides a slightly more textured contact point.
Can I use two rods?
Absolutely. One rod for spray bottles and another (lower or on the side) for hanging microfiber cloths, gloves, or small baskets with S-hooks.
Just make sure you can still access shutoffs and that nothing rubs against plumbing.
What should never live under the sink?
Generally: food, small appliances, lightbulbs, and anything easily damaged by moisture. Paper towels and extra sponges often do better elsewhere, too.
The under-sink cabinet should be a functional “cleaning + sink support” zone, not a random storage landfill.
Real-Life Experience: My Week With the Under-Sink Tension Rod (500+ Words)
I’ll be honest: the first time I tried the tension rod trick, I approached it with the confidence of someone who has watched exactly
two home organization videos and now believes they are a minimalist wizard. I measured my cabinet width onceoncethen bought
a rod that was “close enough.” Reader, it was not close enough.
Attempt #1 ended with me twisting the rod like I was opening a jar of pickles with my entire soul. It fit… technically… but it also
made a sound that can only be described as “future regret.” I hung three spray bottles. I stepped back. I admired my work.
Then I closed the door and the rod popped loose with a dramatic thunk, as if my cabinet had rejected my leadership.
One bottle stayed hanging, one spun like a disco ball, and one landed upright in a way that felt like it was mocking me.
So I did what any rational person does: I blamed the cabinet. Then I did what any slightly more rational person does:
I measured again. Properly. With a tape measure. In inches. Like an adult. I realized I’d tried to install the rod on a section
where the side walls weren’t perfectly parallel (older cabinets love a little personality). I moved the rod slightly forward where
the frame was sturdier and the walls were more consistent. Suddenly, it tightened like it actually wanted to be there.
Attempt #2 was the glow-up. I hung five spray bottles by their triggersglass cleaner, all-purpose, degreaser, disinfectant, and
the one labeled “multi-surface” that is definitely just all-purpose wearing a different hat. Immediately, the cabinet floor looked
bigger. Not “walk-in pantry” bigger, but “I can see the floor” bigger, which is an under-sink miracle.
Then came the second lesson: hanging bottles is great, but loose small items will still try to ruin your life. Sponges,
dishwasher tabs, and scrub brushes don’t magically become organized just because the sprays are off the ground. I added two bins:
one labeled “Dish Stuff” (technical term) and one labeled “Clean Stuff.” That alone stopped the daily scavenger hunt.
On day three, I discovered the sneaky benefit nobody brags about: cleanup is easier. When a little soap dribbled, I wiped the cabinet
liner in ten seconds because nothing was piled on the floor. Before the rod, that same dribble would have required moving five bottles,
two mystery cloths, and a crusty scrub pad that I didn’t even remember buying.
By the end of the week, my under-sink cabinet had something I hadn’t felt in years: trust. I could open it quickly,
grab what I needed, and close it without initiating an avalanche. The tension rod didn’t just organize the cabinetit reduced the
tiny daily friction that makes home chores feel heavier than they are. And the best part? When I decided I wanted the rod an inch higher,
I moved it in under a minute. No tools. No drama. No cabinet uprising.
Final takeaway from real life: measure twice, install where the cabinet is most stable, and pair the rod with bins so small items
don’t become free-range clutter. Do that, and your under-sink cabinet stops being a horror story and starts being… shockingly pleasant.
Conclusion
Organizing your under-sink cabinet doesn’t require fancy renovations or a cart full of trendy organizers. A tension rod gives you
immediate vertical storage by lifting spray bottles off the floor, which makes room for simple bins, easier cleaning, and a cabinet
that actually makes sense. Start with one rod, a couple of wipeable bins, and clear categories. Keep safety in mindespecially around
kids and chemicalsand do a quick weekly reset to maintain the system.
The under-sink cabinet will always be an odd little space. But with a humble tension rod, it can finally be the kind of odd space
that works for you instead of against you.