Table of Contents >> Show >> Hide
- Quick Answer: The Two Band Removal Styles
- Before You Start: Set Yourself Up for a “No Oops” Band Swap
- Style 1: How to Remove a Standard Apple Watch Band (Slide-Off Method)
- Style 2: How to Remove the Apple Watch Link Bracelet (Two-Part Method)
- Troubleshooting: What to Do If the Apple Watch Band Won’t Come Off
- Band Safety: Don’t Force It (Seriously)
- Choosing the Right Replacement Band (So You Don’t Buy the Wrong One)
- FAQ: Quick Questions People Ask After (or During) a Band Swap
- Real-World Experiences: What Band Swaps Are Like in Actual Human Life (Extra Insights)
- Conclusion
Swapping an Apple Watch band is one of life’s rare modern miracles: it’s genuinely easier than opening a
clamshell package without turning into a feral raccoon. But there’s one catchApple Watch bands come in
two “removal styles,” and if you treat them the same, you might end up yanking at a perfectly good band
while the watch silently judges you.
This guide walks you through both styles step-by-step (with troubleshooting, safety tips, and the “why is this
stuck” section we all pretend we don’t need until we do).
Quick Answer: The Two Band Removal Styles
-
Style 1: Slide-Off Bands (Most Bands) Press and hold the band release button on the back of
the watch, then slide the band out sideways. -
Style 2: Link Bracelet First split the bracelet into two pieces using the quick release
button(s) on the bracelet, then remove each half like a standard slide-off band.
If you’re unsure which you have: if it’s a metal bracelet with links and a butterfly-style clasp, it’s probably
the Link Bracelet style. If it’s silicone, nylon, leather, braided, looped, or looks like it belongs at the gym
(or a coffee shop with excellent Wi-Fi), it’s likely the standard slide-off style.
Before You Start: Set Yourself Up for a “No Oops” Band Swap
Apple Watch bands are designed to come off cleanlywhen the release button is fully pressed and the band is
sliding in the right direction. A few setup steps make everything smoother (and keep your screen from kissing
a countertop).
What you’ll want
- A soft, clean cloth (microfiber is ideal)
- A flat surface (table, desk, or any place you won’t drop tiny expensive things)
- Optional: good lighting (because the release buttons love subtlety)
Do this first
- Take the watch off your wrist. Removing bands while wearing the watch is possible, but it’s like cutting your own hair: technically doable, emotionally risky.
- Place it face down on the cloth. This helps prevent scratches and keeps the watch stable.
- Close or loosen the band. For most bands, unfasten it. For the Link Bracelet, close the clasp before splitting the bracelet.
Bonus tip: If you’re swapping bands frequently, consider making it a “two-minute routine” like changing shoes at
the door. Your watch stays cleaner, your bands last longer, and you feel like a person who has their life
together (even if your email inbox says otherwise).
Style 1: How to Remove a Standard Apple Watch Band (Slide-Off Method)
This is the method used by most Apple Watch bands: Sport Band, Sport Loop, Solo Loop, Braided
Solo Loop, Leather bands, and many third-party bands designed to fit Apple’s slide-in channel system.
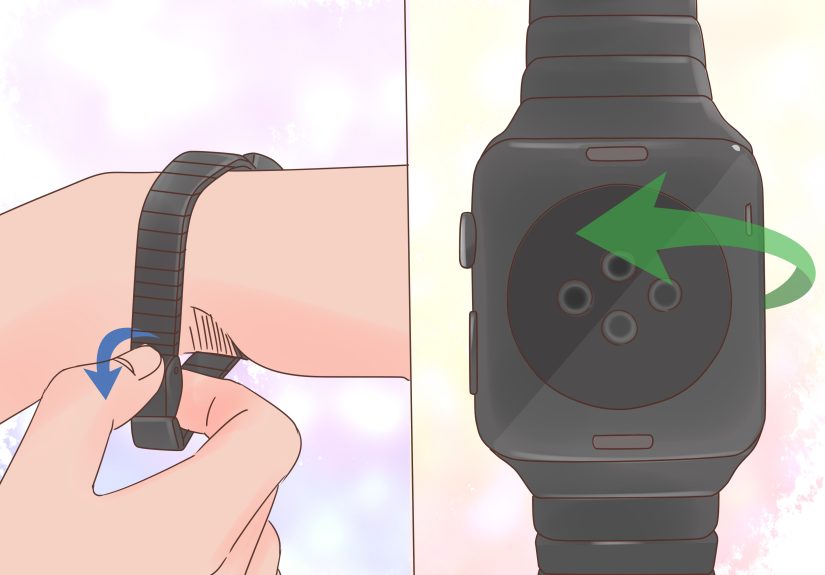
Step-by-step: Remove the first half
- Flip the watch over so the back (sensors) faces up.
-
Find the band release button. There are twoone near the top slot and one near the bottom
slot. - Press and hold one release button.
-
While holding the button down, slide the band sideways (left or right) out of the slot.
Think “drawer,” not “plug.” - Repeat for the other half of the band.
What “correct” feels like
- The band slides out with steady, gentle movementno snapping, no twisting, no dramatic soundtrack.
- You should not need to force it. If it resists, it’s usually because the button isn’t fully pressed.
Common mistake to avoid
Don’t pull up or outward. Apple Watch bands come out sideways. Pulling upward is the
quickest way to turn a smooth swap into a confusing little wrestling match.
Installing a new band (quick but important)
- Line up the new band with the slot.
- Slide it in until you feel (and usually hear) a soft click.
- Gently tug to confirm it’s locked. If it slides, it’s not seated properlyslide it out and try again.
If your band has text on the underside, a reliable rule is: text facing you during insertion,
so it’s oriented correctly once you wear it.
Style 2: How to Remove the Apple Watch Link Bracelet (Two-Part Method)
The Link Bracelet is specialnot because it’s difficult, but because it’s designed to split into two sections
first. If you skip that part, you’ll be trying to slide off a bracelet that’s still “connected” around itself,
like trying to remove a necklace without unclasping it.
Step 1: Close the clasp
Close the butterfly clasp so the bracelet lies flat and stable. This makes the next step easier and helps avoid
awkward bending.
Step 2: Split the bracelet using the quick release button
-
Locate the quick release button(s) on the inside of the bracelet near the clasp area (they’re
built into certain links). - Press and hold the quick release button.
- While holding it, gently pull the links apart. The bracelet should separate into two pieces.
Step 3: Remove each half like a standard band
- Flip the watch so the back is facing up.
- Press and hold the band release button on the watch.
- Slide one half of the bracelet out sideways.
- Repeat for the other half.
Putting the Link Bracelet back on
- Slide each half back into its slot until it clicks.
- Reconnect the bracelet halves (you should feel them seat securely).
- Open and close the clasp once to confirm smooth operation.
If you’re adjusting the number of links for sizing, do that separately from removal. Band removal is about the
watch’s release buttons and (for Link Bracelet) the quick-release link mechanismnot about resizing.
Troubleshooting: What to Do If the Apple Watch Band Won’t Come Off
If your band won’t slide out, it’s almost always one of these issues: the release button isn’t fully pressed,
debris is lodged in the channel, or the band is slightly misaligned. Here’s how to fix it without brute force.
Try this first (the “most likely to work” list)
- Press and hold the release button againfirmly and fully.
- Wiggle the band slightly side-to-side while sliding it out (still sideways, not upward).
- Switch directions (slide left instead of right, or vice versa).
- Try the other release button if you’re working on the opposite slot by mistake.
If it still won’t budge
-
Check for gunk: sweat, lotion, sand, and pocket lint can build up around the release button
and inside the band channel. -
Clean gently: wipe the back of the watch and the band connector area with a dry microfiber
cloth. If needed, use a slightly damp cloth and let everything dry completely before trying again. - Avoid “helpful” lubricants: oils and sprays can attract more debris and make things worse.
If your watch band is genuinely stuck and you’ve tried everything above, the safest next step is to contact
Apple Support or visit an Apple Store (or authorized service provider). It’s better than turning a minor
annoyance into a repair appointment you didn’t want.
Band Safety: Don’t Force It (Seriously)
Apple’s band channel system is designed to lock securely, but it’s not meant to be forced. Forcing a band can
damage the band’s connector, the release mechanism, or the slot itself.
- If it doesn’t slide, stop and reset. Re-press the button and try again.
- Keep the band level with the slot while sliding.
- Use a soft surface so a slip doesn’t become a screen scratch.
Choosing the Right Replacement Band (So You Don’t Buy the Wrong One)
Apple Watch bands aren’t universal like traditional watch straps. Compatibility depends on your watch case size
group. The good news: Apple and reputable retailers clearly label compatibility (on product pages, packaging,
and listings).
Two quick buying rules
- Match your case size group. Bands are sold for specific case sizes (or compatible size ranges).
- Buy from reputable brands. A well-made connector is the difference between “secure click” and “mystery wobble.”
If you use third-party bands, look for clear sizing and compatibility statements and avoid anything that feels
loose in the slot after installation.
FAQ: Quick Questions People Ask After (or During) a Band Swap
Do I need tools to remove an Apple Watch band?
For standard Apple Watch bands and the Link Bracelet, no tools are required. The watch and bracelet include
built-in release mechanisms designed for tool-free swapping.
Can I remove the band while the watch is on my wrist?
You can, but it’s not ideal. Taking the watch off gives you better control and reduces the chance of dropping
it or scratching the screen.
Why are there two release buttons?
Because the band is in two piecestop and bottom. Each half has its own release button and slot.
How do I know the new band is locked in?
You’ll usually feel and/or hear a small click. After that, gently tug the band. If it slides, remove it and
reinsert it until it locks securely.
Real-World Experiences: What Band Swaps Are Like in Actual Human Life (Extra Insights)
Let’s talk about what happens outside the perfect, well-lit tutorial universewhere you have clean hands,
unlimited patience, and not a single crumb of mystery grit anywhere near your watch. In real life, removing an
Apple Watch band is usually quick… until it’s not. And when it’s not, it’s almost never because you “forgot how
to press a button.” It’s because tiny details add up.
One common experience: the “gym band glue” effect. After workouts, sweat dries around the band
connector, and if you also use sunscreen or lotion, the residue can mix into a slightly sticky film. The band
might still come off, but it feels like it needs “one extra nudge.” In these moments, people tend to pull
outward (which doesn’t help) instead of re-pressing the release button and sliding more patiently. A quick wipe
with a microfiber cloth before attempting removal can make the difference between “easy swap” and “why am I
negotiating with my watch.”
Another real-life scenario: sand, lint, and the beach bag of doom. If your watch has been near
fine sandbeach, playground, outdoor sports fieldsthose grains can lodge in the band channel. The band may
refuse to slide smoothly, even when the button is pressed. The most helpful habit here is preventative:
occasionally remove the band and wipe the connector area. People who do this every couple of weeks report fewer
“stuck band” moments than those who never take the band off until something goes wrong.
Then there’s the winter hands problem: dry hands and low grip. In cold seasons, pressing the
release button firmly while sliding the band can be surprisingly hard, especially with smooth metal or tightly
fitted bands. A small trick many people use is to place the watch on a cloth (so it won’t move), press the
button with the thumb of one hand, and use the other hand to slide the band. It sounds obvious, but the
two-hand method prevents that “I swear I’m pressing it!” feeling that happens when your grip slips.
The Link Bracelet has its own personality. People commonly describe the first removal as “confident until the
split step.” The key experience here: once you find the quick release button and separate the bracelet into two
pieces, everything suddenly becomes straightforward. Before that, it can feel like the bracelet is “too
complete” to removewhich is exactly why Apple designed the split mechanism. Many users also report that doing
the split over a table (not midair) makes it feel controlled and effortless instead of fiddly.
Finally, there’s the band wardrobe effect: once you learn how easy swaps are, you start
changing bands like you’re styling an outfit. Sport band for workouts, leather for going out, nylon for
everyday, and suddenly your Apple Watch is a tiny accessory closet on your wrist. The practical upside people
notice most is comfortdifferent materials behave differently with heat, sweat, and long wear. The downside is
that once you own multiple bands, you will absolutely spend at least one evening trying to justify a new color
to yourself like it’s a responsible financial decision. (It’s fine. We’ve all done it.)
In short: the “experience” of removing an Apple Watch band gets easier with repetition, and most friction comes
from environmentsweat, sand, lotion, dry handsnot from the mechanism itself. Treat the process like a gentle
slide-and-click system (not a tug-and-hope system), and your band swaps will stay fast, safe, and surprisingly
satisfying.