Table of Contents >> Show >> Hide
- Why Chalk Marker Comes Off Some Surfaces Easily
- Before You Start: 5 Smart Rules
- How to Remove Chalk Marker from Any Surface: 8 Easy Methods
- Surface-by-Surface Guide
- Common Mistakes That Make Chalk Marker Harder to Remove
- What If the Chalk Marker Still Will Not Come Off?
- of Real-World Experience: What Actually Happens When You Try to Remove Chalk Marker
- Conclusion
- SEO Tags
Chalk markers are the overachievers of the craft-and-cleaning world. They write brighter than dusty old chalk, look fabulous on signs and windows, and thensometimesdecide they would like to live there forever. That is usually the moment when a fun menu board turns into a tiny household crisis.
The good news is that liquid chalk marker cleanup is usually very doable. The less-good news is that the right method depends on the surface. Glass, mirrors, whiteboards, metal, and other nonporous materials usually let go with much less drama. Porous surfaces like unfinished wood, unsealed chalkboards, paper, painted drywall, or concrete may hang on to pigment and leave ghosting behind. In other words, your marker is not being rude on purpose. It is just following chemistry.
This guide walks you through how to remove chalk marker from any surface with eight easy methods, plus practical advice for common materials like glass, whiteboards, chalkboards, walls, plastic, metal, wood, and even fabric. We will start with the gentlest solution and work up from there, because nobody wants to remove the marker and the finish in the same afternoon.
Why Chalk Marker Comes Off Some Surfaces Easily
Most liquid chalk markers are designed to work best on smooth, nonporous surfaces. On those materials, the pigment sits mostly on top, which means water, glass cleaner, or an alcohol-based product can usually loosen it. On porous surfaces, the ink can sink into tiny openings and hold on like it just signed a long-term lease.
That is why the first rule of chalk marker removal is simple: match the method to the surface. A damp microfiber cloth may be perfect for a mirror, but not nearly enough for a painted wall. A melamine sponge may rescue a stubborn board, but on the wrong finish it can also leave dull spots. A little patience saves a lot of regret.
Before You Start: 5 Smart Rules
- Test first. Always try your cleaner on a hidden corner before tackling the obvious mess.
- Start mild. Water first, stronger cleaners second, aggressive options last.
- Use soft cloths. Microfiber is your best friend here.
- Do not oversoak porous surfaces. Too much liquid can spread pigment or damage the material.
- Work gently. Scrubbing like you are polishing a pirate ship usually makes things worse.
How to Remove Chalk Marker from Any Surface: 8 Easy Methods
1. Warm Water and a Microfiber Cloth
This is the best first move for glass, mirrors, whiteboards, metal signs, sealed chalkboards, and other nonporous surfaces. Many chalk markers are designed to release with moisture, so do not skip the simplest option just because it feels too easy.
How to do it: Dampen a clean microfiber cloth with warm water, wipe the marks in small circles, then follow with a dry cloth. If the residue smears at first, keep wiping with a clean area of the cloth instead of rubbing harder.
Best for: Fresh marks, everyday cleanup, and surfaces that are supposed to erase easily.
2. Dish Soap and Warm Water
If plain water leaves a haze, dish soap is the logical next step. It helps cut through the binder in the ink and lifts residue without being too harsh on most household surfaces.
How to do it: Mix a few drops of mild dish soap into warm water. Dip a soft cloth into the solution, wring it out well, and wipe the area. Rinse with a second cloth dampened with plain water, then dry thoroughly.
Best for: Plastic, sealed wood, laminate, tile, metal, mirrors, and painted surfaces that need a gentle approach.
Tip: On painted walls, use very light pressure. The wall should not feel like it is being exfoliated.
3. Glass Cleaner
Glass cleaner is a solid option for windows, mirrors, glossy signs, and sealed surfaces that still look streaky after soap and water. It is especially handy when chalk marker residue is thin but annoyingbasically the cleaning equivalent of a song stuck in your head.
How to do it: Spray the cleaner onto a cloth rather than directly onto small decorative items. Wipe the area, then buff dry with a clean microfiber cloth.
Best for: Glass, mirrors, stainless trim, chrome, glossy plastic, and car windows.
Tip: If you are cleaning tinted car windows or delicate finishes, choose an ammonia-free glass cleaner and test a hidden spot first.
4. Rubbing Alcohol
When chalk marker gets stubborn, rubbing alcohol is one of the most reliable upgrades. Alcohol helps break down inks and pigments, which is why it shows up again and again in stain-removal advice.
How to do it: Put a small amount of isopropyl alcohol on a cotton pad or microfiber cloth. Blot or wipe gently until the marker lifts. Follow with a damp cloth to remove any remaining residue, then dry the surface.
Best for: Whiteboards, plastic, laminate, glass, tile, sealed wood, and some fabrics.
Use caution on: Painted walls, delicate finishes, untreated wood, and surfaces that can discolor.
5. Hand Sanitizer
Yes, the bottle rattling around in your bag can do more than save you from mystery shopping-cart handles. Because many hand sanitizers are alcohol-based, they can help loosen marker residue, especially on vertical surfaces where a gel formula clings better than straight liquid alcohol.
How to do it: Apply a small dab to the stain, let it sit for 30 to 60 seconds, then wipe with a soft cloth. Rinse with a damp cloth and dry.
Best for: Whiteboards, laminated labels, plastic bins, glossy signs, and some hard nonporous surfaces.
Tip: Do not use giant globs. This is not frosting.
6. White Vinegar Solution
Vinegar is a handy middle-ground cleaner for surfaces that need something more than water but less than a full chemical showdown. It can also help with film or cloudy residue left behind after other cleaners.
How to do it: Mix equal parts white vinegar and water. Dampen a cloth with the solution and wipe the mark gently. For boards or glass, finish by buffing dry to avoid streaks.
Best for: Whiteboards, glass, mirrors, sealed tile, and some countertops.
Use caution on: Natural stone, unsealed surfaces, and finishes that do not love acidic cleaners.
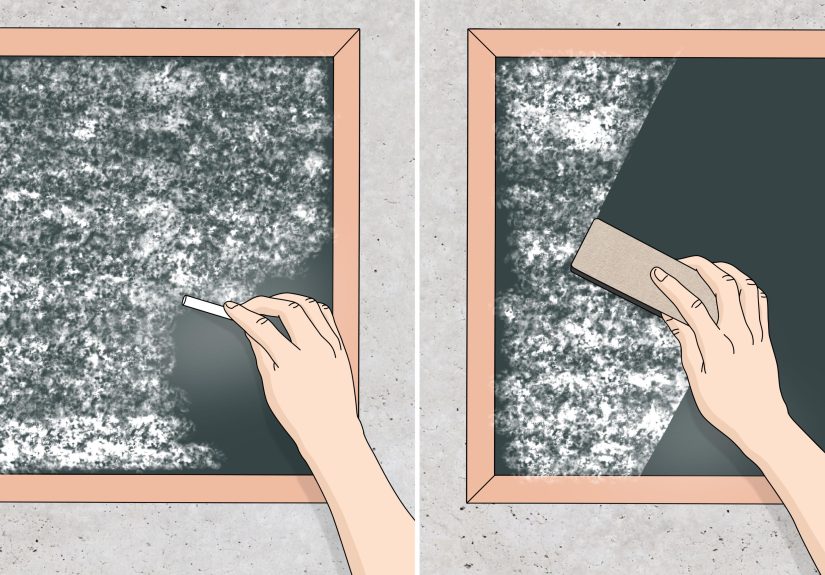
7. Magic Eraser or Melamine Sponge
This is the “break glass in case of ghosting” option. A melamine sponge can remove stubborn residue from walls, boards, tile, and other hard surfaces because it works like a very fine abrasive. That is also why it needs a gentle touch. Too much pressure can dull or damage certain finishes.
How to do it: Wet the sponge, squeeze out excess water, and rub the mark lightly. Stop often to check the finish. Wipe the area with a damp cloth and dry.
Best for: Stubborn haze on walls, tile, sealed boards, and hard surfaces that can tolerate light abrasion.
Avoid or test carefully on: High-gloss, polished, dark, satin, faux-finish, bare wood, brushed metal, stainless appliances, and delicate painted surfaces.
8. Board Cleaner or a Whiteboard Refresh Trick
If the surface is a whiteboard, dry-erase board, or specialty chalkboard, a board-specific cleaner can be the easiest win. These cleaners are made to lift residue without wrecking the writing surface. On whiteboards, a classic trick is to go over stubborn old marks with a fresh dry-erase marker and then wipe everything away.
How to do it: For board cleaner, spray lightly and wipe with a clean cloth. For the refresh trick, scribble over the old mark with a dry-erase marker, let it sit briefly, then erase and wipe clean.
Best for: Whiteboards, dry-erase boards, menu boards, and surfaces that show ghosting after repeated use.
Tip: If your “chalkboard” is actually porous slate or unfinished paint, even the right cleaner may remove most of the mark but leave a faint shadow.
Surface-by-Surface Guide
| Surface | Best First Method | What to Try Next |
|---|---|---|
| Glass and mirrors | Warm water + microfiber | Glass cleaner, then alcohol |
| Whiteboards | Damp cloth | Board cleaner, alcohol, dry-erase refresh trick |
| Sealed chalkboards | Damp cloth | Dish soap solution or board cleaner |
| Painted walls | Dish soap + water | Hand sanitizer or melamine sponge very lightly |
| Plastic and laminate | Dish soap + water | Glass cleaner or rubbing alcohol |
| Metal and chrome | Damp cloth | Glass cleaner or alcohol |
| Sealed wood | Dish soap + water | Alcohol after spot test |
| Unsealed wood or porous chalkboard | Minimal moisture + patience | Expect ghosting; full removal may not be possible |
| Fabric | Blot first | Alcohol-based stain treatment, then wash and air-dry |
Common Mistakes That Make Chalk Marker Harder to Remove
Using the wrong cleaner first
Jumping straight to a harsh product can damage the surface before you even know whether warm water would have done the job.
Letting residue sit for weeks
The longer the pigment sits, the more likely it is to leave ghostingespecially on older boards and slightly porous finishes.
Scrubbing with the wrong tool
Rough scrubbers can scratch glass, dull finishes, and chew through paint. If your sponge looks like it belongs in a garage, maybe do not start there.
Overwetting walls or wood
Too much liquid can spread the stain, soak into the material, or damage the finish. Damp is smart. Dripping is chaos.
What If the Chalk Marker Still Will Not Come Off?
If you have tried water, soap, glass cleaner, and alcohol and the mark is still hanging on, the surface may be more porous than it looks. This happens often with older chalkboard paint, unsealed boards, matte walls, unfinished wood, and decorative surfaces sold as “chalkboard style” rather than truly erasable. In that case, you may be dealing with staining instead of simple residue.
Your best options are to reduce the mark as much as possible, use a board-safe refresher if it is a writing surface, or repaint and reseal if the material was never meant to be wet-wipe erasable in the first place. Not every chalk marker disaster ends with a perfect disappearing act, but most can at least be improved dramatically.
of Real-World Experience: What Actually Happens When You Try to Remove Chalk Marker
One of the most useful lessons people learn with chalk marker cleanup is that the surface matters more than the cleaner. On a mirror, the mark usually looks intimidating for about thirty seconds, and then a damp microfiber cloth walks in like a hero in a low-budget action movie and fixes everything. On a whiteboard, the same marker can leave a faint film if the board is old, heavily used, or cleaned with the wrong rag for months. That is when people start thinking the marker is the villain, when really the board has been quietly collecting residue for ages.
Another common experience is the false confidence that comes from success on glass. Someone uses a liquid chalk marker on a café-style sign, a framed plastic insert, and a window with no issues, then assumes a painted pantry door will behave the same way. It usually does not. Paint, especially matte paint, tends to hold pigment more stubbornly. That is why so many cleanup stories begin with, “It came right off the glass, so I thought the wall would be fine.” The wall, unfortunately, did not agree.
Whiteboards create their own category of drama. Fresh marks usually wipe away easily, but older boards often develop ghosting. People try to fix that by scrubbing harder, which can make the surface look tired fast. The better experience usually comes from using a board cleaner, rubbing alcohol on a soft cloth, or the old dry-erase-over-the-mark trick. It feels oddly magical the first time it works. It also makes you wonder how many household problems could be solved by drawing on them first.
Sealed chalkboards tend to sit in the middle. If they are modern, smooth, and nonporous, cleanup is often simple. If they are vintage slate, homemade, or coated with a paint that was never fully sealed, the result can be faint shadows that stick around after the design is gone. That is frustrating, but also extremely common. People often think they did something wrong when the real issue is that the writing surface was better for display than for repeated erasing.
Then there is the melamine sponge experience. Used lightly, it can feel like a miracle. Used aggressively, it can feel like a plot twist. Plenty of people discover that it removed the marker and also a tiny bit of shine, paint, or finish. That is why testing first is not just boring cleaning adviceit is the difference between solving one problem and starting a second one.
The most successful chalk marker cleanups usually follow the same pattern: start gentle, match the cleaner to the material, use microfiber instead of brute force, and stop escalating once the mark begins to lift. In real homes, classrooms, restaurants, and craft rooms, that sequence works far better than panic-cleaning with the nearest mystery spray under the sink. Chalk marker can be stubborn, sure, but most of the time it is not unbeatable. It just wants you to be smarter than dramatic, and that is a pretty fair deal.
Conclusion
If you want the fastest answer to how to remove chalk marker from any surface, here it is: start with warm water on nonporous surfaces, move to dish soap or glass cleaner, then step up to rubbing alcohol, hand sanitizer, vinegar, or a board-specific cleaner if needed. Save the melamine sponge for stubborn ghosting, and treat porous materials with extra caution because some staining may be permanent.
In most cases, the marker is removable. The trick is not using the strongest cleaner first. The trick is using the smartest one. And if all else fails, remember this timeless household truth: every sign looked like a good idea until cleanup day.