Table of Contents >> Show >> Hide
- First Things First: “Roof Paint” Usually Means Roof Coating
- Which Roofs Are Usually Good Candidates?
- Why Use a Roller Instead of a Sprayer?
- What Professionals Check Before They Start
- How a Roller-Painted Roof Job Usually Comes Together
- Best Practices That Make a Roof Coating Last Longer
- Common Mistakes People Make
- Is Roller-Painting a Roof Worth It?
- Experience Notes: What People Learn After a Roof Coating Job
- Final Thoughts
If you have ever looked up at a tired roof and thought, “That thing could use a glow-up,” you are not alone. A faded metal roof, a weathered low-slope roof, or an older coated surface can make an otherwise decent-looking home seem like it skipped coffee and sunscreen for a decade. But before you grab a roller and channel your inner weekend warrior, here is the truth: roof painting is not the same as painting a bedroom wall. A roof is exposed to sun, rain, ponding water, expansion, contraction, and gravity’s very rude attitude.
That is why most professionals do not even call it “painting” in the casual sense. On many roof systems, the real job is applying a roof coating designed for that specific surface. Done correctly, a coating can refresh the appearance of a roof, improve weather resistance, and in some cases help reflect heat. Done badly, it can peel, blister, trap problems, or simply waste a heroic amount of money in five-gallon buckets.
This guide explains how roller-applied roof coatings work, which roofs are usually good candidates, what preparation matters most, and what common mistakes cause failure. Think of it as the smart, practical version of roof paintingthe one that respects chemistry, weather, and the fact that slipping off a roof is a terrible way to become memorable.
First Things First: “Roof Paint” Usually Means Roof Coating
When people search for how to roller-paint a roof, they often imagine ordinary exterior paint and a standard roller tray. In reality, the best approach depends on the roofing material. Many successful projects use elastomeric, acrylic, silicone, or specialty roof coatings made for specific substrates such as metal, concrete, modified bitumen, previously coated roofs, or certain low-slope systems.
That distinction matters because a roof coating is designed to handle movement, sunlight, moisture, and temperature swings in ways normal house paint usually is not. It also explains why manufacturers obsess over terms like adhesion, mil thickness, recoat windows, and compatible primers. Those are not marketing buzzwords. They are the difference between “Looks great” and “Why is my roof shedding skin?”
Another key point: not every roof should be coated. A roof with active leaks, wet insulation, structural issues, or widespread damage is not ready for a cosmetic refresh. It is ready for repair, and sometimes replacement. Also, many roofing manufacturers strongly discourage field-applied coatings over installed asphalt shingles, so the words roof paint and shingle roof do not automatically belong in a happy relationship.
Which Roofs Are Usually Good Candidates?
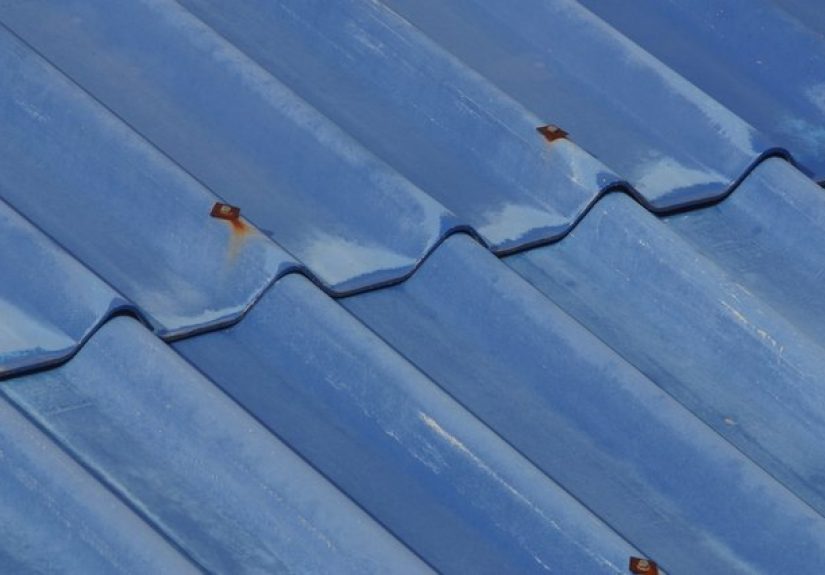
A roller-applied roof coating is often most appropriate on roofs that are still structurally sound but look worn, chalky, faded, or lightly weathered. Metal roofs are common candidates because they can often be cleaned, repaired, primed where needed, and recoated with a compatible product. Low-slope roofs with existing coating systems may also be candidates for restoration if the membrane is dry, stable, and suitable for the coating chemistry.
Concrete roofs, some previously coated roofs, and certain specialty systems can also work well when the product label specifically lists them as acceptable. On the other hand, roofs with trapped moisture, open seams, rust that has gone beyond surface-level, failing flashings, rotten decking, or major movement problems are not “paint first, think later” situations.
In plain English, here is the rule: if the roof is basically sound, a coating may help protect and refresh it. If the roof is already auditioning for a disaster movie, coating it is just expensive optimism.
Why Use a Roller Instead of a Sprayer?
Roller application is popular for several reasons. First, it gives better control on smaller jobs, detail areas, and windy conditions where overspray can become a neighborhood-wide announcement. Second, many roof coatings are thick, and rolling allows the installer to work the material into the surface while keeping an eye on coverage. Third, rollers are practical for touch-ups, maintenance coats, and situations where dragging in spraying equipment would be overkill.
Rollers are also useful for backrolling, which helps even out material, reduce holidays, and push thick coatings into rough or textured areas. On some systems, manufacturers still prefer spray application for speed, but even then, backrolling may be recommended. In other words, the roller is not the backup singer. Sometimes it is the lead vocalist.
What Professionals Check Before They Start
1. Roof Type and Slope
A low-slope roof is very different from a steep residential roof. A coating that makes sense on a low-slope membrane may be a poor idea on a steep shingle roof. Even when a coating is technically compatible with a pitched surface, steep roofs raise major safety concerns and can make uniform application more difficult.
2. Existing Condition
Pros check for leaks, soft spots, wet insulation, open seams, corrosion, fastener issues, failed penetrations, blistering, and loose existing coatings. A coating is not meant to magically erase underlying failure. Small defects can often be repaired as part of the prep stage, but serious defects need a bigger solution.
3. Surface Cleanliness
Most coating failures trace back to bad prep. Dust, mildew, oils, chalking, rust residue, and loose coating all interfere with adhesion. A roof can look “mostly clean” and still be dirty enough to sabotage the job.
4. Moisture and Weather
Roof coatings want dry conditions, predictable temperatures, and enough time to cure before rain, heavy dew, or temperature swings interfere. Direct sun can also create trouble by making the surface far hotter than the air. If the roof is too hot, too damp, too cold, or about to get rained on, the product may not cure correctly. Roofing chemistry is talented, but it is not psychic.
How a Roller-Painted Roof Job Usually Comes Together
For a publishable, accurate overview, it is helpful to think of the process in phases rather than as a simplistic “open bucket, roll roof, admire brilliance” routine.
Phase 1: Inspection and Repairs
Before coating starts, the roof should be inspected carefully. On metal roofs, that may include tightening or replacing loose fasteners, dealing with corrosion, and checking seams, ridges, and penetrations. On low-slope systems, it may mean identifying wet areas, repairing damaged membrane sections, and addressing drains or flashing details. Any leaks should be found and repaired before coating begins.
Phase 2: Cleaning
The roof needs to be thoroughly cleaned and allowed to dry. Depending on the substrate, that may involve washing away dirt, mildew, oxidized residue, and loose material. Previously coated roofs often need scraping or wire brushing in areas where old coating is failing. Mold, mildew, and chalky residue are especially common troublemakers because they prevent proper bond formation.
Phase 3: Priming and Detail Work
Some roofs need a primer, and some absolutely demand one. Metal, asphaltic surfaces, and problem areas may need specialty primers for adhesion or bleed-blocking. Seams, flashing transitions, fasteners, curbs, penetrations, and repairs may also need mastics, fabrics, or reinforcing materials before the field coating is applied. This is one of the biggest differences between a professional roof-coating job and a casual paint project: the details are where performance lives or dies.
Phase 4: Roller Application
Once the surface is ready, the coating is rolled on in a controlled pattern, usually while maintaining a wet edge to reduce lap marks. Manufacturers often recommend a specific nap size, coverage rate, and number of coats. On some products, one coat is possible under certain conditions. On others, two coats are standard and may be applied in alternating directions for more even coverage.
The installer typically works systematically across the roof rather than bouncing around randomly. That keeps film thickness more consistent and reduces the risk of thin spots. If the product is heavy-bodied, careful rolling technique matters. Too much enthusiasm can create roller marks, uneven texture, or missed low spots. Too little material can leave the coating underbuilt and underperforming.
Phase 5: Cure, Inspection, and Maintenance
After application, the coating needs time to cure according to product directions and weather conditions. The job should then be checked for thin areas, pinholes, missed edges, inconsistent coverage, and detail failures around penetrations and seams. A coated roof is not a forever roof, so periodic inspection and maintenance still matter.
Best Practices That Make a Roof Coating Last Longer
Use the Right Product for the Right Surface
This sounds obvious, yet it is the scene of many avoidable disasters. Acrylic, silicone, and elastomeric coatings are not interchangeable magic soup. Each has strengths, limitations, and ideal substrates. A product that excels on a low-slope roof with occasional ponding water may not be the best fit for another roof type. Read the label, the technical data sheet, and the compatibility list like they owe you money.
Respect Coverage Rates
Roof coatings are performance products. Coverage rate affects film thickness, and film thickness affects how well the coating protects the roof. Stretching the product to save a bucket may save money today and destroy performance tomorrow.
Watch the Weather Window
Even a premium coating can fail if it is applied under the wrong conditions. Direct sunlight, rising roof temperatures, overnight dew, and humidity can all change the outcome. Successful jobs are timed carefully, not casually.
Do Not Skip Detail Areas
The broad field of the roof gets attention because it is visible. The trouble usually starts at fasteners, seams, drains, penetrations, edges, and transitions. Those are the areas that deserve extra patience and the right accessories.
Common Mistakes People Make
- Coating a roof that is leaking, saturated, or structurally compromised.
- Using a product not meant for that substrate.
- Ignoring manufacturer warnings about shingles or incompatible surfaces.
- Applying to a damp or dirty roof.
- Working in brutal sun, high humidity, or just before rain or heavy dew.
- Rolling too thin in an attempt to stretch coverage.
- Skipping primers, seam treatment, or reinforcement details.
- Treating the roof like a decorative project instead of a building-envelope system.
If that last point sounds dramatic, good. Roofs are expensive, and the building underneath them is usually full of things people prefer dry.
Is Roller-Painting a Roof Worth It?
It can be, when the roof is a legitimate candidate and the product is chosen wisely. A properly coated roof can improve appearance, renew weather protection, and in some cases extend service life before a full replacement becomes necessary. For some owners, especially those with aging but still-serviceable metal or low-slope roofs, coating can be a practical middle ground between doing nothing and paying for a full tear-off.
But the value depends entirely on whether the project solves the right problem. If the issue is simple weathering and surface fatigue, coating may be a smart move. If the issue is hidden moisture, failed seams, rotted decking, or a roofing material that should not be coated in the first place, then painting the roof is like putting cologne on a smoke alarm. It does not address the actual problem.
Experience Notes: What People Learn After a Roof Coating Job
One of the most interesting things about roof-coating projects is how often people say the same thing afterward: the prep took longer than the rolling. That surprises first-timers, who picture the hard part as pushing a roller around under the sun. In reality, the demanding part is everything that happens before the roller touches the roof. Cleaning, drying, scraping, checking seams, addressing rust, taping off trouble spots, and waiting for the right weather window can eat up far more time than expected. The actual coating stage often feels almost relaxing by comparisonat least until someone realizes they have been crawling around on a warm roof for hours and their knees are now negotiating a ceasefire.
Another common experience is learning how different a roof surface feels from the ground-level idea of it. A roof that looked “not too bad” from the driveway can reveal chalking, loose old coating, failed fasteners, soft areas, or grime that only becomes obvious up close. People also discover that roofs are full of small interruptions: vent stacks, curbs, edges, seams, gutters, transitions, flashing joints, and random awkward geometry apparently designed by a committee that disliked straight lines. Those details slow down the work and demand more care than broad open sections.
Weather becomes the uninvited project manager. Many people start out thinking in terms of a convenient Saturday. After one real roof project, they start thinking in terms of sun angle, dew point, cloud cover, overnight moisture, and how hot a surface can get by late morning. That shift in mindset is important. A coating job often succeeds because someone had the discipline to wait, not because they worked harder. Experienced painters and roofers understand that timing can be just as valuable as technique.
There is also the visual lesson. Freshly coated roofs can look fantastic, but only when the finish is consistent. People who rush or stop and start at random often notice lap marks, roller tracking, texture differences, or thin spots once the coating dries. That is why professionals stay so focused on wet edges, even pressure, planned sections, and uniform coverage. A roof coating is not just protection; it is also a giant, sunlit display of whether the installer had a system or just had feelings.
On metal roofs especially, owners often say the biggest surprise is how much detail work matters. Tightening fasteners, treating rust correctly, sealing penetrations, and reinforcing seams may not sound glamorous, but those steps are what make the coating feel trustworthy afterward. The roller coat itself is only the visible finish. The confidence comes from knowing the little failure points were handled properly first.
Finally, many people come away with a new respect for when to hire a professional. Not because rolling is mysterious, but because roofs combine height, heat, chemistry, weather, and structural judgment in one place. That is a spicy combination. Owners who start by thinking, “How hard can it be?” often end by saying, “I now understand why good roofers charge money and sleep well at night.” That may be the most valuable experience of all.
Final Thoughts
Roller-painting a roof can be a smart restoration strategy when you are dealing with the right roof, the right product, and the right conditions. The biggest secret is not secret at all: success comes from preparation, compatibility, and patience. If the roof is sound, clean, dry, and appropriate for a coating system, a roller-applied finish can refresh appearance and add meaningful protection. If the roof is leaking, damaged, saturated, too steep, or made of a material the manufacturer warns against coating, the smarter move is repair or professional evaluation.
So yes, a roof can absolutely get a second act. Just do not treat it like a giant craft project. Treat it like what it is: the part of your home that takes the weather personally.