Table of Contents >> Show >> Hide
- Why Sealing Windows Works (and Why Drafts Feel Like Personal Attacks)
- Step 1: Find Where Your Windows Are Leaking
- Step 2: Pick the Right Sealing Method
- Step 3: Seal Around the Window Frame (Interior First)
- Step 4: Weatherstrip the Moving Parts (So Your Window Can Still… Window)
- Step 5: Add a Second Layer for Big Draft Problems
- Moisture, Safety, and “Please Don’t Seal That” Warnings
- Extra Credit: Window Coverings That Boost Efficiency
- What Kind of Savings Should You Expect?
- When to Stop Sealing and Consider Bigger Fixes
- Quick Checklist: A Practical Order of Operations
- Experiences From the Real World: What Sealing Windows Actually Feels Like (and What I’d Do Differently)
- Conclusion
Drafty windows are basically your home’s way of leaving a group chat… with your money. The good news: sealing windows is one of the most beginner-friendly, low-cost upgrades you can do to improve comfort and cut heating and cooling waste. The better news: you don’t need a construction degreejust a little patience, the right materials, and the willingness to stare suspiciously at your window trim like it owes you rent.
This guide walks you through how to find leaks, choose the right sealing method (caulk vs. weatherstripping vs. plastic film), and do the work in a way that actually lasts. You’ll also learn what not to seal (yes, that’s a thing), how to avoid moisture problems, and when it’s smarter to stop patching and consider upgrades.
Why Sealing Windows Works (and Why Drafts Feel Like Personal Attacks)
Windows aren’t just glassthey’re a system: frame, sash, stops, locks, tracks, trim, and the gap between the frame and the rough opening. Air sneaks through tiny cracks where materials meet, where paint has failed, where weatherstripping has flattened, or where the window simply wasn’t installed tightly decades ago.
When outside air leaks in (or inside air leaks out), your HVAC system has to “re-heat” or “re-cool” that replacement air. Translation: your furnace and AC are doing extra reps at the gym… and you’re paying for the membership.
Step 1: Find Where Your Windows Are Leaking
Before you buy every roll of foam tape in the hardware store, figure out where the air is actually moving. Sealing is most effective when you target real leaks, not vibes.
Quick checks you can do in 10 minutes
- The hand test: On a windy day (or when your HVAC is running), move your hand slowly around the window frame, trim edges, and where the sash meets the frame. Feel a cool stream? That’s a leak.
- The “rattle” test: Gently press on the sash. If it shifts easily or rattles, air probably does the same thing.
- The flashlight test at night: If you can see light around the edges of the sash or frame, air can usually pass too.
A slightly nerdier (but very effective) test
- Incense/smoke pencil: Hold it near the trim and sash edges. If smoke gets pulled sideways, you’ve found airflow.
- IR thermometer: You’re looking for cold streaks around trim and frame edges, not the center of the glass.
Pro tip: Mark leaks with painter’s tape. You’ll feel extremely powerful and also avoid forgetting the exact spot five minutes later (which is a real thing that happens to real adults).
Step 2: Pick the Right Sealing Method
There are three main categories of window sealing. Using the wrong one is like trying to fix a leaky faucet with duct tape: it might work briefly, but it’s not the vibe.
Caulk: best for stationary cracks and gaps
Use caulk where two non-moving surfaces meet: trim-to-wall, frame-to-siding, small cracks in casing, and joints in exterior trim. A good rule: caulk is for small gaps (think narrow cracks), not for wide holes you could hide snacks in.
- Interior: Paintable acrylic-latex caulk is common and easy to work with.
- Exterior: Use a high-quality exterior-rated caulk designed for weather and UV exposure.
- Bigger gaps: Add foam backer rod first, then caulk over it for a clean, durable seal.
Weatherstripping: best for moving parts
Weatherstripping seals where the window opens and closessashes, jambs, meeting rails, and tracks. It’s designed to compress and rebound over time (unlike caulk, which will crack if you try to use it like a hinge).
Common types include:
- V-strip (tension seal): Great for double-hung and sliding windowsfits into channels and springs back.
- Foam tape: Easy and cheap, but not always long-lasting in high-friction spots.
- Silicone or rubber bulb seals: More durable for frequent use.
- Spring bronze: Old-school, very durable, excellent for historic wood windows (and makes you feel like you own a cozy 1910 bungalow even if you don’t).
Temporary seasonal barriers: best for “I need this fixed by tonight”
If you’re renting, dealing with a brutal winter, or trying to stretch the life of older windows, you can add a removable layer that reduces drafts:
- Shrink-film plastic window insulation kits
- Interior storm panels (often acrylic/magnetic)
- Thermal curtains or cellular shades (not sealing, but helps reduce heat loss)
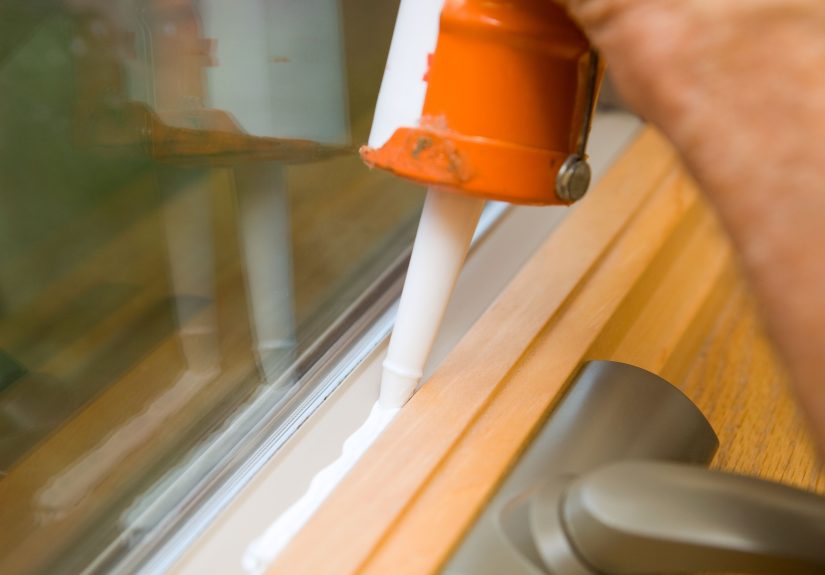
Step 3: Seal Around the Window Frame (Interior First)
Most DIYers get the best results by sealing the interior trim and frame first. It’s cleaner, easier to inspect, and protects comfort immediately.
What you’ll need
- Caulk + caulk gun
- Utility knife and/or scraper
- Rubbing alcohol or mild cleaner
- Painter’s tape (optional, but it makes lines prettier)
- Backer rod (for larger gaps)
- A damp rag or sponge
Prep like you mean it
- Remove old failing caulk: Cut it with a utility knife and peel/scrape it out.
- Clean the surface: Dust, grease, and old paint chips reduce adhesion.
- Dry fully: Caulk hates moisture during application.
Apply caulk (without creating modern art)
- Cut the nozzle at a small anglestart smaller than you think.
- Hold the gun steady and pull a continuous bead along the crack.
- Smooth the bead with a caulk tool or a damp finger for full contact and a tidy finish.
- Let it cure per the label before painting or heavy cleaning.
Go deeper: sealing behind trim (high impact)
If you’re comfortable doing a slightly bigger project, gently remove the interior casing/trim and seal the gap between the window frame and the rough opening. This is where some of the biggest leaks hide. For small gaps, use low-expansion foam made for doors/windows or backer rod + caulk. Then reinstall trim.
Important: Use low-expansion foam specifically labeled for windows/doors. High-expansion foam can bow frames and make windows hard to openturning “energy savings” into “why won’t my window close” savings.
Step 4: Weatherstrip the Moving Parts (So Your Window Can Still… Window)
Now attack the leaks where the sash meets the frame. The goal is a snug seal that still allows smooth operation.
Double-hung windows (classic up-and-down)
- Add V-strip in the side channels where the sash slides.
- Check the meeting rail (where upper and lower sashes meet) and add thin weatherstripping if there’s a gap.
- Make sure locks pull the sashes tightsometimes a simple lock adjustment improves sealing.
Casement windows (crank-out style)
- Inspect the existing compression seal around the perimeterreplace if cracked or flattened.
- Check hinge-side gaps and latch alignment so the sash closes tightly.
Sliding windows
- Clean tracks thoroughlydirt can prevent a tight seal.
- Use V-strip or brush weatherstripping along the meeting edge.
- Replace worn “pile” weatherstripping (the fuzzy stuff) if it’s flattened.
Rule of thumb: If your weatherstripping causes sticking or makes operation miserable, it’s either too thick or in the wrong spot. Sealing should reduce draftsnot your will to live.
Step 5: Add a Second Layer for Big Draft Problems
Sometimes sealing gaps isn’t enoughespecially with older single-pane windows, loose sashes, or rooms that feel like they’re air-conditioned by ghosts. A secondary barrier can make a noticeable difference.
Option A: Shrink-film plastic kits (quick, inexpensive)
These kits create a tight, nearly invisible air layer over the interior of the window. Installed properly, they can dramatically reduce drafts. They’re especially handy for older windows you don’t want to rebuild mid-winter.
- Clean the frame surface where tape will stick.
- Apply double-sided tape around the perimeter.
- Press the film onto the tape, leaving it slightly loose.
- Use a hair dryer to shrink the film tight and smooth.
Option B: Interior storm panels (reusable and sturdy)
Interior storm panels (often acrylic or glass) create a better seal than film and can be removed seasonally. Great for drafty rooms, noisy streets, and anyone who enjoys not hearing every leaf rustle outside.
Option C: Exterior storm windows (bigger upgrade, strong payoff)
Well-fitted storm windowsespecially low-e versionscan improve comfort and reduce heat loss significantly, especially over older windows. They’re often less expensive than full window replacement and can preserve historic trim and character.
Moisture, Safety, and “Please Don’t Seal That” Warnings
Sealing is good. Sealing everything without thinking can be… not good. Here’s how to stay comfortable and avoid moisture or indoor air quality issues.
Don’t block drainage paths
Many windows have weep holes or designed drainage channels. If water can’t escape, it can rot wood, damage drywall, or create mold-friendly damp zones. When in doubt, avoid sealing obvious drain holes and follow manufacturer guidance for your window type.
Watch condensation
After tightening up a room, you may notice more condensation on glass in cold weather. That’s not automatically a disasterit can simply mean warm indoor air is staying indoors. Improve ventilation (bath fans, range hood, or a dehumidifier if needed), and keep indoor humidity at a reasonable level.
Be mindful in older homes
- Lead paint risk: If your home is older (especially pre-1978), disturbing painted trim can create lead dust. Use safe work practices and consider professional guidance if you’re sanding or scraping heavily.
- Egress windows: Don’t permanently seal windows needed for emergency escape.
Extra Credit: Window Coverings That Boost Efficiency
Sealing stops air leaks. Window coverings reduce heat transfer and drafts you feel near glass. They’re not the same tool, but they work great together.
- Cellular (honeycomb) shades: Their air pockets help insulate.
- Thermal curtains: Use a snug curtain rod and close gaps at the sides for better performance.
- Draft stoppers: Helpful for windows that leak at the sill (but don’t treat them as a substitute for real sealing).
What Kind of Savings Should You Expect?
Exact savings depend on your climate, the condition of your windows, and how leaky your home is overall. But sealing drafts around windows can reduce uncomfortable cold spots, help rooms hold temperature longer, and cut the workload on your heating and cooling system.
If you want a realistic mindset: think of window sealing as a comfort-first upgrade with a money-saving bonus. In many homes, sealing is most effective when combined with broader air-sealing (other leaks around doors, attic bypasses, and penetrations). The small cost and quick improvement make it a smart first stepespecially before paying for larger upgrades.
When to Stop Sealing and Consider Bigger Fixes
Sealing is powerful, but it can’t fix everything. Consider repair or upgrades when:
- Frames are rotted, soft, or visibly water-damaged.
- Double-pane glass is fogged (seal failure in the unit).
- The window won’t close properly even after adjustments.
- You’ve sealed repeatedly, but the room still feels like a breezy porch.
Sometimes the best “seal” is restoring sash fit, repairing tracks, or adding storms rather than throwing more caulk at a structural problem.
Quick Checklist: A Practical Order of Operations
- Find leaks (hand test, smoke test, flashlight).
- Seal interior trim cracks with caulk.
- Weatherstrip moving parts (V-strip/foam/silicone).
- Seal behind trim if drafts persist.
- Add shrink film or interior storm panels for stubborn windows.
- Pair with efficient window coverings for comfort.
Experiences From the Real World: What Sealing Windows Actually Feels Like (and What I’d Do Differently)
The first time I tried to seal drafty windows, I had two goals: (1) stop the chilly breeze from sneaking into the living room like it paid rent, and (2) prove to myself that I could do a “grown-up home project” without calling three different relatives for moral support. I started with one of those classic older double-hung windows that looked innocent enoughuntil the wind hit it and the curtains moved like they were in a music video.
I did what most people do: I bought caulk first. Not because it was the right first step, but because caulk is the home improvement equivalent of confidence. I got home, loaded the caulk gun, and immediately learned Lesson #1: too much caulk is a thing. My bead looked less like a neat line and more like a squiggly worm trying to escape. The fix was simplego slower, cut the nozzle smaller than you think, and smooth the bead right away. Once I got the hang of it, it was oddly satisfying, like frosting a cake… if the cake was a 1970s window frame and your frosting had a “paintable” label.
Then came Lesson #2: sealing the trim helps, but the real drama is often behind the trim. After caulking the visible cracks, I still felt a draft near the sides. That’s when I carefully removed a piece of interior casing and discovered a gap that could’ve hosted a tiny neighborhood meeting. It wasn’t just a “caulk it and forget it” situation. I used backer rod in the larger spaces and a low-expansion foam designed for windows in a couple of deeper spots. The difference was immediate. The room stopped feeling like it had its own microclimate, and my heater stopped cycling like it was training for a marathon.
Lesson #3 was about weatherstripping. I underestimated how much old, flattened weatherstripping matters. The window still rattled a bit, which is basically your window admitting it’s not sealed. Installing V-strip in the channels was a small job that made a big impact, but it took patience. Cleaning the jambs first mattered more than I expectedadhesives don’t stick to “mystery dust” and old paint flakes. After the V-strip went in, the sash slid with more resistance, but it still worked. That’s the sweet spot: snug but functional.
And thenbecause winter loves plot twistsLesson #4: sometimes you need a second layer. One window in a bedroom was still drafty enough to make the room feel five degrees colder at night. I used a shrink-film plastic kit and, no exaggeration, it changed the vibe of the entire room. The trick was taking the cleaning step seriously and using a hair dryer slowly so the film tightened evenly. When it’s done right, it’s almost invisible, and you stop feeling that sneaky cold “fall” off the glass area.
Finally, Lesson #5: sealing is also a comfort project, not just a math project. Yes, you want to save on your energy bill, but the immediate reward is that your house feels calmerno random drafts, no cold corners, and fewer thermostat battles. If I could redo the whole thing, I’d start with leak detection, seal the big gaps first, and treat caulk like a precision toolnot a fire hose. Also, I’d keep paper towels nearby and accept that the first attempt is rarely perfect. The goal isn’t perfection. The goal is a warmer, quieter homeand an energy bill that doesn’t jump-scare you every month.
Conclusion
Sealing windows is one of those rare home projects that’s affordable, beginner-friendly, and genuinely noticeable. Find the leaks, use caulk where things don’t move, use weatherstripping where they do, and add a seasonal barrier (like shrink film or interior storms) for the stubborn troublemakers. Your reward is fewer drafts, more comfort, and an HVAC system that finally gets to stop doing extra work for no reason.