Table of Contents >> Show >> Hide
- Why Sealing Windows Works (and Why Your HVAC Will Thank You)
- Step One: Find the Leaks (Because Guessing Is Expensive)
- Know What to Seal (and What Not to Seal)
- Your Window-Sealing Toolkit (What You’ll Actually Use)
- How to Caulk Around Windows (Without Making It Look Like a Kindergarten Art Project)
- Weatherstripping Windows: The Draft-Blocking MVP
- Temporary Fixes That Work Shockingly Well
- How Much Can You Save by Sealing Windows?
- Common Mistakes (So You Don’t Become a Cautionary Tale)
- When to Call a Pro (Because Sometimes It’s Not Just a Draft)
- Real-World Experiences: Lessons From Drafty Windows (So You Don’t Learn the Hard Way)
- Conclusion
Drafts are sneaky. They don’t kick down your door yelling, “I’m wasting your money!” They slip in like a cat burglar, stealing warm air in winter and cool air in summerone tiny crack at a time. If your house has that mysterious “why is it always a little chilly right here?” vibe, your windows are prime suspects.
The good news: sealing windows is one of the most cost-effective DIY upgrades you can do for comfort, noise reduction, and yeslower monthly energy bills. The even better news: you don’t need a degree in rocket science. You mostly need patience, the right materials, and the willingness to stare at a window frame like it personally offended you.
Why Sealing Windows Works (and Why Your HVAC Will Thank You)
Energy loss around windows happens in two big ways: air leakage (drafts) and heat transfer (the glass and frame letting heat move through). Air leakage is often the easiest to fix quickly. When outside air sneaks in and conditioned air leaks out, your furnace or AC has to run longer to maintain the temperature you setmeaning more energy use and higher bills.
Sealing also improves comfort. Many people think the thermostat is “wrong” when the real issue is uneven temperatures caused by leaky spots. Fix the leaks and suddenly the living room stops feeling like it’s flirting with the outdoors.
Step One: Find the Leaks (Because Guessing Is Expensive)
Before you start flinging caulk around like frosting, locate where air is actually moving. You’re hunting for gaps, cracks, and worn sealsespecially where window parts meet and where the frame meets the wall.
Fast DIY draft-detection methods
- The hand test: On a windy day, slowly move your hand around the window perimeter and along the sash. If you feel air movement, that’s your target.
- Tissue test: Hold a strip of tissue near suspected leak areas. If it flutters, you found airflow.
- Incense test (careful, responsible adult mode): Watch the smoke trail near edges. Smoke that pulls sideways means air is moving.
- Night flashlight trick: From outside, shine a bright light toward trim gaps while someone inside watches for light leaks (works best on older homes).
Common leak zones around windows
- Where the trim meets the wall (interior casing gaps)
- Where the window frame meets siding (exterior perimeter)
- The meeting rail on double-hung windows
- The tracks on sliders
- Worn sash seals or missing weatherstripping
- Hidden gaps behind trim where the window was installed
Pro tip: If you want a truly nerdy (and very effective) assessment, a home energy audit with a blower door test can reveal leaks you’d never notice on your own. But you can still get huge gains with basic DIY sealing.
Know What to Seal (and What Not to Seal)
Here’s the golden rule: caulk is for stationary joints and weatherstripping is for moving parts. Mix those up and you’ll end up with a window that doesn’t open… which is a bold strategy for emergency exits and fresh air.
Don’t accidentally create a moisture problem
Windows also manage water. Some designs have weep holes or drainage paths to let moisture escape. Sealing the wrong exterior openings can trap water and invite rot, mold, and the kind of repair bill that makes you reconsider your life choices.
In many assemblies, it’s smart to focus on making the interior side more airtight while keeping proper exterior drainage intact. If you’re unsure, seal conservatively and prioritize obvious cracks and failed caulk linesnot engineered drainage features.
Your Window-Sealing Toolkit (What You’ll Actually Use)
You don’t need a garage full of gear. A basic kit gets you very far:
- Caulk: Paintable acrylic latex for interior; exterior-grade silicone or hybrid sealant for outside (choose based on conditions and labeling).
- Caulk gun: The unsung hero of neat, continuous beads.
- Backer rod: Foam rope that fills wide gaps so you don’t waste caulk (and your sanity).
- Weatherstripping: V-seal, foam tape, rubber, felt, or metal spring bronze depending on window type and age.
- Utility knife + scissors: For clean cuts (and occasional packaging battles).
- Rubbing alcohol / mild cleaner: Adhesives hate dirt and grease.
- Window insulation film kit (optional): Great for renters and winter drafts.
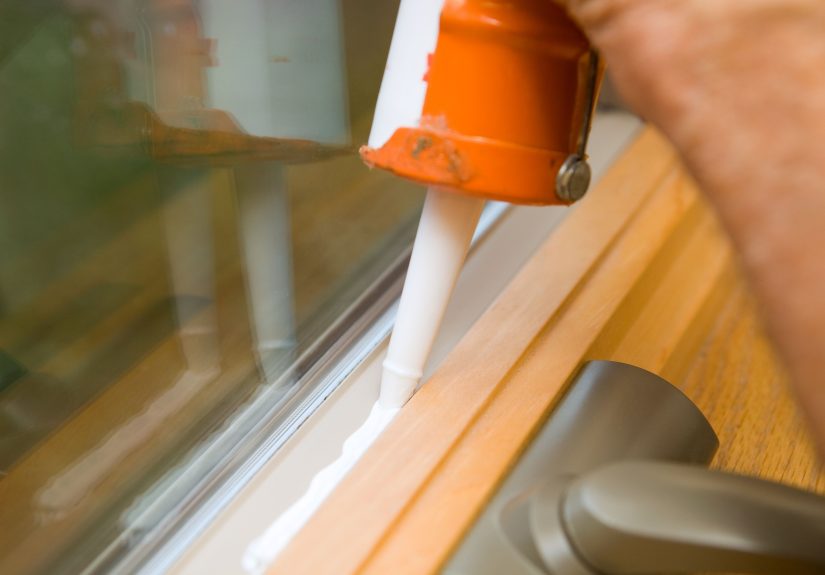
How to Caulk Around Windows (Without Making It Look Like a Kindergarten Art Project)
Caulking is simple, but good caulking is… a personality trait. Here’s how to do it right.
1) Prep like you mean it
- Remove loose or cracked old caulk with a scraper or putty knife.
- Clean and dry the surface completely. Adhesion is everything.
- If gaps are wide, push in backer rod first so the caulk can bridge properly.
2) Cut the tip for the job
Cut the caulk tube tip at an angle. Smaller hole for small cracks. Bigger hole for larger gaps. This is not the time for “go big or go home.” Go accurate or go home.
3) Apply a continuous bead
Run a smooth, steady bead along the crack where the frame meets trim (interior) or where the exterior casing meets siding (exterior). Keep the gun moving to avoid blobs.
4) Tool the bead
Use a damp finger or a caulk tool to press the bead into the gap and smooth it. The goal is a sealed joint, not a decorative icing border.
5) Let it cure
Respect cure times on the label. Painting too soon can crack or peel the bead. If the caulk says “24 hours,” it means “24 hours,” not “whenever you get bored.”
Weatherstripping Windows: The Draft-Blocking MVP
Weatherstripping seals gaps around parts that movelike sashes, sliders, and casements. Done right, it reduces drafts while still letting windows open and close smoothly.
Pick the right type for your window
- V-seal (tension seal): Great for double-hung and sliding windows; forms a springy barrier in channels.
- Foam tape: Easy and cheap; best for small, consistent gaps (but may wear faster).
- Rubber or vinyl: Durable compression seals in some tracks and stops.
- Felt: Old-school; works, but typically less durable and less airtight.
- Spring bronze (older wood windows): Long-lasting and excellent for historic sashes, though more time-intensive to install.
Install weatherstripping the right way
- Apply to clean, dry surfaces.
- Measure carefully and cut cleanlygaps in weatherstripping defeat the point.
- Make sure the material compresses when the window closes. No compression = no seal.
Small but mighty: If your double-hung window doesn’t lock tightly, the sash may not seat well. A functioning sash lock helps pull the window snug, improving the seal and reducing rattles.
Temporary Fixes That Work Shockingly Well
If you’re renting, on a budget, or just not ready to commit to bigger repairs, you still have options that can noticeably reduce drafts.
Window insulation film (the “invisible storm window” vibe)
Plastic shrink-film kits create a tight air barrier over the interior side of the window. Typical steps: clean the frame, apply double-sided tape, stick the film, then use a hair dryer to shrink it tight. If installed neatly, it’s surprisingly clear and can dramatically reduce drafts in winter.
Rope caulk (for old windows with gaps you can’t ignore)
This pliable caulk-like material is pressed into gaps and removed later. It’s perfect for seasonal sealingespecially in older homes with leaky sashes where you want a reversible solution.
Thermal curtains and cellular shades
These don’t “seal” cracks, but they reduce heat transfer and can improve comfort. For rooms with big windows, they’re a practical second layerespecially at night in winter or during blazing summer afternoons.
How Much Can You Save by Sealing Windows?
The honest answer: it depends on your home, your climate, and how leaky things were to begin with. But reputable energy programs consistently point to air sealing and insulation as high-ROI upgrades. Sealing air leaks can reduce wasted heating and cooling, and many basic fixes can pay back quicklysometimes within about a yearbecause materials are inexpensive and comfort improvements are immediate.
Also, don’t underestimate the “hidden savings”: when your home is less drafty, you may feel comfortable setting the thermostat a little lower in winter or a little higher in summerwithout feeling like you’re living in a wind tunnel. That behavior change can amplify the savings.
Common Mistakes (So You Don’t Become a Cautionary Tale)
- Caulking moving parts: If it moves, weatherstrip it. Caulk belongs on stationary seams.
- Skipping prep: Dirt and moisture ruin adhesion. Clean and dry first.
- Overusing expanding foam: The wrong foam can bow frames and jam windows. If you use foam, choose a low-expansion product and go lightly.
- Sealing drainage paths: Don’t block weep holes or water-management details.
- Ignoring ventilation: Tightening a home can reduce fresh-air exchange. If you notice lingering humidity, odors, or condensation, address ventilation and moisture control.
When to Call a Pro (Because Sometimes It’s Not Just a Draft)
DIY sealing is great, but some problems signal a bigger issue:
- Visible rot or soft wood around frames
- Fog or moisture between double-pane glass (failed seal)
- Significant structural gaps suggesting installation problems
- Persistent condensation or mold indicating moisture/ventilation concerns
A qualified contractor or energy auditor can help prioritize fixesespecially if your home has complex moisture dynamics or you’re planning broader weatherization work.
Real-World Experiences: Lessons From Drafty Windows (So You Don’t Learn the Hard Way)
The first time I sealed windows in an older home, I assumed the drafts were “just the glass.” Spoiler: the glass was innocent. The real culprit was the trimthin cracks where the interior casing met the wall, plus gaps where the frame met the rough opening behind the trim. I didn’t even know those hidden voids existed until I removed one piece of casing and discovered what looked like a tiny canyon. A little backer rod and careful sealing made the room feel calmerlike the house stopped exhaling all the time.
Next lesson: not every draft is loud. Some are silent, subtle, and weirdly localized. One window felt fine around the perimeter, but the meeting rail on the double-hung sash leaked like it had a side hustle as a wind instrument. Adding the right weatherstripping and making sure the sash lock actually pulled the window tight did more than any amount of “extra caulk” would have. The difference was immediate: fewer cold streaks across the couch and less of that “why is my ankle freezing?” phenomenon.
Then came the infamous shrink-film experiment. I expected it to look like a sci-fi force field. Instead, my first attempt looked like a wrinkled sandwich bag taped to a museum artifact. The fix was not “more tape” or “more hair dryer.” The fix was prep: cleaning the frame properly, keeping the tape straight, and shrinking gradually from the edges toward the center. When installed neatly, it actually became almost invisible from a few feet away. And the draft reduction? Legit. In the coldest weeks, it turned a “can’t-sit-here” room into a “fine, I’ll work here” room.
One more thing that surprised me: once the drafts were gone, I noticed indoor air felt different. Not badjust different. The house held onto humidity more. That’s when “build tight and ventilate right” stopped sounding like a slogan and started sounding like common sense. A bathroom fan used consistently, a kitchen hood that actually vents outside, and short, intentional fresh-air cycles helped keep the air comfortable without undoing the energy gains. Sealing windows isn’t just about trapping warm air; it’s about controlling your indoor environment on purpose.
Finally, the most practical experience-based tip: do one room first. Seal one problem window. Compare comfort. Learn what works in your house. You’ll get faster, neater, and more confidentand by the time you hit the last window, you’ll be laying down caulk lines that would make a pastry chef jealous (minus the sugar and existential dread).
Conclusion
If you want to save on your energy bill without jumping straight to full window replacement, sealing windows is the sweet spot: low cost, high comfort, and real efficiency gains. Start by finding drafts, use caulk for stationary joints, weatherstripping for moving parts, and add temporary insulation film when you need a quick seasonal win. Seal smart, keep drainage paths clear, and don’t forget ventilationbecause a comfortable home is one that’s controlled, not just “closed.”