Table of Contents >> Show >> Hide
- What You’ll Learn (Beginner Method in Plain English)
- Before You Start: Cube Setup & One Important Rule
- Rubik’s Cube Notation (Quick, Painless Version)
- The Only Algorithms You Need Today
- Step 1: Solve the First Layer (White on Bottom)
- Step 2: Put the Last-Layer Corners in the Correct Spots (Permutation)
- Step 3: Twist the Last-Layer Corners (Orientation)
- Common Mistakes (So You Don’t Yeet the Cube Across the Room)
- Practice Tips to Get Faster (Without Becoming a Full-Time Cube Monk)
- FAQ: Beginner Questions That Deserve Real Answers
- Real-World Experiences: What Learning a 2×2 Usually Feels Like (500+ Words)
- Conclusion
The 2×2 Rubik’s Cube looks like the “snack-size” version of the 3×3… until it humbles you in public and makes you pretend you were “just scrambling it on purpose.” The good news: the 2×2 (often called the Pocket Cube or Rubik’s Mini) is absolutely beginner-friendly once you know what’s really going on.
A 2×2 has only cornersno edges, no centersso solving it is basically a story about putting corners in the right places and then twisting them the right way. In this tutorial, you’ll learn a simple method that uses just two main algorithms (plus a tiny repeatable move), with clear steps and beginner-proof troubleshooting.
What You’ll Learn (Beginner Method in Plain English)
- Step 1: Solve the first layer (usually white) on the bottom.
- Step 2: Put the last-layer corners in the correct positions (even if they’re twisted wrong).
- Step 3: Twist those last corners until every face is solid color.
If you can follow a recipe and resist the urge to “just do random turns to see what happens,” you can solve a 2×2. (And yesrandom turns are the #1 cause of “I was so close!” heartbreak.)
Before You Start: Cube Setup & One Important Rule
Pick your first color (we’ll use white)
Most tutorials start with white because it’s common, but you can start with any color. Just be consistent. For the first layer, we’ll build a full face (white) and match the side colors as we go.
The rule that saves beginners
When you do an algorithm, keep the same face as “Front” for the whole sequence. Don’t rotate the cube mid-algorithm unless the step tells you to. This one habit prevents a shocking percentage of beginner mistakes.
Rubik’s Cube Notation (Quick, Painless Version)
Algorithms are written as letters. Each letter means “turn that face 90 degrees” as if you’re looking directly at that face.
- R = Right face clockwise
- L = Left face clockwise
- U = Up (top) face clockwise
- D = Down (bottom) face clockwise
- F = Front face clockwise
- B = Back face clockwise
- ’ (apostrophe) means counterclockwise (example: R’)
- 2 means turn twice (180 degrees), like U2
Example: R U R’ U’ is a classic “right-hand” move sequence you’ll use a lot. Don’t memorize it like a robotthink of it like a tiny tool you can pick up and reuse.
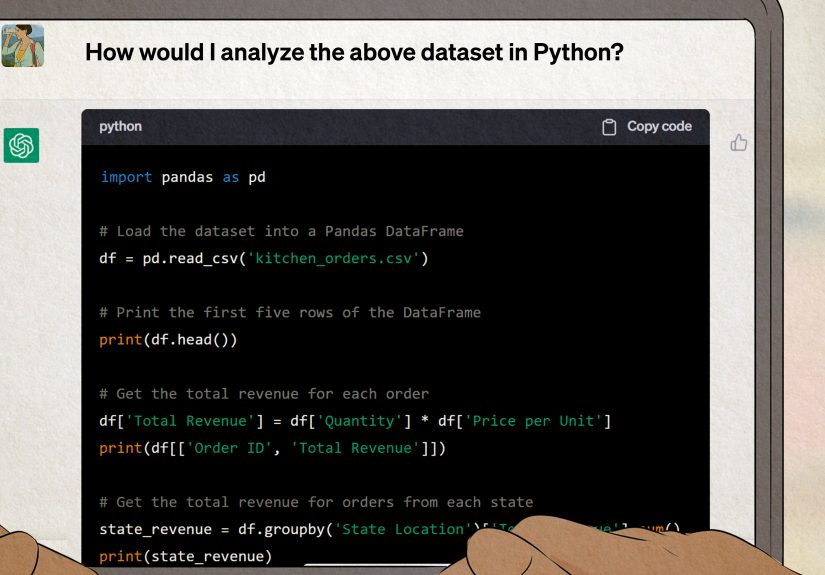
The Only Algorithms You Need Today
Algorithm A: Right-Hand Algorithm
R U R’ U’
This is your Swiss Army knife. You’ll use it to help build the first layer and later to twist corners at the end.
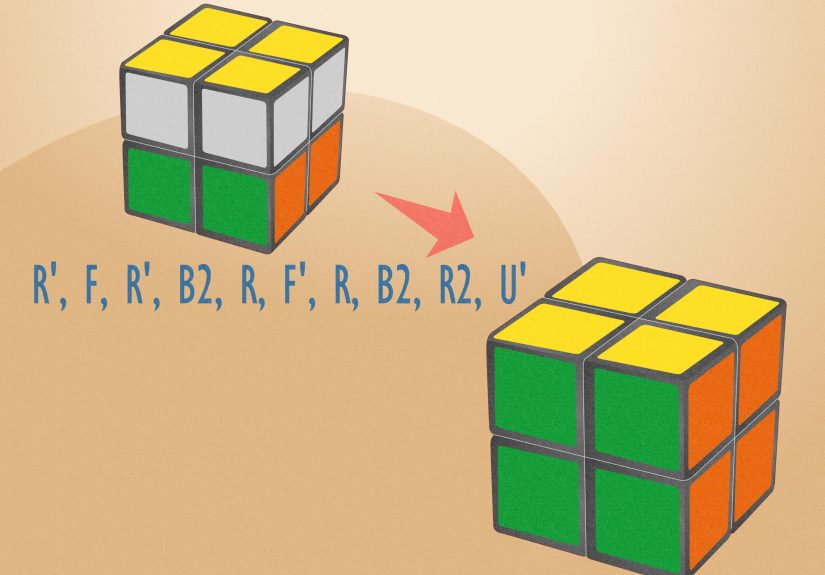
Algorithm B: Niklas (Corner Positioning)
R U’ L’ U R’ U’ L U
This one helps move the last-layer corners into the correct spots. It looks longer, but it’s very learnable if you break it into two chunks: (R U’) then (L’ U) then (R’ U’) then (L U).
Step 1: Solve the First Layer (White on Bottom)
Hold the cube so white is on the bottom. Your goal is to complete the bottom layer so: (1) the bottom face is all white, and (2) the side colors match up in neat vertical pairs.
1) Choose a “home base” corner
Find a corner with white, for example white-red-blue. Put it in the bottom layer. This becomes your reference corner.
2) Build a 2-corner “bar”
Find another corner that shares white + red (or white + blue) and place it next to your base corner so the side colors line up. Now you have two adjacent corners solved correctly.
3) Insert the remaining two corners
Here’s the beginner-friendly trick: if a corner won’t go where you want, bring that corner into the top layer above its target location. Then use R U R’ U’ repeatedly until it drops into place correctly.
Mini example: Suppose you want to insert the white-red-green corner. Put it on the top layer above the spot where it belongs (between the red and green sides), then do R U R’ U’ until the corner lands correctly. If it lands twisted, keep goingthis move cycles it through orientations until it clicks into place.
When you’re done with Step 1, the entire bottom layer is solved and the cube should look “stable” (meaning: you can turn the top without breaking the bottom).
Step 2: Put the Last-Layer Corners in the Correct Spots (Permutation)
Now we’ll fix where the top corners go (their positions), without worrying yet about whether the top color is facing up. The goal: each top corner should sit directly above the matching bottom corner (same two side colors).
1) Try a simple U turn first
Turn the top layer (U) and see if you can get exactly one top corner to match the corner below it by side colors. If you can, greatkeep that matched corner in place for the next step.
2) If nothing matches, do Niklas once
If you cannot get a single matching corner with U turns (or everything seems “almost right but not really”), do: R U’ L’ U R’ U’ L U
3) Hold the matched corner in the correct place and repeat as needed
Once you have exactly one top corner matching its bottom partner, hold the cube so that matched corner is in the bottom-left position of the top layer (imagine looking at the top layer corners like a 2×2 grid). Then do the Niklas algorithm again.
Repeat until all four top corners are in the correct spots above their matching bottom corners. At the end of Step 2, the cube may still look unsolved because the top face isn’t a solid color yetbut the corners are in the right locations.
Step 3: Twist the Last-Layer Corners (Orientation)
This step feels like magic the first time you do it. We’ll twist one corner at a time without “ruining everything,” as long as you follow the setup exactly.
1) Flip the cube (don’t turn any layers)
Without making moves, simply rotate the whole cube in your hands so the solved layer (white) is now on top. You’re not doing an algorithm hereyou’re just changing how you hold it.
2) Put an unsolved corner in the bottom-right
Look at the bottom layer (which used to be the top). Find a corner that is twisted wrong and place it in the bottom-right position.
3) Repeat the Right-Hand Algorithm until that corner is correct
Do R U R’ U’ again and again until the bottom-right corner is oriented correctly. For most corners, it takes 2 or 4 repeats (occasionally you’ll feel like it’s taking foreverusually because one move was misread).
Important: The cube will look more scrambled during this step. That’s normal. You are temporarily messing things up to twist one corner, and then the method “pays you back” when you finish all corners.
4) Move to the next corner
Once that corner is correct, turn only the bottom layer (D) to bring the next unsolved corner into the bottom-right position. Then repeat R U R’ U’ until that corner is correct.
Continue until all corners are oriented, then do a final D (or U, depending on how you’re holding it) to align the cube perfectly. Congratulationsyou just solved a 2×2.
Common Mistakes (So You Don’t Yeet the Cube Across the Room)
Mistake 1: Rotating the cube mid-algorithm
If your “Front” face changes during an algorithm, you’re basically doing a different algorithm. Fix: pause, reset your grip, and repeat with the same front face the whole time.
Mistake 2: Confusing clockwise vs counterclockwise
Remember: every move is described as if you are looking directly at that face. If you’re not sure, physically point your eyes toward that face before turning it.
Mistake 3: Step 3 feels like it’s destroying progress
That’s the point (in a nice way). Step 3 intentionally scrambles other pieces while twisting one corner. If you always keep the unsolved corner in the bottom-right and only rotate the bottom layer between corners, it will resolve.
Practice Tips to Get Faster (Without Becoming a Full-Time Cube Monk)
Turn algorithms into “chunks”
Instead of memorizing 8 letters in a row, memorize pairs: (R U’) (L’ U) (R’ U’) (L U). Your hands will learn the rhythm faster than your brain learns the spelling.
Use light finger tricks
- For U turns, many solvers push with the index finger (quick and controlled).
- For R turns, use a wrist turn at first, then refine into a finger push as you get comfortable.
Do “micro-drills”
Two minutes a day of just R U R’ U’ (slowly, perfectly) beats 30 minutes of frantic turning and forgetting where “Front” went. Accuracy first. Speed shows up later like a cat when you stop staring at it.
FAQ: Beginner Questions That Deserve Real Answers
Is a 2×2 easier than a 3×3?
Mechanically, yes: fewer pieces. Mentally, it can feel tricky because you’re only dealing with corners, and twisting corners looks chaotic at first. Once you learn the method, 2×2 is usually much faster to solve than 3×3.
Do I need to memorize tons of algorithms?
No. This tutorial uses the Right-Hand Algorithm and the Niklas algorithm for positioning, then repeats the Right-Hand Algorithm to finish. That’s a beginner-friendly setup that still teaches you “real cubing skills” you can reuse later.
What if my cube colors are different?
Some cubes have different color layouts. The method still worksjust match colors consistently on the sides. If you ever feel lost, re-check that the corner you’re inserting actually belongs in that location (same two side colors).
Real-World Experiences: What Learning a 2×2 Usually Feels Like (500+ Words)
Learning to solve a 2×2 is a little like learning to whistle: everyone makes it look effortless, and your first attempts feel like the cube is personally offended by your existence. Most beginners go through a predictable emotional arc: excitement, confidence, confusion, mild bargaining (“If I solve it once, I’ll never scramble it again”), and then that moment when it finally clicks and you suddenly want to show every living creature you know.
The first “aha” usually happens during Step 1. When you realize corners aren’t random and that the side colors tell you where a corner belongs, the cube stops feeling like a magic trick and starts feeling like a puzzle. Many learners notice that building the first layer is the easiest part once you stop trying to force pieces. The simple habit of moving the corner you want into the top layer directly above its target spotand then using R U R’ U’ as a gentle insertion toolmakes the process feel almost… polite. Like you’re asking the cube nicely instead of arguing with it.
Step 2 is where people commonly hit their first real speed bump. This is the “my top corners look right-ish, but nothing matches” phase. It’s also where new solvers often learn a valuable cubing lesson: setup matters. Niklas works best when you first create a situation where exactly one corner is matched, then hold the cube correctly before repeating. The experience here is very specific: you do the algorithm, check alignment, do a few U turns, and suddenly one corner “locks in.” That’s the moment you start trusting the method instead of improvising. And yes, improvising is how “almost solved” becomes “how did I get here and why is white on the side now?”
Then comes Step 3, the drama queen of the tutorial. Twisting corners one at a time feels wrong the first time because the cube temporarily looks worse. Beginners often describe this as the “I broke it” momentespecially when the top layer appears to scramble after repeating R U R’ U’. The key experience shift is learning to focus on one corner only: keep the target corner in the bottom-right, repeat until it’s correct, then move to the next corner using only a bottom-layer turn. Once you’ve done it a few times, Step 3 transforms from terrifying to satisfying, because you can literally watch a corner twist into place like a tiny safe dial clicking open.
Another common experience: your hands learn faster than your brain. At first you’ll say the moves out loud (“R… U… R-prime… U-prime…”). After a few short practice sessions, your fingers start doing the right thing while your mind is thinking about dinner. That’s not a flexit’s normal skill building. Many cubers also notice that short, consistent practice beats long sessions. Five minutes a day often produces more improvement than one exhausting hour once a week, because muscle memory likes repetition, not punishment.
Finally, most new solvers get a motivational boost from a silly-but-true realization: solving the 2×2 changes how you see the cube. It’s no longer a “random object that randomly hates you.” It becomes a system. And once it’s a system, you can improve itcleaner turns, fewer pauses, smoother algorithms, and eventually faster times. That first clean solve is usually the start of a surprisingly addictive hobby.
Conclusion
Solving a 2×2 Rubik’s Cube is less about being “good at puzzles” and more about having a plan you can repeat calmly. Build the first layer, position the last-layer corners with Niklas, then twist corners into place using the Right-Hand Algorithm. Stick to the setup, keep your front face consistent, and don’t panic when Step 3 looks messyit’s supposed to.
Once you can solve it reliably, you can start shaving time with smoother finger tricks and faster recognition. But first: enjoy the win. You just taught your brain a brand-new kind of logic… and you did it with a cube that fits in your pocket.