Table of Contents >> Show >> Hide
- What Is a Humerus Fracture, Exactly?
- Before You Splint Anything, Remember the Golden Rule
- How to Splint a Humerus Fracture: 8 Steps
- Step 1: Check for bigger emergencies first
- Step 2: Control bleeding and cover any open wound
- Step 3: Leave the arm in the position you found it
- Step 4: Remove tight items and check the hand before splinting
- Step 5: Pad the arm and create gentle support
- Step 6: Apply a sling, then secure the arm to the body
- Step 7: Add ice and recheck circulation after splinting
- Step 8: Get medical care and keep monitoring during transport
- Common Mistakes to Avoid
- What Happens After the Splint?
- Experience-Based Lessons From Real-World Humerus Fracture Situations
- Conclusion
A humerus fracture is the kind of injury that ruins a perfectly normal day in record time. One bad fall, one awkward sports collision, one unfortunate meeting with a ladder, and suddenly the upper arm is sending very dramatic messages to the brain. The humerus, for the record, is the long bone that runs from the shoulder to the elbow. When it breaks, the goal of first aid is not to “fix” it on the spot. The goal is to protect the arm, reduce pain, limit movement, and get the person to proper medical care without turning a bad injury into a worse one.
That last part matters. Splinting a humerus fracture is temporary first aid, not home orthopedics. No one gets extra points for improvising a movie-worthy battlefield cast out of curtain rods and optimism. A good splint keeps the arm still, protects nerves and blood flow, and buys time until a clinician can examine the injury, order X-rays, and decide whether the person needs a sling, a brace, a coaptation splint, or surgery. Done well, first aid is simple, calm, and surprisingly powerful.
What Is a Humerus Fracture, Exactly?
The humerus is your upper arm bone. Fractures can happen near the shoulder, through the shaft in the middle of the upper arm, or down near the elbow. That matters because location changes treatment. A proximal humerus fracture may leave the shoulder severely swollen and almost impossible to move. A shaft fracture often causes obvious pain, swelling, bruising, or a deformity in the upper arm. A distal humerus fracture, closer to the elbow, can be especially concerning because nerves and blood vessels may be at risk.
In plain English: all humerus fractures deserve medical attention, but some are true emergencies. If there is a lot of bleeding, bone sticking through the skin, a hand that looks pale or blue, numb fingers, severe weakness, or a major crash with other injuries, emergency services should be involved right away.
Before You Splint Anything, Remember the Golden Rule
The golden rule is this: immobilize, don’t improvise a reduction. In other words, keep the arm as still as possible, but do not try to straighten it, snap it back into place, or push exposed bone under the skin. That is a medical procedure, not a DIY project. For a suspected humerus fracture, the safest temporary support is usually padding, a sling, and securing the arm gently to the torso so it moves less.
If professional help is coming quickly, focus on comfort, bleeding control, and keeping the patient calm. If help is delayed, careful splinting can reduce pain and protect the arm during transport.
How to Splint a Humerus Fracture: 8 Steps
Step 1: Check for bigger emergencies first
Before you focus on the arm, make sure the person is breathing normally, responsive, and safe to approach. If the injury followed a car crash, a fall from height, or a violent impact, think bigger than the arm. There could be head, neck, chest, or spine injuries too. If the person looks faint, confused, very pale, sweaty, or short of breath, treat that as urgent. Call 911 right away.
This is also the moment to look for red flags that push the injury into emergency territory: severe bleeding, an open fracture, obvious deformity, worsening swelling, numbness, tingling, or a hand that is cold, pale, or bluish. Those signs mean the fracture may be affecting nerves or blood flow, and speed matters.
Step 2: Control bleeding and cover any open wound
If the skin is broken, place a clean dressing or cloth over the wound and apply gentle pressure around it to control bleeding. Do not press directly on protruding bone, and absolutely do not push bone back inside. The mission here is simple: reduce bleeding, reduce contamination, and leave the alignment question to trained medical professionals.
If the wound is small, cover it. If it is large or bleeding heavily, keep pressure with a clean cloth and wait for emergency responders. Open fractures carry a higher risk of infection, so they are not “watch and see” injuries. They are “get help now” injuries.
Step 3: Leave the arm in the position you found it
This step saves people from making the most common mistake. If the injured arm is bent, cradled, or hanging at an awkward angle, resist the urge to force it straight. Painful does not automatically mean better when straightened. In fact, forcing the arm into a new position can worsen bleeding, soft-tissue damage, or nerve injury.
Instead, support the arm with your hands or with a folded towel while you prepare the splint. Think of yourself as a human pause button. Your job is to prevent extra motion, not to win an arm-wrestling match against the fracture.
Step 4: Remove tight items and check the hand before splinting
Before swelling gets any bigger, remove rings, bracelets, a watch, or tight sleeves from the injured side if you can do it without moving the arm too much. Swelling can turn jewelry into tiny metal handcuffs in a hurry, and no one enjoys that sequel.
Then quickly check the hand. Look at the fingers. Ask whether the person can feel you touch them. Ask if they have numbness or tingling. Notice whether the hand is warm and pink or cold and pale. This gives you a baseline before splinting. If the hand is already cold, blue, very numb, or very weak, treat it as an emergency.
Step 5: Pad the arm and create gentle support
Now build the temporary splint. For a humerus fracture, this often means bulky padding plus support, not a rigid stick strapped aggressively to the arm. Place a folded towel, soft clothing, or padding between the injured arm and the side of the chest. This cushions the arm and reduces unwanted movement.
If you have proper splinting material and know how to use it, the splint should extend enough to control motion above and below the injured area without forcing the arm into a painful new position. In many everyday first-aid situations, though, the torso acts as the practical stabilizer. That is why upper-arm fractures are so often managed temporarily with a sling and swathe. The point is protection, not perfection.
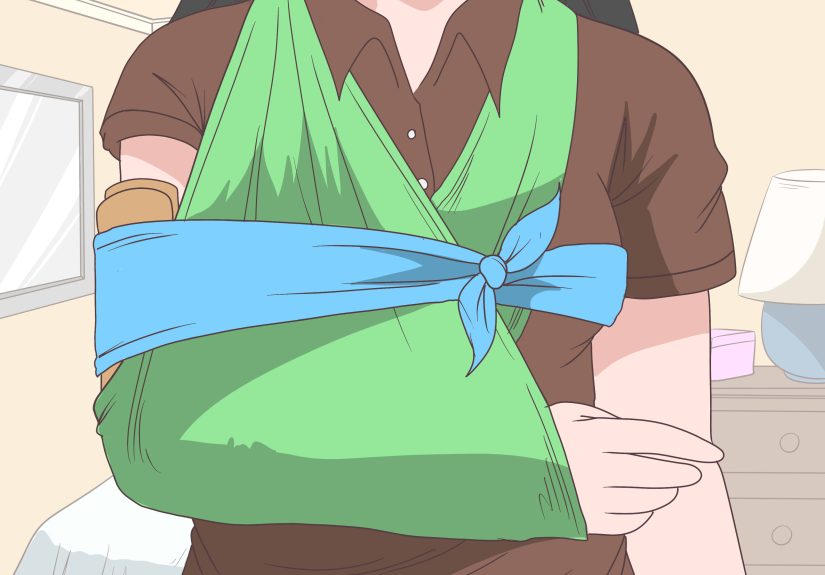
Step 6: Apply a sling, then secure the arm to the body
Once the arm is padded and supported, apply a sling. A triangular bandage is ideal, but a scarf, shirt, or folded cloth can work in a pinch. The elbow should usually be supported in a comfortable bent position, and the wrist should not droop out of the end of the sling. If the sling is too short or too loose, it stops being a helpful support and becomes decorative fabric.
After the sling, add a swathe. That means wrapping another broad cloth or bandage around the arm and chest to secure the arm gently against the torso. This reduces shoulder and upper-arm movement, which is exactly what a painful humerus fracture does not want. Make it snug enough to support the arm, but not so tight that breathing feels restricted or the fingers begin to look pale or cold.
Step 7: Add ice and recheck circulation after splinting
Apply an ice pack wrapped in cloth to the area for short periods to help with pain and swelling. Do not place ice directly on the skin. This is first aid, not frostbite speedrun. Cooling the area can make transport easier and may reduce swelling while you wait for help or head to urgent care or the emergency department.
Most importantly, check the hand again after the splint and sling are in place. Look for color. Ask about numbness or tingling. Make sure the fingers are not becoming colder, paler, or more painful. If symptoms worsen after splinting, loosen the wrap. A splint that cuts off circulation is not a treatment plan. It is a plot twist.
Step 8: Get medical care and keep monitoring during transport
Even if the splint looks beautiful and the person says, “It’s probably fine,” assume they still need medical evaluation. Humerus fractures usually require X-rays and a treatment decision based on the location and severity of the break. Some people do well with a sling, brace, or splint. Others need surgery, especially when the bone is displaced, the fracture is complex, or nerves and blood vessels are involved.
During transport, keep the person seated or positioned comfortably, continue to support the injured arm, and recheck the fingers every so often. If pain climbs sharply, swelling balloons, or the hand changes color or sensation, seek emergency care immediately. A calm trip to the ER beats a heroic but unnecessary detour every time.
Common Mistakes to Avoid
Mistake one: trying to straighten the arm. This is the classic “I saw it in a movie” error. Movies also feature explosions with suspiciously good hair. Real first aid is quieter. Leave the arm where it is most comfortable unless a clinician instructs otherwise.
Mistake two: tying the splint too tightly. Wrapping the arm like a holiday ham can reduce circulation and make nerve problems worse. A proper splint stabilizes without strangling.
Mistake three: forgetting the hand. The fracture may be in the upper arm, but the fingers tell you a lot. Color, warmth, sensation, and movement matter before and after splinting.
Mistake four: treating an open fracture like a regular bruise. Bone through skin, heavy bleeding, or a visibly misshapen limb deserves urgent evaluation. That is not the time for “let’s see how it feels tomorrow.”
Mistake five: assuming movement means it is not broken. People can sometimes move a fractured limb a little, especially through sheer stubbornness. Pain, swelling, bruising, deformity, and loss of function matter more than bravado.
What Happens After the Splint?
Once a patient reaches medical care, the next steps usually include an exam, X-rays, pain control, and a closer look at circulation and nerve function. Some humerus fractures are treated without surgery using a sling, splint, cast, or functional brace. Others need operative repair with plates, screws, rods, or other fixation devices. The decision depends on where the fracture is, whether the bones are displaced, whether the fracture is open, and whether nearby nerves or blood vessels are injured.
Recovery is not instant. Even when pain improves early, bone healing takes time. Some patients need physical therapy later to restore shoulder, elbow, and arm motion. That is why the first-aid phase matters so much. Gentle immobilization at the beginning can reduce further damage and make everything that follows a little less dramatic.
Experience-Based Lessons From Real-World Humerus Fracture Situations
When you read enough clinical guidance and first-aid recommendations, a few consistent real-world patterns stand out. The first is that humerus fractures rarely happen in a neat, textbook mood. They happen on basketball courts, stairways, wet driveways, bike trails, and living-room floors after a missed step that seemed harmless right up until it wasn’t. The second is that people almost always underestimate how much a broken upper arm can hurt and how hard it becomes to move the shoulder, elbow, and hand as one unit. It is not just “arm pain.” It is a full-system complaint that gets the body’s attention fast.
Another common experience is panic caused by deformity or swelling. The arm may look wrong. The shoulder may seem dropped, or the upper arm may swell so quickly that families assume the worst. In those moments, the people who do best are usually the ones who get very boring, very fast. They stop trying to inspect the injury from twelve creative angles. They stop asking the patient to “just move it a little.” They support the arm, cover wounds if present, remove jewelry, keep the person still, and focus on getting help. It is not flashy, but it works.
One especially useful lesson from real cases is that comfort often improves when the arm is supported against the body rather than suspended awkwardly in space. A towel between the arm and chest, a well-fitted sling, and a broad wrap around the torso can make a dramatic difference. Patients often describe that moment as the first time the arm feels protected instead of loose and vulnerable. In other words, a good splint does not just immobilize. It reassures.
There is also a repeated lesson about circulation checks. In actual first-aid situations, people tend to remember the sling and forget the fingers. But fingers are the report card. If the hand starts to look pale, blue, or cold, or if numbness worsens after wrapping, the splint needs attention and the patient needs urgent reassessment. That simple recheck can catch problems early. Experienced responders know that what happens below the injury matters just as much as what hurts above it.
Another real-world truth is that not every humerus fracture is treated the same once the patient reaches the hospital. Some patients go home in a sling or brace. Others need a formal coaptation splint, closer monitoring, or surgery. That variation is exactly why first aid should stay in its lane. Temporary stabilization is enough. The point is not to predict the final treatment from the driveway. The point is to hand off a protected, monitored patient to professionals who can image the injury and decide the next step.
Finally, the most practical experience-based lesson is this: the calmest person in the room becomes part of the treatment. Pain rises when chaos rises. Splinting goes better when one person supports the arm, one person gathers materials, and everybody uses indoor voices. A broken humerus is serious, but it is also manageable when first aid stays simple. Support the arm. Avoid heroic repositioning. Check the hand. Get medical care. Sometimes the smartest response is not dramatic at all. It is careful, calm, and just a little stubborn about doing the basics well.
Conclusion
Splinting a humerus fracture is all about safe temporary immobilization. Keep the arm in the position found, pad it well, support it with a sling, secure it gently to the body, and keep checking the hand for circulation and sensation. Do not try to realign the bone, and do not ignore red flags like open wounds, heavy bleeding, numb fingers, or a pale, cold hand. When in doubt, choose the safer path: less movement, more support, and faster medical care. That approach may not look dramatic, but it is exactly what good first aid is supposed to be.