Table of Contents >> Show >> Hide
- Why a Computer Armoire Makes an Amazing Cricut Cabinet
- Step 0: Pick the Right $60 Armoire (Because Not All “Deals” Are Friends)
- Plan Your Layout Like a Crafter (Not Like a Furniture Catalog)
- Tools and Materials You’ll Likely Need
- Step-by-Step: Convert the Armoire Into a Cricut Craft Cabinet
- 1) Empty It, Strip It, and Label What Comes Off
- 2) Clean Like Paint Depends on It (Because It Does)
- 3) Repair and Reinforce the Structure
- 4) Prep and Paint for a Finish That Lasts
- 5) Build the “Cricut Zone” (Stable, Centered, and Uncluttered)
- 6) Add Storage That Matches Your Materials (Vinyl, Mats, Tools, and Paper)
- 7) Use the Doors Like Bonus Walls (Pegboard = Instant Sanity)
- 8) Add Lighting and Power (So You’re Not Crafting in a Cave)
- 9) Finish With Hardware, Labels, and One “Pretty” Detail
- Sample Budget Breakdown (Yes, You Can Keep It Reasonable)
- Safety and Durability Tips (Quick, Not Preachy)
- Conclusion: A Cricut Craft Cabinet That Hides (and Organizes) the Chaos
- Real-World Experiences () From People Who’ve Done This Kind of Cricut Cabinet DIY
Picture this: you score a slightly-awkward, early-2000s computer armoire for about $60complete with a keyboard tray that squeaks like a haunted violin. It’s bulky, it’s dated, and it’s somehow still heavier than your entire Cricut tool collection combined. But here’s the twist: that “outdated office furniture” is secretly the perfect foundation for a compact, close-the-doors-and-look-like-a-responsible-adult Cricut craft cabinet.
This DIY guide walks you through converting a bargain computer armoire into a functional Cricut craft station with storage for vinyl, tools, mats, paper, and all the little accessories that love to disappear the moment you need them. We’ll keep it practical, budget-friendly, and polished enough that you won’t feel the urge to apologize to guests for “the craft explosion in the corner.”
Why a Computer Armoire Makes an Amazing Cricut Cabinet
Computer armoires were designed to hide chaos: towers, printers, cords, disks, and the emotional baggage of dial-up internet. That “hide it all behind doors” design is exactly what most crafters want todayespecially if your craft area shares space with a living room, bedroom, or home office.
Even better, these armoires often come with built-in features you can repurpose:
- Pull-out trays that can become a Cricut platform, weeding tray, or laptop shelf.
- Vertical compartments originally meant for CPU towershello, vinyl roll storage.
- Adjustable shelves that can be reconfigured for cardstock, blanks, and materials.
- Doors that can hold pegboard, hooks, bins, or tool rails without stealing floor space.
Step 0: Pick the Right $60 Armoire (Because Not All “Deals” Are Friends)
Before you fall in love with the price tag, do a quick “craft cabinet eligibility check”:
Look for These Features
- Solid structure: Doors hang straight, hinges aren’t pulling out, and the base feels stable.
- Enough depth: Your Cricut needs space front-to-back for material feed. Measure your machine and add breathing room.
- Interior flexibility: Adjustable shelves or open bays you can customize.
- Door swing clearance: Make sure doors can open fully where you plan to place it.
Proceed With Caution If You See…
- Swollen particleboard: Water damage is hard to truly “fix,” and paint won’t perform miracles.
- Musty odor: If it smells like a basement from 1998, it may keep smelling like that forever.
- Wobbly back panel: Not a deal-breaker, but you may need to reinforce it.
Plan Your Layout Like a Crafter (Not Like a Furniture Catalog)
The best Cricut craft cabinet setups support a simple workflow: design → cut → weed/assemble → store. Your armoire layout should match how you actually craft, not how you wish you crafted during your most organized fantasies.
A Simple (Very Real-Life) Cricut Cabinet Layout
- Middle zone (prime real estate): Cricut machine on a stable shelf or pull-out platform at a comfortable height.
- Upper shelves: Frequently used tools, vinyl sheets, transfer tape, and small bins for blades and accessories.
- Lower zone: Heavier materials, paper stacks, blank tumblers/tees, or a small heat press (if it fits safely).
- Door interiors: Pegboard or hooks for tools (scraper, tweezers, spatula), scissors, rulers, and weeding picks.
Pro tip: Take a photo of the inside, then sketch your plan on your phone (or a sticky note you’ll lose immediatelyyour choice). Identify what stays out on display versus what gets tucked away behind doors.
Tools and Materials You’ll Likely Need
You can keep this build simple or go “custom cabinetry energy.” Here’s a balanced list that covers most upgrades without getting fancy:
Basic Supplies
- All-purpose cleaner/degreaser, microfiber cloths
- Screwdriver/drill, measuring tape, level
- Wood filler, putty knife, sandpaper or sanding sponge
- Primer and paint (or stain), plus brush/roller
- New cabinet pulls/knobs (optional but highly satisfying)
Organization Upgrades
- Pegboard (or a thin metal pegboard), hooks, small baskets
- Drawer dividers or small containers for blades and tiny tools
- Dowel rods or PVC pipe pieces for vinyl roll cubbies
- Label maker or vinyl labels (yes, your Cricut can label the Cricut cabinetfull circle)
“Worth It” Power + Light Add-Ons
- Plug-in power strip (preferably with surge protection)
- Cable clips/Velcro ties
- LED puck lights or LED strip lights (battery or plug-in)
Step-by-Step: Convert the Armoire Into a Cricut Craft Cabinet
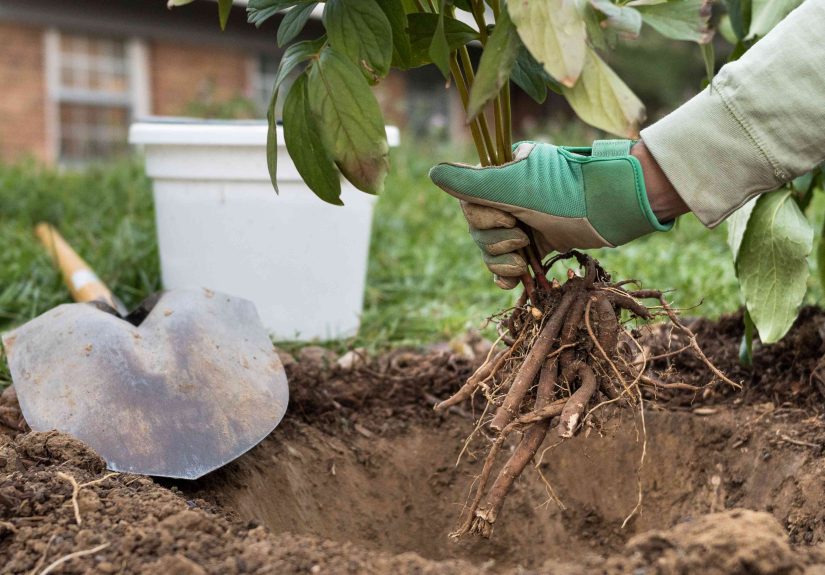
1) Empty It, Strip It, and Label What Comes Off
Remove everything: shelves, keyboard tray, outdated file organizers, random brackets from unknown eras. Take photos as you go. Put screws in labeled bags (or in a cup you swear you’ll remember… until you don’t).
If your armoire has a pull-out keyboard tray, decide now whether it becomes:
- a Cricut pull-out platform,
- a weeding station with a self-healing mat, or
- a “we tried” donation pile item.
2) Clean Like Paint Depends on It (Because It Does)
Old furniture collects furniture-poltergeist grime: dust, oils, and mystery stickiness. Clean all surfaces thoroughly, especially around handles and edges. Let it dry completely before prepping for paint.
3) Repair and Reinforce the Structure
Now’s the time to make it solid:
- Fill unused holes with wood filler.
- Tighten hinges and replace stripped screws (a longer screw often fixes a sagging hinge).
- If the back panel flexes, add a few screws or small braces to stiffen it.
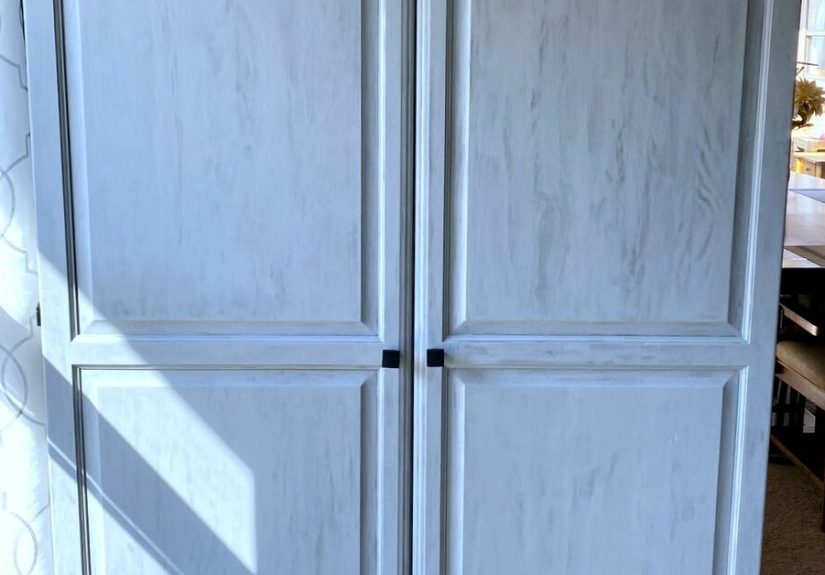
4) Prep and Paint for a Finish That Lasts
Good prep is what separates “Pinterest glow-up” from “why is this peeling already?” Depending on the existing finish, you can lightly sand to scuff the surface or use a deglosser/pre-paint cleaner. Either way, remove dust before priming.
Easy, durable painting approach:
- Scuff sand glossy areas and wipe clean.
- Prime if needed (especially if the piece is dark, stained, or slick).
- Paint 2 coats, allowing proper dry time between coats.
- Optional topcoat on high-wear shelves if you’re rough on your tools (no judgment).
If you want a modern craft-room look, consider painting the interior a lighter color to improve visibility. Dark cabinets hide supplies like they’re playing hide-and-seek professionally.
5) Build the “Cricut Zone” (Stable, Centered, and Uncluttered)
Your Cricut deserves a dedicated parking spot that doesn’t require moving three bins and a pile of vinyl scraps just to start a project.
Option A: Fixed Shelf (Simplest)
Set a shelf at a comfortable height for loading mats and feeding material. Make sure there’s clearance above the machine for opening lids and accessing materials.
Option B: Pull-Out Shelf (Game-Changer)
Use full-extension drawer slides to create a sturdy pull-out platform. This gives you better access when loading materials, and you can push it back in when you’re done and close the doors like a crafting ninja.
Design note: If your armoire is narrow, a pull-out shelf can keep your machine usable without needing the doors fully open all the time.
6) Add Storage That Matches Your Materials (Vinyl, Mats, Tools, and Paper)
Here’s where the magic happenscustom storage that actually fits Cricut life.
Vinyl roll storage ideas:
- Vertical bin method: Use tall bins or baskets so rolls stand upright and stay visible.
- Dowel dividers: Add short vertical dividers (wood dowels or PVC sections) to keep rolls from collapsing into a tangled rainbow.
- Door-mounted organizers: Lightweight rolls can live on door storage if it doesn’t stress the hinges.
12×12 sheets and cardstock:
- Use stackable trays sized for paper and vinyl sheets.
- Keep frequently used colors up front and store “special occasion glitter chaos” separately.
Cutting mats:
- Store mats vertically in a slot, magazine file, or narrow side bay so they don’t warp or collect debris.
7) Use the Doors Like Bonus Walls (Pegboard = Instant Sanity)
Pegboard on the inside of armoire doors is one of the smartest upgrades because it turns dead space into vertical storage. Add hooks for tools, small baskets for blades and caps, and a spot for scissors you won’t have to hunt for.
To keep it looking intentional (not garage-core), frame the pegboard or paint it to match your cabinet. Bonus points for labeling zones: “WEEDING,” “ADHESIVES,” “MEASURING,” and “WHERE DID MY TWEEZERS GO?”
8) Add Lighting and Power (So You’re Not Crafting in a Cave)
Armoires can be shadowy insideespecially once shelves and bins move in. Add simple lighting so you can actually see what you’re doing:
- Stick-on LED puck lights for quick installs.
- LED strip lighting along the interior frame for even illumination.
For power, mount a surge-protected power strip inside the cabinet (screwed in or secured safely), then route cords neatly using cable clips. This keeps your workspace clean and avoids the dreaded “cord spaghetti waterfall.”
9) Finish With Hardware, Labels, and One “Pretty” Detail
Swapping dated handles for modern pulls is the easiest visual upgrade. Then label bins and drawers so supplies return to their homes after projects (in a perfect world… but labels help).
Finally, add one fun touch that makes you want to craft:
- Wallpaper or peel-and-stick liner on the back panel
- A painted accent color inside
- A small inspiration board or mini clipboard for project notes
Sample Budget Breakdown (Yes, You Can Keep It Reasonable)
Your totals depend on what you already have, but here’s a realistic example that stays true to the “$60 armoire” spirit:
- Armoire: $60
- Cleaner + sandpaper: $10–$20
- Primer + paint: $25–$60 (less if you already have some)
- Hardware (optional): $10–$40
- Pegboard + hooks: $15–$40
- Lighting: $10–$30
- Drawer slides for pull-out shelf (optional): $20–$60
If you skip the pull-out shelf and use what’s already inside the armoire, you can often land well under the cost of a brand-new “craft cabinet” marketed specifically for cutting machines.
Safety and Durability Tips (Quick, Not Preachy)
- Ventilate when painting and follow product directions for dry/cure times.
- Don’t overload door storageheavy items can stress hinges and cause sagging.
- Anchor if needed if the piece feels top-heavy, especially in homes with kids or pets.
- Keep heat tools separate unless you’ve built a safe, heat-resistant zone with clearance.
Conclusion: A Cricut Craft Cabinet That Hides (and Organizes) the Chaos
Turning a $60 computer armoire into a Cricut craft cabinet is one of those rare DIY wins that checks every box: it’s affordable, space-smart, and genuinely useful. You’re not just painting furnitureyou’re designing a craft system that supports how you work, keeps supplies visible, and lets you shut the doors when life gets busy.
Start with a sturdy armoire, plan the layout around your workflow, prioritize a stable Cricut zone, and use the doors for vertical storage. When you’re done, you’ll have a cabinet that looks like furniture, functions like a mini craft studio, and makes it way easier to say, “Sure, I can make that!” without first clearing off a whole table.
Real-World Experiences () From People Who’ve Done This Kind of Cricut Cabinet DIY
In real life, converting an armoire into a Cricut craft cabinet tends to go through three very predictable phases: confidence, chaos, and conversion to total happiness. If you’ve ever started a project thinking, “This will take one weekend,” congratulationsyou’re officially part of the DIY tradition.
Most people report the biggest surprise is not the buildingit’s the planning. The armoire looks spacious until you start assigning homes to supplies. Vinyl rolls are long. Cutting mats want to stay flat. Tools multiply. The “tiny little accessories” (replacement blades, housings, tips, caps, adapters, tiny screws) quickly demand their own dedicated container. A common lesson is to build in a “small parts” drawer earlybecause if those items end up in a catch-all bin, you’ll spend more time rummaging than crafting.
Another frequent experience: the paint stage is either delightful or humbling. When prep is skipped, people often notice chipping around door edges and handles firstexactly where hands touch constantly. The crafters who are happiest long-term usually did one unglamorous thing: they cleaned thoroughly, scuffed or deglossed properly, and respected dry time. It’s not exciting, but it’s the difference between “sleek craft cabinet” and “why is my cabinet shedding?”
Pull-out shelves get rave reviewswhen they’re built for real weight. Many DIYers love being able to slide the Cricut forward for easy loading, then push it back to close the doors. But the best experiences come from using sturdy, full-extension slides and a thick enough shelf so it doesn’t sag. People who tried to “make it work” with flimsy rails often ended up rebuilding that part later. The universal takeaway: the Cricut shelf is not the place to cut corners (even though you literally bought the armoire because it had corners to cut).
Door storage is a crowd favorite, with one warning: it’s easy to overdo it. Pegboard hooks and small baskets are fantastic for lightweight tools, but heavy items can make doors feel strained over time. A common strategy is to store only the items you use constantly on the doors (weeding tools, scraper, scissors, ruler), while heavier supplies live on shelves or in drawers. People also love adding labelsespecially when crafting is shared with family membersbecause it turns “Where is the transfer tape?” into “It’s literally labeled TRANSFER TAPE.”
Finally, the best experiences come from treating the cabinet like a system, not a storage dump. Crafters who keep a “project-in-progress” bin (one per active project) say it prevents the cabinet from turning into a jumble. Others swear by a quick reset routine: toss scraps, re-hang tools, and restock the top shelf after each crafting session. The end result is the same: a cabinet that makes crafting feel easier, faster, and way more enjoyablebecause your supplies stop running your life, and start supporting it.