Table of Contents >> Show >> Hide
- Why a screen works so well for jewelry
- Choose the right screen material
- The easiest build: a picture frame screen jewelry organizer
- Three design variations (pick the one that fits your space)
- Make it work for studs, necklaces, and bracelets
- Go big: old window frame or screen door jewelry wall
- How to make it look “intentional” (not accidental)
- Example layout: organize a 30-pair earring collection in under 10 minutes
- Common problems and quick fixes
- Maintenance (so it stays cute)
- Where to find materials (and how to prep them)
- Conclusion
- My Real-World Notes: What I Learned Making a Screen Jewelry Organizer
Some people collect jewelry. Other people collect tiny, tangled problems that happen to sparkle. If your earrings are currently freelancing as drawer confetti (and your necklaces have formed a knot-ty book club), a screen-based organizer is about to change your life.
Here, “screen” means window screening, screen-door mesh, or decorative metal meshthe stuff with ready-made holes. Those holes are perfect for earring hooks, helpful for hoops, and (with a few add-ons) surprisingly useful for necklaces and bracelets. The result can look like wall art, not storage.
Below you’ll find a step-by-step build, a few design variations, and practical tips so the organizer stays tight, tidy, and sturdy instead of turning into a wavy jewelry hammock.
Why a screen works so well for jewelry
- Instant “hangers” for earrings: slide hooks through mesh openings.
- Visible = wearable: you stop forgetting what you own (and rebuying duplicates “by accident”).
- Easy to customize: add hooks, knobs, shelves, or a stud strip based on your collection.
- Doubles as décor: a good frame makes organization feel intentional.
Choose the right screen material
Fiberglass window screen
Best for: lightweight hook earrings and quick builds. It cuts easily and is widely available, but it can sag if it isn’t stretched tight.
Aluminum screen or decorative perforated aluminum sheet
Best for: a crisp, modern look and better stiffness. Handle edges carefullycut metal can be sharp, and some perforated sheets can crack if you bend them.
Chicken wire or hardware cloth
Best for: rustic “statement” organizers and heavier pieces. It’s sturdy, but the cut ends can be very sharpgloves are your friend.
Craft mesh, lace, or cross-stitch fabric
Best for: a softer, decorative look. Pick something stiff enough to stay taut over time.
Skip these
- Rusty wire (it can stain jewelry and walls)
- Super-stretchy mesh (it will droop)
- Unfinished sharp edges (they’ll snag fingers and fabric)
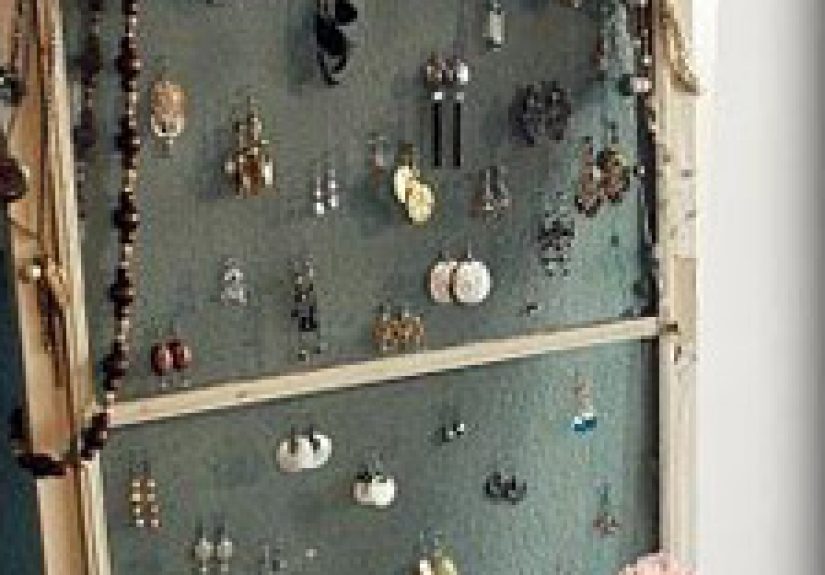
The easiest build: a picture frame screen jewelry organizer
This is the “one-thrift-store-trip” version: a frame becomes the structure, and the screen becomes the organizer. Hang it on the wall or lean it on a dresser.
Materials & tools
- Picture frame (deeper frames are easiest)
- Screening (fiberglass, aluminum screen, or decorative metal mesh)
- Staple gun and staples or heavy-duty tacks or strong craft adhesive
- Scissors/tin snips (match to your screen type), ruler, pencil
- Optional: paint, sandpaper, backing board + fabric/paper, cup hooks/knobs
Step-by-step
- Remove glass and backing. You’ll replace the “picture” with your screen.
- Refinish the frame (optional). Lightly sand, wipe clean, and paint/stain. Let it dry completely.
- Measure the opening. Cut your screen about 1–2 inches larger on each side than the opening so you have room to attach it.
- Stretch the screen tight. Center it on the back of the frame. Staple the top edge, then the bottom edge, then the sidesworking opposite sides to keep tension even.
- Tap down staples and trim. If staples sit proud, tap them with a hammer. Trim excess screen close to the staples.
- Add a clean backing (optional but worth it). Reinstall the original backing board behind the screen, or add cardboard/foam board covered in fabric or scrapbook paper. This looks polished and keeps earring backs from scraping the wall.
- Hang it securely. Add picture-hanging hardware. If you’ll load it up, use a stud or a quality wall anchor.
Three design variations (pick the one that fits your space)
1) The “leaning frame” countertop organizer
If you rent, hate wall holes, or like changing your setup every other Tuesday, build the frame version and simply lean it on a dresser. Add stick-on rubber bumpers to the bottom corners so it doesn’t slide, and keep heavier necklaces off the top edge (gravity is helpful, not chaotic).
2) The “cork + screen” hybrid for necklaces and earrings
Want a one-stop station? Mount your screen frame above a fabric-covered cork board. Use pushpins for necklaces and bracelets on the cork, and use the screen for hook earrings. This combo keeps chains separated while your earrings stay visible and easy to grab.
3) The “double-duty” hinged organizer
Use two matching frames and connect them with small hinges like a folding display. One side can hold screen for dangles, while the other side can hold foam for studs or a fine perforated sheet. It’s great for closets and vanities because it stands on its own.
Make it work for studs, necklaces, and bracelets
Stud earrings: add a “stud strip”
- Foam insert: glue a strip of upholstery foam along one edge; cut shallow slits and slide posts in.
- Fine perforated sheet: swap in a decorative metal sheet with smaller holes.
- Cork strip: cover cork with fabric and push posts through like pins.
Necklaces and bracelets: add hooks with breathing room
Screw small cup hooks or knobs along the bottom rail of the frame. Give each chain its own hook so detangling doesn’t become your cardio. For extra control, hang necklaces by length (short to long) so chains don’t overlap and tangle as you lift pieces on and off.
Go big: old window frame or screen door jewelry wall
If you want a boutique-style display, use an old window frame, empty sash, or screen-door panel. Many designs mix materialswire mesh for dangle earrings, pegboard for hooks, and a row of knobs for necklaces. It’s also a smart option if you own larger statement pieces that need more vertical spacing.
Build notes
- Safety: If there’s glass, remove it carefully with gloves and eye protection. Old glazing points/pins are sharp.
- Fit matters: Cut inserts to fit each opening snugly, then fasten with staples, screws + washers, or glazing points.
- Mount like it’s heavy… because it will be: large organizers can gain weight fast. Aim for studs or heavy-duty anchors rated for the load.
How to make it look “intentional” (not accidental)
- Match the style: thin black frame + aluminum screen feels modern; distressed wood + chicken wire reads farmhouse.
- Use contrast: a fabric-backed board behind the screen makes jewelry pop and looks finished.
- Leave space: earrings aren’t flatgive rows enough room so pieces don’t tangle with neighbors.
- Keep categories together: a simple layout (studs left, dangles right, hoops in the middle) makes getting ready faster.
Example layout: organize a 30-pair earring collection in under 10 minutes
- Top row: everyday studs (use foam or a fine perforated sheet).
- Middle rows: dangles and statement earrings (screen mesh shines here).
- Bottom corners: “special occasion” pairs you don’t wear weekly (still visible, but out of your daily traffic).
- Rule of thumb: leave one empty column/strip as a buffer. It gives you room to add new pieces without reorganizing the entire board.
Common problems and quick fixes
- Screen is sagging: re-stretch and staple, alternating opposite sides. Consider sturdier mesh for larger frames.
- Edges are sharp: fold cut wire inward with pliers, then cover the perimeter with ribbon, tape, or trim.
- Studs fall out: add foam/cork, or hang studs on their original earring cards.
Maintenance (so it stays cute)
- Dust the mesh: a soft brush or microfiber cloth once a month keeps things fresh.
- Check fasteners: if tension loosens, add a couple of staples where the screen is slack.
- Seasonal reset: once in a while, take everything off and rehang by typethis is where you rediscover pieces you forgot existed.
Where to find materials (and how to prep them)
Frames: Thrift stores, garage sales, and discount home shops are gold mines for deep framesespecially the kind with a slightly chunky profile that leaves room behind the mesh for earring backs. If the frame is scratched, that’s not a deal-breaker; paint covers a multitude of sins. Just make sure the corners feel solid (a frame that wiggles now will wobble forever).
Screening: Hardware stores sell replacement window screen by the roll (fiberglass or aluminum), plus sturdier wire mesh like hardware cloth. You can also repurpose a clean, undamaged screen from an old window or screen doorjust avoid anything rusty or bent beyond repair. For a more decorative look, craft stores sometimes carry stiff mesh and needlework fabrics with evenly spaced holes.
Prep tips: Wash salvaged screens with mild soap and water, let them dry fully, and wipe down frames before painting. If you’re using wire mesh, take two minutes to tame the sharp bits: fold cut ends inward with pliers or cover the perimeter once it’s attached. Your fingers (and your sweaters) will appreciate the extra care.
Conclusion
Turning a screen into a jewelry organizer is the rare DIY project that keeps paying you back: it saves time, prevents tangles, and makes your collection easy to see (and actually wear). Start with a simple picture frame build, upgrade with hooks and a stud strip, andif you’re feeling bravegraduate to a full window-frame jewelry wall that doubles as décor.
My Real-World Notes: What I Learned Making a Screen Jewelry Organizer
The first time I tried this project, I assumed window screen would behave like a well-trained sheet. I cut the mesh exactly to the frame opening, tried to staple it down, and ended up with a wavy trampoline that made my earrings look like they were displayed on rough seas. The fix was simple, but not obvious: cut the screen larger so you have something to pull on, and staple like you’re tightening a drumtop, bottom, left, right, repeating in small steps until the tension is even.
The second lesson was that “holes” are personal. Fiberglass screen is amazing for hook earrings, but it can be annoying for studs and certain hoops. My collection is mostly studs (because I’m a creature of habit), so I added a skinny strip of upholstery foam along the bottom of the frame. I cut shallow slits with scissors and slid the posts in. It instantly made studs easy to grab, and it stopped that daily scavenger hunt for matching backs. If you hate foam, a fine perforated metal sheet does the same job with a sleeker look.
Then there’s the frame depth issue. Shallow frames look nice, but they don’t leave much room behind the mesh for earring backs. When the organizer sat flat against the wall, removing earrings felt like trying to unhook a fish while wearing mittens. Spacers solved it: a couple of rubber bumpers (or felt pads) on the back corners created a small gap, protected the wall, and made everything easier to remove. It also cut down on that “clink-clink” sound that makes you feel like you’re robbing your own jewelry box at 6 a.m.
My most practical surprise was how quickly weight adds up. Ten pairs of earrings are light. Fifty pairs plus necklaces and bracelets turns a cute frame into a small shiny kettlebell. If you plan to hang it, use real picture hardware, not a mystery hook from the bottom of a junk drawer. On my first try, I used a cheap adhesive hook and watched the whole thing slump like a disappointed houseplant. Now I either anchor into a stud or use a rated wall anchor, and I keep heavy necklaces on sturdier hooks spaced far enough apart that chains don’t braid themselves together.
Finally, the “human behavior” lesson: organization only sticks if it’s easy and visible. When my organizer lived where I got readyand looked nice enough to count as décorI used it. When I tucked it in a closet, I went back to the pile method like a raccoon collecting shiny objects. So I styled the organizer on purpose: matching frame color to the room, leaving breathing space between rows, and putting everyday favorites at eye level. Suddenly, the system wasn’t just storageit was a little reminder that I actually own good accessories, and I should probably wear them.