Table of Contents >> Show >> Hide
- What Are Grow Bags (and Why Do Gardeners Love Them)?
- Step 1: Choose the Right Grow Bag (Size, Material, and Color)
- Step 2: Choose the Best Location (Sun, Wind, and What’s Under the Bag)
- Step 3: Use the Right Soil Mix (This Is Where Most Problems Begin)
- Step 4: Fill the Grow Bag Correctly (No, Don’t Fill It Like a Sack of Cement)
- Step 5: Plant (or Transplant) Like You Mean It
- Step 6: Watering Grow Bags (The Make-or-Break Skill)
- Step 7: Fertilizing (Because Containers Don’t Refill Nutrients by Magic)
- Step 8: Support and Stability (Stop Your Plants From Face-Planting)
- Step 9: Ongoing Care (Mulch, Prune, and Monitor Like a Calm Detective)
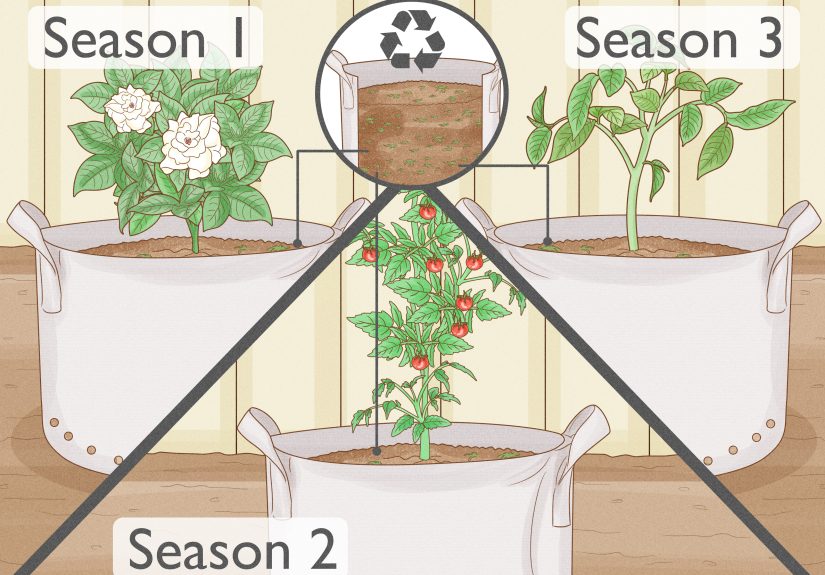
- Step 10: End-of-Season Cleanup and Reuse
- Troubleshooting: Common Grow Bag Problems (and Quick Fixes)
- Quick Step-by-Step Checklist
- Conclusion
- Real-World Grow Bag Lessons ( of Practical Experience)
Grow bags (also called fabric pots or growing bags) are the “choose-your-own-adventure” version of container gardening: you can grow a patio tomato jungle, a tidy herb corner, or a potato treasure huntwithout committing to a permanent raised bed. They’re lightweight, breathable, and surprisingly forgiving… as long as you remember one thing: fabric dries out faster than plastic. (Yes, your plants will judge you if you forget to water. They’re polite about it, but they’ll judge you.)
This guide walks you through exactly how to set up and use grow bags, from picking the right size to watering like a pro, troubleshooting common problems, and keeping your plants thriving all season. Let’s get those roots living their best lives.
What Are Grow Bags (and Why Do Gardeners Love Them)?
Grow bags are flexible containers made from breathable fabric (often felt-like, nonwoven material). The fabric allows extra air to reach the root zone and helps excess water drain away. When roots hit the bag’s edge, they tend to stop “circling” and instead branch into more fine rootsoften called “air pruning.” In plain English: more fibrous roots can mean better water and nutrient uptake.
Big perks
- Excellent drainage (helpful if you’ve ever loved a plant to death with water).
- Healthier root structure compared to circling roots in hard plastic pots.
- Portabilitymove plants to chase sun, dodge storms, or hide from a surprise frost.
- Space-friendly for patios, balconies, driveways, front stepsany sunny spot works.
Trade-offs (aka “the part where grow bags keep you humble”)
- They dry out faster, so watering is more frequentespecially in heat or wind.
- They can wear out over seasons (fabric + sun + water is a tough long-term relationship).
- They need stable footinga tall plant in a soft-sided bag can tip if you don’t plan ahead.
Step 1: Choose the Right Grow Bag (Size, Material, and Color)
Pick the right size (the “root rent” must be paid)
Bag size is usually listed in gallons. Bigger isn’t always mandatory, but it’s almost never a mistake for fruiting plants. Use these as practical starting points:
- 1–3 gallons: herbs, lettuce, small flowers, green onions
- 5 gallons: peppers, eggplant, compact cucumbers (with a trellis), bush beans
- 7–10 gallons: determinate tomatoes, larger peppers, larger herbs (like rosemary)
- 10–15+ gallons: indeterminate tomatoes (or any tomato you want to spoil), squash (with support), larger roots
- 10–20 gallons: potatoes (more soil volume = more room for tubers and “hilling”)
- 25–60 gallons: “mini raised bed” style plantingmultiple plants in one bag
Quick reality check: a small bag can grow a plant; it just may grow a smaller plant with smaller yields and bigger watering demands. If you’re the type who sometimes forgets where you put your phone while you’re holding it, size up.
Material and build quality
- Thick fabric + sturdy stitching lasts longer and holds shape better.
- Reinforced handles matter if you’ll move bags mid-season (wet soil is heavy).
- Lined vs unlined: lining can slow evaporation in hot weather, but unlined bags breathe and drain faster.
Color and heat
Dark bags can heat up more in full sun. In hot climates or on heat-reflecting surfaces (concrete, asphalt), consider lighter colors, shade cloth for the bag itself, or placing bags where they get morning sun and a break from brutal afternoon heat.
Step 2: Choose the Best Location (Sun, Wind, and What’s Under the Bag)
Treat grow bags like you would any container: they need the right light, and they’re at the mercy of wind and temperature swings.
Sunlight basics
- Vegetables: aim for 6–8 hours of sun, especially for fruiting plants (tomatoes, peppers, cucumbers).
- Leafy greens: tolerate partial shade and often appreciate afternoon shade in summer.
Put something smart underneath
Grow bags drain well, so water will come out the bottom. Options:
- On soil/grass: great drainage; roots may grow through the bottom and “anchor.” (Moving later gets harder.)
- On concrete/decking: use a saucer, plant caddy, or a tray to protect surfacesthen empty standing water after watering.
- On gravel: helps drainage and reduces mess.
Wind matters more than you think
Fabric pots dry faster in wind. If your patio is a wind tunnel, plan on more frequent watering, add mulch, and stake taller plants early.
Step 3: Use the Right Soil Mix (This Is Where Most Problems Begin)
Grow bags are containers, not garden beds. That means you want a potting mix (light, airy, drains well), not heavy garden soil. Garden soil compacts in containers, drains poorly, and can lead to stressed roots.
A simple, reliable grow bag mix
- High-quality potting mix as the base (look for mixes with perlite/vermiculite for aeration).
- Compost (optional, but helpful) to improve nutrient holding.
- Slow-release fertilizer at planting time if your mix doesn’t include it (follow the label).
Two myths to skip
- “Put rocks at the bottom for drainage.” In containers, this can backfire and create a water-saturated zone above the rocks.
- “Pack the soil down tight.” Roots like oxygen. Keep it fluffy.
Step 4: Fill the Grow Bag Correctly (No, Don’t Fill It Like a Sack of Cement)
- Fluff your potting mix in a tub or wheelbarrow so it’s airy, not compressed.
- Pre-moisten the mix so it’s evenly damp (like a wrung-out sponge). Dry peat-based mixes can be hard to re-wet later.
- Fill the bag to within 1–3 inches of the top to leave a watering “reservoir.”
- Don’t mash it down. Lightly settle it, but keep pores open for airflow and water movement.
Special case: potatoes
Potatoes are a “layering” crop. Start with only a few inches of soil, plant seed potatoes, then add more soil gradually as the plants grow. That keeps developing tubers in darkness and encourages more production.
Step 5: Plant (or Transplant) Like You Mean It
For transplants (tomatoes, peppers, herbs)
- Dig a hole slightly wider than the root ball.
- Set the plant at the right depth. Tomatoes can be planted deeper; peppers generally go at the same depth as in their nursery pot.
- Backfill gently, firming only enough to remove big air pockets.
- Water thoroughly until water drains from the bottom.
For seeds (greens, beans, carrotsyes, carrots, if the bag is deep enough)
- Level the surface and sow at the recommended depth.
- Mist or water gently so you don’t blast seeds into next week.
- Keep consistently moist until germination.
Step 6: Watering Grow Bags (The Make-or-Break Skill)
Here’s the deal: grow bags breathe, which is great for roots, but it means they lose moisture fasterespecially in heat and wind. Expect to water more often than you would with plastic pots.
How to water correctly
- Water deeply until you see drainage from the bottom. This encourages deeper roots.
- Water the soil, not the leaves (less disease risk, more efficient).
- Check moisture daily in summerstick a finger 1–2 inches down. If dry, water.
- Morning watering is ideal; mid-day emergencies are allowed, but your plants will still act dramatic.
When it’s really hot
In extreme heat, containers may need watering dailysometimes twice. If daytime temperatures are high and the bag is in full sun, consider these upgrades:
- Mulch the top (straw, shredded leaves, bark, compost) to reduce evaporation.
- Move bags to give plants afternoon shade.
- Drip irrigation or micro-sprayers make watering consistent and less labor-intensive.
Step 7: Fertilizing (Because Containers Don’t Refill Nutrients by Magic)
In containers, nutrients wash out over time with watering. Most grow bag plants benefit from a planned feeding routine. A good strategy is slow-release fertilizer at planting plus periodic liquid feeding as the season progresses.
Simple feeding schedule (general guide)
- At planting: mix in a slow-release fertilizer if your potting mix doesn’t include it.
- Every 2–4 weeks: apply a water-soluble fertilizer or organic liquid feed (follow the product label).
- Heavy feeders: tomatoes, peppers, cucumbers, squash often need more consistent feeding once fruiting begins.
Tip: If plants are lush and leafy but not flowering or fruiting, you may be overdoing nitrogen. Dial it back and ensure the plant is getting enough sun.
Step 8: Support and Stability (Stop Your Plants From Face-Planting)
Grow bags can be tall-plant-friendly, but you need a plan.
- Tomatoes: add a cage or stake at planting time so you don’t spear roots later.
- Cucumbers and peas: trellis early; they’re climbers, not mind readers.
- Top-heavy bags: use a plant caddy, place bags near a railing/fence for support, or cluster bags together to reduce tipping in wind.
Step 9: Ongoing Care (Mulch, Prune, and Monitor Like a Calm Detective)
Mulch is your secret weapon
A 1–2 inch mulch layer reduces evaporation, buffers temperature swings, and helps prevent soil from splashing onto leaves.
Pruning and cleanup
- Remove yellowing leaves that rest on the soil surface (common disease entry point).
- Thin crowded growth so air circulatesespecially important in humid regions.
- Deadhead flowers (ornamentals) to encourage more blooms.
Pest and disease basics
Containers reduce some soil-borne issues, but pests still show up uninvited. Check the undersides of leaves weekly and look for early signs: chewed edges, stippling, sticky residue, or curled new growth. Address problems early with the least aggressive method first (hand removal, strong water spray, or targeted treatments when needed).
Step 10: End-of-Season Cleanup and Reuse
Grow bags are often reusable for multiple seasons if you clean and store them properly.
- Dump the old mix into a compost pile (if disease-free) or a “resting” pile to amend later.
- Brush off debris and rinse the bag.
- Wash if needed (mild soap and water). Let it dry completely.
- Store dry out of direct sun to slow fabric breakdown.
Troubleshooting: Common Grow Bag Problems (and Quick Fixes)
Problem: “My bag dries out insanely fast.”
- Use a larger bag (more soil volume holds more water).
- Add mulch.
- Water deeply, not in tiny sips.
- Consider drip irrigation for consistency.
- Give afternoon shade in extreme heat.
Problem: “Water runs down the sides and barely soaks in.”
- Your mix may be hydrophobic (common with dried peat-based mixes). Pre-moisten thoroughly before planting.
- Water slowly in pulses to let the mix rehydrate.
Problem: “Leaves are pale, growth is slow.”
- Likely under-fertilized. Start a consistent feeding routine.
- Confirm adequate sun exposurecontainers can drift into shade as seasons change.
Problem: “The plant keeps tipping over.”
- Stake or cage early.
- Use a wider bag or place the bag in a supportive ring/caddy.
- Cluster bags together as a windbreak.
Quick Step-by-Step Checklist
- Choose the right bag size for the crop (bigger for fruiting plants).
- Place bag where it gets appropriate sun and is protected from extreme wind.
- Use potting mix (not garden soil); pre-moisten before filling.
- Fill with 1–3 inches of space at the top; don’t compact.
- Plant and water deeply until it drains.
- Mulch the surface to slow evaporation.
- Water more often than plastic pots; check daily in heat.
- Fertilize on a schedule (slow-release + periodic feeding).
- Support tall/climbing plants early.
- Clean and store bags dry at season’s end.
Conclusion
Grow bags make it ridiculously easy to garden almost anywhere, and they’re especially great when you want good drainage, healthy root structure, and the flexibility to move plants around. The winning formula is simple: good potting mix + consistent watering + steady nutrition. Master those three, and grow bags go from “neat idea” to “why didn’t I do this sooner?”
Real-World Grow Bag Lessons ( of Practical Experience)
Here’s what “experience” with grow bags usually looks like in the real worldmeaning what many gardeners discover after the excitement of planting day wears off and real life shows up with a calendar full of meetings, errands, and that one neighbor who wants to chat exactly when you’re holding a watering can.
Lesson 1: The first heat wave is a wake-up call. Grow bags are champions at draining water, which is fantastic for root health. But once summer heat and wind kick in, that breathability turns into faster evaporation. Many gardeners find that the schedule they used for plastic pots is suddenly “cute” but ineffective. The fix is rarely complicated: water deeply, add mulch, and consider moving bags so plants get morning sun and a break from harsh afternoon rays. It’s not cheatingit’s strategy.
Lesson 2: “I watered yesterday” is not a valid argument. Plants in fabric can go from happy to stressed surprisingly fast. The most reliable habit is the quick finger test: poke 1–2 inches down. If it’s dry, water. If it’s damp, don’t. This keeps you from overwatering while still preventing those dramatic mid-day wilts that make your tomatoes look like they just heard bad news.
Lesson 3: Bigger bags feel like overkill… until you try them. A small bag can absolutely grow a pepper plant, but gardeners often notice a pattern: larger bags mean steadier moisture, less temperature swing, fewer missed-waterings disasters, and often better yields. It’s not that roots demand luxuryit’s that the extra soil volume gives you a bigger buffer against real-life inconsistency. If you’re deciding between two sizes and you have the space, choosing the larger one is usually the lower-stress option.
Lesson 4: Feeding is not optional for heavy producers. Many first-time grow bag users plant into a decent potting mix and assume nutrients will last all season. Then flowering starts, fruits set, and suddenly the plant looks tired and pale. Containers lose nutrients with frequent watering, so experienced growers tend to rely on a simple routine: slow-release fertilizer at planting, then a predictable feeding schedule (every couple of weeks) once plants start growing actively. The consistency matters more than perfection.
Lesson 5: Support early saves headaches later. Waiting to stake tomatoes until they’re tall is like waiting to buy an umbrella until you’re already soaked. When the soil is fresh and roots are small, adding a cage or stake is easy and safe. Once roots fill the bag, forcing in support can damage them and stress the plant. Grow bags are flexible; your timeline should be, too.
Lesson 6: The “bag ecosystem” is a thing. Over a season, the soil surface can crust, algae can appear if it stays constantly wet, and fungus gnats may show up if conditions are too damp. Gardeners often solve multiple issues at once with the same tools: mulch to reduce surface moisture swings, watering at the base, and letting the top inch dry slightly between waterings (for plants that tolerate it). The goal isn’t sterile perfectionit’s balanced conditions where roots are moist and aerated, and pests don’t get a cozy, constant-spa environment.
If you take only one “experience-based” takeaway, make it this: grow bags reward consistency. They’re incredibly productive, but they don’t hide neglect the way in-ground beds sometimes can. Build simple habitscheck moisture, mulch, feed on scheduleand your plants will do the rest. (And yes, you can absolutely brag about it.)