Table of Contents >> Show >> Hide
- What Makes This Tart “French,” Anyway?
- A Quick Recipe Snapshot (Without Copying the Whole Thing)
- Shopping List Energy: Ingredients That Actually Matter
- How It Went in My Kitchen (A Play-by-Play You Can Actually Use)
- The Taste Test: What Does Ina’s French Apple Tart Actually Taste Like?
- Biggest Wins (And What I’d Do Differently Next Time)
- Common Mistakes (So You Don’t Have to Learn the Hard Way)
- Serving Ideas That Feel Very Barefoot Contessa
- Make-Ahead and Leftovers
- Is It Worth Making?
- Bonus: of Real-World “I Tried It” Experience Notes
- Conclusion
Main keyword: Ina Garten French apple tart recipe
There are two kinds of dessert energy in this world: “I baked you something” and “I
baked you something that looks like I have my life together.” Ina Garten’s French apple tart
is firmly in the second categorysleek rows of apples, glossy apricot glaze, and a crust that
whispers, Yes, I definitely own a linen napkin collection.
But here’s the best part: it’s not fussy in the way many French desserts can be. Ina’s version
is famously simplethin pastry, crisp apples, sugar, butter, and a shiny finishing glaze with
a splash of something boozy (or not). It’s the kind of recipe that looks like a pastry case flex,
yet doesn’t require a pastry degree or a dramatic montage with French music.
What Makes This Tart “French,” Anyway?
In American baking, “apple dessert” often means big cinnamon vibes: deep-dish pie, warm spices,
thick filling, and a slice that needs two hands and a nap afterward. A classic French-style apple tart
(often called tarte aux pommes) is typically thinner, more minimalist, and laser-focused on the apple itself.
The fruit is the headline. Everything else is supporting cast.
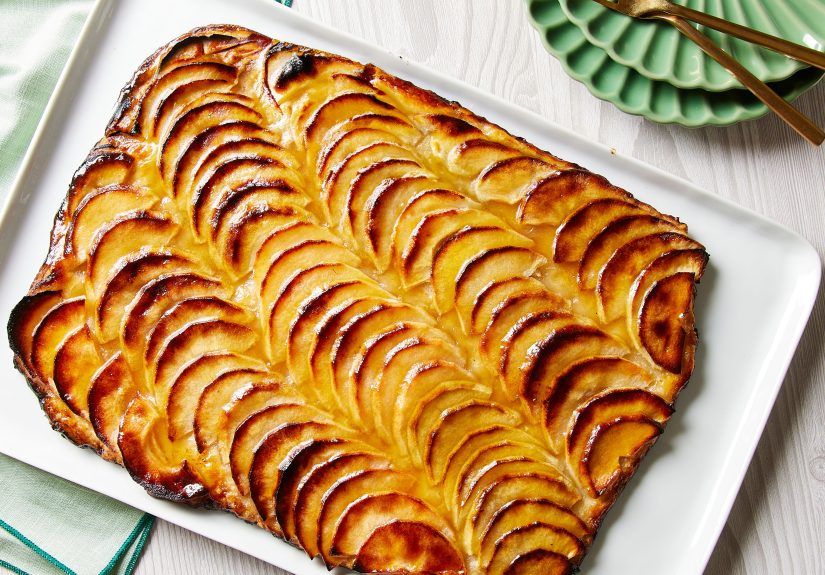
Ina’s French apple tart follows that philosophy. It’s apples arranged in tidy overlapping slices on a
rectangular sheet of pastry, baked until the edges caramelize, then brushed with apricot to make it
shine like it’s ready for its close-up.
A Quick Recipe Snapshot (Without Copying the Whole Thing)
Ina’s version uses a simple, buttery pastry dough (made quickly in a food processor) that chills before you roll it out.
The apples are sliced thin and arranged in diagonal rows. You sprinkle sugar over the top, dot with butter, bake until
the crust browns and the apples start to bronze at the edges, then finish with warmed apricot jelly/jam plus Calvados
(or rum or water).
The vibe is: “This is what happens when ‘simple’ meets ‘stunning.’”
Shopping List Energy: Ingredients That Actually Matter
1) Apples: choose crisp, tart, and sturdy
Ina’s recipe calls for Granny Smith apples, and that choice is doing real work. Tart apples balance the sugar, and firmer
apples hold their shape so you get those elegant slices instead of applesauce confetti. That said, plenty of bakers love mixing
applesone tart variety plus one aromatic sweet-tart varietybecause it adds depth without making the tart cloying.
If you want alternatives, think Honeycrisp, Pink Lady, Jonagold/Jonathan, or a mix. The biggest “pro move” isn’t a specific brand
it’s choosing apples that stay structured when baked and taste like apples, not just sweetness.
2) Butter: cold is non-negotiable
Cold butter is how you get flaky layers in a quick pastry dough. If the butter melts into the flour before baking, you’ll lose that
tender, crisp texture. Translation: when in doubt, chill more than you think you need.
3) Apricot glaze: the secret to bakery-level shine
Apricot jelly (or sieved apricot jam) warmed until brushable gives the tart a professional finish. It’s not only about looks
it adds a gentle fruity sweetness that makes the apples taste brighter and more “finished.”
4) Calvados (or rum, or water): optional, but fun
Calvados is a French apple brandy, and it makes a lot of sense here: apples + apple brandy = harmony. But if you don’t have it,
using water still gives you the glossy glaze effect. If you do have a bottle, the aroma is a subtle little bonus that whispers,
“I’ve been to Paris,” even if you haven’t left your kitchen.
How It Went in My Kitchen (A Play-by-Play You Can Actually Use)
Step 1: The pastry dough is easier than it looks
This dough is refreshingly straightforward: flour, a little sugar and salt, cold butter, and ice water. The food processor does the heavy lifting,
pulsing the butter into pea-sized bits. Once it barely comes together, you stop. No overthinking. No overworking. The dough chills for at least
an hour, which is not Ina being dramaticthis is how the crust ends up crisp instead of cranky.
My takeaway: the dough is “simple,” but it rewards patience. If you rush the chill time, you’ll spend the bake time watching the crust slump like
it just remembered it has Monday emails.
Step 2: Rolling and trimming makes it look fancy
One surprisingly effective detail is trimming the dough into a neat rectangle on a parchment-lined sheet pan. Clean edges instantly upgrade the look.
It’s like hemming your jeans: you don’t need to do it, but when you do, people assume you have a personal tailor.
Bonus: sliding the rolled-out dough back into the fridge while you prep apples keeps everything cold and well-behaved.
Step 3: Apple slicing is where you earn the pretty
Thin, even slices are the whole aesthetic. A mandoline makes this faster and more uniform, but a sharp knife works if you keep your slices consistent.
The apples are halved, cored (Ina suggests a melon baller for a clean core), then sliced crosswise.
Arranging them diagonally in overlapping rows is the magic trick. You’re basically making edible shingles.
Take a breath, line them up, and suddenly you’re starring in your own cooking show.
Step 4: Sugar + butter does the caramelizing
The topping is minimal: a generous sprinkle of sugar and small bits of cold butter dotted over the apples. No cinnamon is the signature move here.
It’s a deliberate choicethis tart is about pure apple flavor, not “apple pie spice latte.”
If you’re the kind of person who feels emotionally unsafe without cinnamon, you can add a whisper of it on your second bake.
But the original is refreshingly clean, especially with tart apples.
Step 5: Baking drama is normal
The tart bakes until the pastry is browned and the apple edges start to caramelize. During baking, you rotate the pan so it browns evenly.
And here’s the important psychological preparation: juices can bubble out and darken on the pan. It may look like your sheet pan is starring in a
disaster movie. This is expected. The tart itself is usually fine.
If a section of pastry puffs up too much, a tiny slit releases steam so the crust settles back down. Think of it as letting the tart exhale.
Step 6: Glaze = “Wow, you made that?”
Warm the apricot jelly/jam with a splash of Calvados/rum/water until it’s brushable, then gently paint it over the apples and crust.
This is where the tart goes from “nice” to “photo-worthy.” It catches the light. It looks glossy and intentional.
The Taste Test: What Does Ina’s French Apple Tart Actually Taste Like?
The best way I can describe it is: crisp, buttery pastry + tender apples + a bright, lightly fruity finish.
It’s not heavy. It’s not overly sweet. It doesn’t taste like a candle labeled “Autumn Memories.”
It tastes like applesclean and sharpbalanced by caramelized sugar and butter.
The crust is thin and flaky rather than thick and bready, which keeps each bite light. And that apricot glaze does more than shine:
it adds a gentle sweetness and a hint of fruit complexity that makes the whole tart feel finished, like a final filter on a photo.
Biggest Wins (And What I’d Do Differently Next Time)
Win: The presentation-to-effort ratio is unreal
This tart looks like you planned your weekend around it, even though the hardest part is slicing apples and not eating them mid-slice.
Win: It’s “company dessert” without being exhausting
The ingredient list is short and familiar. The method is logical. The only “advanced” part is the neat apple layout, and that’s more patience than skill.
Tweak: Watch the apple thickness
If slices are too thick, you risk apples that soften but don’t get that elegant, lightly caramelized edge. If too thin, they can dry out faster.
Aim for thin, consistent slices so the bake is even and the look is polished.
Tweak: Choose apples based on your sweetness preference
Granny Smith gives you tang and structure. If you want a sweeter result, blend in a sweet-tart apple like Honeycrisp or Pink Lady.
A mix can give you the best of both worlds: structure plus aroma.
Common Mistakes (So You Don’t Have to Learn the Hard Way)
1) Warm dough = sad crust
If your dough feels soft or sticky, pause and chill it. This recipe loves cold butter and cold dough.
The fridge is not a suggestion; it’s part of the technique.
2) Skipping the glaze
You can skip it. You also can wear sweatpants to a wedding. Both choices are legal, but one makes the occasion sparkle.
The glaze is quick and delivers big impact.
3) Overloading the apples
The tart is designed to be a thin layer of apples in tidy rows. If you pile them up, the pastry underneath may not crisp properly.
This isn’t an apple pie; it’s an apple showcase.
4) Underbaking the crust
A pale crust is a missed opportunity. You want browned edges and a fully baked base, especially since the apples release moisture.
Bake until the pastry looks confidently golden.
Serving Ideas That Feel Very Barefoot Contessa
- Vanilla ice cream: Classic, simple, and honestly unbeatable.
- Lightly sweetened whipped cream: Soft contrast to crisp apples.
- Crème fraîche: Tangy and grown-up (but still friendly).
- Caramel drizzle: If you want extra indulgence without changing the tart itself.
Make-Ahead and Leftovers
This tart is best the day it’s made because the crust is at peak crispness. You can make the dough ahead and chill it, which spreads out the work.
If you have leftovers, store them covered and rewarm briefly in the oven to bring back some crispness (a microwave will soften the crust).
Is It Worth Making?
If you like desserts that taste bright and not overly spiced, yesabsolutely. If you want something that looks impressive without requiring a rolling pin
duel at sunrise, also yes. Ina’s French apple tart is one of those recipes that feels like a life upgrade: you make it once, and suddenly you have a
“go-to elegant dessert” you can pull out whenever you need to look like a person who owns matching serving platters.
Bonus: of Real-World “I Tried It” Experience Notes
The first thing I learned is that this tart is secretly a time-management recipe. Not because it takes all daybecause it doesn’tbut because it
rewards you for doing things in the right order. Dough first, chill second, apples third, bake fourth, glaze fifth. The moment I tried to get “efficient”
by slicing apples before the dough was fully chilled, I realized I was basically auditioning for “How to Make a Warm Dough Situation.”
Cold dough is calmer dough. It rolls cleaner, bakes flakier, and doesn’t act like it’s trying to escape the sheet pan.
My second lesson: the apple layout is the whole personality of the tart. If you’ve ever frosted a cake and thought, “Well, it tastes good,” you’ll
understand the feeling. The tart will taste good even if your slices are a little chaoticbut the visual payoff comes from taking an extra five minutes
to make the rows neat. What surprised me is how relaxing it becomes once you commit. You overlap a slice, nudge it into place, line up the next one, and
suddenly you’re doing edible geometry. It’s oddly satisfying, like organizing a drawer, but with snacks.
Let’s talk tools, because this is where the recipe can feel dramatically easier. A sharp peeler makes quick work of the apples, and a mandoline turns the
slicing step from “my knife skills are fine” to “I could work in a pastry shop for exactly one day.” The key is consistent thickness so everything bakes evenly.
If you don’t have a mandoline, a steady knife and a little patience still get you therejust aim for uniform slices and don’t rush.
(Also: if you do use a mandoline, use the safety guard. This tart is not worth donating fingertip to the cause.)
During baking, I had my one moment of panic when the juices bubbled out and darkened on the parchment and pan. It looked like I’d accidentally started
a small caramel incident. But the tart itself baked up beautifully, and once the glaze went on, it looked like it belonged on a magazine cover.
That’s the sneaky brilliance of the recipe: it’s forgiving. Slightly messy bake? Glaze covers a multitude of sins. A puffed-up corner of pastry?
A tiny slit lets out steam and everything settles. It’s the kind of dessert that wants you to succeed.
Flavor-wise, the no-cinnamon thing is realand I ended up loving it. Without spices, you notice the apple’s tang, the caramelized edges, and the buttery crust.
The apricot glaze makes the apples taste brighter, almost like they’ve been polished. If you’re serving people who expect “apple dessert = cinnamon,” you can
add a faint dusting of spice on top after the glaze for a gentle bridge. But if you want a dessert that feels clean, elegant, and a little European,
keep it simple and let the apples be the star.
Final practical note: this tart is a dinner-party cheat code. You can make the dough earlier, assemble quickly, and serve it warm or room temp.
It looks impressive on a platter, slices nicely, and pairs with ice cream like it was designed for that exact moment when everyone’s lingering at the table.
In short: it’s the kind of dessert that makes people think you tried very hardwhile you quietly enjoy the fact that you mostly just arranged apples in rows
and let Ina do the rest.
Conclusion
Ina Garten’s French apple tart is what happens when “simple ingredients” meet “high-end results.” It’s crisp, glossy, and apple-forward,
with a flaky pastry base and that signature apricot finish. Make it once and you’ll understand why it’s a repeat dessert: it’s elegant without being exhausting,
and it tastes like fall without shouting about it.