Table of Contents >> Show >> Hide
- Why I Chose a Hybrid Build: Foam for Flex, 3D Prints for Precision
- The Plan That Saved Me (And the Plan That I Forgot to Follow)
- Materials and Tools That Did the Heavy Lifting
- Where the 400+ Hours Went: A Realistic Time Breakdown
- Building the Dragon Head: Foam Skin Over a Printed Skeleton
- The Animation System: Making a Dragon Feel Alive
- Finishing: The Part Where You Learn the Meaning of “One More Sanding Pass”
- Comfort and Convention-Proofing
- 18 Pics: Captioned Build Snapshots You Can Practically See
- What I’d Do Differently Next Time
- Conclusion: The Dragon That Ate My Free Time (And I’m Not Mad About It)
- Extra: of Real Build Experience (The Part No Tutorial Can Fully Teach)
I didn’t set out to spend over 400 hours building an animated dragon cosplay. I set out to build “a cool dragon head.”
You know, something normal. Something that wouldn’t slowly absorb my evenings, my weekends, and my ability to say “no” to new ideas.
But one test-fit became two. A simple jaw became “what if it blinked?” Foam turned into 3D prints. Then wiring showed up like a
raccoon in your garage: uninvited, persistent, and somehow holding snacks.
This is the story (and the practical breakdown) of how foam and 3D printing became the ultimate tag-team for a lightweight,
wearable dragon with animation. I’ll walk you through the design thinking, the build strategy, what ate the most time, and what I’d
do differently if I ever decide to adopt another 400-hour “pet project.” Plus: an 18-caption “photo” gallery you can picture in your head
even if your camera roll is just 37 blurry shots of clamps.
Why I Chose a Hybrid Build: Foam for Flex, 3D Prints for Precision
Dragon costumes ask for two things that don’t naturally get along: big shapes and wearable weight.
Foam (especially EVA) is the MVP for large forms because it’s light, forgiving, and comfortable once padded. But foam alone can get
wobbly when you need crisp symmetrylike teeth that line up, hinges that behave, or mounts that must survive a convention day without
spontaneously becoming modern art.
That’s where 3D prints shine. I used them for “hard truth” parts: internal brackets, hinge housings, servo mounts, tooth sockets, and
alignment keys. Foam became the skin, the volume, and the comfort layer. 3D prints became the skeleton and the “don’t break, please”
components. Together, they let me build something that looked organic but acted engineered.
The Plan That Saved Me (And the Plan That I Forgot to Follow)
Before I cut a single piece of foam, I built what I called a “Dragon Bible.” It was a simple document with four sections:
reference, measurements, mechanics, and mobility.
The goal was to decide what the suit needed to do before I fell in love with features that sounded fun at 1 a.m.
(Spoiler: I still fell in love with features at 1 a.m.)
Reference and silhouette
I pulled together reference images with a consistent stylesame vibe, same scale language. Not “one cute cartoon dragon” mixed with
“one hyper-real film creature” mixed with “my friend’s lizard from 2007.” A coherent look kept my decisions cleaner when I got tired
and started trying to solve problems with optimism.
Wearability rules
My three non-negotiables were: (1) I have to see enough to avoid walking into humans, (2) the head can’t destroy my neck,
and (3) nothing can be so delicate that a doorway becomes my final boss. That meant distributing weight onto a harness/backpack-style
frame and keeping the animated parts modular so repairs could happen without a full dragon disassembly ritual.
Materials and Tools That Did the Heavy Lifting
A build like this is less about “one magic material” and more about picking the right material for each job. Here’s what mattered most:
Foam side
- EVA foam sheets in multiple thicknesses for structure, contouring, and detail layering.
- Contact cement for strong seams and clean edges (used with ventilation and protective gear).
- Heat shaping tools (heat gun) to curve and “train” foam into the dragon’s form.
- Flexible fillers for smoothing seams where needed, without turning the surface into a brittle mess.
3D printing side
- Filament prints for brackets, mounts, alignment keys, and repeatable detail parts (like teeth bases).
- Fasteners (screws, heat-set inserts where appropriate) so key components were removable.
- Finishing supplies for smoothing: sandpaper progression, filler products, primer, and patience.
Animation and electronics
- Servos for jaw and small expressive motions (blink/eye movement optional, depending on ambition).
- Controller (microcontroller or servo driver) to keep motion consistent and tunable.
- Power system sized for runtime, plus safe cable routing and strain relief to survive movement.
- Mechanical linkage materials (hinges, rods, lightweight plates) to translate servo motion cleanly.
Also: clamps. So many clamps. At some point I considered naming them and listing them as dependents.
Where the 400+ Hours Went: A Realistic Time Breakdown
The most surprising thing about long builds isn’t the difficultyit’s the multiplication. One decision creates five follow-up tasks,
and each follow-up task creates two mistakes you only notice after paint. Here’s a realistic breakdown of where my time vanished:
- Design + patterning (60–90 hours): sketching, scaling, foam templates, test fits.
- 3D modeling + printing (80–120 hours): CAD, test prints, revisions, final prints, reprints.
- Foam build + detailing (90–130 hours): cutting, heat forming, assembly, texture work.
- Mechanics + wiring (60–90 hours): mounts, linkages, cable management, troubleshooting.
- Finishing + paint (60–100 hours): filling, sanding, priming, paint layers, sealing.
That doesn’t even count the invisible hours: staring at the ceiling while mentally solving hinge geometry like it’s a personal feud.
Building the Dragon Head: Foam Skin Over a Printed Skeleton
Step 1: Lock the size before you get emotionally attached
I started with the head because it’s the “face” of the cosplay and the easiest place to test the hybrid method.
First, I scaled it to my body: shoulder width, neck position, and where the weight would land. If your dragon head is too big,
you’ll look amazing for six minutes and then you’ll become a cautionary tale.
Step 2: Print the parts that must be precise
The most important printed parts were the jaw hinge system and the servo mount housing. These components needed consistent alignment,
predictable movement, and the ability to be removed for repairs. I designed them to be “serviceable,” meaning I could access screws
without dismantling the entire head. Future-me deserved that kindness.
Step 3: Foam becomes the anatomy
Foam formed the skull volume, cheek plates, brow ridges, and snout contours. I built in layers: big shapes first, then medium shapes,
then detail. The best trick I learned was to keep detail consistentchoose a “scale language” and stick to it. Random scale sizes read as
messy; intentional scale sizes read as creature design.
The Animation System: Making a Dragon Feel Alive
Animation doesn’t have to be complicated to be effective. A dragon that can breathe (subtle head motion),
react (blink or eye movement), or communicate (jaw movement with sound or gestures) instantly feels more real.
I focused on reliability first, spectacle second.
The jaw: the highest impact motion
I treated the jaw like a door: it needed a strong hinge line, consistent clearance, and a “closed position” that looked natural.
The servo motion traveled through a linkage to open and close smoothly. I added a little mechanical “forgiveness” so a bump wouldn’t
strip gears or jam the jaw. A cosplay jaw must survive unexpected physicslike someone leaning in for a photo at the worst possible angle.
Optional expression moves
If you want a dragon that steals attention without adding too much complexity, these are great “tier two” motions:
- Blinking eyelids: quick, readable emotion with small movement.
- Eye swivel: makes photos feel interactive (people love “eye contact”).
- Ear or horn twitch: tiny motion, huge personality.
Control: keep it simple, keep it tunable
I set the motion to be adjustablespeed, range, and “rest position.” The goal was to avoid the two classic cosplay animatronic problems:
movement that’s too subtle to notice, and movement that’s so aggressive it looks like the dragon is trying to escape.
Smooth, repeatable motion wins. Always.
Finishing: The Part Where You Learn the Meaning of “One More Sanding Pass”
Foam and 3D prints don’t naturally share the same surface texture. If you paint them raw, the camera will absolutely snitch on you.
Finishing is what makes the hybrid build look like one creature instead of “a foam project hugging a plastic project.”
Blending foam seams
I focused on seams that would be visible in photos: snout lines, cheek transitions, brow ridges. Some seams I left alone on purpose,
because organic creatures can have natural segmentation. The trick is making it look intentional, not accidental.
Smoothing 3D prints without losing your will to live
I used a repeatable cycle: fill, sand, prime, sand, evaluate under harsh light, repeat. The “harsh light” step is underratedbright,
unforgiving light reveals texture you won’t see indoors. It’s better to discover print lines in your garage than in someone else’s
4K convention video titled “Look At This Amazing Dragon (Also Zoom In On The Layer Lines).”
Paint: build depth like it’s a real creature
The dragon looked best when I painted it like it had history: darker tones in recesses, lighter highlights on raised scales,
and subtle color variation across big surfaces. Real animals aren’t one flat color, and dragons shouldn’t be either.
A little tonal shift makes foam read like skin instead of craft material.
Comfort and Convention-Proofing
The most beautiful cosplay in the world loses to discomfort. I added padding, airflow space, and quick access panels.
I also built the suit so key systems could be reached fast: battery swaps, servo access, and emergency “something is rubbing my collarbone”
adjustments. If you can’t fix it in five minutes, it will break at the exact moment someone says, “Can we get a quick photo?”
Weight distribution
The head and mechanics needed support that didn’t rely on my neck. I used a harness/backpack concept so the load sat on my torso.
That’s the difference between “I’m having fun” and “I am one staircase away from becoming a cautionary infographic.”
18 Pics: Captioned Build Snapshots You Can Practically See
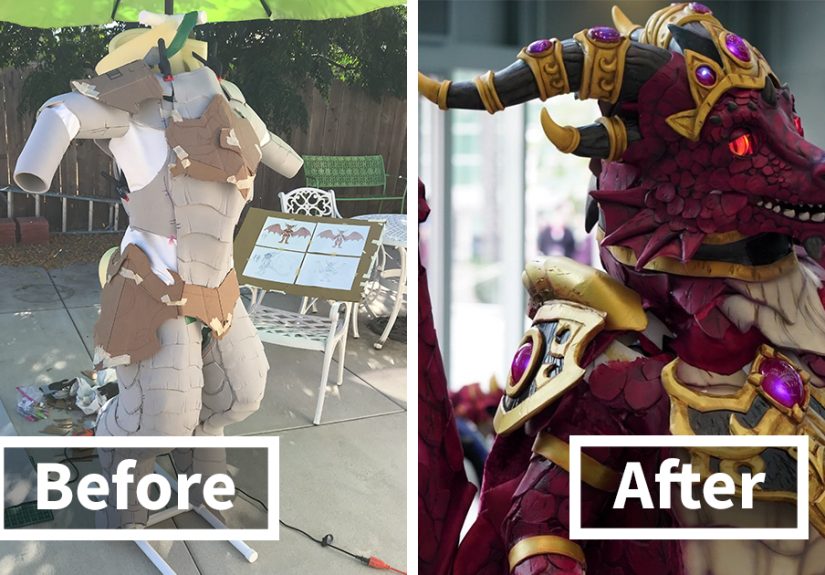
- Pic 1: The early sketchwhen I still believed this would be “a weekend build.”
- Pic 2: Cardboard mock-up for head sizeaka “my ego meets real-world scale.”
- Pic 3: First foam pattern pieces taped together like a dragon piñata prototype.
- Pic 4: The first heat-shaped snout curvemy “okay, this might actually work” moment.
- Pic 5: CAD screenshot of the jaw hinge blockprecision parts begin.
- Pic 6: Test print of the hingefits wrong, but in a very educational way.
- Pic 7: The corrected hinge installedsuddenly the jaw line looks real.
- Pic 8: Foam cheeks layered upinstant creature volume.
- Pic 9: Teeth laid out like a dental horror story (but organized).
- Pic 10: First servo mount in placemechanical heart goes in.
- Pic 11: Linkage testjaw opens, closes, and doesn’t explode (victory).
- Pic 12: Scale texture passwhen the dragon starts looking alive instead of “foam geometry.”
- Pic 13: Seams mid-fillugly stage, but necessary.
- Pic 14: Primer coat reveals everything I pretended not to see.
- Pic 15: Base paint goes onfirst time it looks like a finished creature.
- Pic 16: Shading and highlightsdepth shows up, photos start popping.
- Pic 17: Harness test fitcomfort upgrades and weight balancing.
- Pic 18: Final revealanimated head, confident stance, and me quietly whispering “never again” (lying).
What I’d Do Differently Next Time
- Prototype motion earlier: animation decisions affect structure, not just wiring.
- Design for maintenance: every moving part should be accessible without drama.
- Modularize the details: removable horns, panels, and teeth save you in transport and repairs.
- Plan cooling: your dragon may be mythical, but your body heat is very real.
- Stop upgrading mid-build: “one more feature” is how timelines evaporate.
Conclusion: The Dragon That Ate My Free Time (And I’m Not Mad About It)
Foam gave me the size, comfort, and creature-like surfaces. 3D prints gave me precision, repeatability, and the confidence to build
moving parts that wouldn’t instantly regret existing. Together, they let me create a dragon cosplay that didn’t just look like a creature
it behaved like one. The 400 hours were real, the learning curve was steep, and the payoff was worth it the moment the jaw moved and people
reacted like it was alive.
If you’re thinking about building your own animated creature, start with one motion, keep it serviceable, and let foam and 3D prints do what
they do best. Your future self will thank you. Your sleep schedule might not, but it wasn’t doing much for you anyway.
Extra: of Real Build Experience (The Part No Tutorial Can Fully Teach)
The biggest lesson I learned wasn’t about foam thickness or print settingsit was about momentum. A long build doesn’t get finished
by talent; it gets finished by showing up when you’re tired and doing the unglamorous work anyway. My “dragon days” weren’t always cinematic.
Sometimes it was me, in a hoodie, sanding a tiny edge while questioning every life choice that led me to “handmade animated reptile.”
There’s also a weird emotional arc to a 400-hour cosplay. Early on, everything feels fast because you’re building big shapes. You cut foam,
glue foam, hold it up, and suddenly it looks like a dragon. That stage is pure dopamine. Then comes the middle stretchfinishing, refining,
redoing. It’s slow, repetitive, and it punishes impatience. I had nights where I “fixed” a seam only to make it worse, then spent another hour
undoing my fix. That’s when you learn to celebrate microscopic wins: a hinge that aligns, a paint pass that finally looks like skin, a cable route
that doesn’t snag when you turn your head.
Testing taught me humility. The first time I ran the jaw motion for more than a minute, I discovered a tiny rub point that turned into a jam.
It wasn’t dramaticit was just enough resistance to make the movement look awkward. The fix wasn’t complicated, but it cost time: sand here,
add clearance there, re-seat the mount, tighten everything, test again. I started doing “micro tests” constantly: one motion, ten cycles, check
screws; another motion, ten cycles, check cable strain. It felt tedious, but it saved me from catastrophic failures later.
The first real public wear was a completely different experience than a mirror test at home. In public, people move unpredictably. They lean
into your space for photos. They point at details you didn’t expect. They also react to motion immediately. The second the jaw opened,
I watched people’s expressions change from “cool costume” to “wait… it’s alive.” That reaction is the fuel. It makes the sanding nights feel
less ridiculous. It also reminded me why reliability matters: if the motion fails, the illusion breaks. So I built in habitsturn the head slowly,
pause before crowded corners, keep a small repair kit nearby, and take breaks before fatigue turns me into a clumsy dragon-shaped hazard.
The final surprise? The project changed how I look at making. I stopped thinking of foam as “soft material” and printing as “hard material.”
I started thinking in systems: structure, surface, motion, comfort, repair. That mindset is what I’ll carry into the next buildwhenever I
recover enough to say, “Sure, let’s do another animated creature.” (Someone please hide my hot glue and my optimism.)