Table of Contents >> Show >> Hide
- What Makes These Key Lime Cheesecake Bars Work
- Key Lime vs. Regular Lime: Do You Really Need Key Limes?
- Ingredients
- Equipment
- Step-by-Step Instructions
- Flavor Tips (Small Moves, Big Citrus Energy)
- Easy Variations
- Make-Ahead, Storage, and Freezing
- Troubleshooting (Because Cheesecake Has Opinions)
- Serving Ideas
- Approximate Nutrition (Per Bar)
- FAQs
- of Real-World “Key Lime Cheesecake Bar” Experiences
- Conclusion
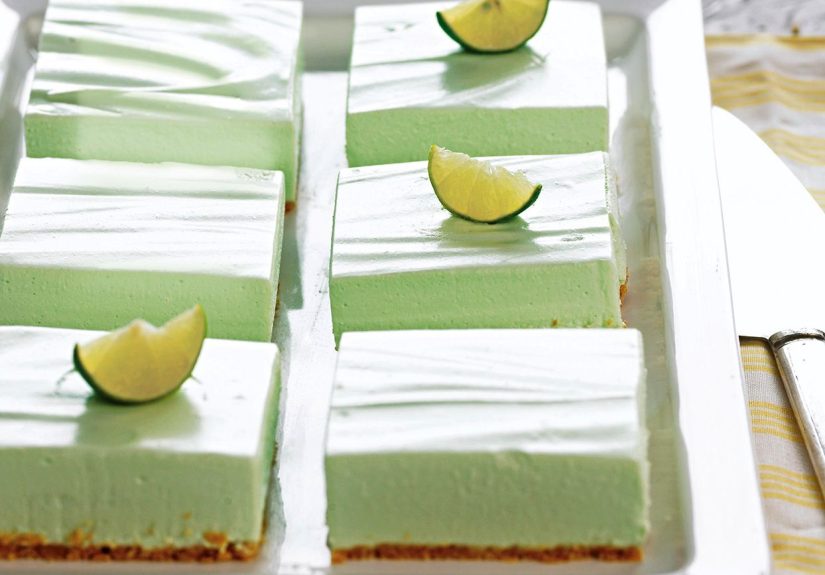
Key lime cheesecake bars are what happens when a classic cheesecake and a Key lime pie meet on a sunny day and decide to become the life of the potluck. You get buttery graham cracker crust, a creamy-tangy filling that tastes like citrus vacation, and neat little squares that are way easier to share than slicing a wobbly pie while everyone “helpfully” watches.
And yesthis recipe aims for that signature Key lime vibe: bright, aromatic, and a little more “Florida Keys postcard” than “generic lime candy.” Key limes are smaller and famously fragrant, but if your grocery store only stocks regular (Persian) limes, you can still make bars that slapjust lean on zest and taste as you go.
What Makes These Key Lime Cheesecake Bars Work
They’re tangy without being a sour dare
Key lime desserts are supposed to be punchy, but cheesecake needs balance. We use zest for aroma and juice for tang, plus sour cream to soften the sharp edges so it tastes refreshingnot like you licked a battery.
They slice cleanly (no cheesecake landslides)
A short bake at a slightly lower temperature helps the filling set gently. Then the real magic happens in the fridge: chilling firms the custard-like structure so you can cut pretty squares instead of “abstract expressionist wedges.”
The crust stays crisp
Pre-baking the graham crust gives it structure and keeps it from turning into sweet sand once the filling goes in.
Key Lime vs. Regular Lime: Do You Really Need Key Limes?
If you can get Key limes, use themthey’re typically smaller, seedier, and more aromatic than Persian limes, which helps that classic Key lime flavor pop. If you can’t, use regular limes and add a little extra zest. Your bars will still be bright, tangy, and wildly snackable.
Ingredients
Makes about 24 bars (9×13-inch pan)
For the graham cracker crust
- 2 cups graham cracker crumbs (about 15–18 full sheets, finely crushed)
- 1/4 cup granulated sugar
- 1/2 teaspoon kosher salt (or 1/4 teaspoon fine salt)
- 10 tablespoons (1 1/4 sticks) unsalted butter, melted
For the key lime cheesecake filling
- 32 ounces (4 blocks) full-fat cream cheese, softened to room temperature
- 1 cup granulated sugar
- 2 tablespoons all-purpose flour (helps stability; optional but recommended)
- 1/2 cup sour cream, room temperature
- 3 large eggs, room temperature
- 1/2 cup Key lime juice (fresh or bottled)
- 2 tablespoons finely grated lime zest (Key limes if possible)
- 1 teaspoon vanilla extract
- 1/4 teaspoon kosher salt
Optional toppings (choose your own adventure)
- Whipped cream
- Extra lime zest or thin lime slices
- Toasted coconut
- Crushed graham crackers
- White chocolate curls
Equipment
- 9×13-inch baking pan
- Parchment paper (highly recommended for easy lifting)
- Food processor or zip-top bag + rolling pin (for crumbs)
- Hand mixer or stand mixer
- Microplane zester
- Rubber spatula
Step-by-Step Instructions
1) Prep the pan and oven
- Preheat oven to 350°F.
- Line a 9×13-inch pan with parchment paper, leaving overhang on the long sides (a “sling” for lifting later). Lightly grease the parchment if you want extra insurance.
2) Make and bake the crust
- In a bowl, mix graham crumbs, sugar, and salt.
- Pour in melted butter and stir until the texture looks like damp sand and holds together when pinched.
- Press firmly and evenly into the pan (a flat-bottom measuring cup works great).
- Bake for 10 minutes. Remove and let cool while you make the filling.
3) Lower oven temperature
Reduce oven to 325°F. Cheesecake likes gentle heat. Think “spa day,” not “boot camp.”
4) Mix the filling (without whipping in a million air bubbles)
- In a large bowl, beat softened cream cheese on low-medium until smooth (about 1–2 minutes).
- Add sugar and flour; mix just until combined.
- Add sour cream, zest, vanilla, and salt; mix until smooth.
- Add eggs one at a time, mixing on low just until each disappears into the batter. (Overmixing can lead to puffing, sinking, and cracks.)
- Slowly stream in Key lime juice and mix briefly. Scrape the bowl and fold once or twice with a spatula to ensure everything is evenly blended.
5) Bake
- Pour filling over the warm crust and smooth the top.
- Bake at 325°F for 35–45 minutes, until the edges are set and the center has a gentle jiggle (like Jell-O that’s trying to be brave).
- Turn off the oven, crack the door, and let the bars sit for 15 minutes to cool gradually.
6) Cool and chill (this is where the “bar” part becomes real)
- Cool at room temp for about 1 hour.
- Refrigerate uncovered until fully chilled, at least 6 hours (overnight is even better).
7) Slice like a pro
- Lift the chilled cheesecake slab out using the parchment sling and place on a cutting board.
- For the cleanest slices: dip a sharp knife in hot water, wipe dry, slice; repeat between cuts.
- If your kitchen is warm, pop the slab in the freezer for 10–15 minutes before slicing to firm the edges.
Flavor Tips (Small Moves, Big Citrus Energy)
Zest first, juice second
Zesting after juicing is like trying to vacuum after the dog already ate the vacuum. Zest the limes while they’re firm, then juice them.
Avoid bitter pith
Only grate the bright green (or yellow-green) outer layerstop before the white pith, which can taste bitter.
Fresh vs. bottled Key lime juice
Fresh Key lime juice can taste extra aromatic and punchy. Bottled Key lime juice is convenient and consistent, especially when Key limes are hard to find. Either worksyour best move is to taste and adjust zest for aroma.
Easy Variations
1) “Key lime pie” style (condensed milk twist)
Want more classic Key lime pie vibes? Replace the 1 cup sugar with 1 can (14 oz) sweetened condensed milk and reduce lime juice to 1/3 cup (condensed milk sweetens and changes the texture). Keep the zest. Bake time may be similar, but start checking at 30–35 minutes.
2) Coconut Key lime cheesecake bars
Add 1/2 cup toasted coconut to the crust, or sprinkle toasted coconut on top with whipped cream. Coconut + lime tastes like a beach trip you can hold in one hand.
3) Ginger snap crust
Swap grahams for crushed ginger snaps for a spicier, brighter contrast. (It’s like Key lime pie wearing a leather jacket.)
4) Mini bars in an 8×8 pan
Halve the recipe for an 8×8 pan (about 9–12 bars). Bake a little longer if the filling is thickerstart checking at 35 minutes and use the “set edges, jiggly center” rule.
Make-Ahead, Storage, and Freezing
- Make-ahead: These are better the next day. Chill overnight for top texture.
- Refrigerator: Store covered for up to 5 days.
- Freezer: Freeze sliced bars (wrapped individually) for up to 2 months. Thaw in the fridge overnight.
- Food safety: Keep refrigerated and don’t leave out at room temp for more than 2 hours.
Troubleshooting (Because Cheesecake Has Opinions)
My cheesecake cracked
Totally fine. Cracks usually come from overmixing (too much air), overbaking, or cooling too fast. Cover with whipped cream and call it “rustic.”
The center seems soft
If the edges are set and the center jiggles slightly, you’re on track. Cheesecake firms dramatically as it chills. If it’s still loose after 6+ hours, it may have needed a few more minutes in the oven next time.
Crust is crumbly
Either the crumbs weren’t fine enough, the butter ratio was low, or it wasn’t pressed firmly. Next time: finer crumbs + firm press + pre-bake.
Flavor isn’t “Key lime-y” enough
Add more zest (not more juice). Juice adds tang, but zest adds the aromatic “wow.”
Serving Ideas
- Top with whipped cream and a pinch of zest for a classic finish.
- Add toasted coconut for a tropical upgrade.
- Serve with fresh berries for color and contrast.
- Drizzle with a thin white chocolate glaze if you want dessert that looks like it has a publicist.
Approximate Nutrition (Per Bar)
Estimate based on 24 bars; actual values vary by brand and portion size.
- Calories: ~260–320
- Protein: ~4–6g
- Carbs: ~22–28g
- Fat: ~18–22g
FAQs
Can I use low-fat cream cheese?
You can, but full-fat gives the smoothest texture and best set. Low-fat versions may bake up softer and slightly grainier.
Do I need a water bath?
Not for bars. A water bath helps with tall, delicate cheesecakes, but these are thinner and bake more evenly. Gentle mixing and not overbaking matter more here.
Why room-temperature ingredients?
They blend smoothly, reducing lumps and lowering the urge to overmix (which adds air and invites cracks).
Can I double the lime juice for extra tang?
Better to increase zest first. Too much juice can thin the filling and make it harder to set.
of Real-World “Key Lime Cheesecake Bar” Experiences
There’s a funny pattern with Key lime cheesecake bars: the first time people bake them, they tend to panic at least once. The most common moment of doubt arrives when the timer rings and the center still has a gentle wobble. It looks too soft. It feels like a trap. Someone inevitably whispers, “Is this… done?” Here’s the reassuring truth: that slight jiggle is exactly what you want. In the oven, cheesecake behaves like a shy custardit sets up fully only after cooling and chilling. The fridge is the finishing school where your bars learn manners and hold their shape.
Another frequent experience: the zest revelation. A lot of bakers assume juice is the main flavor driver, then wonder why the bars taste “nice” but not “wow.” The “wow” is often in the zest. Zest perfumes the batter in a way juice can’t, especially if you’re using regular limes. People who start zesting generously (without hitting the bitter white pith) usually report the biggest jump in flavor with the smallest change in effort. It’s the culinary equivalent of putting on real shoes for a video callsuddenly everything looks more put together.
Then there’s the slicing saga. Cheesecake bars are humble, but they demand respect from your knife. Many folks discover that a warm blade and a quick wipe between cuts turns “crumbly edges and smear marks” into clean, bakery-style squares. If you’re bringing these to a party, that clean slice isn’t just aestheticsit’s logistics. Neat bars stack better, travel better, and won’t melt into each other on the dessert table like a sweet little traffic jam. Some experienced bakers even chill the slab in the freezer for 10–15 minutes before slicing, especially in warmer kitchens. It’s a small trick that feels like cheating (the best kind).
Potluck stories are where these bars really shine. People love them because they’re familiar (cheesecake!) but also bright and refreshing (Key lime!). They’re the rare dessert that can feel rich without being heavy. In summer gatherings, when chocolate brownies start to feel intense and frosted cupcakes threaten to collapse in the heat, Key lime cheesecake bars tend to disappear first. They taste like a break from the humidity. They also photograph wellpale green-ish filling, fluffy whipped cream, a sprinkle of zestso they get posted, shared, and requested again.
And if you ever get a crack? Welcome to the club. Cracks happen. Most of the time, nobody notices once there’s whipped cream on top. Many bakers end up calling it “a design feature” and moving onbecause the flavor is the real headline. The most repeatable lesson people share is simple: mix gently, bake until the edges are set and the center still wobbles, then chill long enough that the bars can become the version of themselves they were meant to be. That’s not just baking advice; it’s basically life advice with lime zest.
Conclusion
These Key lime cheesecake bars deliver the best parts of two beloved desserts: the tangy brightness of Key lime pie and the creamy richness of cheesecakewithout the drama of slicing a whole cake. Bake, chill, slice, and top however you like. The only real risk is making them once and getting volunteered to bring them to every event forever.