Table of Contents >> Show >> Hide
- Why Kitchen Cabinets Matter More Than People Think
- Know the Main Cabinet Types Before You Buy Anything
- Step 1: Measure Your Kitchen Like a Responsible Adult
- Step 2: Plan a Layout That Works in Real Life
- Step 3: Learn the Standard Cabinet Dimensions
- Step 4: Install Kitchen Cabinets Without Creating New Problems
- Step 5: Painting Kitchen Cabinets the Right Way
- Step 6: Upgrade Hardware and Adjust Doors
- Common Kitchen Cabinet Mistakes to Avoid
- Final Thoughts
- Real-World Experiences With Kitchen Cabinets
If your kitchen cabinets are outdated, crooked, scuffed, or simply giving “I survived three owners and one questionable backsplash era,” this tutorial is for you. Cabinets do a lot of heavy lifting in a kitchen. They store the plates, hide the snacks, frame the whole room, and quietly judge your junk drawer. So whether you want to install brand-new cabinets, repaint old ones, or just stop a door from hanging like it lost the will to live, understanding the basics can save you money, time, and a few dramatic sighs.
This kitchen cabinets tutorial walks you through the essential steps: choosing cabinet types, measuring correctly, planning a functional layout, installing cabinets with fewer regrets, painting them the right way, and fixing common problems without turning your kitchen into a two-month science project. The goal is simple: help you make smart decisions and get results that look intentional, polished, and pleasantly not-chaotic.
Why Kitchen Cabinets Matter More Than People Think
Cabinets are not just boxes nailed to a wall. They affect workflow, storage, resale appeal, counter space, lighting, and how enjoyable your kitchen feels when you are cooking dinner or reheating pizza with ambition. Good cabinets create order. Bad cabinets create mystery piles, awkward corners, and that one drawer that only opens if you stand at exactly the right angle.
A well-planned cabinet setup should do three things: make storage easier, keep movement comfortable, and match the style of the home. When you get all three right, the kitchen feels bigger, cleaner, and more expensive than it actually was. That is the sweet spot.
Know the Main Cabinet Types Before You Buy Anything
1. Base Cabinets
Base cabinets sit on the floor and support the countertop. These are the workhorses of the kitchen. They hold pots, pans, sinks, trash pull-outs, and all the things you swear you use weekly. In most kitchens, they define the layout and carry the functional load.
2. Wall Cabinets
Wall cabinets hang above the counter and are ideal for glasses, dishes, dry goods, and anything you do not want toddlers, pets, or your midnight snack self to access too easily. They also shape the visual rhythm of the kitchen, so their height and spacing matter.
3. Tall or Pantry Cabinets
These full-height cabinets are storage champions. They are perfect for food, brooms, trays, small appliances, and the waffle maker you insisted was a lifestyle change. Use them when you need vertical storage and a more built-in look.
4. Stock, Semi-Custom, and Custom Cabinets
Stock cabinets are budget-friendly and fast to get, but they come in limited sizes and finishes. Semi-custom cabinets offer more flexibility in dimensions, accessories, and details. Custom cabinets are tailored to your space and style, but they come with a larger price tag and more lead time. If your kitchen has odd dimensions or you want a highly specific look, semi-custom often hits the balance between practical and pretty.
Step 1: Measure Your Kitchen Like a Responsible Adult
Before you fall in love with a cabinet style online, measure your kitchen carefully. And yes, “carefully” means more than one heroic tape measure sweep while balancing coffee in the other hand.
Start by sketching the room. Then measure each wall, the locations of doors and windows, the floor-to-window height, window-to-ceiling height, and anything that affects cabinet placement, including plumbing, electrical outlets, gas lines, vents, and appliances. Measure existing cabinets from the outside, not the inside, if you are trying to compare or replace them.
Also check whether the floor is level and whether the walls are plumb. This matters because cabinets do not magically hide uneven surfaces. In fact, they highlight them with rude confidence. The highest point on the floor becomes your reference point for laying out base cabinets, which is why experienced installers find that first before they fasten anything.
Step 2: Plan a Layout That Works in Real Life
Pretty kitchens get attention. Functional kitchens get used. The best cabinet layout supports how people actually move through the room. You want enough counter space near major work zones, enough storage where it is useful, and enough clearance so two people can exist in the same kitchen without passive-aggressively side-stepping each other.
Common layouts include:
L-Shaped Kitchen
This is one of the most flexible and popular layouts. It works well in open-concept homes, supports an efficient work triangle, and can often accommodate an island if space allows.
Galley Kitchen
Great for compact spaces. Everything is close, which makes cooking efficient, but cabinet placement must be smart so the room does not feel like a stylish hallway.
U-Shaped Kitchen
Excellent for storage and counter space. Just be sure the aisle is wide enough so the kitchen feels useful instead of like a cabinet ambush.
Island or Peninsula Layout
These layouts add prep space, seating, and storage, but only if you have enough room around them. An island should not turn every trip to the fridge into a low-stakes obstacle course.
As a rule, your layout should support clean movement between the sink, refrigerator, and cooking area. Keep major traffic from cutting straight through that work zone. Also, maintain comfortable aisle widths. A work aisle should feel roomy enough to function, not like an airline seat assignment.
Step 3: Learn the Standard Cabinet Dimensions
You do not need to memorize every cabinet size in existence, but knowing the common standards helps you plan faster and shop smarter.
Base cabinets are commonly about 34.5 inches high and 24 inches deep. With a standard countertop, the finished work surface usually lands around 36 inches high. Widths vary depending on function. Wall cabinets commonly range in several heights and widths, with shallower depths than base cabinets. Tall pantry cabinets are usually much taller and can stretch storage upward in a clean, built-in way.
When planning upper cabinets, pay attention to clearance. Many installers use a layout line that places the bottom of wall cabinets around 54 inches from the floor, though manufacturer specs and room conditions should always win. Translation: standard dimensions are helpful, but your actual kitchen gets the final vote.
Step 4: Install Kitchen Cabinets Without Creating New Problems
If you are installing cabinets yourself, patience matters almost as much as a level. Maybe more.
Start With the Reference Lines
Find the high point of the floor. From there, mark a level line for the top of the base cabinets. Then mark the line for the bottom of the upper cabinets. Locate the studs and mark them clearly. This layout work feels boring, but it is what makes the finished kitchen look crisp instead of mildly haunted.
Hang the Upper Cabinets First
Most pros install wall cabinets before base cabinets. Why? Because it is easier to work without leaning over lower cabinets, and you are less likely to ding finished surfaces. Remove doors, drawers, and shelves first to make the cabinet boxes lighter. Label everything so reassembly is not a puzzle written by chaos.
Use a ledger board or cleat beneath the layout line to temporarily support the uppers while you position them. Start in a corner if your design has one. Clamp adjoining cabinets together, make sure the face frames are flush, drill pilot holes, and fasten them securely. Check for plumb as you go, and use shims where needed. Tighten only after alignment is correct.
Install the Base Cabinets Next
Set the corner cabinet first, then work outward. Shim from the floor as needed so the tops line up with your layout line. Clamp cabinets together, keep faces flush, and fasten them through solid points into studs. If walls are bowed, shims and filler strips become your best friends. No one puts those on a mood board, but they are often what separates amateur-looking work from professional-looking results.
Do Not Rush the Finishing Details
Once the cabinet boxes are secure, add fillers, scribe where necessary, reinstall doors and drawers, and check reveals. Small alignment issues are usually fixable at the end, but only if the installation was fundamentally level and square to begin with.
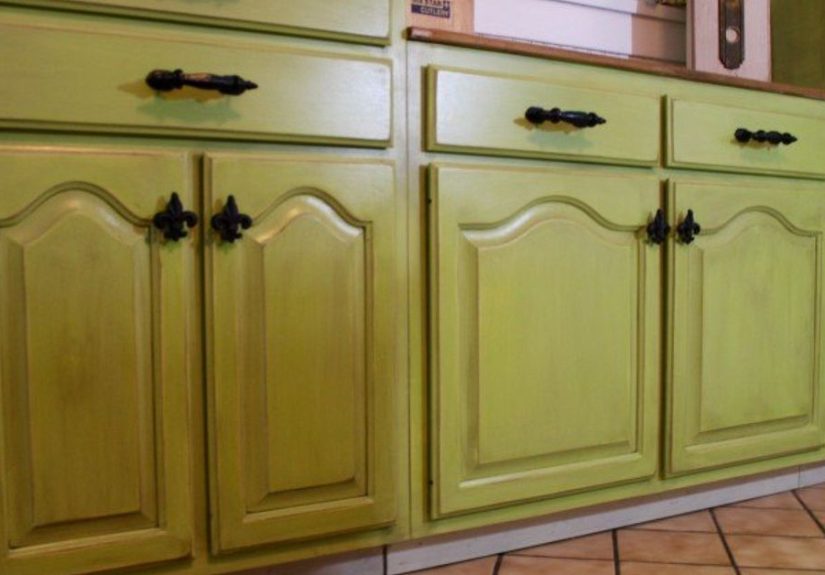
Step 5: Painting Kitchen Cabinets the Right Way
Painting kitchen cabinets is one of the most cost-effective ways to transform a kitchen, but it is also one of the easiest ways to create a sticky, peeling mess if you skip prep. Cabinet painting is not glamorous. It is mostly cleaning, labeling, drying, sanding, and wondering when you became emotionally invested in primer. Then, suddenly, it looks amazing.
What Good Prep Looks Like
Empty the cabinets. Remove doors, drawers, shelves, hinges, and hardware. Label everything carefully so each piece goes back where it belongs. Clean all surfaces thoroughly with a degreaser, because kitchen cabinets collect more oils than people realize. If you paint over grease, the finish will tell on you.
After cleaning, fill old hardware holes if you are changing pull placement. Scuff sand or degloss the surfaces so primer can adhere properly. Remove dust completely. Then prime. A stain-blocking primer may be necessary if the cabinets are heavily stained or made from a material that tends to bleed through.
Painting Tips That Actually Help
Use smooth, even coats and follow the structure of the cabinet door when brushing. Roll or spray large flat areas if appropriate for your setup. Sand lightly between coats for a smoother finish. Let pieces cure fully before reinstalling hardware and closing doors repeatedly like an impatient raccoon.
The finish matters too. Kitchen cabinets need durability, not just a pretty color. Choose a cabinet-grade product or a high-quality enamel designed for trim and cabinetry. The goal is a hard, washable finish that stands up to fingerprints, steam, and life.
Step 6: Upgrade Hardware and Adjust Doors
Sometimes cabinets do not need replacing or repainting. Sometimes they just need better hardware and a little calibration. New knobs or pulls can dramatically change the look of the kitchen, especially on plain cabinet fronts. Use a template or jig so placement stays consistent. Crooked hardware is one of those tiny details that somehow screams from across the room.
If your cabinet doors are crooked, most modern concealed hinges can be adjusted with a screwdriver. Small screw turns can move the door side-to-side, up-and-down, or in-and-out. Make tiny adjustments, test the reveal, and repeat. The process is more trial-and-error than drama, which is refreshing for a home project.
Common Kitchen Cabinet Mistakes to Avoid
Buying before measuring: Cabinets are expensive guesses if you do this backward.
Ignoring floor and wall issues: Uneven surfaces do not fix themselves because you are optimistic.
Skipping labels: Every unmarked door becomes a future scavenger hunt.
Painting over grease: This is how nice ideas become peeling finishes.
Choosing style over function: A beautiful kitchen that stores nothing is just a showroom with snacks.
Forgetting aisle clearance: Tight clearances make the kitchen feel cramped, especially in shared spaces.
Final Thoughts
A successful kitchen cabinet project is not about chasing perfection. It is about making smart choices in the right order. Measure carefully. Plan for the way the room actually works. Respect the layout lines. Take prep seriously. Then let the details do their job. Whether you are installing new kitchen cabinets, repainting the old ones, or simply upgrading hardware and adjusting doors, the transformation can be dramatic without requiring a full renovation meltdown.
The best part is that cabinets offer both visual impact and practical payoff. You are not just making the kitchen prettier. You are making it easier to use every single day. And that is the kind of glow-up that deserves real credit.
Real-World Experiences With Kitchen Cabinets
One of the most common experiences homeowners have with kitchen cabinets is discovering that the “easy weekend project” version of reality is usually fiction with better lighting. On paper, replacing cabinets sounds straightforward: pick a style, order the boxes, screw them in place, and enjoy your new dream kitchen by Sunday evening. In practice, the first surprise often comes before installation even begins. The walls are not perfectly straight. The floor is not perfectly level. The old cabinets were hiding weird gaps, patched drywall, and one mystery pipe that seems to have been added by a previous owner with equal parts confidence and chaos.
Another shared experience is underestimating how emotional cabinet color can be. A white sample chip looks crisp and timeless in the store, then suddenly looks icy under cool LED lights at home. A warm greige seems elegant until it meets a countertop with pink undertones and starts a visual argument. Many people learn that paint and finishes should be tested in the actual kitchen, at different times of day, before making a final decision. Cabinets take up a lot of visual space, so small color mistakes do not stay small for long.
There is also the famous hardware lesson. Homeowners often think knobs and pulls are a finishing touch that can be picked at the last minute. Then they discover that hardware changes the whole mood of the room. Sleek black pulls can make simple shaker cabinets feel modern. Brass knobs can warm up a classic kitchen. Oversized bar pulls can look great on a giant drawer and comically aggressive on a narrow cabinet door. People usually become much more interested in center-to-center measurements after drilling the first wrong hole. Funny how that happens.
Painting cabinets is another category full of hard-earned wisdom. Most people who have done it well will tell you the same thing: the finish is won or lost in the prep. The actual painting feels like the reward. Cleaning grease, removing hardware, labeling doors, sanding, priming, waiting for cure time, and not rushing reassembly are what separate “fresh and polished” from “sticky and tragic.” It is not glamorous work, but it is satisfying. Few home updates offer a bigger before-and-after moment for a relatively manageable budget.
Then there is the installation experience itself. Many DIYers say the project becomes easier once they stop trying to force every cabinet into place and start working with the room instead. Shims, filler strips, scribes, and patient adjustments are not signs that something went wrong. They are signs that the installer understands real houses. Real rooms move, settle, and age. Cabinets have to adapt to that reality.
Finally, people often realize that the best cabinet decisions are the ones tied to daily life. Deep drawers for pots. Pull-out trash near prep space. A pantry cabinet that ends countertop clutter. Uppers that do not feel too low. Storage where it is needed, not just where it looks symmetrical. In the end, the most successful kitchen cabinet projects are not the ones that impress strangers for ten seconds. They are the ones that make everyday cooking, cleaning, and living feel easier for years.