Table of Contents >> Show >> Hide
- What a Countertop Aluminum Tray Really Does (Besides Looking Organized)
- Why Aluminum Is a Smart Pick for a Countertop Tray
- The Best Places to Use a Countertop Aluminum Tray
- How to Choose the Right Countertop Aluminum Tray
- Care & Cleaning: Keep the Tray Nice Without Making It a Whole Hobby
- Food Safety Notes: When Aluminum Meets Acid, Salt, and Heat
- Styling Tips That Don’t Turn Into Countertop Clutter
- Specific Example Setups (Copy-Paste Your Way to a Better Counter)
- Quick Buying Checklist
- Conclusion: A Small Upgrade That Makes Your Kitchen Feel Bigger
- Experiences: Living With a Countertop Aluminum Tray (The Good, The Real, and the “Oops”)
There are two kinds of kitchen countertops: the ones that look like a magazine spread, and the ones that look like a
“before” photo on a decluttering show. Most of us live in the second categorybecause life happens. Coffee splashes.
Olive oil drips. Honey bottles form a sticky alliance with your salt cellar. And somehow your “I’ll wipe it later”
corner becomes a permanent exhibit.
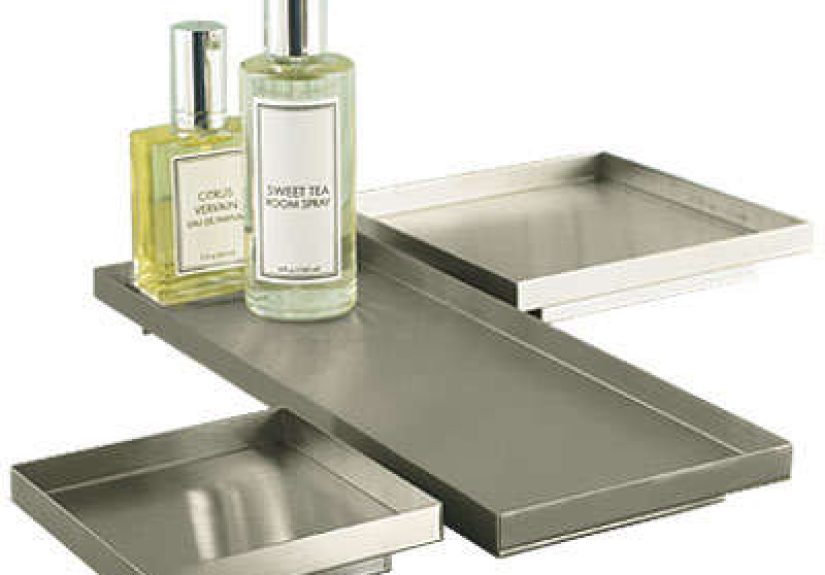
Enter the unsung hero of sanity: the countertop aluminum tray. It’s not glamorous in the way a
marble slab is glamorous. It’s more like the dependable friend who shows up with paper towels and doesn’t judge you
for owning three different hot sauces that are all “medium.” A good tray corrals the chaos, catches the drips, and
makes your countertop look intentionally styledeven if you’re basically using it to hide evidence of your morning
routine.
What a Countertop Aluminum Tray Really Does (Besides Looking Organized)
At its simplest, a countertop tray is a flat (usually slightly raised) platform that groups items together. That’s
it. But the magic is what grouping does:
- Containment: One “zone” for coffee stuff, sink stuff, or cooking stuffso it stops spreading.
- Cleanup speed: Wipe the tray, not the entire counter. Your future self says thank you.
- Drip control: Oils, syrups, dish soap, and wet sponges stay on the tray, not on stone or wood.
- Visual calm: A cluster of items can look messy; that same cluster on a tray looks curated.
Think of it like a tiny stage for your countertop essentials. Without a stage, everything is just… standing around.
Awkwardly. In your way. Like guests who don’t realize the party ended 45 minutes ago.
Why Aluminum Is a Smart Pick for a Countertop Tray
You can buy countertop trays in wood, ceramic, acrylic, rattan, stainless steelyou name it. Aluminum earns its spot
because it hits a sweet spot of practicality:
1) It’s lightweight but sturdy
A tray you can lift with one hand is a tray you’ll actually use. Aluminum trays are usually light enough to move for
quick wiping, but strong enough to hold bottles, mugs, and the occasional “I’m carrying everything at once” moment.
2) It handles daily mess like a champ
A countertop tray is basically an “oops catcher.” Aluminum is naturally corrosion-resistant in normal kitchen
conditions, and many trays come with finishes that make them even tougher.
3) You get finish options that match real kitchens
- Brushed aluminum: Modern, subtle, hides fingerprints better than shiny finishes.
- Anodized aluminum tray: A hard, sealed surface that’s more scratch- and stain-resistant.
- Powder-coated or painted: Great color options, but you’ll want to avoid harsh abrasives.
- Raw aluminum: Industrial vibe; can show patina, which is either “character” or “annoying,” depending on your personality.
4) It’s recyclable and long-lived
If you’re building a kitchen you don’t want to replace every year, durable materials matter. Aluminum is widely
recyclable and tends to age wellespecially if you buy a tray that’s thick enough to resist denting.
The Best Places to Use a Countertop Aluminum Tray
The secret to loving a tray is picking a job for it. A tray without a job becomes a junk-drawer-without-walls. Here
are the “high ROI” zones where a kitchen countertop tray earns its keep.
Coffee station tray: the morning sanity zone
If your coffee corner currently looks like a convenience store condiment counter, you’re not alone. A tray gives you
an instant “station” without remodeling anything.
What to put on it:
- Coffee pods or filters in a small container
- Sugar, cinnamon, cocoa, sweetener packets (one jar each, not one jar for all chaos)
- Stir sticks, spoons, or a tiny scoop
- Two favorite mugs (yes, twoso you don’t build a mug tower)
- A small catch cup for used pods/tea bags (optional but life-changing)
Pro tip: pick a tray with a lip. Coffee grounds have a special talent for teleportation, and a raised edge helps
keep your counter from looking like a tiny beach.
Sink tray: where soap and sponges stop ruining your countertop
Dish soap rings and wet sponge puddles are not décor. A tray by the sink keeps your scrub brush, sponge, soap, and
hand lotion in one contained footprint. It also makes wipe-downs faster because you can lift the whole station, wipe
underneath, and put it back.
Look for: a tray with a textured or slightly raised base, or add a small silicone mat inside to reduce slipping.
Cooking zone tray: oils, salt, and spices that behave
If you cook often, you probably keep olive oil, kosher salt, pepper, and maybe a utensil crock near the stove. The
downside is greasy residue slowly migrating across your counter like it’s exploring new territories. A tray stops
the spread.
What works especially well:
- Oil and vinegar bottles
- Salt cellar + pepper mill
- Garlic keeper or small bowl for ginger
- A spoon rest (yes, on the traydouble containment!)
“Landing pad” tray: a controlled drop zone for daily items
Not every kitchen has a mudroom. If your counter is where keys, sunglasses, and mail go to multiply, a tray can be a
“drop zone” that looks intentional. Just keep it away from food prep areas and set a strict rule: when it’s full,
it’s time to empty it.
How to Choose the Right Countertop Aluminum Tray
Buying a tray seems simple until you get one that’s either “cute but useless” or “so large it has its own zip code.”
Use this checklist to pick a tray that actually improves your kitchen.
1) Measure the footprint (and be honest about space)
Measure the area where the tray will livewidth and depth. Then subtract at least 2–3 inches so you still have
breathing room. A tray should create order, not become a countertop annex.
2) Pick a lip height that matches the mess
- Low lip: Easier to slide items on and off; best for “styling” zones.
- Medium/high lip: Better for drips and crumbs; ideal for coffee and cooking stations.
3) Decide if you need handles
Handles are great for portabilityespecially if you’ll carry the tray to the table or move it for cleaning. If the
tray is mainly stationary, sleek handle-free designs can look cleaner.
4) Choose a finish that matches your cleaning style
- Anodized: Great for daily use and easier maintenance.
- Painted/powder-coated: Lovely colors, but treat it gently.
- Raw/brushed metal: Looks modern; expect minor patina over time.
5) If it will touch food, buy with that in mind
Many countertop trays are decorative, while others are intended as serving trays. If you’ll serve pastries, fruit,
or snacks directly on it, look for trays marketed for food contact and choose reputable brands and sellers.
Care & Cleaning: Keep the Tray Nice Without Making It a Whole Hobby
A tray is supposed to reduce chores, not become a “high-maintenance roommate.” Most aluminum trays stay happy with
simple care.
Everyday cleaning (the 2-minute routine)
- Empty the tray (yes, even the “temporary” stuff).
- Wipe with a damp cloth and mild dish soap if needed.
- Rinse quickly (if the tray is washable) and dry thoroughly.
Dishwasher: should you do it?
Some aluminum items can go in the dishwasher, but many manufacturers recommend hand-washing because automatic
dishwasher detergents and heat can discolor aluminum. If your tray has a decorative finish, hand-wash to protect it.
If it’s raw aluminum, expect possible color changesoften cosmetic, but surprising if you wanted “shiny forever.”
What not to use (unless you enjoy regret)
- Steel wool or aggressive scouring pads: scratches, dulling, and sad vibes.
- Harsh abrasives: powders can mar decorative finishes.
- Soaking forever: standing water invites spots and dullness.
Stains, oxidation, and that weird gray film
Aluminum can develop discoloration over time, especially if it’s uncoated and exposed to moisture, salts, or acidic
drips. Usually, it’s not dangerousjust not pretty. For a decorative countertop aluminum tray, keep it simple:
warm soapy water, gentle wiping, and thorough drying. For more stubborn grime on durable, uncoated aluminum, a brief
soak and a non-scratch scrubber can help. Always test any stronger method in a small, hidden spot first.
Food Safety Notes: When Aluminum Meets Acid, Salt, and Heat
A countertop tray isn’t usually used for cooking, but it often holds food-adjacent items: lemons, vinegar bottles,
salted snack bowls, and that tomato you swear you’ll slice “in a minute.” Here’s the practical deal:
Limit direct contact with highly acidic or salty foods on bare aluminum
Acids (think tomatoes, citrus, vinegar) and salts can react with aluminum surfaces. That can lead to discoloration,
pitting, or a faint metallic taste if food sits directly on bare aluminum for long periodsespecially with heat.
The easy workaround: use a small plate, parchment, or a liner if you’re serving something acidic on a tray that
isn’t anodized or coated.
Don’t microwave aluminum
This one’s simple: aluminum and microwaves do not get along. If your tray is holding leftover containers, move the
containersdon’t try to “microwave the whole setup” unless you enjoy sparks and life lessons.
Buy smart: reputable brands matter
In recent years, U.S. regulators have warned about certain imported cookware products that may leach lead. While a
countertop tray is not the same as a cooking pot, the broader takeaway is useful: choose reputable sellers,
especially for items that may touch food. If a “food-safe aluminum serving tray” has no clear labeling, no brand
info, and costs less than your latte, consider it a decorative tray onlyor skip it.
Styling Tips That Don’t Turn Into Countertop Clutter
The goal is a tray that looks great and works harder than it looks. Try these design moves:
Use the “three-category rule”
Pick up to three categories per tray. Example for a coffee tray: mugs + sweeteners + pods. If you add candles,
plants, framed art, a tiny statue, and a seasonal garland… you don’t have a coffee station, you have a museum.
Give items “containers within the container”
A tray is step one. Step two is adding one or two small jars or cups so loose items don’t roam freely. This keeps
your tray from looking like a junk drawer that learned to lie flat.
Match metals intentionally
If your faucet and cabinet pulls are brushed nickel, a brushed aluminum tray looks cohesive. If your kitchen is warm
(brass, wood, cream tones), consider a matte or powder-coated aluminum tray to soften the look.
Specific Example Setups (Copy-Paste Your Way to a Better Counter)
Setup A: The “I Actually Cook” Station
- Medium-lip aluminum organizer tray
- Olive oil + neutral oil
- Salt cellar + pepper mill
- Small crock for spatula + tongs
- Mini ramekin for garlic cloves
Why it works: everything you reach for is in one place, and the tray catches oily rings. Your counter stays cleaner,
and your tools stop migrating.
Setup B: The “Coffee Corner Without Renovation” Station
- Rectangular aluminum tray with handles
- Two mugs
- Canister for pods/tea bags
- Small jar for sugar + cinnamon
- Tiny bin for stir sticks
Why it works: it’s a functional “zone,” and it’s portable for wipe-downs. Bonus: it looks like you planned your life.
Setup C: The “Sink Looks Like a Spa” Station
- Shallow tray (or tray + silicone liner)
- Dish soap bottle
- Hand soap
- Brush + sponge holder
- Small towel folded neatly (for 12 minutes, minimum)
Quick Buying Checklist
- Measured your countertop space (with breathing room)
- Picked a lip height that matches your mess level
- Finish makes sense for your cleaning habits (anodized = easiest)
- Non-slip feet or a liner if you have slick countertops
- Reputable brand/seller if it may contact food
- Easy to lift and wipe underneath (you’ll do it more often)
Conclusion: A Small Upgrade That Makes Your Kitchen Feel Bigger
A countertop aluminum tray isn’t a dramatic kitchen makeoverand that’s why it works. It’s a small,
practical upgrade that makes your daily routines smoother: coffee stays in one place, oils stop leaving rings, sink
essentials look tidy, and cleaning gets faster. Pick the right size, choose a finish that fits your life, and give
the tray a specific “job.” Do that, and you’ll get a countertop that looks calmer without needing to become a
minimalist monk who owns one mug and a single spoon.
Experiences: Living With a Countertop Aluminum Tray (The Good, The Real, and the “Oops”)
The first experience most people have with a countertop aluminum tray is a quiet, suspicious joy. You set it down,
place a few items on it, step back, and think: “Wait… is this what organized people feel like?” The counter looks
cleaner, even though you didn’t actually get rid of anything. You just gave the clutter a border. And borders are
powerful.
Week one tends to reveal the tray’s true superpower: cleanup speed. Instead of wiping around coffee
pods, sticky syrup drips, and a spoon you swear you’ll reuse, you lift the tray, wipe once, and put it back. It’s
not that the mess disappears; it’s that the mess stops spreading. People often notice this most near the stove,
where oil bottles can leave invisible residue that slowly turns into a grimy halo. On a tray, the halo stays on the
traycontained like a well-behaved ghost.
The second common experience is realizing you bought the wrong size. Too small, and your coffee station looks like a
crowded subway car at rush hourmugs bumping into sweetener jars, everything toppling when you reach for one item.
Too big, and the tray starts acting like a permission slip to keep more stuff on the counter. “It fits on the tray”
becomes “it belongs on the counter,” and suddenly your kitchen has a countertop museum exhibit titled:
Objects We Use Sometimes.
A surprisingly helpful “aha” moment happens when you add one small container inside the tray. A
short tumbler for stir sticks. A jar for sugar packets. A little bin for tea bags. That’s when the tray stops
looking like a flat storage area and starts working like a system. Loose items stop drifting. Everything has a home.
And when you’re half-awake, you can still find what you need without turning into a raccoon pawing through shiny
objects.
Then comes the finish-learning phase. People with raw or brushed aluminum trays often discover that harsh scrubbing
is a fast track to “Why does this look cloudy now?” If you’re using a tray mostly for lookslike a modern metal
organizer tray on a clean countergentle cleaning and thorough drying usually keep it looking better longer. Folks
with anodized finishes typically report the least drama: fewer scratches, easier wipe-downs, less visible wear. The
biggest win is remembering that a tray is a workhorse. If it picks up a little patina over time, that’s not failure;
it’s evidence you actually live in your kitchen.
The final, most universal experience is the moment you realize the tray changes behavior. When there’s a defined
zone, you’re more likely to put the thing back where it belongs. You stop leaving the honey bottle “somewhere on the
counter” and start leaving it “on the tray.” It’s a tiny habit shift, but it adds up. A countertop aluminum tray
doesn’t just hold your stuffit trains your kitchen to feel organized, even on busy days. And honestly? In the real
world, that’s the kind of luxury that matters.