Table of Contents >> Show >> Hide
- What People Mean by “Lemon Jelly” (So We’re Making the Right Thing)
- The Science of a Perfect Set (In Plain English)
- What You’ll Need
- Classic Homemade Lemon Jelly (Pectin-Based, Spreadable)
- Water-Bath Canning Overview (Optional, for Pantry Storage)
- Flavor Variations That Still Taste Like Lemon (Not Perfume)
- Troubleshooting Lemon Jelly (Because Pectin Has Opinions)
- How to Use Lemon Jelly (Beyond Toast)
- Quick Bonus: Lemon “Jelly” Cups (Gelatin Dessert Version)
- Storage and Safety Notes
- Real-World Kitchen Notes (500+ Words of “What It’s Actually Like”)
- Conclusion
Lemon jelly is basically breakfast optimism in a jar: bright, tangy, and glossy enough to make toast feel like it’s wearing a clean shirt.
It’s also the perfect “I have lemons… now what?” projectespecially when you want something that’s not lemon curd (rich and eggy) and not lemonade (gone in 12 minutes).
In this guide, you’ll get a reliable lemon jelly recipe that’s spreadable, giftable, and gloriously citrusy, plus a few smart variations and
real troubleshooting so you don’t end up with “lemon syrup” (still tasty, but not what we’re here for).
What People Mean by “Lemon Jelly” (So We’re Making the Right Thing)
The phrase lemon jelly can mean two different treats in American kitchens:
-
Spreadable lemon jelly (pectin-based): A clear-ish, golden jelly you spoon onto biscuits, swirl into yogurt, or use as a glaze.
This is the classic “jelly” you can water-bath can for pantry storage. - Lemon jelly dessert (gelatin-based): A jiggly, chilled dessert (think “Jell-O style”) made with gelatin.
The main recipe below is the spreadable, pectin-based lemon jelly. If you were hoping for the jiggly dessert version, don’t worrythere’s a quick bonus recipe for that, too.
The Science of a Perfect Set (In Plain English)
A good jelly isn’t magicit’s teamwork. Traditional jelly sets when you have the right balance of:
- Pectin: The gelling helper (a natural fiber found in fruit; sold as liquid or powdered pectin for consistency).
- Sugar: Sweetens and helps pectin form a stable gel.
- Acid: Lemon brings plenty of this; acid helps pectin “link up” so the jelly sets.
- Heat: A true rolling boil activates the process and drives off excess water so your jelly isn’t watery.
Lemons are wonderfully acidic but not naturally high in pectin for jelly-making, which is why most reliable lemon jelly recipes use
commercial pectin. It gives you a predictable set and a clean, bright flavor.
What You’ll Need
Kitchen tools
- Microplane or fine grater (for zest)
- Juicer (handheld or reamer)
- Large, heavy-bottom pot or Dutch oven
- Measuring cups (accuracy matters here)
- Wooden spoon or silicone spatula
- Fine-mesh strainer
- Optional but helpful: candy/jelly thermometer
If you want pantry-stable jars
- 4 half-pint canning jars with two-piece lids
- Jar lifter and canning funnel (strongly recommended)
- Boiling-water canner or a deep stockpot with a rack
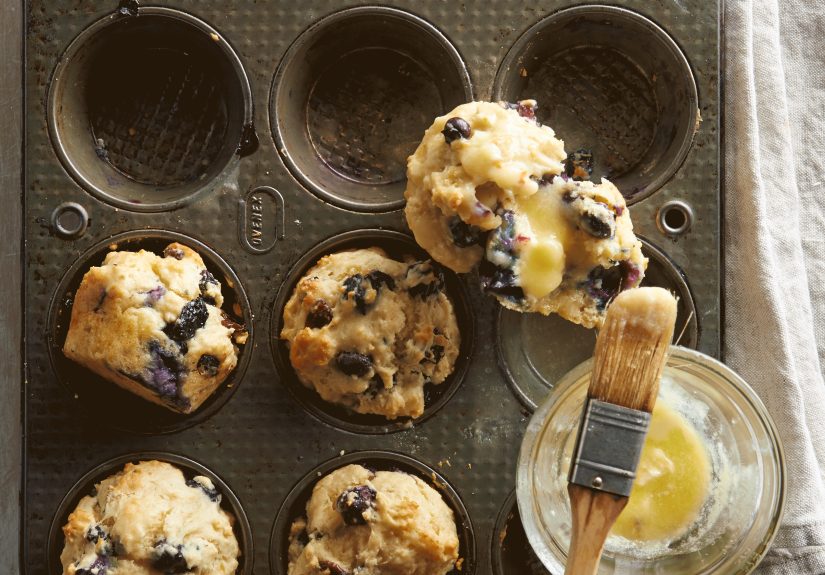
Classic Homemade Lemon Jelly (Pectin-Based, Spreadable)
This is a bright, classic homemade lemon jelly with real zest flavor. The steep-and-strain step gives you a clean jelly that still tastes like actual lemon,
not “yellow candy.”
Yield
About 4 half-pint jars (great for gifts, or for keeping one jar and “sharing” the restmeaning you hide them behind the oatmeal).
Ingredients
- 4 fresh lemons (choose firm, bright-skinned lemons)
- 1 1/2 cups water
- 4 1/4 cups granulated sugar
- Liquid fruit pectin (use the amount specified for one standard pouch; follow the package size you bought)
Step-by-step instructions
-
Prep jars (if canning): Wash jars and keep them hot until filling. Prepare lids according to the manufacturer’s directions.
If you’re making a refrigerator batch only, you can skip the canning setup. - Zest for flavor: Finely grate about 1 tablespoon lemon zest. Avoid the white pith (it’s bitter and does not play nice).
- Juice the lemons: Squeeze enough juice to get 3/4 cup lemon juice. Strain out seeds.
-
Steep the lemon base: In a bowl or measuring pitcher, combine the zest, lemon juice, and 1 1/2 cups water.
Let it stand for 10 minutes so the zest perfumes the liquid. -
Strain and measure: Strain the mixture through a fine-mesh strainer to remove zest/pulp. Measure out 2 cups of the lemon liquid.
(If you’re a little short, top up with water. If you have extra, save it for iced tea or cocktails.) -
Boil with sugar: Pour the 2 cups lemon liquid into a large pot. Add 4 1/4 cups sugar. Bring to a
full rolling boil over high heat, stirring constantly. A rolling boil means it’s boiling hard enough that stirring can’t calm it down. -
Add pectin and boil again: Quickly stir in the liquid pectin. Return to a full rolling boil and boil hard for 1 minute,
stirring constantly so nothing scorches. - Skim foam: Remove from heat. Skim off any foam (a metal spoon works well). Foam is harmless, but it can make the top look cloudy.
- Fill jars: Ladle hot jelly into hot jars, leaving 1/4-inch headspace. Wipe rims, apply lids, and tighten bands fingertip-tight.
Water-Bath Canning Overview (Optional, for Pantry Storage)
If you want to store lemon jelly at room temperature, use a boiling-water canner (water-bath canning). This is designed for
high-acid foods like many fruit preserves.
- Place filled jars on a rack in a canner with hot water covering the jars by 1–2 inches.
- Bring to a rolling boil, then start timing once the water returns to a boil after adding jars.
- Process using a tested time for jams/jellies and adjust for altitude as needed.
- Turn off heat, remove lid, and let jars rest briefly before lifting out to cool undisturbed for 12–24 hours.
Important: Processing times and altitude adjustments matter. If you’re new to canning, follow a trusted canning guide and the pectin manufacturer’s instructions exactly.
(And yes, you really do need actual canning jarsrepurposed pasta sauce jars are the kitchen equivalent of wearing flip-flops in a snowstorm.)
Flavor Variations That Still Taste Like Lemon (Not Perfume)
Lemon jelly is a fantastic base for subtle add-ins. The key word is subtlelemon is the lead singer here.
- Meyer lemon jelly: Swap in Meyer lemons for a sweeter, less sharp citrus profile. Measure the juice the same way.
- Ginger-lemon jelly: Steep a few thin slices of fresh ginger in the lemon-water mixture, then strain before cooking.
- Herb-kissed lemon jelly: Add a sprig of thyme or rosemary to the steeping step (remove before boiling).
- Honey-lemon twist: Replace a small portion of sugar with honey for a warmer note (keep the total sweetener close to the tested ratio for best setting).
- Vanilla-lemon: Add a tiny splash of vanilla extract after cooking (off-heat) for a “lemon cookie” vibe.
Troubleshooting Lemon Jelly (Because Pectin Has Opinions)
My jelly didn’t set (it’s runny)
- Common cause: Not reaching a full rolling boil or not boiling long enough after adding pectin.
- Also common: Ingredient ratios drifted (too little sugar or too much liquid).
- Fix: Give it 24–48 hourssome jellies set slowly. If it’s still syrup, you can remake it using safe “remake soft jellies” guidance from trusted canning sources.
My jelly is too firm (it slices like a gummy)
- Common cause: Overboiling or accidentally using extra pectin.
- Next time: Time the 1-minute hard boil precisely and remove promptly from heat.
- Save it: Use firm jelly as a filling layer for cookies, bars, or thumbprintsno one complains about “structural integrity” in dessert.
My jelly looks cloudy
- Too much pulp or zest left in the mix, or foam wasn’t skimmed.
- Strain more thoroughly next time and skim foam promptly.
My jelly tastes bitter
- Too much pith (white part) made it into the zest.
- Use a light touch: zest only the colored layer.
Sugar crystals formed
- Crystals can happen when sugar splashes onto the pot sides and doesn’t fully dissolve.
- Stir until dissolved before boiling hard, and avoid scraping dried sugar from the pot walls into the jelly.
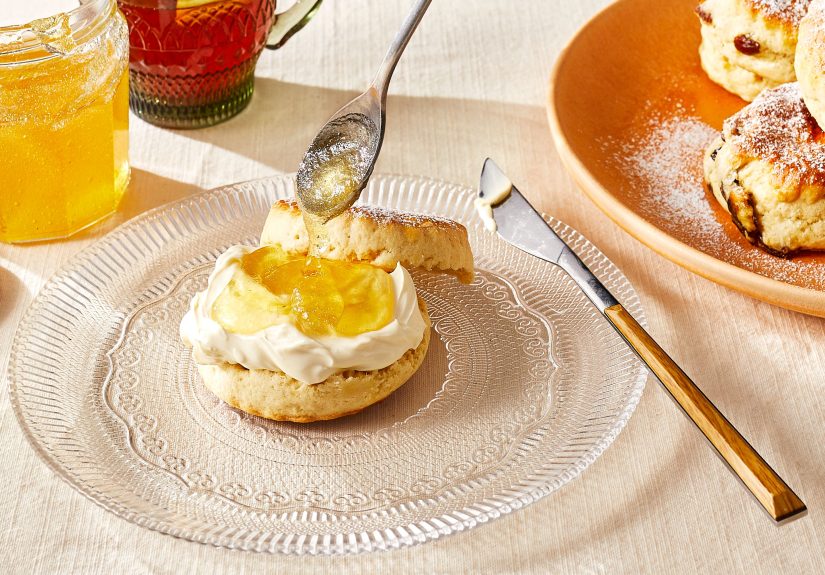
How to Use Lemon Jelly (Beyond Toast)
- Breakfast: biscuits, scones, English muffins, pancakes, yogurt parfaits
- Cheese boards: especially with brie, chèvre, or sharp cheddar
- Glaze: warm a few spoonfuls with a splash of water and brush over chicken, salmon, or roasted carrots
- Baking: thumbprint cookies, cake filling, swirl into cheesecake topping
- Drinks: shake a teaspoon into a lemony cocktail for extra body and shine
Quick Bonus: Lemon “Jelly” Cups (Gelatin Dessert Version)
If you meant the jiggly kind, here’s a simple homemade lemon gelatin cup using real lemon juice. It’s bright, refreshing, and doesn’t require canning equipmentjust a fridge and patience.
Ingredients
- 1/2 cup fresh lemon juice
- 1 1/2 cups water (divided)
- Sweetener to taste (start with 1/4 cup sugar or honey, then adjust)
- Unflavored gelatin (use the amount appropriate to set ~2 cups of liquid per the package)
Directions
- Sprinkle gelatin over 1/2 cup cool water and let it bloom for about 5 minutes.
- Heat the remaining 1 cup water until hot (not ragingly boiling). Stir in sweetener to dissolve.
- Add bloomed gelatin and stir until fully dissolved. Stir in lemon juice.
- Pour into cups and chill 2–3 hours until set.
Tip: Very acidic mixtures can set more softly depending on gelatin type and concentration, so if you want firmer cubes, slightly increase gelatin (still within package guidance).
Storage and Safety Notes
- Refrigerator jelly: Store in a sealed container and use within a few weeks.
- Canned jelly: Store sealed jars in a cool, dark place. Refrigerate after opening.
- When in doubt, throw it out: If you see mold or smell anything “off,” don’t taste-test it. Your bravery is admirable, but your digestive system did not sign up for that storyline.
Real-World Kitchen Notes (500+ Words of “What It’s Actually Like”)
Recipes are neat. Kitchens are not. Real life has sticky counters, a phone buzzing with notifications, and at least one moment where you wonder,
“Is this boiling hard enough… or is it just enthusiastic simmering?” Here are the kinds of experiences home cooks commonly share after making a batch of lemon jelly.
1) The aroma is the first win. Before the jelly even sets, the zest-steeping step makes the whole kitchen smell like fresh lemon peel
bright, clean, and way more “bakery” than “cleaning aisle.” People often describe this as the moment they realize lemon jelly is different from just
heating lemon juice and sugar. The zest does real flavor work.
2) Rolling boil confidence is learned, not inherited. Many first-timers start timid: medium heat, gentle bubbles, lots of stirring.
Then they wonder why the jelly is slow to come together. Once you see a true rolling boilthe kind that doesn’t stop boiling when you stiryou get it.
It’s loud, it’s dramatic, and it’s also the point where you should stop multitasking. The difference between “done” and “why is my pot trying to caramelize?”
can be about 60 seconds.
3) Timing feels absurdly short. Boiling for one minute after adding pectin sounds too easy, like a scam.
But that short, high-heat boil is exactly why pectin jellies work well. Home cooks often say the hardest part is believing the clock.
Set a timer. Don’t do mental math. Your brain is already busy making sure you don’t splash molten sugar on yourself.
4) Foam is a personality test. Some people skim every bubble like they’re polishing a trophy. Others shrug and say, “Rustic!”
Both can be fine, but if you’re gifting jars, skimming foam makes the top look clearer and more professional. In real kitchens, a small bowl for foam
becomes the “chef snack”a spoonful of warm lemony sweetness that mysteriously disappears.
5) The set is sometimes slow, and that’s normal. A batch can look loose while hot and still set beautifully by the next day.
It’s common to panic, open the jar, spoon it, decide it’s syrup, and then discover it’s perfect 24 hours later. Patience is a free ingredient,
even if it’s everyone’s least favorite one.
6) Small flavor tweaks feel huge. Adding a little extra zest (or letting it steep a touch longer) makes the jelly taste more “lemon candy”
in a good waybright but not bitter. A tiny bit of ginger or thyme can turn the jelly into something that tastes fancy enough for a cheese board,
even if you’re serving it on whatever crackers were on sale.
7) Gifting jars has a ripple effect. People who gift lemon jelly often hear, “I didn’t know lemon jelly existed,” followed by
“What do I put it on?” and then “Can I get another jar?” It’s the kind of homemade gift that feels thoughtful without being clutter,
because it gets eaten (usually quickly).
8) The best “mistake” is a glaze. If a batch is slightly soft, home cooks frequently repurpose it as a glaze for cakes, quick breads,
roasted chicken, or salmon. Soft jelly warms easily, brushes on smoothly, and tastes like a lemony finishing sauce.
The consolation prize is arguably better than the original planlike accidentally booking the seat with extra legroom.
9) You’ll become oddly protective of your ratio. After one good batch, people start measuring more carefully than they do for taxes.
They learn that jelly is not the place for “eh, close enough.” Once you get a set you love, you’ll treat the sugar-to-liquid balance like sacred text.
10) You’ll start imagining new uses. The first jar goes on toast. The next ends up in yogurt, then in a vinaigrette, then stirred into
sparkling water for a quick mocktail. Lemon jelly has a way of sneaking into your cooking routine because it adds bright acidity and sweetness in one spoonful.
It’s basically a shortcut to “this tastes like I tried.”
Conclusion
A great lemon jelly recipe is equal parts technique and attitude: measure carefully, boil with confidence, and don’t panic if it looks thin while hot.
Once you nail the basics, you can keep it classic or play with Meyer lemons, ginger, herbs, and honey. Either way, you end up with a jar of sunshine that
makes ordinary food taste like a little celebration.