Table of Contents >> Show >> Hide
- Why This Recipe Works (Even If You’re Not “Crafty”)
- Ingredients
- Tools You’ll Want (So You Don’t Lose Your Mind)
- Marshmallow Candy Snowmen (Classic Stack-and-Decorate Method)
- Flavor Upgrades and Fun Variations
- How to Keep Your Snowmen From Falling Apart
- Make-Ahead, Storage, and Food-Safety Notes
- Serving Ideas (Because Snowmen Deserve a Stage)
- Experience Notes: What Making Marshmallow Snowmen Is Actually Like (The Extra )
Some holiday treats are baked. Some are cooked. And some are basically arts-and-crafts that you can eataka the best kind.
Marshmallow candy snowmen land in that last category: adorable, no-bake, kid-friendly (with grown-up supervision), and
guaranteed to make your hot cocoa look like it has a social life.
This guide gives you one core method (stack, “glue,” decorate), plus several variationspeppermint snowmen, cocoa toppers,
sled snowmen, and dipped “fancy coat” snowmen. The goal is simple: build snowmen that stay upright long enough to be admired,
photographed, and then dramatically devoured.
Why This Recipe Works (Even If You’re Not “Crafty”)
Marshmallows are light, squishy, and slightly stickyso they’re naturally cooperative building blocks. The trick is using the
right edible “glue.” Royal icing, candy melts, or thick frosting sets up firm and keeps pieces from sliding. If you’ve ever
watched a marshmallow lean like it’s exhausted from the holidays, you already understand why structure matters.
A second secret is surface prep. Marshmallows can feel slick; letting the “glue” sit for a minute before pressing,
and giving your snowmen a few minutes to set before moving them, dramatically improves stability. Think of it like letting your
snowman “rest” after assemblingbecause even candy deserves a break.
Ingredients
You can mix and match, but this list gives you a reliable, classic snowman look with easy substitutions.
Base Snowman
- Marshmallows: 12 jumbo (bodies) + 12 regular (heads), or 36 regular (stacked snowmen)
- Pretzel sticks or pretzel twists: for arms (and optional “legs” if making toppers)
- Edible glue (choose one): royal icing, thick white frosting, or melted white candy coating/candy melts
Face + Buttons + Accessories
- Mini chocolate chips or black sprinkles (eyes/buttons)
- Orange sprinkles, orange candy melts, or a tiny triangle of orange gummy (nose)
- Licorice laces or fruit leather strips (scarves/headbands)
- Optional: crushed peppermint, sanding sugar, coconut flakes, mini candies for earmuffs, candy canes for “sled rails”
Tools You’ll Want (So You Don’t Lose Your Mind)
- Parchment or wax paper (non-negotiable for easy release)
- Small piping bag or zip-top bag (snip the corner) for icing
- Toothpicks (for precise glue dots and positioning)
- Food-safe edible marker (optional, but incredibly convenient)
- Microwave-safe bowl (if using candy melts)
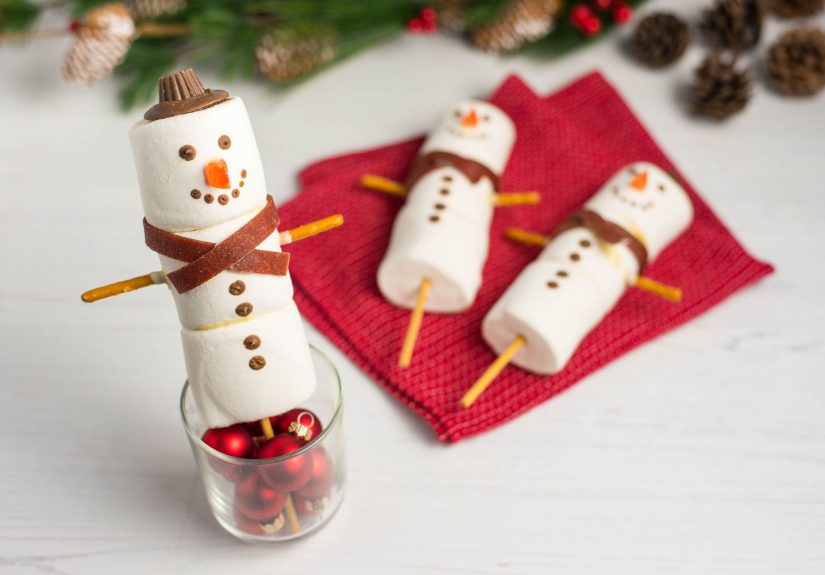
Marshmallow Candy Snowmen (Classic Stack-and-Decorate Method)
Yield: 12 snowmen | Time: 25–40 minutes (plus 10–15 minutes to set)
Step 1: Prep Your Workstation
Line a baking sheet with parchment or wax paper. Set out your decorations in small bowls. This is the only time in the process
you’ll feel fully in controlenjoy it.
Step 2: Make (or Choose) Your Edible Glue
- Royal icing: Best for structure and quick setting.
- Thick frosting: Easy and kid-friendly; sets slower.
- White candy melts: Dries firm and glossy; great for “snowman armor.”
If using candy melts, microwave in short bursts, stirring often, until smooth. You want it fluid enough to dab, not so hot it
turns your marshmallow into a puddle with regrets.
Step 3: Assemble the Snowman Bodies
Place one jumbo marshmallow flat-side down as the body. Add a small dot of glue on top and attach one regular marshmallow as the head.
Hold for 5–10 seconds. Repeat for all snowmen.
Alternative build: Use three regular marshmallows stacked (bottom, middle, top) for a classic “three-snowball” look.
This is especially cute for hot cocoa toppers, because it’s more proportionate in a mug.
Step 4: Add Pretzel Arms
Break pretzel sticks in half (or use small pieces of pretzel twists). Gently press into the sides of the body marshmallow.
If your pretzels crack, congratulationsyou’ve just invented “snowman elbows.” Nobody has to know.
Step 5: Decorate Faces and Buttons
Use mini chocolate chips or black sprinkles for eyes and buttons. For noses, use orange sprinkles, a dab of orange candy melt,
or a tiny wedge of orange candy.
Easy mode: Use a food-safe edible marker to draw eyes and smiles, then add a nose. This reduces the “my snowman’s
face slid off” phenomenon.
Step 6: Accessorize Like It’s a Snowman Fashion Week
- Scarf: Wrap a thin strip of fruit leather or licorice around the “neck.”
- Hat: Press a mini chocolate cup, a chocolate kiss, or a gumdrop on top with a glue dot.
- Earmuffs: Small candies on each side connected by a thin licorice strip.
Step 7: Let Them Set
Leave snowmen on the lined tray until the glue is firmabout 10–15 minutes for candy melts, longer for frosting.
Once set, they’re ready to serve, package, or proudly line up like a tiny marshmallow choir.
Flavor Upgrades and Fun Variations
1) Peppermint Party Snowmen
Add a tiny drop of peppermint extract to your icing (or use peppermint-flavored elements like crushed candy canes).
For an extra festive look, roll sticky spots lightly in crushed peppermint for a “sparkly snow” effect.
2) Hot Cocoa Topper Snowmen
Build smaller snowmen (three regular marshmallows stacked) and keep decorations minimal so they sit nicely on mug rims.
Want “floating” snowmen? Put them on a small chocolate base (like a melting wafer) to help them stay upright on whipped cream.
3) Sled Snowmen (Edible Transport Included)
Create a simple sled using a cracker base and candy cane “rails,” then secure your snowman on top with frosting.
It’s whimsical, portable, and frankly the safest way to move a snowman without a tragic faceplant.
4) Dipped Snowmen (For a Glossy, Giftable Finish)
Dip the bottom marshmallow (or the whole assembled snowman carefully) into melted white candy coating.
Let excess drip off, then place on parchment to set. Add sprinkles while still tacky for a “snow suit” look.
This style travels well in treat bags and looks impressively professional for something you made in socks.
How to Keep Your Snowmen From Falling Apart
Common Issues (and Fixes)
- They slide: Your glue is too warm or too thin. Let candy melts cool slightly, or use thicker icing.
- They lean: Your marshmallows aren’t sitting flat. Use flat sides down, or trim a tiny slice off the base.
- Decorations drop off: Press gently and give each piece a few seconds to grab. Tiny dots of glue work better than big blobs.
- Pretzels snap: Pre-break pieces and insert with a slow twist. (And yes, “snowman elbows” are still adorable.)
Make-Ahead, Storage, and Food-Safety Notes
Marshmallow snowmen are best within 1–3 days for peak softness and cuteness, but they can last longer in an airtight container
in a cool, dry spot. Heat and humidity are the real villainswarm rooms can soften candy coating and make marshmallows sticky.
If you use dairy-heavy frostings and leave them out for extended periods at room temperature, follow basic food-safety practices:
when in doubt, don’t leave perishable foods sitting out for hours. For gifting, candy melts or royal icing are usually the most
stable choices.
Serving Ideas (Because Snowmen Deserve a Stage)
- Hot cocoa bar: Set out snowmen toppers with crushed peppermint, mini marshmallows, and chocolate shavings.
- Cookie trays: Add snowmen as a no-bake centerpiece next to cookies and fudge.
- Edible gifts: Package two or three snowmen in clear bags with a ribbon and a tag that says “Melt me, maybe?”
- Classroom parties: Pre-assemble bodies, then let kids decorate faces and accessories (less chaos, more joy).
Experience Notes: What Making Marshmallow Snowmen Is Actually Like (The Extra )
The first time you make marshmallow candy snowmen, it usually starts with confidence and ends with at least one snowman who looks
like he’s seen things. That’s normal. In fact, it’s part of the charmbecause these are supposed to be playful, not perfect.
The “experience” of snowman-building is half recipe, half tiny holiday theater.
Here’s what most people notice right away: marshmallows are friendlier than they look, but they demand a little patience. If your
glue is too warm (especially candy melts), the marshmallow surface gets slick, and the head wants to drift sideways like it’s
trying to escape awkward family conversations. Letting the melted coating cool for a minutestill spreadable, but not hotchanges
everything. Suddenly, your snowmen stand tall like they’ve got excellent posture and a personal trainer.
Another universal moment: the pretzel arms. Someone will snap a pretzel stick. Someone will laugh. Someone will announce that the
snowman has “battle scars.” And then you realize broken pretzels are actually useful because they create more natural-looking arms,
with little angles and bends. If you’re making these with kids, pretzel breakage becomes a feature, not a problem. You can even
put out a bowl of “arm parts” and let everyone pick their snowman’s arm style: straight, wiggly, or “I’m waving at the neighbors.”
Decorating is where personalities show up. Give two people the same marshmallows and the same mini chocolate chips, and you’ll
still get two completely different snowmen. One will be cheerful and symmetrical. The other will have an eyebrow and an attitude.
Edible markers are fantastic for this because you can draw tiny expressions quicklyhappy faces, surprised faces, “I just realized
I forgot the gift exchange” faces. If you’re using candies for eyes and buttons, the trick is to dab glue first, then place the
candy. If you press a chocolate chip directly into marshmallow without glue, it may hold for a minute…then take a dramatic tumble
like it’s auditioning for a holiday soap opera.
The best “experience hack” is setting up a mini assembly line. Build the bodies first. Let them set. Then add arms. Then faces.
Then accessories. When you try to do everything on one snowman start-to-finish, you’ll bump pieces while the glue is still wet and
end up chasing tiny buttons across the counter. A calm assembly line makes the whole process feel easier and more funlike a tiny
candy workshop where everyone has an important job (even if the job is “official sprinkle manager”).
Finally, the moment of truth: serving. Marshmallow snowmen get laughs at parties because they’re instantly recognizable and slightly
ridiculous in the best way. On a hot cocoa bar, they turn a regular mug into a holiday photo op. As gifts, they look thoughtful,
even though they’re mostly marshmallows wearing accessorieswhich is, honestly, a life goal. And if one snowman leans a little in
the container? Call it “windblown.” The holidays are busy. Your candy snowmen understand.