Table of Contents >> Show >> Hide
- What Are Melted Crayon Valentine Stained Glass Hearts?
- Supplies You’ll Need
- How to Make Melted Crayon Valentine Stained Glass Hearts
- Safety Tips and Common Mistakes to Avoid
- Creative Variations on Melted Crayon Valentine Hearts
- Why Melted Crayon Hearts Still Feel So Magical
- Real-Life Experiences with Melted Crayon Valentine Stained Glass Hearts
- Conclusion
If you’ve got a drawer full of sad, broken crayons and a soft spot for Valentine’s Day, this craft is your moment. Melted crayon Valentine stained glass hearts turn those stubby crayons into glowing, colorful “glass” hearts you can hang in the window, string as garlands, or use to decorate a Valentine’s Day party. They’re inexpensive, kid-friendly, and just nostalgic enough to make the adults smile too.
Popular DIY tutorials show the same basic idea: grate old crayons, sprinkle them between sheets of wax paper, gently melt them with an iron, then cut out heart shapes that look like stained glass when the light shines through. It’s simple, but the results are surprisingly beautifulperfect for a Hometalk-style project you’ll be proud to share.
What Are Melted Crayon Valentine Stained Glass Hearts?
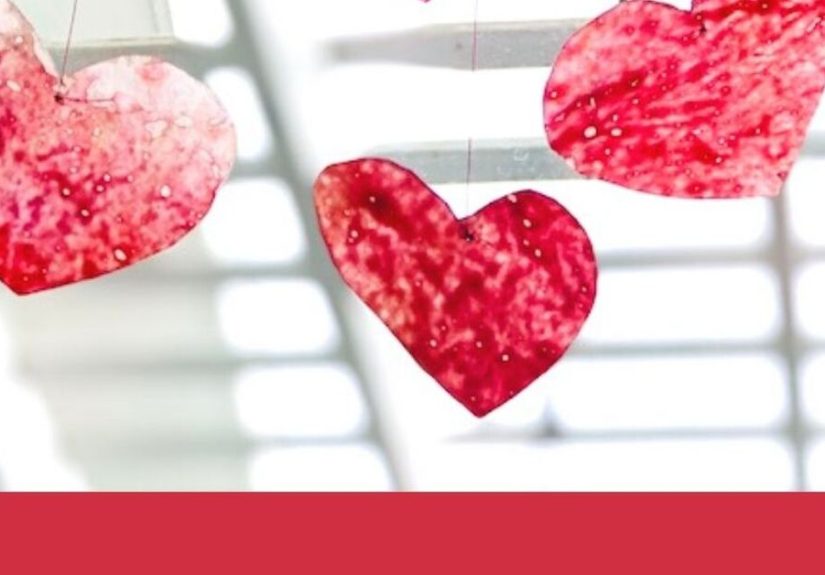
These hearts are essentially little suncatchers made from melted crayon shavings trapped between layers of wax paper. When the wax melts, the crayon pigment spreads into marbled swirls and streaks that mimic real stained glass.
Most crafters use classic Valentine’s Day colorsreds, pinks, purples, and whitebut you can mix in anything you like. The hearts look especially pretty hung in a sunny window or doorway where the light can shine through. Tutorials from crafting blogs and family sites emphasize that this project is budget-friendly, accessible for kids, and a great way to recycle crayons instead of tossing them.
Why this Valentine craft is a keeper
- Eco-conscious: Uses up broken or leftover crayons.
- Kid-approved: Children can help grate crayons, sprinkle color, and pick heart shapes (with supervision for the hot parts).
- Customizable: Change colors, sizes, and shapes to fit any season or decor style.
- Display-ready: The hearts double as suncatchers, garlands, or party decor.
Supplies You’ll Need
You don’t need a fancy craft room to make melted crayon Valentine stained glass hearts. Most supplies are probably already in your home:
- Old crayons (reds, pinks, purples, white, or any colors you love)
- Wax paper (not parchmentwax is what helps the crayons melt and bond)
- Cheese grater, microplane, crayon sharpener, or vegetable peeler for making shavings
- Iron (set to low or medium, no steam)
- Old towel or ironing board cover you don’t mind getting messy
- Brown paper bag, parchment paper, or scrap paper to protect your iron
- Paper heart templates (printed or hand-drawn in different sizes)
- Scissors
- String, twine, ribbon, or fishing line for hanging
- Optional: construction paper or cardstock to create frames, hole punch, glitter
Many tutorials recommend grouping your crayons by color family (pinks together, reds together, etc.) to avoid muddy results. This is especially helpful when crafting with kids, who may enthusiastically sprinkle every color at once.
How to Make Melted Crayon Valentine Stained Glass Hearts
The process is straightforward, but a few small details make a big difference in how your Valentine hearts turn out.
1. Prep and protect your workspace
Lay an old towel or ironing board cover on your work surface. Place a sheet of wax paper on top and fold it in half to create a crease. Many crafters recommend sandwiching the wax paper between sheets of scrap paper to protect both your iron and your work surface from stray wax.
Plug in your iron and set it to a low or medium setting, with no steam. You want enough heat to melt the crayons, but not so much that you scorch the wax paper.
2. Make your crayon shavings
Peel the paper off the crayons. Use a cheese grater, microplane, or sharpener to turn the crayons into fine shavings. Some tutorials suggest using chunkier toddler crayons because they’re easier to grate.
It helps to create small piles of each color so kids can “decorate” the hearts with intentional color combinations instead of random handfuls.
3. Arrange the “stained glass” layer
Unfold the wax paper and sprinkle crayon shavings on one half. Keep shavings away from the edges so they don’t spill out when you iron. You only need a thin layertoo many shavings can create clumps instead of a translucent, stained glass effect.
Try a few fun combinations:
- All pinks and reds for classic Valentine hearts
- Red, white, and fuchsia for bold contrast
- Pastels for a softer, watercolor look
4. Melt with an iron
Fold the clean half of the wax paper over the shavings so they’re fully covered. Place a sheet of scrap paper or brown paper on top and another underneath. This “wax sandwich” protects your iron and work surface.
Press the iron gently over the paper in small sections, lifting and moving rather than sliding. You’ll see the colors start to melt and swirl. It only takes a few seconds per spot. If you overheat one area, the wax can spread too much and lose the marbled effect.
Once everything looks melted and smooth, set the sheet aside to cool completely.
5. Cut out your heart shapes
When the melted sheet is cool, trace heart templates onto the wax-paper “stained glass.” Cut out the hearts with scissors. Many crafters like to create a mix of sizesfrom large statement hearts to tiny filler pieces.
For a more polished look, you can also cut slightly larger hearts from construction paper, then cut a smaller heart out of the center to form a frame. Glue or tape the melted hearts behind the opening so you get a dark outline like real stained glass.
6. Turn them into suncatchers, garlands, or decor
Now comes the fun part: displaying your Valentine hearts.
- Suncatchers: Punch a small hole at the top of each heart, add ribbon or twine, and hang them in a sunny window.
- Garland: String multiple hearts onto a long piece of ribbon to create a “heartstrings” banner across a doorway or mantel.
- Gift tags: Attach small hearts to wrapped Valentine gifts or treat bags.
- Classroom decor: Tape hearts to walls, bulletin boards, or classroom windows for a bright, cheerful display.
Safety Tips and Common Mistakes to Avoid
Even though this is a kid-friendly Valentine’s Day craft, there are two elements that need extra care: the iron and the hot, melted wax.
Supervise the iron closely
Most child-focused tutorials clearly state that adults should handle the ironing step. Kids can help with grating crayons, sprinkling shavings, and choosing templates, but the iron stays in grown-up hands.
Don’t skip the paper “buffer”
Skipping the scrap-paper or brown-paper layers can leave melted wax on your iron or ironing board cover. One crafter admits that not folding the protective paper in properly ruined her ironing board. A simple sandwich of wax paper between scrap paper prevents this mess.
Use the right amount of crayon
Too many shavings can create thick, opaque spots that don’t let much light through. Too few, and your hearts may look sparse. Aim for a thin, even scattering. This is where a quick test sheet helpsmelt one small piece to see how your shavings behave before you commit to a big batch.
Watch your color choices
Grouping similar tones usually creates more attractive “stained glass” than mixing every color. Reds and pinks with a little purple work well for Valentine’s Day; avoid heavy use of dark browns or blacks, which can overpower the design.
Creative Variations on Melted Crayon Valentine Hearts
Once you master the basic technique, it’s easy to adapt melted crayon stained glass hearts for different ages, styles, and occasions.
Add bold frames and layers
Some tutorials suggest using black cardstock or construction paper to frame the hearts, mimicking the lead came in real stained glass. Cut heart-shaped frames and glue your melted crayon hearts behind them. You can layer multiple hearts in a vertical line to create a mobile or “heartstrings” effect.
Play with shapes and seasons
The same melted crayon and wax-paper method works for other holidays:
- Leaves in autumn colors (orange, yellow, red, brown)
- Eggs or flowers for spring
- Stars, trees, or snowflakes for winter
Several kids’ craft blogs use this technique year-round, simply swapping out the cookie cutter or template shape to fit the season.
Turn it into a mini art lesson
Because the colors blend and marble as they melt, this Valentine craft is a natural way to teach kids about color mixing and warm vs. cool color palettes. Let them experiment with different combinations and talk about what happens when they layer similar vs. contrasting shades.
Why Melted Crayon Hearts Still Feel So Magical
There’s a reason this project keeps resurfacing on Pinterest, blogs, and social platforms every February. It’s low-pressure, colorful, and surprisingly satisfying. Crafters mention how much kids enjoy watching the crayons transform from dusty shavings into glossy, swirling patterns.
For adults, it’s a hit of nostalgiamany people remember making melted crayon crafts in school. Bringing it back as a modern stained glass Valentine project feels both retro and fresh, especially when you share your creations on community platforms like Hometalk.
Real-Life Experiences with Melted Crayon Valentine Stained Glass Hearts
If you read through the comment sections of popular tutorials, a clear theme emerges: this Valentine’s Day craft doesn’t just look prettyit creates memories.
A classroom full of glowing hearts
Imagine walking into an elementary classroom where every window is lined with colorful hearts catching the afternoon sun. Teachers who use melted crayon Valentine stained glass hearts in class projects say it’s one of those crafts that genuinely engages kids from start to finish.
The students love the “sprinkle” stepshaking tiny crayon shavings onto the wax paper like confetti. There’s a lot of negotiation around who gets which color, some accidental color theory lessons, and plenty of “Wow!” moments when the wax melts under the iron. The final display becomes a temporary art installation, and even parents notice the glow when they walk down the hallway.
Family craft night win
At home, melted crayon Valentine stained glass hearts work beautifully for a low-key family craft night. One parent might be in charge of using the iron, while kids rotate through the “design station,” building their heart panels from personalized color palettes.
Older kids often get more experimentaladding stripes of color, blending unexpected shades, or cutting geometric designs instead of classic hearts. Younger children are perfectly happy to pile on shavings and announce, “This one is for Grandma.” When the hearts go up on a sliding glass door or front window, the house suddenly looks like Valentine’s Day exploded in the best possible way.
A Hometalk-style project you’ll actually revisit
This is also the kind of project that lends itself to community sharing. On platforms like Hometalk, you’ll often see DIYers take a classic idealike melted crayon stained glass heartsand put their own spin on it: layered garlands across a mantel, hearts framed in rustic wood, or windows packed with overlapping hearts that look like a patchwork of colors.
If you’re a frequent sharer, you might photograph your process: the piles of crayons, the shavings on wax paper, the first test sheet, and the final, sunlit hearts. These visual steps make your project more helpful for others and give that satisfying before-and-after story that Hometalk readers love.
Lessons learned from the melted crayon “trenches”
After a few rounds of making melted crayon Valentine stained glass hearts, most crafters pick up a few key tips:
- Less is more: A lighter sprinkle of shavings often looks more elegant than a thick layer of wax.
- Test first: Making one small test panel helps you dial in iron temperature and melting time before doing big sheets.
- Embrace imperfection: No two hearts will ever look the sameand that’s the fun of it. The unpredictable swirls are what make each piece feel special.
- Take advantage of leftovers: When you finish cutting hearts, you can save the offcuts and hole-punched mini hearts for confetti or future collages.
In the end, this craft isn’t just about decorating for Valentine’s Day. It’s about slowing down, playing with color, and turning something as ordinary as broken crayons into mini works of art that brighten your home. When you hang those stained glass hearts in the window and see them glow, you’ll understand why this simple project has become a beloved Valentine tradition for so many families, classrooms, and DIY fans.
Conclusion
Melted crayon Valentine stained glass hearts are proof that you don’t need complicated supplies to create eye-catching decor. With wax paper, crayons, and a bit of heat, you get a kid-friendly Valentine’s Day craft that looks impressive enough for any Hometalk feed or DIY blog.
Whether you’re crafting with a classroom, hosting a family Valentine workshop, or just looking for a cozy weekend project, these hearts deliver: they’re budget-friendly, customizable, and full of charm. Hang them in your windows, string them into garlands, or tuck them into Valentine cardsand let those stained glass colors do their thing.