Table of Contents >> Show >> Hide
- Quick Tomato Spot Detective Guide (60 Seconds)
- 1) Blossom-End Rot (The “Why Is the Bottom Melting?” Problem)
- 2) Early Blight / Alternaria Fruit Rot (The “Target Spot” Villain)
- 3) Bacterial Spot (Scabby Spots That Feel Like Sandpaper)
- 4) Bacterial Speck (The “Pepper-Shaker” Spots)
- 5) Anthracnose (Ripe-Fruit Rot That Sneaks Up Late)
- What If You’re Seeing Black Spots on Leaves Too?
- The “Save This Crop” Prevention Playbook
- So… Should You Throw Away Every Spotted Tomato?
- Experiences Gardeners Commonly Report (And What They Learn the Hard Way)
- Experience #1: “The First Tomatoes Were Perfect… Then the Bottoms Turned Black”
- Experience #2: “After a Rainy Week, I Started Seeing Bull’s-Eyes on Leavesand Dark Spots Near the Stem”
- Experience #3: “My Tomatoes Looked Like They Got Acne OvernightTiny Scabs Everywhere”
- Experience #4: “They Aren’t Big SpotsJust Tiny Black FlecksBut They’re On So Many Tomatoes”
- Experience #5: “My Tomatoes Were Beautiful… Until They Got Ripe. Then They Developed Sunken Spots and Rot Fast”
- The “One Change That Helps Almost Everyone”
- Final Thoughts
- SEO Tags
You walk out to your tomato plant feeling like a proud garden parent… and then you see them:
mysterious black spots on tomatoes. Suddenly your dream BLT is giving “true crime documentary.”
Don’t panic-pull the whole plant just yet.
Black spots can come from a few very different causessome are plant “plumbing problems,” some are fungi,
and some are bacteria. The good news: if you match the spot’s location, texture, and
timing, you can usually diagnose what’s happening fastand decide whether you’re dealing with a
cosmetic issue or a fruit-ruining rot.
Quick Tomato Spot Detective Guide (60 Seconds)
- Spot is on the bottom (blossom end), looks sunken/leathery → likely blossom-end rot.
- Spot is near the stem and has “target rings” → likely early blight (Alternaria).
- Spots are raised, scabby, rough (sometimes with a pale halo) → likely bacterial spot.
- Spots are tiny pinpoints (pepper-like specks) → likely bacterial speck.
-
Ripe fruit gets sunken circles with dark centers; in humidity you may see pink/salmon “ooze” →
likely anthracnose.
Now let’s break down the five most common culprits, how to tell them apart, what to do today, and how to
prevent a rerun next week.
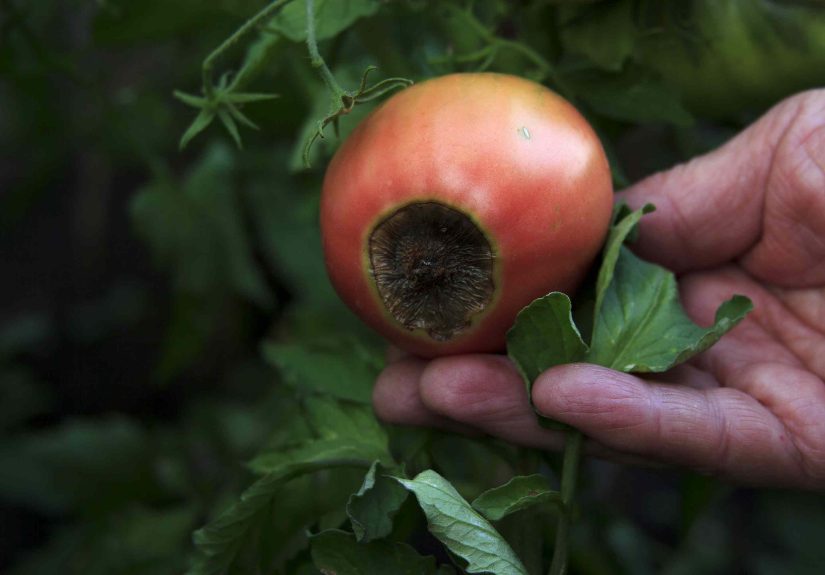
1) Blossom-End Rot (The “Why Is the Bottom Melting?” Problem)
What it looks like
A dark spot forms on the blossom end (the bottomopposite the stem). It often starts tan, then
turns brown/black and becomes sunken and leathery. On fast-growing fruit, it can
get big enough to ruin the whole tomato.
What causes it
Blossom-end rot isn’t a contagious diseaseit’s a physiological disorder. The fruit isn’t getting
enough calcium in the fruit tissue at the right time. That can happen even when your soil contains plenty
of calcium. The usual trigger is inconsistent soil moisture (big swings between dry and drenched),
plus stressors like root damage, extreme heat, or heavy nitrogen feeding that pushes leafy growth faster than the
plant can supply fruit.
What to do right now
- Remove damaged fruit early. The plant won’t “heal” the spot.
-
Water consistently. Aim for evenly moist soil, not a cycle of drought-then-flood.
Deep watering is better than daily sprinkles that barely wet the root zone. - Mulch (2–3 inches). It’s basically a moisture thermostat for your soil.
- Go easy on high-nitrogen fertilizer. Too much “leaf hype” can make the problem worse.
-
If you suspect soil imbalance, consider a soil test and correct pH/nutrients sensibly.
(Random calcium dumping is the gardening version of guessing a password until you get locked out.)
Can you eat it?
If the rest of the tomato is firm and the damage is localized, you can cut off the affected portion
and use the rest. If it’s soft, smelly, or moldycompost it and move on.
2) Early Blight / Alternaria Fruit Rot (The “Target Spot” Villain)
What it looks like
On fruit, early blight often creates dark, leathery spotscommonly near the stem endwith
concentric rings that look like a bull’s-eye. On leaves, you’ll often see brown spots with that same
target pattern, usually starting on lower foliage and moving upward.
Why it happens
Early blight is caused by fungi in the Alternaria group that thrive when leaves stay wet for long
stretches (rainy periods, heavy dew, overhead watering). Spores splash up from soil and plant debris, then spread
upward. It’s very common in home gardens because tomatoes are basically leaf umbrellas that love to trap moisture.
What to do right now
- Prune lower leaves that touch soil and remove badly infected foliage (don’t compost if heavily diseased).
- Stake/cage plants so fruit and leaves aren’t lounging on the ground like they pay rent there.
- Mulch to reduce soil splash (a huge deal for fungal spread).
- Water at the base (drip/soaker is your best friend). Avoid overhead watering.
-
If disease pressure is high, use a labeled garden fungicide as a preventive (not a miracle cure),
and follow label directions carefully. - End-of-season cleanup: remove plant debris, and rotate tomatoes away from that bed next year.
Quick “Is it early blight?” test
If your fruit spot has a bull’s-eye look and you also see classic target lesions on older leaves, early blight jumps
to the top of the suspect list.
3) Bacterial Spot (Scabby Spots That Feel Like Sandpaper)
What it looks like
On fruit, bacterial spot often shows up as small, raised lesions that become
scabby and rough. Some varieties show a pale or waxy-looking halo around spots.
Leaves may have small dark lesions, sometimes with yellowing around them.
Why it happens
This is a true bacterial disease. It spreads through splashing water, handling wet plants, and
sometimes infected seed/transplants. Warm, wet weather is basically its favorite playlist.
Fruit spots are often more about appearance (blemishes) than deep rot, but severe infections can weaken plants and
reduce harvest quality.
What to do right now
- Stop overhead watering if you can. Splashing is bacterial Uber.
- Don’t work plants when wet (pruning/tying spreads bacteria).
-
Remove heavily infected leaves to reduce spreadespecially if spots are multiplying fast.
Sanitize pruners between cuts. -
Consider a copper-based bactericide labeled for tomatoes as a preventive to slow spread.
It works best early and may be less effective if bacterial resistance is presentso lean on cultural control first. - Rotate crops and clean up debris at season’s end.
Can you eat it?
Usually yesif the tomato is otherwise firm, you can wash it and trim blemishes.
If the fruit is cracking, soft, or rotting around lesions, compost it.
4) Bacterial Speck (The “Pepper-Shaker” Spots)
What it looks like
Bacterial speck lesions on fruit are very smalloften almost pinpoint dots that may be slightly
raised, flat, or shallowly sunken. They don’t usually go deep, and they often look like someone sprinkled tiny
black flecks on the tomato’s skin.
Why it happens
Like bacterial spot, speck spreads through wet conditions, splashing water, and sometimes contaminated seed.
It’s commonly associated with cooler, wet weather compared with bacterial spot.
The result is mostly cosmetic fruit spotting, but leaf infection can stress the plant.
What to do right now
- Keep foliage dry (drip irrigation, morning watering, good airflow).
- Avoid handling wet plants and sanitize tools.
- Remove badly infected foliage if it’s spreading rapidly.
-
Copper products labeled for garden tomatoes can help reduce spread when used properly,
but cultural steps matter more than spraying your way out of a swamp. - Rotate away from tomatoes/peppers/eggplant/potatoes for a couple of seasons if possible.
Spot vs. Speck in plain English
If it’s raised and scabby, think bacterial spot.
If it’s tiny and pinpoint, think bacterial speck.
Either way, moisture management is the main plot twist.
5) Anthracnose (Ripe-Fruit Rot That Sneaks Up Late)
What it looks like
Anthracnose usually attacks ripe or overripe tomatoes. Spots begin as small, slightly sunken circles,
then expand into deeper, depressed lesions with dark centers. In humid conditions, you may see
pink or salmon-colored spore masses on the surfacenature’s way of saying, “I’m not done yet.”
Why it happens
Anthracnose is caused by a fungus that can hang around in soil and on plant debris. It often becomes noticeable
when fruit sits ripe on the plantespecially if fruit touches soil, gets splashed, or stays wet from rain or heavy dew.
It’s one reason “I’ll pick them tomorrow” sometimes turns into “Why is my basket dissolving?”
What to do right now
- Harvest promptly as fruit begins to color (don’t let ripe fruit linger forever outdoors).
- Keep fruit off the ground (cage/stake + mulch).
- Remove infected fruit quickly to reduce spore spread.
-
In wet seasons or if anthracnose returns yearly, a labeled fungicide used preventively can help,
along with strict sanitation and rotation. - Handle harvest gently and keep fruit dry; don’t store bruised fruit with clean fruit.
What If You’re Seeing Black Spots on Leaves Too?
Fruit spotting often comes with leaf clues. If leaves are covered in spots and yellowing from the bottom up,
you’re more likely dealing with a disease like early blight or a bacterial issue. If leaves look mostly fine but ripe
fruit gets sunken, dark-centered pits, anthracnose becomes more likely. Use the plant like a detective board:
fruit is the headline, leaves are the footnotes.
The “Save This Crop” Prevention Playbook
Whether your problem is blossom-end rot, early blight, bacterial spot, bacterial speck, or anthracnose, these habits
dramatically reduce your chances of seeing black spots on tomato fruit again:
-
Water for consistency: Deep, regular watering beats unpredictable extremes. Use mulch to keep soil
from swinging between desert and bathtub. -
Keep foliage dry: Drip irrigation or soaker hoses beat sprinklers. If you must water overhead, do it
early so plants dry quickly. - Increase airflow: Space plants well, prune lower leaves, and avoid a jungle canopy that stays damp.
- Stake/cage: Fruit off the soil means fewer splash-borne pathogens and fewer rots.
-
Clean up and rotate: Remove old plant debris. Rotate tomatoes and their relatives out of the same bed
when possible. - Start clean: Choose healthy transplants and avoid bringing in plants already spotted or stressed.
-
Be gentle with fertilizer: Overdoing nitrogen can make plants lush and vulnerablegreat for leaves,
not always great for fruit quality.
So… Should You Throw Away Every Spotted Tomato?
Not necessarily. Here’s a simple food-quality rule of thumb:
- Firm fruit + superficial spots (scabby/skin-deep) → wash, trim if needed, and use.
- Soft fruit, spreading rot, bad smell, or mold → compost/trash it.
- Blossom-end rot often leaves the rest of the fruit usable if caught earlyjust cut off the damaged end.
Bottom line: black spots are a symptom, not a life sentence. Once you match the pattern to the cause, your next steps
get a lot more effective than “stare sadly at the plant and hope.”
Experiences Gardeners Commonly Report (And What They Learn the Hard Way)
You don’t have to garden for long before tomatoes teach you one universal truth: they are dramatic, but they are also
surprisingly forgivingif you respond to the right problem.
Below are real-world-style scenarios that gardeners commonly describe when dealing with black spots on tomatoes,
plus the practical takeaway that usually makes the biggest difference.
Experience #1: “The First Tomatoes Were Perfect… Then the Bottoms Turned Black”
A classic story: early fruit sets during a warm stretch, and suddenly the first few tomatoes develop that ugly, black
patch on the bottom. Many gardeners assume the soil “has no calcium,” rush to add supplements, and are confused when
the problem continues. What often fixes it isn’t a magic calcium productit’s changing the watering pattern.
Gardeners who switch from occasional heavy watering to a consistent routine (and add mulch) frequently notice that
newer fruit improves. The damaged fruit never recovers, but the plant can absolutely produce healthy tomatoes
afterward. The lesson: blossom-end rot is often a moisture management problem first, and a nutrient
problem second.
Experience #2: “After a Rainy Week, I Started Seeing Bull’s-Eyes on Leavesand Dark Spots Near the Stem”
Another familiar timeline: a stretch of rain (or daily overhead watering) followed by lower leaves turning spotty,
yellow, and tired. Shortly after, fruit near the stem end starts showing darker lesions that look leathery, sometimes
with faint rings. Gardeners who act earlyby pruning the lowest leaves, mulching, and keeping water off foliageoften
slow the spread enough to salvage a big portion of the harvest. The gardeners who wait until half the plant is
defoliated usually end up with smaller fruit and sunburn issues later. The lesson: with early blight, the
speed of your response matters more than having the “perfect” product.
Experience #3: “My Tomatoes Looked Like They Got Acne OvernightTiny Scabs Everywhere”
Gardeners sometimes report fruit that suddenly looks rough and peppered with raised spotsespecially after storms,
sprinklers, or enthusiastic hose spraying. In many of these cases, bacterial spot is the culprit, and the biggest
turning point is stopping the splash cycle. Switching to drip watering, avoiding pruning when plants are wet, and
improving airflow often reduces the number of new lesions even if existing spots remain. Some gardeners add a
copper product and see modest improvementothers see little changebecause bacteria can be stubborn and conditions
can overpower sprays. The lesson: bacterial problems are mostly managed by reducing wetness + reducing spread,
not by “nuking” them with a single spray.
Experience #4: “They Aren’t Big SpotsJust Tiny Black FlecksBut They’re On So Many Tomatoes”
This is where bacterial speck shines (in the least fun way). Gardeners often describe the spots as so small they look
like ground pepper or a marker dot. The good news is the fruit is frequently still usablethose specks are often
shallow. The frustration is volume: it can show up across lots of fruit at once. Gardeners who keep plants dry and
harvest regularly tend to feel less defeated because they can still use most of the crop. The lesson: speck is often
more about cosmetics and convenience than total crop lossso adjust your management and keep picking.
Experience #5: “My Tomatoes Were Beautiful… Until They Got Ripe. Then They Developed Sunken Spots and Rot Fast”
This is the anthracnose heartbreak. Gardeners describe leaving ripe fruit on the plant “just one more day” and then
discovering sunken circles that expand quicklysometimes with a slimy pinkish spore smear in humid weather.
People often notice it most after rainy periods, or when fruit is touching soil. The most effective habit change
reported is simple but powerful: harvest at first blush (when color starts) and let fruit finish
ripening indoors. Add staking, mulch, and quick removal of infected fruit, and the problem often becomes manageable.
The lesson: anthracnose punishes procrastinationso make harvesting part of your routine, not an occasional event.
The “One Change That Helps Almost Everyone”
Across all these experiences, one theme keeps showing up: moisture control.
Consistent soil moisture helps prevent blossom-end rot, and dry foliage helps reduce fungal and bacterial spread.
If you do nothing else, mulch + base watering + airflow is the triple-combo that makes tomatoes behave like they’ve
been to therapy.
Final Thoughts
When you spot black marks on tomatoes, don’t treat every spot like it’s the same problem. Location and texture are
your best clues. Fix watering swings for blossom-end rot, reduce leaf wetness for early blight, limit splash and
handling for bacterial issues, and harvest promptly to outsmart anthracnose. Your tomatoes can absolutely bounce back
and your sandwiches deserve that comeback story.