Table of Contents >> Show >> Hide
- Why a Pegboard Is the Summer MVP
- Step 1: Do a “Summer Gear Audit” (10 Minutes, Promise)
- Step 2: Pick the Right Pegboard and the Right Spot
- Step 3: Install It So It Doesn’t Rage-Quit
- Step 4: Design “Zones” Like a Mini Store
- Step 5: Choose Pegboard Accessories That Do the Heavy Lifting
- Step 6: Layout Rules That Keep Your Wall From Becoming Chaos Art
- Three Summer Pegboard Setups You Can Copy
- Common Mistakes (and How to Avoid Them)
- Maintenance: The 30-Second Reset That Keeps It Organized
- Experiences: What I Learned After Actually Using a Summer Pegboard (The Honest Version)
- Conclusion
Summer gear has a special talent: it multiplies overnight, migrates to the least convenient corner of your garage, and then plays hide-and-seek exactly when you’re already late.
Goggles vanish. Sunscreen expires in a mystery tote. The kite string becomes one with the lawn chairs. If your “system” is currently a pile (or seven piles), a pegboard can be the
calm, upright adult in the room.
Organizing summer items on a pegboard isn’t about making your garage look like a tool commercial. It’s about creating a grab-and-go station for the stuff you use all season:
pool days, beach trips, yard work, camping weekends, backyard dinners, and “the kids are bored” emergencies. The goal: everything visible, reachable, and easy to put backwithout
needing a treasure map or a motivational speech.
Why a Pegboard Is the Summer MVP
A pegboard does three things traditional storage struggles with: it uses vertical space, it keeps categories visible, and it adapts when your summer changes (because it will).
You can move hooks around as your needs shiftfrom swim season to soccer tournaments to gardening marathonswithout rebuilding shelves or buying a new cabinet.
- Visibility: You stop buying duplicates because you “couldn’t find the other one.” (We’ve all funded that economy.)
- Speed: The right item is where your hand expects it to beno digging, no lid wrestling, no bin avalanche.
- Flexibility: Hooks, baskets, and shelves can be rearranged in minutes as your gear changes week to week.
- Accountability: When something has a home on the wall, it’s easier to notice what’s missing and easier to return it.
Step 1: Do a “Summer Gear Audit” (10 Minutes, Promise)
Before you hang a single hook, do a quick audit. This is the part where you prevent your pegboard from turning into a decorative junk wall (a very real genre).
Grab a laundry basket and pull together everything that counts as “summer items”:
- Beach + pool: goggles, swim caps, towels, float pump, sand toys, water shoes
- Outdoor play: balls, frisbees, chalk, bubbles, jump ropes, kites
- Garden + yard: gloves, trowel, pruners, twine, hose nozzle, plant ties
- Camping + travel: headlamps, bug spray, small first-aid kit, dry bags, camp utensils
- Backyard hosting: grill tools, lighter (if used), citronella accessories, string-light clips, patio games
Sort into three buckets
Keep this simple:
Daily/Weekly (you reach for it often), Monthly (you still want it accessible), and Occasional (it can live lower or off to the side).
Anything broken, missing pieces, or deeply annoying goes into a “fix/replace” boxdon’t let it squat on premium pegboard real estate.
Step 2: Pick the Right Pegboard and the Right Spot
Choose a material that matches your life
Pegboards come in a few common types: traditional hardboard, metal, and molded plastic systems. Traditional hardboard is budget-friendly and easy to paint.
Metal pegboards are sturdier, often with better accessory options, and can handle heavier-duty setups. Plastic systems can work well indoors or in lower-moisture areas.
The “best” choice is the one you’ll actually useand that won’t warp or wobble where you install it.
Location: follow the traffic
The best pegboard location is where your summer items naturally enter and exit your home. If the gear lives in your garage, put it near the garage door or near where you load the car.
If your beach stuff comes through the mudroom, that wall might be your best friend. If your garden supplies live in a shed, mount the pegboard right above the potting bench.
- Garage: Great for sports, pool, outdoor toys, and yard tools.
- Mudroom/entry: Ideal for sunscreen, hats, tote bags, water bottles, and quick-grab outdoor essentials.
- Shed: Perfect for gardening, lawn accessories, and outdoor entertaining extras.
Step 3: Install It So It Doesn’t Rage-Quit
A pegboard only works if it’s mounted correctly. Hooks need clearance behind the board, and the board needs strong attachment points (especially if you’re hanging summer items with weight,
like pumps, paddles, or garden tools). A common approach is to mount the pegboard over wood spacers or furring strips so there’s an air gap between the board and the wall.
Installation essentials (the “please don’t skip this” list)
- Find studs when possible: Secure the mounting strips into studs for strength and stability.
- Create a gap: Use wood strips/spacers behind the pegboard so hooks can seat properly.
- Use washers: Washers help screws hold the board securely without tearing through the holes.
- Add enough fasteners: More attachment points = less wobble, especially with frequent use.
- Level it: A crooked pegboard will haunt you every time you try to line up hooks in neat rows.
If you’re mounting on drywall without studs (not ideal, but sometimes real life wins), use appropriate heavy-duty anchors and keep your load lighter. When in doubt, treat the pegboard
like a bookshelf: it’s happiest when it’s supported properly and not asked to perform miracles.
Step 4: Design “Zones” Like a Mini Store
The secret to pegboard organization ideas that actually stick is zoning. If you mix pool toys with garden twine and grilling tongs, you’ll create a wall that looks busy and feels useless.
Instead, build small zones based on activities. Think of it like setting up departments in your own tiny summer supply shopminus the fluorescent lighting.
High-value pegboard zones for summer items
- Pool + Beach Zone: goggles, sunscreen basket, swim bags, sand toys, towel clips
- Outdoor Play Zone: balls, frisbees, bubbles, chalk, jump ropes
- Garden + Yard Zone: gloves, pruners, twine, hose nozzle, hand tools
- Camping + Adventure Zone: headlamps, lantern accessories, dry bags, bug spray
- Backyard Hosting Zone: grill tools, matches/lighter storage (safely), patio game pieces, clips for tablecloths
Keep wet stuff from “sharing” with paper and metal
Summer includes water, sweat, and the occasional surprise rainstorm. If you hang damp towels over metal hooks, you’re inviting rust and musty smells to the party.
Consider a dedicated “drying corner” with removable hooks or a small rack, and keep cloth items separate from anything that corrodes or stains easily.
Step 5: Choose Pegboard Accessories That Do the Heavy Lifting
Hooks are great, but hooks alone won’t solve everything. The magic is mixing accessories so every shape has a home. Summer gear is famously awkward: round, floppy, leaky, and
occasionally covered in sand. (Sand is basically glitter’s outdoorsy cousin.)
Accessory cheat sheet
- J-hooks + curved hooks: Perfect for swim bags, hats, lightweight hoses, jump ropes, and tote handles.
- Double hooks: Better stability for items like goggles cases, small pumps, or garden shears.
- Loop hooks: Great for extension cords, hoses, and anything you want to coil.
- Wire baskets: Your best friend for sunscreen, bug spray, spare goggles, small toys, and “random but necessary” items.
- Small shelves: Useful for bins, folded towels, or items you don’t want hanging (like fragile accessories).
- Clips: Handy for hats, thin towels, maps, or “don’t lose this” lists.
- Dowel rods: Surprisingly good for tape, twine, dog leashes, or small rollable items.
For a garage pegboard setup, choose accessories that lock in well so you don’t pull the hook out every time you grab something. If you’ve ever removed a hook by accident and felt like
you lost a small wrestling match, you know what I mean.
Step 6: Layout Rules That Keep Your Wall From Becoming Chaos Art
Put “grab daily” items at eye level
Eye level is prime real estate. Put the items you use constantlylike swim bags, sunscreen basket, goggles, hose nozzle, garden gloveswhere you can reach them without thinking.
Save lower sections for bulkier or less-used gear, and higher sections for seasonal extras (like a kite or spare float valves).
Group by task, then by size
Inside each zone, arrange items so the flow makes sense. Example: in the pool zone, keep goggles near swim caps and towel clips, and keep the float pump near inflatables.
In the garden zone, keep gloves next to hand tools and plant ties. When your wall mirrors the way you move, cleanup becomes automatic instead of optional.
Use “shadowing” and labels (yes, it’s worth it)
If you want a pegboard organization system that stays neat, outline key items or use simple labels. You can paint a small block of color behind each category, add tags to baskets,
or mark hook positions for frequently used items. It sounds extrauntil you realize it saves you from asking, “Where’s the pump?” every weekend until September.
Leave breathing room
Overcrowding is the #1 way pegboards fail. Leave a little space between items so you can remove one thing without taking down three others like a game of storage Jenga.
A good rule: if your hand can’t grab it cleanly, your layout needs more space.
Three Summer Pegboard Setups You Can Copy
1) The “Weekend Warrior” garage wall
Picture a 4×6 pegboard near the garage door. Left side: a pool and beach zone with two baskets (sunscreen/bug spray + goggles/earplugs), plus hooks for swim bags and water shoes.
Center: outdoor play with hooks for balls in mesh bags, frisbees, and jump ropes. Right side: yard zone with gloves, pruners, twine, and the hose nozzle on a double hook.
Bottom row: a small shelf for towels (clean only), and a labeled bin for replacement batteries or small repair parts.
2) The shed “garden + hosting” board
Use a pegboard above your potting bench. One basket for plant ties and seed packets, one for gloves and hand wipes, hooks for trowel/pruners, and a loop hook for twine.
Add a small shelf for a handheld sprayer and a second hook cluster for outdoor entertaining extraslike string-light clips and a lighter stored safely in a contained spot.
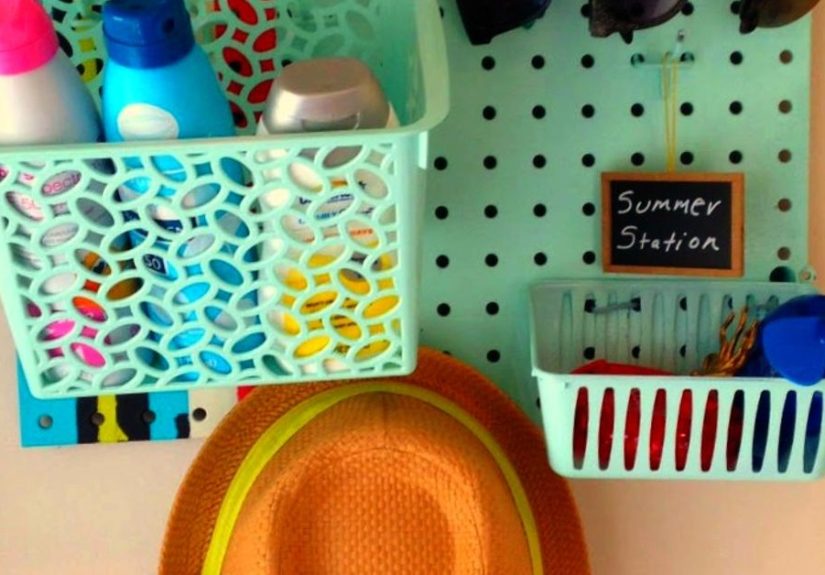
3) The mudroom “beach launch pad”
Smaller pegboards work great indoors: a compact board can hold hats, tote bags, swim goggles, and a basket for sunscreen. Keep a hook for a “go bag” and a clip for a checklist
(towels, water bottles, snacks, keys). This setup is especially helpful if your summer activities start at the front doornot the garage.
Common Mistakes (and How to Avoid Them)
- Mounting without a gap: Hooks won’t sit right and will pop out. Use spacers/furring strips.
- Ignoring weight: Heavy items need better support and sometimes a different storage method. Don’t overload the board.
- Mixing categories: Pool stuff + garden stuff + camping stuff all together = nobody wins.
- No “small item plan”: Tiny pieces need baskets, bins, or jarsotherwise they become floor confetti.
- Not planning for sand/water: Give wet and gritty items their own area, and keep soft goods from staying damp.
Maintenance: The 30-Second Reset That Keeps It Organized
Pegboards stay organized when “put it back” is easy. Make it a quick reset: after a pool day, hang the swim bags, toss goggles into the labeled basket, and put the pump back on its hook.
If you’ve outlined the hook placements or labeled zones, even kids can help (and yes, miracles do happen).
Once a month, do a two-minute scan: toss expired sunscreen, check for missing pieces, and rotate anything that’s moved into the wrong zone. Think of it like brushing your teethbut for
your garage pegboard. Less dramatic than a full cleanup, and way more effective.
Experiences: What I Learned After Actually Using a Summer Pegboard (The Honest Version)
The first time I organized summer items on a pegboard, I did what many optimistic humans do: I arranged everything to look impressive, not to work. It was gorgeous. It was also useless
the moment real summer life showed upwet towels, sandy toys, someone yelling that they couldn’t find the goggles (while standing in front of the goggles), and the sudden discovery that
“lightweight” inflatables still take up a lot of space when they’re half-deflated and sticky.
The biggest lesson was that function beats aesthetics, but you can still have both. Once I stopped trying to make every row symmetrical, things got easier.
I gave the pegboard a few “mess-friendly” zones: a basket that could handle sunscreen and bug spray without tipping, a hook cluster for swim bags, and a low section where the kids could
return items without needing a step stool or a pep talk. That last part mattered more than I expectedwhen the board is reachable, stuff goes back. When it isn’t, stuff migrates to the
floor like it’s following a secret command.
I also learned that baskets are the true heroes of pegboard organization. Hooks are perfect for anything with a handle, loop, or strap. But summer gear includes a lot of
“free-range chaos” like earplugs, nose clips, small sunscreen sticks, bandages, hair ties, and the tiny plastic pieces that somehow keep pool toys alive. Once those items got a labeled
basket, the frantic searching stopped. The basket didn’t need to be pretty; it needed to be obvious. If you can spot it from three feet away, you’ve already improved your life.
Another surprise: sand management is an organizing category all by itself. If you hang beach toys directly on hooks and they’re still sandy, that sand ends up everywhere.
The fix was simple: I added a “shake-out” rule and a designated spot for a mesh bag. The mesh bag could hang on a sturdy hook, and it let sand fall out before the toys went back into
their basket. Was it perfect? No. Did it reduce the gritty garage floor situation? Absolutely.
Finally, I stopped thinking of the pegboard as “finished.” A pegboard is more like a whiteboard: you adjust it as your season changes. Early summer needed pool and beach gear up front.
Mid-summer added garden tools and grilling accessories. Late summer shifted toward sports equipment and back-to-school items. Every small adjustmentmoving the pump closer to the float
storage, lowering the kids’ hooks, adding one more basket for “small stuff”made the system more realistic. If your pegboard changes with you, it stays useful. If you freeze it in one
perfect layout, summer will break it like a wave breaks a sandcastle.
Conclusion
A pegboard turns summer clutter into a simple, visual system: zones for activities, accessories that match the shapes you own, and a layout that makes returning items almost automatic.
Start with the gear you use most, mount the board securely, and build a setup that’s easy to maintainnot just nice to look at. Once your summer essentials live on the wall, you’ll spend
less time hunting and more time doing the fun part… you know, the actual summer.