Table of Contents >> Show >> Hide
- Why the Oven-to-Grill Method Works (aka: Science You Can Eat)
- Choosing and Prepping Baby Back Ribs Like a Pro
- Flavor Plan: Dry Brine, Rub, and Sauce (Choose Your Own Adventure)
- The Oven Phase: Low-and-Slow Tenderizing
- The Grill Finish: Sticky, Charred, and Absolutely Not Burnt
- Make-Ahead and Timing (Because Life Happens)
- Troubleshooting: When Ribs Misbehave
- Serving Ideas: Build the Plate
- Conclusion: The Best of Both Worlds
- Extra: of Real-World Rib Experiences (So You Don’t Have to Learn the Hard Way)
If you love barbecue ribs but don’t love babysitting a smoker like it’s a newborn with a mischievous streak, welcome. Oven-to-grill baby back ribs are the “work smarter, eat stickier” method: you use the oven for the long, gentle tenderizing, then finish on the grill for that smoky-kissed char and glossy, caramelized sauce that makes people suddenly forget how to use indoor voices.
This is not a shortcut that tastes like a shortcut. It’s a strategy. The oven gives you steady, predictable heat; the grill gives you flame-kissed flavor and that last-minute “yes, I meant to do that” bark. Put them together and you get tender baby back ribs with a backyard-grill personalityeven if your “backyard” is a balcony and your grill is the size of a carry-on.
Why the Oven-to-Grill Method Works (aka: Science You Can Eat)
1) The oven does the heavy lifting
Baby back ribs are naturally tender compared with spare ribs, but they still contain collagen and connective tissue that need time to melt into gelatin. Low, steady oven heatespecially with a tight foil wrapcreates a humid environment that gently breaks down those tough bits without drying out the meat. Think of it as a spa day for pork: warm, steamy, and slightly mysterious.
2) The grill brings the drama
Barbecue sauce and sugars love to burn if you grill them too long. But a quick grill finish over indirect heat lets you set a sticky glaze, then sear briefly over direct heat for char and caramelization. You get the flavor of the grill without turning your ribs into a cautionary tale.
Choosing and Prepping Baby Back Ribs Like a Pro
Baby back ribs vs. spare ribs
Baby back ribs come from the loin area (higher on the hog), so they’re typically leaner, smaller, and cook a bit faster than spare ribs. They’re a great match for the oven-to-grill approach because they tenderize beautifully in a few hours, then finish fast on the grill.
The membrane: remove it (your teeth will thank you)
On the bone side, there’s a thin membrane (sometimes called “silver skin”) that can turn chewy and block seasoning from penetrating. The easiest move: slide a dull knife under a corner, lift, then grab with a paper towel and pull. If it tears, no panicjust start again. It’s not a test of character; it’s just ribs.
Quick trim and portioning
Pat the rack dry. Trim any big flaps of loose fat or meat that will burn on the grill. If your racks are huge, you can cut them in half to fit your baking sheet and make flipping easier later.
Flavor Plan: Dry Brine, Rub, and Sauce (Choose Your Own Adventure)
Step one: a short dry brine
Salt isn’t just “seasoning.” Given time, it helps the meat hold onto moisture and tastes more “ribby” (technical term). Even 30–60 minutes helps. If you can plan ahead, 4–12 hours in the fridge is fantastic.
Step two: a balanced dry rub (with options)
Here’s a rub that plays nicely with most barbecue saucessweet, smoky, and a little spicy. If you’re worried about sugar burning, reduce the brown sugar by half and add a touch more paprika.
Simple rib rub (enough for 2 racks)
- 2 tbsp kosher salt
- 2 tbsp brown sugar (use 1 tbsp for a lower-sugar option)
- 1 tbsp smoked paprika (or regular paprika)
- 2 tsp black pepper
- 2 tsp garlic powder
- 2 tsp onion powder
- 1 tsp chili powder
- 1/2 tsp cayenne (optional, but fun)
Step three: sauce strategy (don’t paint too early)
If your sauce is sweet (Kansas City-style, molasses-heavy, honey-forward), apply it near the end so it glazes instead of scorches. If you like vinegar-forward sauces (Carolina-ish), you can brush lightly earlier because they burn less. Either way, save a little sauce for servingfresh sauce on hot ribs is unfairly good.
The Oven Phase: Low-and-Slow Tenderizing
This is the “set it and relax” chapter. The goal is ribs that are tender enough to finish quickly on the grill without falling apart when you try to move them (we want majestic racks, not delicious rubble).
What you’ll need
- 2 racks baby back ribs
- Your rub
- Heavy-duty foil
- Rimmed baking sheet
- Optional: 2–4 tbsp apple juice, beer, or diluted apple cider vinegar per rack (for a little extra steam)
Oven instructions
- Preheat your oven to 275°F. Line a rimmed baking sheet with foil (easy cleanup is a love language).
- Season the ribs: pat dry, remove membrane, then coat both sides with rub. Let sit 30–60 minutes (or refrigerate longer if you can).
- Wrap tight: Place each rack on heavy-duty foil, bone side up. Add a small splash of liquid (optional), then seal into a tight packet. The tighter the wrap, the better the gentle steaming.
- Bake for 2.5 to 3.5 hours, depending on thickness. Start checking around 2.5 hours. You’re looking for meat that has pulled back slightly from the bone ends and feels flexible when you lift the packet (carefullysteam is sneaky).
- Check tenderness: If a toothpick slides in with little resistance between bones, you’re in the zone. If it still feels tight and rubbery, give it another 20–30 minutes.
Food safety note: pork is considered safe at 145°F with a rest, but ribs are a “tough cut” that most people prefer cooked further so collagen breaks down. For that tender bite, many cooks aim well above the minimum safe temperaturedoneness is about tenderness, not just a number.
The Grill Finish: Sticky, Charred, and Absolutely Not Burnt
Now we turn “tender oven ribs” into “barbecue ribs that make neighbors appear.” The key is two-zone heat: one side indirect (no flames under the ribs), one side direct (for quick caramelization).
Set up your grill
- Gas grill: Preheat to medium-high, then turn one side to medium/low (indirect zone) and leave the other side hotter for searing.
- Charcoal grill: Bank coals to one side. Put ribs on the cooler side. Lid on. Vents adjusted to hold steady heat.
Grill instructions
- Unwrap carefully (steam againstill sneaky). Transfer ribs to a tray. If you like, lightly brush off excess rub clumps.
- Start indirect: Place ribs on the indirect side, meat side up. Close the lid and grill 8–12 minutes to dry the surface a bit and pick up flavor.
- Glaze: Brush on a thin layer of barbecue sauce. Close the lid 5 minutes. Repeat once more for a thicker lacquer.
- Quick char (optional but delightful): Move ribs briefly over direct heat for 1–3 minutes per side, watching constantly. You want caramelized edges, not “campfire marshmallow tragedy.”
- Rest 5–10 minutes, then slice between bones and serve with extra sauce.
Make-Ahead and Timing (Because Life Happens)
This method is party-friendly. You can bake the ribs earlier in the day (or even the day before), chill them in their foil packets, then rewarm and finish on the grill right before serving. If reheating, warm the wrapped ribs in a low oven until hot, then grill to glaze. That means you’re not stuck in the kitchen while everyone else is outside discussing important topics like “which chip is the saltiest.”
Troubleshooting: When Ribs Misbehave
“My ribs are tough.”
They probably need more time in the oven. Tough ribs are usually under-tenderized collagen. Wrap tight and bake longer in 20–30 minute bursts.
“My ribs are dry.”
Overcooked or too much high heat at the end. Next time, shorten the grill time and focus on indirect heat for glazing. Also: don’t skip restingjuices need a moment to calm down.
“My sauce burned.”
Sugary sauce + direct flame + time = heartbreak. Apply sauce late, keep the ribs mostly on indirect heat, and do any direct charring as a quick, supervised eventnot an unattended lifestyle choice.
“I want more smoky flavor.”
Use smoked paprika in the rub, choose a smoky barbecue sauce, or toss a small chunk of wood (charcoal grill) or a smoker box (gas grill) during the indirect phase. Even 10–15 minutes of gentle smoke at the end can add a surprising boost.
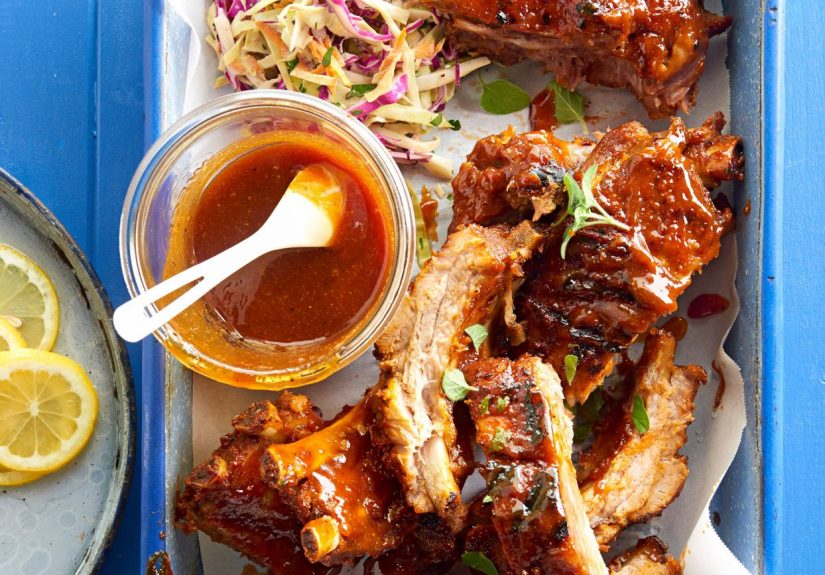
Serving Ideas: Build the Plate
Baby back ribs love classic sides: crunchy slaw, baked beans, corn on the cob, potato salad, pickles, and anything that can carry extra sauce without judgment. For drinks, go with iced tea, lemonade, crisp lager, or something tart and fizzy to cut through the richness.
Conclusion: The Best of Both Worlds
Oven-to-grill baby back ribs give you the tenderness of low-and-slow cooking and the flavor of a grill finishwithout requiring a smoker, an engineering degree, or a willingness to stare at meat for six straight hours. Bake until tender, grill to glaze, char just enough to brag about it, and remember: the only “wrong” rib is the one you didn’t make enough of.
Extra: of Real-World Rib Experiences (So You Don’t Have to Learn the Hard Way)
The first time most people try oven-to-grill ribs, the biggest surprise is how calm the process feels. You season the racks, wrap them up, and the oven does the long work while you’re free to live your lifeanswer emails, tidy up, or practice saying, “Oh these? Just something I threw together.” That calm can be dangerous, though, because ribs reward attention in the last 15 minutes more than they demand it for the first three hours.
One common “welcome to ribs” moment is the membrane. You’ll read that removing it matters, you’ll assume you can skip it, and then you’ll bite into a chewy layer that feels like the world’s most determined plastic wrap. The best experience is when you remove it successfully in one clean pullsuddenly you feel like you should receive a tiny trophy shaped like a pig. If it tears, don’t spiral. Lots of people remove it in pieces. Paper towel grip is the cheat code.
Another classic experience: the sauce sprint. People often start with noble intentionstwo-zone fire, gentle glaze, quick charand then get distracted by one conversation about sports, traffic, or why someone insists their aunt’s coleslaw is “life-changing.” Meanwhile, sugar in the sauce is out there making bold decisions over direct heat. The practical lesson is simple: sauce goes on late, and direct heat is a short, supervised field trip. If you want deeper color without fear, keep the ribs indirect, close the lid, and build the glaze with two thinner coats instead of one thick paint job.
Then there’s the tenderness paradox. If your ribs are “done” by temperature but still feel tight, the experience is confusingbecause you did what responsible adults do and checked the thermometer. Ribs teach you that safety and tenderness aren’t identical. They’re safe at lower temps, but truly satisfying once the collagen has surrendered. The first time you nail that toothpick-slide tenderness, you’ll understand why people become emotionally invested in barbecue.
Finally, oven-to-grill ribs create a very specific hosting experience: you can prep early, socialize, and still deliver a grill-finish moment that feels fresh. You’ll notice guests hovering near the grill, pretending they’re “just getting a drink,” and you’ll also notice how fast ribs disappear once sliced. The most reliable real-world tip? Make more than you think. The second most reliable? Hide a few bones “for later” before you put the platter downbecause later might never happen.