Table of Contents >> Show >> Hide
- What Is a Penrose Tiling (and Why Does It Look Like Wizardry)?
- Why a Penrose Tile Wall Works So Well in a Room
- The Make:-Inspired Version: When the Wall Becomes a Light Show
- Two Routes to Your Own Penrose Tile Wall
- Plan the Pattern Like a Grown-Up (So You Can Build Like a Gremlin Later)
- If You’re Using Real Tile: Substrate Prep Is the Secret Main Character
- How to Build a Penrose Tile Wall (DIY Workflow)
- Step 1: Create or download a Penrose layout at your wall’s dimensions
- Step 2: Do a dry run (yes, even if you’re “good at eyeballing”)
- Step 3: Start from a stable reference line
- Step 4: Set tiles (or mount pieces) in manageable zones
- Step 5: Cut edges cleanly and intentionally
- Step 6: Grout, clean, seal (for real tile builds)
- Want the LED Version? A Home-Scale Blueprint
- Design Ideas That Look High-End Without Trying Too Hard
- Common Mistakes (and How to Avoid Them)
- Conclusion: A Wall That Never Repeats, but Always Delivers
- Extra: Practical “Experience Notes” Makers Swear By (About )
Some people hang a picture frame. Some people paint an accent wall. And then there are the glorious chaos-goblins who look at a blank wall and think,
“What this needs is non-repeating mathematical poetry… possibly with LEDs.”
That’s the vibe behind a Penrose tile wall: a geometric feature wall based on an aperiodic tiling system (translation: it never repeats, which is also how my sock drawer works).
The pattern feels orderly and wild at the same timelike a well-behaved jazz solo.
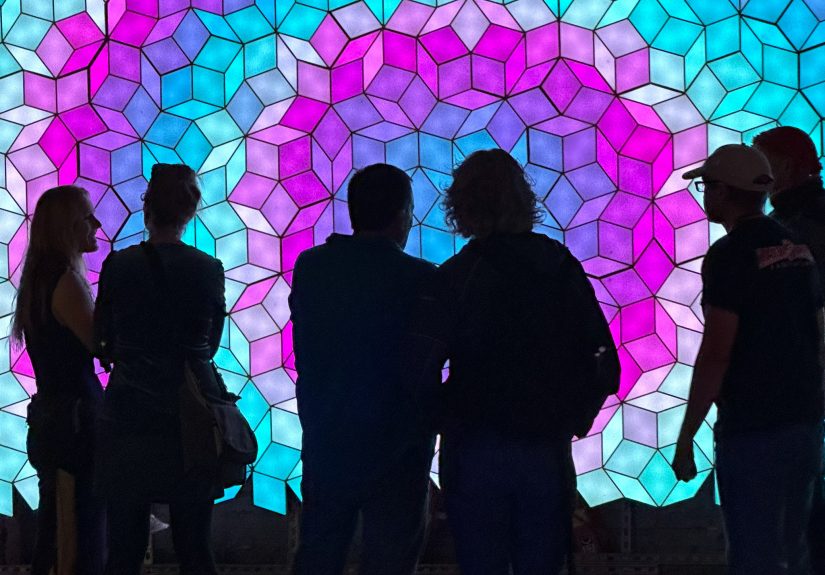
And when Make: showcased Chuck Sommerville’s illuminated Penrose Tile Wall, it proved the concept at full-send scale: a giant, glowing, “how is this even possible?” wall that’s equal parts art installation and math flex.
This article breaks down what makes Penrose tiling special, why it looks so good in interiors, and how you can borrow the same principleswhether you’re installing actual tile,
building a wood-and-light “tile wall,” or faking it convincingly with paint and a weekend of determination.
What Is a Penrose Tiling (and Why Does It Look Like Wizardry)?
Aperiodic tiles: a pattern that refuses to “copy-paste”
Most tile patterns repeat. You can point to a spot on the wall, slide your finger over a few tiles, and the same motif shows up again like it’s on a loop.
Penrose tilings are the opposite: they cover a plane without ever repeating periodically. You get local symmetry (especially fivefold “starburst” moments),
but no repeating wallpaper rhythm. Your eyes keep finding new clusters and “wait, what is that shape?” moments.
Mathematicians love Penrose tilings because they sit at a fascinating crossroads: order without periodic repetition.
They’re part of a bigger story about aperiodic tiling setsshapes that can tile forever, but only in a nonrepeating way.
(In other words, the pattern is committed to being unique. Respect.)
Kites, darts, and rhombs: choose your tile “cast”
Penrose tilings can be built from a couple of different tile sets. Two common ones are:
- Kite and dart tiles (two quadrilaterals that feel a bit more “origami”).
- Thick and thin rhombs (two diamonds/rhombuses with angles that play nicely with fivefold symmetry).
Under the hood, the golden ratio shows up like it owns the place. That “1.618…” relationship is baked into how lengths and diagonals relate in the geometry,
and it’s one reason Penrose patterns feel balanced even when they’re not repeating.
Why a Penrose Tile Wall Works So Well in a Room
It reads as “designed,” not “decorated”
A Penrose feature wall doesn’t look like you picked a trendy pattern and stuck it on the wall. It looks like the room has a secret backstory.
The nonrepeating structure creates depth without needing loud colors or busy graphics. Even neutral palettes feel sophisticated because the geometry is doing the heavy lifting.
It’s geometric… but not rigid
Square grids can feel strict. Subway tile can feel classic (and sometimes a little expected). Penrose tiling gives you sharp lines and strong geometry
while still feeling organicalmost like a pattern nature would invent if nature had a ruler and a mild caffeine habit.
It scales from subtle to “museum installation”
You can go minimalmatte ceramic in two close tones, thin grout lines, calm lighting.
Or you can go full Make:: build an illuminated wall with individually addressable light “cells” that animate in real time.
Same pattern family, wildly different energy.
The Make:-Inspired Version: When the Wall Becomes a Light Show
In Make:, Chuck Sommerville’s Penrose Tile Wall is the kind of project that makes you say “cool” out loud, even if you’re alone.
It’s a large illuminated wall built from hundreds of diamond-shaped cells, each containing lighting modules, all mounted on a structural frame.
The result is a living display where the pattern never gets oldbecause the animations are generated in real time.
The really fun part isn’t just that it’s bright. It’s that the Penrose geometry gives the animations a natural complexity.
Traditional LED grids are basically pixel TVs. A Penrose layout is more like… a pixel TV that studied philosophy and decided repetition was a social construct.
What you can borrow from the Make: build (even at home scale)
- Cell-based construction: treat each tile as a “unit” you can build, label, and troubleshoot.
- Diffusion matters: LEDs look best behind a diffuser layer so you get glow, not glare.
- Information mapping: even if you’re not coding animations, planning tile orientation and neighbors prevents layout chaos.
- Modularity: build in sections so you can install, transport, and repair without crying quietly into a grout sponge.
Two Routes to Your Own Penrose Tile Wall
| Approach | Best For | Reality Check |
|---|---|---|
| Real ceramic/porcelain tile | Kitchens, baths, durability, “this is forever” builds | Cutting and layout precision are non-negotiable |
| Wood/MDF “tiles” (painted or finished) | Feature walls, rentals (with the right mounting), easy customization | Surface flatness and alignment still matter |
| LED “tile wall” (cells + diffusion) | Studios, makerspaces, events, maximalist statement pieces | Power, wiring, heat, and control systems add complexity |
| Paint/stencil Penrose pattern | Budget-friendly, low-tool, “try it first” experiments | Masking takes patience; geometry takes planning |
Plan the Pattern Like a Grown-Up (So You Can Build Like a Gremlin Later)
1) Pick your tile system and commit
Decide early: kite-and-dart or rhombus (thick/thin diamonds). For most DIY wall builds, rhombs are friendlier because the shapes are consistent and cut well on a CNC,
laser cutter, wet saw, or even careful template work. Kites/darts can look more “artsy,” but they introduce more edge variety.
2) Choose scale: small tiles feel intricate, big tiles feel architectural
A Penrose wall reads differently depending on tile size:
- 2–4 inch tiles: detailed, mosaic-like, great for backsplashes.
- 6–10 inch tiles: graphic and modern, perfect for a feature wall.
- 12+ inch “tiles”: bold and sculptural, especially in wood or illuminated cells.
3) Decide how “true” you want the tiling to be
True Penrose tilings follow matching rules (often expressed as edge markings) to prevent periodic repetition.
For home décor, you can be:
- Strict: generate a correct Penrose patch and follow it exactly.
- Practical: use a correct base patch, then trim edges or adjust borders to fit the wall.
- Rebellious (but tasteful): keep the Penrose “feel” while prioritizing symmetry around a focal point (mirror, TV, headboard).
4) Map the wall: centerlines, focal points, and “where do cuts land?”
Whether you’re setting tile with thinset or mounting wood pieces, do a layout plan first.
Mark a centerline and a level line. Decide what you want centered: a starburst cluster, a thick-rhomb “flower,” or a calm region with fewer visual spikes.
The biggest regret in decorative tiling is discovering your most beautiful motif is hiding behind a light switch plate.
If You’re Using Real Tile: Substrate Prep Is the Secret Main Character
Penrose patterns reward precision. That means your wall needs to be flat, stable, and appropriate for the space.
For wet areas (showers, tub surrounds), a proper tile backer board system is standard practice. For a kitchen backsplash, many guides allow clean, flat drywall in non-wet zones,
but you still need a sound surface and the right adhesive choice.
Prep checklist (the unglamorous part that prevents future rage)
- Wall is clean, flat, and solid (no flex, no flaky paint).
- Use the right substrate for the location (especially moisture exposure).
- Plan your grout line width and use spacers consistently.
- Work in small sections so thinset doesn’t skin over before tiles go up.
How to Build a Penrose Tile Wall (DIY Workflow)
Step 1: Create or download a Penrose layout at your wall’s dimensions
Start with a correct Penrose patch sized larger than your wall. Then crop it to your exact rectangle.
If you’re doing real tile, include grout lines in the plan (even a small grout joint changes cumulative dimensions across a large area).
If you’re doing wood “tiles,” decide whether you want visible gaps (shadow lines) or a tight, seamless look.
Step 2: Do a dry run (yes, even if you’re “good at eyeballing”)
Dry-lay a section on a flat surface with spacers. This is where you catch problems cheaply:
awkward micro-cuts, motifs that vanish at the edges, and the classic “why are these two tiles suddenly enemies?” moment.
Step 3: Start from a stable reference line
On a vertical wall, gravity is always auditioning for the role of villain.
Use a level reference line or a temporary ledger board so tiles don’t slide while the mortar cures.
Keep your layout true as you expand outward.
Step 4: Set tiles (or mount pieces) in manageable zones
For real tile, spread thinset only over the area you can cover before it skins over.
Press tiles in, keep grout joints consistent with spacers, and periodically check level/flatness.
For wood tiles, use an adhesive and mounting method appropriate for weight (and your wall type),
and keep alignment crispPenrose geometry is forgiving artistically, but it is not forgiving mechanically.
Step 5: Cut edges cleanly and intentionally
The border is where a Penrose tile wall can look “custom built” or “math homework taped to drywall.”
Consider finishing strategies:
- Frame the patch with trim or a slim metal profile.
- Fade to a solid field at the edges (paint, plaster, or a neutral tile band).
- Use a deliberate crop that creates a clean perimeter of full shapes where possible.
Step 6: Grout, clean, seal (for real tile builds)
Once tiles are set and cured, grout the joints, clean haze carefully, and seal as appropriate for the tile and grout type.
Penrose patterns look especially sharp with consistent grout linesthis is not the project where “close enough” disappears.
Want the LED Version? A Home-Scale Blueprint
You don’t need an 18×9-foot wall to steal the magic. A 4×2-foot illuminated Penrose panel can still be the star of a room.
Here’s a practical, home-scale concept inspired by the Make: approach:
Structure and diffusion
- Backplane: MDF, plywood, or melamine panel cut with cell openings and divider slots.
- Dividers: thin strips forming thick/thin rhombs (painted white inside for better bounce).
- Diffuser layer: stretched diffusion fabric or translucent acrylic to smooth hotspots into glow.
- Frame: a rigid perimeter frame (wood or metal) that keeps everything square and mountable.
Lighting and control
- LED modules/strips: choose consistent color temperature or go addressable for animation.
- Power planning: size power supplies correctly, manage voltage drop, and keep wiring tidy.
- Control options: from beginner-friendly controllers to code-based systems if you want generative patterns.
The visual trick is diffusion plus geometry: the Penrose layout creates “clusters” that your animations or color gradients can emphasize.
Even simple effectsslow hue shifts, breathing brightness, alternating tile familiesfeel complex because the tiling gives them structure.
Design Ideas That Look High-End Without Trying Too Hard
Monochrome + shadow lines
Paint all tiles the same color (or choose a single ceramic series), then let grout lines or tiny gaps do the drawing.
This looks especially good in modern spaces where you want texture without a rainbow.
Two-tone “thick vs thin” coding
Use one color for thick rhombs and another for thin rhombs. It’s clean, graphic, and helps the pattern read from across the room.
In LEDs, this becomes a natural channel: two tile types, two lighting behaviors.
Wood grain Penrose wall
Cut the shapes from veneer plywood and rotate grain direction between tile types. The pattern becomes tactile and warmless “math lab,” more “boutique hotel lobby.”
Bathroom moment: calm colors, precise grout
If you’re tempted to use Penrose tiling in a bathroom, keep the palette quiet and the grout consistent.
Let the geometry be the hero; you don’t need it competing with five different terrazzo trends.
Common Mistakes (and How to Avoid Them)
“I’ll just start in the corner.”
Corners are where patterns go to die. Start from a planned focal point or a centered motif, then expand outward.
You’ll get a more intentional composition and fewer weird slivers.
Inconsistent spacing
Penrose patterns are busy enough; they don’t need wobbly grout lines adding freestyle jazz.
Use spacers, check lines frequently, and keep joints clean as you go.
Ignoring surface flatness
Even slight waves in a wall can telegraph through tile and make the pattern look “off,” especially with glossy finishes or strong lighting.
Fix the substrate first. Future-you will send you a thank-you card.
Underestimating time
A Penrose tile wall is not a “two hours before guests arrive” project. The layout is the project.
The install is just the part where your plan becomes real.
Conclusion: A Wall That Never Repeats, but Always Delivers
A Penrose tile wall is the rare home project that’s both a flex and a joy: it’s mathematically rich, visually addictive, and weirdly timeless.
Whether you follow Make: into the glowing deep endbuilding a modular LED wall with diffusion and generative animationsor you bring the pattern into your home
through real ceramic, wood tiles, or paint, the same principle holds: nonrepeating geometry makes the room feel alive.
Pick a scale that fits your space, plan the layout like a responsible adult, and then give yourself permission to make something a little unhinged (in the best way).
Because when a wall looks like it’s been designed by a mathematician and styled by an artist, it doesn’t just “tie the room together”
it politely grabs the room by the shoulders and says, “We’re interesting now.”
Extra: Practical “Experience Notes” Makers Swear By (About )
People who tackle a Penrose tile wall tend to report the same emotional arc: excitement, confidence, mild confusion, a short negotiation with the laws of geometry,
then a surprising amount of pride. The secret is that the pattern feels like magic, but the build is mostly process. The best “experience-based” advice is boring,
and boring advice is exactly what saves your weekend.
First: label everything. If you’re cutting thick and thin rhombs (or kites and darts) from wood or tile, you’ll eventually rotate a piece, flip it, set it down,
and wonder if you just invented a third shape. A simple pencil code on the backT for thick, t for thin, plus an arrow for “up”prevents the classic spiral of
“why doesn’t this fit” followed by “oh, it’s upside down” followed by “I have no idea what day it is.”
Second: dry-lay more than you think you need. A lot of builders dry-lay a “representative section,” feel good, and then discover the border behaves differently.
Corners and edges introduce partial shapes and cuts that don’t show up in the middle of your test patch. Dry-laying the entire first row (or first major band)
catches those surprises early, when changes are easy.
Third: commit to consistent spacing. On a vertical surface, tiles love to drift while mortar cures, especially if you’re working with small pieces.
Spacers are not optional. Neither is cleaning thinset squeeze-out from joints as you gobecause scraping hardened thinset from tiny Penrose joints later
feels like trying to erase a tattoo with a toothbrush.
Fourth: your wall’s “starting point” is the design decision that echoes. Builders who start from a meaningful motiflike a star cluster centered at eye level
are happier with the final look than builders who start from the left edge because it felt “logical.” Penrose tiling doesn’t reward edge-first thinking.
It rewards “compose the picture” thinking.
Fifth: for LED versions, cable management is the difference between “art” and “science fair panic.” Makers who bundle wires, document connections,
and plan access panels sleep better. A single dead module is no big dealunless it’s buried behind diffusion, dividers, and your last remaining patience.
Testing each section before closing it up is the grown-up move. So is leaving yourself a way to service it later.
Finally: take progress photos. Not for social media (though sure, flex a little). Photos help you retrace steps when a layout gets confusing,
and they’re a morale boost when your brain insists you’ve made “no progress” after three hours of careful placement. You have made progress.
You have placed dozens of little geometric decisions onto a wall. That’s not nothingthat’s the whole point.