Table of Contents >> Show >> Hide
- The Under-$5 Game Plan (How the Math Actually Works)
- Design Basics: Make It Look “Styled,” Not “Stuffed”
- Step-by-Step: The $5 Tinsel-Twist Patriotic Wreath
- Optional Variations (Still Budget-Friendly)
- Make It Last Outside: Sun, Rain, and “Why Is It Fading?”
- Troubleshooting (Because Crafts Love Drama)
- Where to Hang It (And How to Avoid Door-Slam Tragedy)
- Conclusion: A Big Holiday Look Without a Big Holiday Budget
- Extra: of Real Crafting Experience (Lessons From the Porch)
You don’t need a Pinterest-level budget (or a craft room that looks like a glitter factory exploded) to pull off a
festive red, white, and blue patriotic wreath. With a few dollar-store basics and a little
“I totally meant to do that” confidence, you can make a front-door stunner for under $5 that works for
Memorial Day, the 4th of July, Labor Day, Veterans Day, or any day you feel like your porch needs more freedom vibes.
This guide gives you a simple, beginner-friendly wreath that looks full, bright, and intentionally designedeven if
you’re crafting on the corner of your kitchen table while someone asks, “Are we eating soon?” (The answer is yes.
After you finish the bow.)
The Under-$5 Game Plan (How the Math Actually Works)
The easiest way to keep a DIY patriotic wreath under $5 is to build around four core items. Many dollar
stores still carry plenty of items around the $1.25 range, but some locations also have higher-priced sections and
certain products can cost moreso the real secret is: check the shelf label and stay flexible.
What you’ll buy (4 items)
- Wire wreath frame (about 12–14 inches)
- Red/white/blue tinsel garland (or one red + one blue if you can’t find combo)
- Mini American flags (or star picks / patriotic accents)
- Chenille stems (pipe cleaners) or floral wire (for fastening)
What you’ll “shop” from home (free upgrades)
- Scissors (or strong kitchen shears)
- Twist ties, bread-bag ties, or spare wire (backup fasteners)
- Ribbon scraps, fabric strips, or even a cut piece of a plastic tablecloth (for a bow)
- Cardboard from a cereal box (for a simple star tag)
If you already have any fasteners at home (twist ties, wire, zip ties), you can drop the chenille stems and
spend that slot on ribbonstill staying around the same budget.
Design Basics: Make It Look “Styled,” Not “Stuffed”
A great patriotic wreath doesn’t need a hundred decorations. It needs balance. Think of your wreath like
an outfit: the garland is your main outfit, the flags are your accessories, and the bow is the finishing touch that
says, “Yes, I planned this.”
Quick styling rules (that work every time)
- Pick one “main texture” (tinsel or mesh or fabric) and let it do most of the work.
- Cluster accents (flags/stars) in 2–3 spots instead of sprinkling everywhere.
- Give your wreath a “top” (a bow or a focal point) so it hangs the right way.
- Leave a little breathing room so the colors read clearly from the sidewalk.
Step-by-Step: The $5 Tinsel-Twist Patriotic Wreath
Step 1: Prep the frame and add a hanger
Decide which side is the “top.” If your wire frame has crossbars, use the most stable section as the top.
Twist a chenille stem (or any spare wire) into a small loop at the top for hanging.
Step 2: Wrap the tinsel garland (the “fullness” step)
- Start at the top and tie the garland end onto the frame using a chenille stem (or twist tie).
- Wrap the garland around the outer ring, spacing your wraps close enough that the wire frame doesn’t peek through.
-
Every 6–8 inches, tack it down with a quick twist of a chenille stem around the wire and garland.
(This stops slipping and keeps the wreath looking neat.) - When you reach the end, secure the final garland end tightly underneath (again: twist tie, chenille stem, or wire).
Pro tip: If your garland is thin, double-wrap the bottom half of the wreath where it’s most visible.
That gives the wreath a fuller look without buying more supplies.
Step 3: Add the “pop” accents (flags and stars)
Instead of placing flags evenly like a clock (which can look a bit “teacher bulletin board”), use
clusters.
- Cluster A: 2–3 mini flags angled outward near the top right
- Cluster B: 1–2 flags or a star pick near the lower left
- Cluster C (optional): 1 small accent near the top left to balance the weight visually
Fasten each flag/pick by twisting a chenille stem around the stick and onto the wire frame. If the sticks are thick,
use two twist points so nothing wobbles in the wind.
Step 4: Make a bow (even if you “don’t do bows”)
A bow makes the wreath look finished. If you don’t want to buy ribbon, use what you have:
fabric strips, a bandana scrap, or even a sturdy strip cut from a plastic tablecloth.
Easy no-fuss bow method
- Cut one long strip (about 24–30 inches) and one short strip (about 6 inches).
- Make two loops with the long strip like you’re tying your shoeskeep it chunky.
- Pinch the center and wrap the short strip around it to create a “knot.”
- Twist-tie the bow to the top of the wreath frame.
If your bow looks a little lopsided, congratulations: you made an “artisan bow.” Fluff the loops and trim the tails at
an angle (a classic look) or into a V shape (a crisp look).
Step 5: Fluff, step back, and do the sidewalk test
Hang it temporarily and step back about 6–10 feet. If you can’t clearly read “red, white, and blue” from that
distance, tighten your garland wraps or move accents into tighter clusters.
Optional Variations (Still Budget-Friendly)
1) Bandana-wrap wreath (soft, classic, and great for windy porches)
If you can grab red and blue bandanas and a simple hoop/wire frame, you can wrap the bandana pieces around the frame
for a bold look. Add white with a small white ribbon, twine, or a white paper star tag.
2) Straw-and-starburst vibe (modern Americana)
Use paper straws (red/white/blue mix) cut to equal lengths and attach them around a ring base to create a starburst
effect. Finish with a small star in the center for a clean, graphic look.
3) “Pinned, not glued” upgrade (for re-using the base all year)
If you want to re-use the same wreath base for multiple holidays, attach accents with wire or pins instead of
permanent glue. Swap flags for pumpkins in fall, then greenery in wintersame frame, new personality.
Make It Last Outside: Sun, Rain, and “Why Is It Fading?”
Outdoor wreaths deal with sunlight, moisture, dust, and general porch chaos. If your door gets direct sun,
you’ll get more fadingespecially on bright reds and blues.
Weatherproofing options (pick one)
-
Fabric/water + sun protectant spray (good for ribbon, fabric, and some garlands):
apply only to clean, dry materials and test first on a hidden spot. -
UV-resistant clear coating (good for rigid accents like painted tags or decorative pieces):
use light coats and let it dry fully between coats.
Practical tip: If your wreath is on a storm door behind glass, it’s protected from rain but can still fade from heat
and sun. If possible, hang it in a spot that avoids the harshest afternoon sun.
Troubleshooting (Because Crafts Love Drama)
“My garland keeps sliding around.”
Tack it down more often. A small twist-tie every 6–8 inches is the difference between “sturdy wreath” and “sad scarf.”
“It looks flat.”
Double-wrap the most visible areas, fluff the tinsel outward, and cluster accents so your eye has something to focus on.
“My flags flop forward.”
Fasten each flag in two points: one near the bottom of the stick and one near the middle. Angle flags slightly outward
like they’re “fanning” around the wreath.
“It looks too busy.”
Remove one cluster. Seriously. Most wreaths look better the moment you take one thing off.
Where to Hang It (And How to Avoid Door-Slam Tragedy)
- Front door: Use a wreath hook, or tie a loop of wire to the frame and hang from a sturdy ribbon loop.
- Wall or fence: Use a removable hook or a nail and hang from a wire loop.
- Indoor option: Hang it above a mantel or on a large mirror for instant holiday energy.
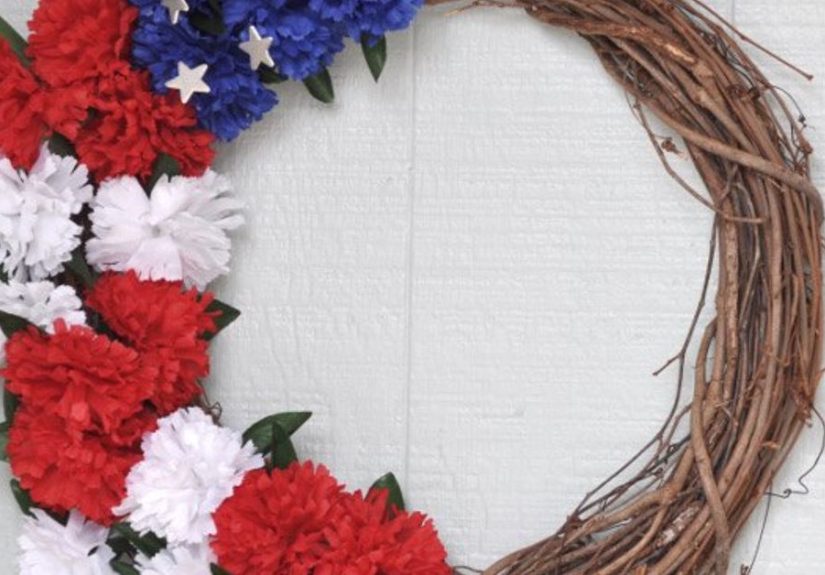
Conclusion: A Big Holiday Look Without a Big Holiday Budget
A DIY red, white, and blue patriotic wreath doesn’t have to be complicated to be cute. Keep your base
full, your accents clustered, and your “top” obvious (team bow!). Whether you’re decorating for the 4th of July or just
want your front door to look like it’s ready for a neighborhood parade, this under-$5 wreath brings the sparkle without
the spending.
Extra: of Real Crafting Experience (Lessons From the Porch)
I’ve made enough “quick” wreaths to learn a universal crafting truth: the project is never the hard partthe
decision-making is. The good news? A red, white, and blue wreath is basically built-in confidence, because the
color palette does half the styling for you. The other half is just keeping your hands from turning into a tangled
knot of tinsel and twist ties.
The first time I tried a budget patriotic wreath, I grabbed what looked like the perfect garland… and discovered at
home that it shed like a glittery golden retriever. My fix was simple: I wrapped the “sheddy” side tighter against the
wire frame and fluffed the better side outward. That one small tweak made it look fuller, and it kept the sparkle where
it belongedon the wreath, not on my floor for the next three weeks.
Another lesson: clusters beat sprinkles. I used to place mini flags evenly all the way around, thinking
symmetry would look fancy. What it actually looked like was a tiny flag fence. Once I started grouping flags into two
strong clusters (plus one small balancing accent), the wreath instantly looked more “designed.” It’s like makeup:
you don’t put eyeliner on every square inch of your face. You put it where it makes an impact.
I also learned to do the “sidewalk test.” When your wreath is in your lap, you see every little flaw. On the door, from
the curb, nobody is grading your bow loops. Step back 6–10 feet and ask one question: “Does this read as patriotic?”
If yes, you win. If no, tighten the garland, brighten the focal point, or move your accents closer together.
My favorite budget upgrade is a homemade tag. I cut a star from cereal-box cardboard, cover it with white paper (or
paint it if I’m feeling ambitious), and write something simple like “USA” or “Land That I Love.” It adds personality
without adding cost. And it gives your wreath a story: it’s not just decor, it’s your decor.
Finally: don’t underestimate the power of a slightly imperfect bow. A bow that’s a bit uneven reads “handmade,” not
“failed.” Fluff it, trim the tails, and move on with your life. The fireworks outside will be loud enough to distract
everyone anyway.