Table of Contents >> Show >> Hide
- First: The Safety Reality Check (Because Gravity Doesn’t Care About Your DIY Spirit)
- What Counts as an “Outside Corner” in Roof Flashing?
- The 5 Rules of Flashing That Make Outside Corners Work
- Tools and Materials (DIY-Friendly, Not “Open a Metal Shop” Level)
- Technique #1: Step Flashing + Corner Wrap (The “Do It Once, Stop Thinking About It” Method)
- Technique #2: Kick-Out Flashing at the Bottom Outside Corner (The Most Skipped, Most Regretted Piece)
- Technique #3: Outside Corner Dormer Detail (Where Two Flashing Systems Meet)
- Technique #4: Drip Edge and Roof Edge Corner Turns (Outside Corners at Eaves and Rakes)
- Technique #5: Metal Roof Outside Corners (Movement and Seams Matter More)
- Choosing the Right Flashing Metal (So You Don’t Accidentally Build a Battery)
- A Fast DIY Checklist for Outside Corner Flashing
- Troubleshooting: How to Tell an Outside Corner Detail Is Failing
- Real-World “Experience” Notes (500+ Words of What DIYers Commonly Learn the Hard Way)
- 1) “My corner isn’t square… and neither is my patience.”
- 2) “I thought step flashing was optional. The roof disagreed.”
- 3) “Tin snips are great… until your hands file a complaint.”
- 4) “The leak wasn’t where I thought it was.”
- 5) “Kick-out flashing felt fussy… until I saw what it prevents.”
- 6) “Photos saved me. So did labeling.”
- Conclusion
Roof leaks love drama. Not the “tiny drip you notice right away” kind of dramamore like the slow-burn,
“why is my drywall bubbling six feet away from the corner?” kind. And outside corners are a favorite stage
because they combine everything water enjoys: gravity, wind, seams, and the occasional optimistic bead of caulk.
This guide breaks down practical roof corner flashing techniques for outside cornersespecially
where a sloped roof meets two walls at a bump-out, dormer, chimney return, or any corner that sticks out like a
proud little elbow. You’ll learn how pros think about layering (“shingle fashion”), how to choose the right
flashing style, and how to build a corner detail that sends water where it belongs: away from your house and
toward the gutter (or at least toward the ground and not your insulation).
First: The Safety Reality Check (Because Gravity Doesn’t Care About Your DIY Spirit)
Working on a roof can be dangerous. If the roof is steep, high, wet, icy, crumbly, or you don’t have proper
fall protection and a stable ladder setup, don’t DIY thishire a pro. Also consider professional help if you
see rotted sheathing, soft decking, mold, active leaks, or complicated intersections (multiple roof planes,
masonry walls, or old layers of roofing).
What Counts as an “Outside Corner” in Roof Flashing?
An outside corner is a convex corner where two wall planes meet and “point out” from the building.
On a roof, you’ll commonly see outside corners in places like:
- Dormers (front wall meets side wall, right above the sloped roof)
- Bump-outs or bay projections where the roof runs into a corner
- Chimney returns where siding or trim creates a corner detail above the roof
- Roof edges where drip edge and fascia metal turn the corner
The goal is always the same: make the corner behave like a roofwater goes down and out,
never behind the wall, never into a seam, and never trapped where it can rot wood.
The 5 Rules of Flashing That Make Outside Corners Work
1) Think Like a Raindrop: “Down and Out” Wins Every Time
Flashing is just a controlled slip-n-slide for water. Every layer must overlap the layer below it so water
always sheds outwardlike shingles, because that’s literally why shingles exist.
2) Don’t Rely on Caulk as the Main Waterproofing Strategy
Sealant is a helper, not a superhero. UV light, temperature swings, and building movement eventually crack
or pull sealant loose. Proper flashing should still shed water even if sealant ages.
3) Let the Wall and Roof Move Without Fighting Each Other
Roof decks and walls expand, contract, and shift differently. Flashing details should accommodate movement
so you don’t end up with buckled shingles or torn seams.
4) Fasten in the “Dry Zone” (Not Where Water Runs)
The best fastener is the one that stays out of the water path. Avoid face-nailing exposed flashing whenever possible.
If you must fasten, keep fasteners high and covered by the next layers.
5) Water Management Is a Team Sport
Outside corners only stay dry when roofing, underlayment, wall WRB/housewrap,
flashing, and siding work together. A perfect roof detail can still fail if the wall drainage
plane dumps water behind itor if the siding gets nailed through the wrong place.
Tools and Materials (DIY-Friendly, Not “Open a Metal Shop” Level)
Common materials
- Step flashing pieces (pre-made or cut/bent from corrosion-resistant metal)
- Kick-out flashing (preformed or fabricated diverter at the eave end)
- Corner apron / wrap flashing (one piece that turns the outside corner)
- Underlayment and (where appropriate) self-adhered membrane (ice & water barrier)
- Counterflashing (siding, trim, or separate metal that covers the top edge of base flashing)
- Compatible sealant (used sparingly and correctly)
- Corrosion-resistant fasteners (roofing nails or screws as specified for your system)
Helpful tools
- Tape measure, pencil/marker, chalk line
- Tin snips, hand seamer (or small brake if you have one)
- Hammer or nailer (as appropriate), flat bar/pry bar
- Utility knife, roller for membrane
- Gloves (sharp metal is extremely honest)
Technique #1: Step Flashing + Corner Wrap (The “Do It Once, Stop Thinking About It” Method)
For asphalt shingles, step flashing is the gold standard at roof-to-wall intersections. The trick at an
outside corner is handling the turn: you need a corner piece that wraps the corner so water can’t sneak
into the seam where the two walls meet.
Where this works best
- Dormer corners (front wall meets side wall above the roof)
- Bump-out corners where the roof runs alongside a wall and turns a corner
- Any shingled roof meeting vertical cladding at a convex corner
How the layers should stack (conceptually)
- Roof deck → underlayment (and membrane where required/appropriate)
- Base flashing (step flashing) woven with each shingle course
- Corner wrap/apron that turns the corner and overlaps correctly
- Wall drainage plane (WRB) laps over the upturned flashing legs in shingle fashion
- Counterflashing (often your siding/trim) covers the top edge of base flashing
DIY steps (high-level, but practical)
Step 1: Strip back enough to see what’s going on. You need access to the bottom of the wall, the roof-to-wall
line, and the corner area. If you can’t expose the layers safely and cleanly, that’s a sign to stop and get help.
Step 2: Confirm the flashing style matches the roofing. Asphalt shingles typically use step flashing pieces.
(Continuous metal can work for some roofing types, but it must be detailed correctly and is often easier to mess up.)
Step 3: Install/repair underlayment and membrane. Treat the roof-to-wall area like a “high-risk zone.”
Any self-adhered membrane should be rolled flat and lapped correctly. Avoid wrinkles at corners; they create channels.
Step 4: Start the run with the correct bottom detail. At the eave end, you’ll usually need a kick-out
(Technique #2) before step flashing begins, so water gets launched into the gutter instead of against the wall.
Step 5: Weave step flashing with each shingle course. Each piece of step flashing goes on top of the shingle
below and under the shingle abovelike a staircase. Keep nails high and covered by the next course.
Step 6: Add a corner wrap/apron at the outside corner. This is the “outside corner secret sauce.”
Instead of stopping one wall’s flashing at the corner and starting the other wall’s flashing separately (hello, leak path),
create a piece that wraps around the corner. This piece should extend onto both wall faces and onto the roof,
overlapping the step flashing in a way that still sheds water down the roof plane.
Step 7: Use counterflashing correctly. The top edge of step flashing should be protected by counterflashing.
Often the siding acts as counterflashing when installed with proper clearances and without fasteners through critical zones.
Corner wrap: simple fabrication idea
A DIY-friendly corner piece can be made from coil stock or flat flashing:
- Form a “two-leg” corner that turns 90° around the outside corner (like a crisp metal book cover).
- Add a roof leg that sits on the shingles/underlayment and laps over the last step flashing piece below it.
- Keep seams out of the direct water path when possible; if a seam is unavoidable, lap it so water flows overnot intoit.
If your corner piece feels like origami made of razor blades… that’s normal. Go slow. Measure twice. Keep edges hemmed
where possible to reduce sharpness and improve stiffness.
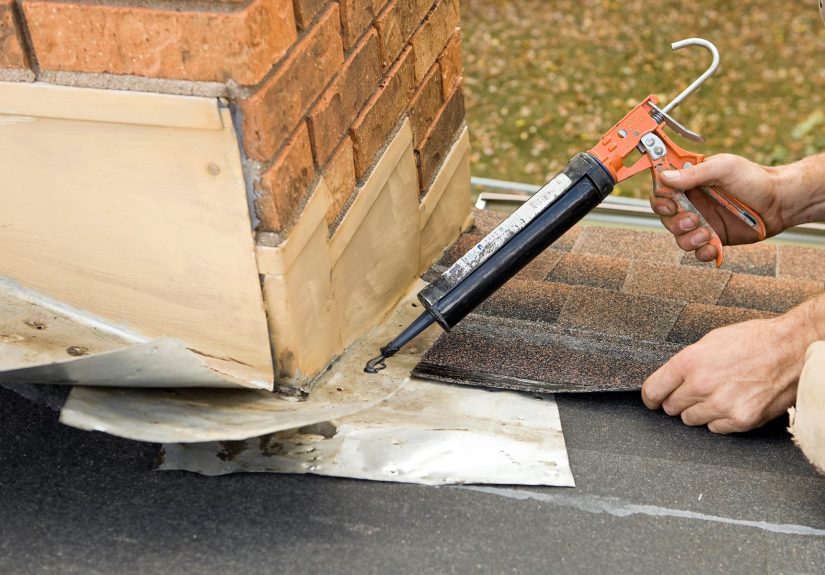
Technique #2: Kick-Out Flashing at the Bottom Outside Corner (The Most Skipped, Most Regretted Piece)
A kick-out flashing (also called a diverter) is installed at the eave end of a roof-to-wall intersection.
It’s designed to force roof runoff away from the wall and into the gutter. Without it, water can hug the wall, dump
behind siding, and rot sheathing like it’s a hobby.
What a good kick-out does
- Creates a physical “ramp” that throws water into the gutter
- Prevents water from running down behind cladding at the corner
- Reduces staining, rot, and hidden wall damage
Kick-out flashing tips that matter
- Bigger is usually better (within reason): a tiny diverter can be overwhelmed by heavy rain.
- Integrate with WRB: the wall drainage plane should lap correctly so any water behind siding exits onto flashingnot into the wall.
- Don’t “caulk it and hope”: the geometry should do the work.
- Prefabricated is fine for many homes. For site-built, seams should be watertight and durable.
Technique #3: Outside Corner Dormer Detail (Where Two Flashing Systems Meet)
Dormers are outside-corner factories: a front wall (headwall) meets sidewalls, and both sit above a sloped roof.
At the outside corner, you’re essentially marrying two flashing strategies:
- Headwall flashing (often a continuous apron at the base of the front wall)
- Sidewall step flashing (woven with shingles up the side)
What “good” looks like at a dormer outside corner
The headwall flashing should turn the corner and extend onto the sidewall enough to prevent a gap at the joint.
Then step flashing continues up the sidewall, overlapping properly so water is always shingled out.
Common dormer-corner mistakes
- Stopping headwall flashing at the corner and starting sidewall flashing separately (gap = leak path)
- Reverse laps at the corner (water runs into the seam instead of over it)
- Nailing the vertical leg and creating a movement-related failure over time
- Letting siding sit too low so it wicks moisture or blocks drainage
Technique #4: Drip Edge and Roof Edge Corner Turns (Outside Corners at Eaves and Rakes)
Not every “roof corner” is a wall intersection. Roof edgeseaves and rakesalso have outside corners where metal
must turn cleanly. If the corner is sloppy, water can roll behind fascia, stain trim, or feed rot at the roof edge.
DIY best practices for edge corners
- Plan the lap direction: corner pieces and runs should overlap so water sheds over joints.
- Avoid over-fastening: too many fasteners can distort metal and create buckling as temperatures change.
- Leave room for drainage: drip edge is meant to kick water away from fascia, not hug it like a wet T-shirt.
Example: a clean drip edge corner
One DIY-friendly approach is to run the eave drip edge first, then lap the rake drip edge over it (or follow your
manufacturer’s spec). For the outside corner, use a preformed corner or a neatly cut-and-folded piece that maintains
the drip lineso water doesn’t get “invited” behind the metal.
Technique #5: Metal Roof Outside Corners (Movement and Seams Matter More)
With metal roofing, flashing details often use continuous pieces, hems, cleats, and intentional allowances for thermal
movement. Outside corners on metal systems can fail if flashing is locked down too tightly or seams aren’t designed to
shed water.
Metal flashing basics for outside corners
- Use hems and cleats where appropriate to secure edges without over-fastening.
- Design seams to move: metals expand and contract significantly compared to wood.
- Lap seams properly (and seal where required) so water can’t be driven back into joints.
Choosing the Right Flashing Metal (So You Don’t Accidentally Build a Battery)
Flashing should be corrosion-resistant and compatible with the rest of the system. Common options include:
aluminum, galvanized steel, copper, and stainless steel. The “right” choice depends on your climate, roof type,
coastal exposure, and what your roofing manufacturer specifies.
- Coastal areas: corrosion resistance becomes a bigger deal (fasteners too).
- Don’t mix metals casually: dissimilar metals can cause galvanic corrosion when water bridges them.
- Follow manufacturer specs for thickness and fasteningespecially on wind-prone sites.
A Fast DIY Checklist for Outside Corner Flashing
- ✅ Water always laps “down and out” (no reverse laps)
- ✅ Step flashing is woven with each shingle course (not a single continuous “shortcut” piece for shingles)
- ✅ Kick-out flashing exists at the eave end of roof-to-wall runs
- ✅ Corner wrap/apron turns the outside corner (no open seam at the wall corner)
- ✅ Vertical legs are protected by counterflashing (siding/trim/metal)
- ✅ No fasteners through critical vertical legs (and no face-nails in water paths)
- ✅ Siding/cladding clearance is maintained above roof surface
- ✅ Underlayment/membrane is integrated with flashing and WRB shingle-fashion
Troubleshooting: How to Tell an Outside Corner Detail Is Failing
Outside corner flashing problems rarely announce themselves politely. Watch for:
- Staining on siding near the roof-to-wall line
- Paint failure or soft trim at the corner
- Rust streaks or corrosion on flashing edges
- Wet insulation or musty smells near the corner inside
- Water marks that show up after wind-driven rain (not just “normal” rain)
If you suspect hidden rot, don’t just patch the surface. Outside corners can funnel water behind cladding for years
before you see obvious interior damage. The fix is almost always about correcting the layersnot applying more goo.
Real-World “Experience” Notes (500+ Words of What DIYers Commonly Learn the Hard Way)
I don’t have personal experiences, but I can tell you the most common experiences DIYers report when tackling
roof corner flashing on outside cornersespecially dormers and bump-outs. Consider this the “things nobody tells you
until you’re already on the roof holding a piece of metal like it personally offended you” section.
1) “My corner isn’t square… and neither is my patience.”
Outside corners often look crisp from the yard, but up close they’re rarely perfect 90s. Framing can be slightly out,
siding can flare, and the roof plane may wave. That means a pre-bent corner flashing might not sit flush. DIYers often
end up doing a test fit, then trimming, then re-bending, then realizing they trimmed the wrong side (a classic).
The practical takeaway: make cardboard templates before cutting metal, and expect to adjust.
2) “I thought step flashing was optional. The roof disagreed.”
A lot of people start with the idea that one long piece of L-shaped metal will solve everything. Then the corner leaks.
Then they add caulk. Then it leaks again. The big lightbulb moment is learning that step flashing is a system, not a
decoration. Outside corners especially need flashing that’s woven with shingles so water can’t ride a seam straight
into the wall. DIYers who switch from “one piece + caulk” to “step flashing + corner wrap + counterflashing” almost
always report a huge improvementbecause the detail finally works with gravity instead of arguing with it.
3) “Tin snips are great… until your hands file a complaint.”
Cutting flashing metal is more tiring than it looks. People expect a few quick snips, but thicker stock (or awkward
angles) can chew up hands fast. Common DIY solutions include: wearing better gloves, using the right snips (left-cut,
right-cut, straight-cut), and taking breaks before you start inventing new words. Also: hemming or folding sharp edges
isn’t just “nice”it makes the piece stiffer and less likely to slice you when you’re test-fitting.
4) “The leak wasn’t where I thought it was.”
Water travels. DIYers often chase the drip and miss the entry point, especially at outside corners. A wet spot inside
might be downhill or sideways from the real problem. That’s why experienced folks focus on intersections: the eave end
of roof-to-wall runs, the outside corner seam, and any place where flashing stops and starts. A very common “aha” moment
is discovering that the wall’s drainage plane (WRB/housewrap) wasn’t lapped correctly, so water behind siding was dumping
onto bare woodno amount of roof-only patching could fix that.
5) “Kick-out flashing felt fussy… until I saw what it prevents.”
Many DIYers skip kick-out flashing because it looks like a small add-on. But when you watch heavy rain hit a roof edge,
you realize that a roof-to-wall run concentrates a surprising amount of water. Without a diverter, that water can sheet
down the wall, soak trim, and slip behind siding at the outside corner. People who add a properly integrated kick-out
often describe it as the most satisfying part of the fixbecause it changes the water’s behavior immediately. It’s like
installing a traffic cop at the intersection where accidents always happen.
6) “Photos saved me. So did labeling.”
Flashing layers are easy to forget once you’re halfway through reassembly. DIYers who take photos at each stepand label
removed piecestend to finish cleaner and faster. Outside corners add complexity because you’re dealing with two wall faces,
multiple laps, and a corner wrap that must overlap the correct components. Documentation turns “I think this goes here?” into
“I know this goes here,” which is a surprisingly luxurious feeling on a roof.
The biggest shared experience? Once DIYers understand the layering logic, the whole job becomes less mysterious.
Flashing stops feeling like magical metal and starts feeling like a predictable system: overlap correctly, keep fasteners out of
water paths, protect vertical legs with counterflashing, and always provide a way for water to exit. Outside corners aren’t
“hard” because they’re specialthey’re hard because they punish shortcuts. Do the layers right, and the corner stops being a problem.
Conclusion
The best outside-corner flashing isn’t the fanciestit’s the one that follows the rules: shingle-fashion laps, a corner wrap that
eliminates the weak seam, step flashing woven with shingles, and a kick-out diverter that throws water into the gutter instead of
into your wall. If you treat outside corners like a high-risk water intersection (because they are), your roof corner flashing detail
can last for years without constant “maintenance” that suspiciously looks like you reapplying caulk every spring.