Table of Contents >> Show >> Hide
- Why Fabric-Covered Boxes Are Worth the Effort
- What You Need Before You Start
- Choose the Easiest Method for Your Box
- Step-by-Step: How to Cover a Box with Fabric Neatly
- How to Make the Corners Look Clean
- Best Fabrics for Covering Boxes
- Simple Design Ideas That Make a Big Difference
- Mistakes to Avoid
- Where Fabric-Covered Boxes Work Best
- Experiences and Lessons Learned from Real Fabric-Covered Box Projects
- Conclusion
If you have ever looked at a plain cardboard box and thought, “You could be cute if you tried,” this project is for you. Covering a box with fabric is one of those wonderfully low-drama DIY ideas that can make a cheap container look custom, polished, and suspiciously expensive. With the right fabric, a little patience, and an adhesive that behaves itself, you can turn a boring box into pretty storage for crafts, photos, office supplies, holiday decorations, baby keepsakes, or the random cables that seem to multiply at night.
The good news is that you do not need to be a professional upholsterer, master seamstress, or crafting wizard with a glue gun holster. You just need a solid box, a plan, and a few simple techniques. Some methods are permanent and sturdy. Others are fast, removable, and great for commitment-phobes who change decor every five minutes. This guide walks through easy ways to cover a box with fabric, how to get neat corners, which fabrics work best, and what to avoid if you want the final result to look intentional instead of “I lost a fight with a bottle of glue.”
Why Fabric-Covered Boxes Are Worth the Effort
A fabric-covered box does two jobs at once: it hides clutter and adds personality. That is a rare talent. Instead of buying expensive decorative storage, you can reuse sturdy shoe boxes, gift boxes, file boxes, and wooden containers you already own. Fabric softens the look of a box, adds texture, and makes simple storage feel more like decor.
It is also one of the easiest ways to coordinate storage with a room. Want your craft room to feel less chaotic? Cover boxes in matching canvas or cotton prints. Need prettier office storage? Use linen-look fabric in calm neutrals. Decorating a nursery? Go with soft patterns, labels, and playful trims. One humble box can suddenly look like it went to finishing school.
What You Need Before You Start
Basic Supplies
- A sturdy box with a lid or open top
- Fabric
- Fabric scissors or a rotary cutter
- Ruler or measuring tape
- Pencil or fabric marker
- Glue or adhesive
- Brush, foam brush, or smoothing tool
- Iron for pressing fabric
- Clips or clothespins for holding edges while drying
Best Adhesive Options
The adhesive you choose matters more than people think. For lightweight craft projects, decoupage medium or fabric glue works well and gives you time to smooth wrinkles. For a stronger hold on cardboard or wood, spray adhesive can be fast and effective, though it needs careful use. Hot glue is great for trim, corners, and quick tacking, but it is not always the cleanest choice for large flat surfaces. Glue sticks can work for very light fabric on small boxes, especially quick kids’ crafts, but they are not the champion of long-term durability.
Best Box Types for This Project
The easiest boxes to cover are square or rectangular with straight sides. Shoe boxes, magazine holders, gift boxes, rigid photo boxes, and storage bins are beginner-friendly. Round boxes can be covered too, but they take a little more patience because fabric behaves differently around curves. Corrugated cardboard boxes work well as long as they are firm and not crushed, damp, or flimsy.
Choose the Easiest Method for Your Box
Method 1: Wrap and Glue the Outside Only
This is the fastest and simplest approach. You measure the box, cut fabric with extra allowance, wrap the outside, and fold the excess neatly over the top or bottom edges. It is perfect for decorative storage boxes that will sit on a shelf and do not need an elaborate interior finish.
Best for: Beginners, quick makeovers, cardboard shoe boxes, and display boxes.
Method 2: Cover the Lid and Base Separately
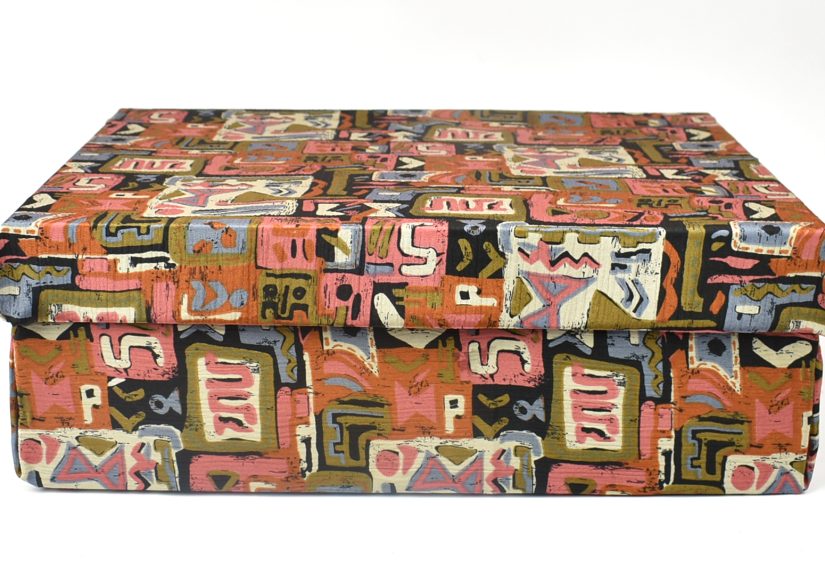
If your box has a lid, treating the lid and base as separate pieces creates a cleaner, more tailored finish. You can use the same fabric for both or mix patterns for contrast. This method usually looks more professional because the seams and folds are easier to hide.
Best for: Gift boxes, memory boxes, decorative office storage, and projects you want to look polished.
Method 3: Make a No-Sew Removable Fabric Wrap
Not every project needs permanent glue. You can wrap fabric around a box and secure it with ribbon, twine, hook-and-loop strips, double-sided tape, or a fitted band. This gives you the look of a fabric-covered box without turning it into a forever relationship.
Best for: Seasonal decor, gift boxes, party storage, and people who redecorate on a whim.
Method 4: Add a Fabric Lining Inside
If you want the box to look finished when opened, line the interior too. This step takes more time, but it makes a big difference. A lined interior protects contents from rough cardboard edges and gives the project that “Oh, fancy” effect.
Best for: Jewelry boxes, keepsake boxes, nursery storage, and handmade gifts.
Step-by-Step: How to Cover a Box with Fabric Neatly
1. Clean and Prep the Box
Start with a clean, dry box. Remove tape, labels, loose paper, and dust. If the surface is glossy or slick, lightly sanding it can help adhesive grip better. If the box is printed with loud graphics and your fabric is thin, paint the box white first or line it with plain paper so the design does not show through.
2. Wash and Iron the Fabric
Wrinkled fabric is a saboteur. Press it before measuring. If you are using cotton or other washable fabric, prewashing helps prevent shrinkage later. Even if the box never sees a washing machine, prepped fabric is easier to handle, cut, and smooth.
3. Measure with Extra Allowance
Measure each side of the box and add enough extra fabric to wrap around edges and fold inside. A good rule is to leave 1 to 3 inches of extra fabric per side, depending on the depth of the box and the thickness of the material. For lids, you usually need extra to wrap the top, sides, and inside lip.
4. Cut Fabric for Each Section
You can either cut one large piece to wrap the whole box or cut separate panels for the bottom, sides, and lid. One-piece wrapping is quicker, but separate panels often look tidier. If you want the cleanest finish, especially with patterned fabric, cut the lid top, lid sides, box sides, and box interior as separate pieces.
5. Dry-Fit Before Gluing
Lay the fabric around the box before applying adhesive. Check the pattern direction, edge placement, and where your seams will land. This step saves you from gluing flowers upside down or discovering that your “extra allowance” was a little too optimistic.
6. Apply Adhesive in Small Sections
Brush or spray adhesive onto one area at a time. Press the fabric down gently and smooth from the center outward to remove bubbles and wrinkles. Do not try to glue the entire project in one heroic move. That path leads to panic and sticky elbows.
7. Smooth as You Go
Use your hands, a plastic scraper, or a brayer to smooth the fabric. Pull it taut, but not so tight that it distorts the pattern or lifts at the corners. You want the fabric snug, not stressed.
8. Fold and Finish the Edges
Fold raw edges under when possible for a cleaner look. On the inside of the box, press the folded edges down firmly. Clips can hold the fabric in place while the glue dries. If the inside edge looks rough, cover it with ribbon, bias tape, or a narrow strip of matching fabric.
9. Let It Dry Completely
Do not rush this part. A box that feels dry on the surface may still be setting underneath. Let it cure fully before stacking, filling, or showing it off like you own a boutique storage line.
How to Make the Corners Look Clean
Corners are where most fabric-covered box projects either shine or confess their secrets. The fix is simple: do not bunch. Instead, trim excess bulk and fold with intention.
Gift-Style Folds
This is the easiest corner method for beginners. Fold the fabric the way you would wrap a present: one side in, the other side over, then flatten and glue. It works especially well on lids and square boxes.
Mitered Corners
Mitered corners create a cleaner, more tailored look. You fold the fabric diagonally so the corner forms a crisp seam instead of a bulky tuck. This takes a little practice, but it is worth it for higher-end results.
Trim Before Folding
If the fabric is thick, trim away some of the seam allowance at the corners before gluing it down. Less bulk means flatter edges. Just do not cut too close, or the box will flash cardboard like an accidental wardrobe malfunction.
Best Fabrics for Covering Boxes
Cotton
Cotton is the all-star. It is easy to cut, easy to glue, easy to fold, and available in endless prints. Quilting cotton is especially beginner-friendly because it is stable and not too bulky.
Canvas
Canvas creates a sturdy, casual look and hides imperfections well. It is great for larger storage boxes, but it can be bulky at tight corners.
Linen or Linen Blends
These fabrics look elegant and textured. They are excellent for decorative boxes in living rooms, offices, or bedrooms. Just keep in mind they may fray more than tightly woven cotton.
Velvet or Upholstery Fabric
These can look luxurious, but they are less forgiving for beginners. Thick fabrics create bulk, and directional pile can make seams more noticeable.
Fabric to Avoid for First Projects
Skip slippery satin, stretchy knits, and super-fray-prone loose weaves for your first attempt. They are not impossible, but they are the crafting equivalent of learning to drive in a parade.
Simple Design Ideas That Make a Big Difference
- Contrast the lid and base: Use a print for the lid and a solid for the box.
- Add labels: Fabric-covered storage is prettier when you can still find your scissors.
- Use trim: Ribbon, pom-pom trim, braid, and ric-rac hide seams beautifully.
- Line the bottom: Add felt or extra fabric underneath to protect shelves and tabletops.
- Match room decor: Repeat colors already in the space for a cohesive look.
- Use scraps creatively: Patchwork panels can turn leftover fabric into something intentional and charming.
Mistakes to Avoid
Using Too Much Glue
More glue does not equal more skill. It usually equals bleed-through, wrinkles, and a surface that dries slower than your patience.
Skipping the Iron
If the fabric starts wrinkled, the finished box will look tired before it even goes to work.
Ignoring Pattern Direction
Stripes, florals, and geometric prints have opinions. Make sure they all face the same way unless “creative chaos” is your brand.
Choosing a Weak Box
Pretty fabric cannot save a collapsing box. Start with something structurally sound.
Rushing Dry Time
Moving the box too soon can shift seams, lift edges, and turn smooth fabric into a wrinkled mess.
Where Fabric-Covered Boxes Work Best
These boxes are incredibly flexible. Use them in a home office for chargers, notebooks, and paper clips. Put them in a nursery for socks, bibs, and tiny mysteries. Store photos, craft tools, sewing notions, and greeting cards in them. They also make thoughtful handmade gifts. A fabric-covered memory box for wedding keepsakes or baby items feels personal without being over-the-top.
They are also useful for seasonal organizing. Cover a group of boxes in coordinated fabrics and store ornaments, gift wrap supplies, or holiday linens. Suddenly your closet looks less like a crime scene and more like an organized adult lives there.
Experiences and Lessons Learned from Real Fabric-Covered Box Projects
One of the most interesting things about learning how to cover a box with fabric is that the first project teaches more than ten tutorials ever could. On paper, the job looks simple: measure, cut, glue, fold, done. In real life, you discover that cardboard has moods, fabric has opinions, and corners are tiny little final exams. The good news is that every project gets easier after the first one, and even the imperfect boxes are usually still useful and charming.
A common beginner experience is underestimating how much fabric is needed. Many people measure only the outside dimensions, then realize too late that they forgot the wrap-around allowance for edges and inner folds. That is when the box starts looking like it is wearing pants that are one size too small. After one mistake like that, most crafters become very generous with seam allowance. It is always easier to trim excess fabric than invent more of it.
Another lesson comes from glue. Early projects often use far too much adhesive because beginners worry the fabric will not stick. But heavy glue can soak through lightweight cotton, leave dark spots, or create wrinkles that dry into place. Experienced crafters usually learn to work in smaller sections with thinner coats, smoothing slowly instead of rushing. The final result looks neater, dries faster, and involves less dramatic sighing.
Fabric choice is another big one. Many people start with whatever scrap fabric is available, which is fine in theory. In practice, some scraps behave beautifully and some act like they were personally offended by the assignment. Crisp cotton is usually the hero because it folds well and stays put. Slippery fabrics shift around, thick upholstery fabric creates bulky corners, and stretchy knits can turn a neat rectangle into modern abstract art. After a few attempts, most people realize that using the easiest fabric is not cheating. It is wisdom.
There is also a very real emotional journey with corners. The first corner may look rough. The second may look worse. By the fourth one, something clicks. You start trimming smarter, folding more neatly, and pulling the fabric just enough without distorting it. Many crafters say that once they learn a simple gift-wrap fold or mitered corner, everything changes. Suddenly the whole project looks more intentional, more polished, and much more giftable.
Another practical experience is discovering where fabric-covered boxes fit best in everyday life. They are not just pretty objects for a shelf. People end up using them for office supplies, remote controls, receipts, photos, sewing tools, children’s toys, holiday decorations, and bathroom storage. A plain box that might have been thrown out becomes something attractive enough to leave in view. That mix of usefulness and beauty is part of why this DIY idea sticks around.
One final lesson is that handmade storage does not need to be flawless to be effective. In fact, some of the most loved fabric-covered boxes are slightly imperfect. A seam may be hidden under ribbon. A corner may be a little thick. The inside fold may not be museum quality. None of that matters much once the box is sitting on a shelf looking polished, holding exactly what you need, and quietly reminding you that a simple project can make your space feel more personal. That is the real appeal here. You are not just covering a box with fabric. You are turning something ordinary into something useful, decorative, and unmistakably yours.
Conclusion
Learning simple ways to cover a box with fabric is one of the easiest DIY upgrades for better-looking storage. You can go quick and casual with an outside wrap, more refined with separate lid and base panels, or fully polished with a lined interior and decorative trim. The secret is not fancy equipment. It is good measuring, pressed fabric, a sturdy box, careful folds, and the patience to let everything dry before you start admiring yourself.
Start with one small box, choose a forgiving cotton fabric, and keep the design simple. Once you get the hang of smoothing fabric and taming corners, you will start looking at every plain box in your house like a makeover opportunity. And honestly, that is a delightful problem to have.