Table of Contents >> Show >> Hide
- Before You Start: Decide What “Security” Means for Your Home
- Step 1: Pick Your Camera Type (This Choice Makes Installation Easyor Not)
- Step 2: Choose Camera Locations That Make Sense (and Actually Capture Useful Video)
- Step 3: Do a Quick Wi-Fi and Power Check (This Prevents 80% of Installation Regret)
- Step 4: Gather Tools (You Don’t Need a Garage FullJust the Right Few)
- Step 5: Mount the Camera (Simple Method: Template, Pilot Hole, Secure Mount)
- Step 6: Power and Connect the Camera
- Step 7: Tune the Settings So the Camera Is Helpful (Not Annoying)
- Step 8: Secure the Camera System (Yes, Your Security Camera Needs Security)
- Step 9: Test, Adjust, and “Future-Proof” the Setup
- Common Installation Mistakes (and the Simple Fixes)
- Real-World Installation Experiences (What People Actually Run Into)
- Experience #1: “The Perfect Camera Spot Has Terrible Wi-Fi”
- Experience #2: “Night Glare Turns Everything Into a UFO Sighting”
- Experience #3: “Drilling Is Easy… Until Your Wall Isn’t”
- Experience #4: “Motion Alerts Are Either Too Quiet or Too Dramatic”
- Experience #5: “Security Isn’t Just MountingIt’s Settings”
- Conclusion
Installing security cameras sounds like a job that requires an electrical engineering degree and a belt full of mysterious tools.
In reality, most modern home security cameras are designed for regular humanspeople with regular ladders, regular Wi-Fi, and a very regular fear
of drilling the wrong hole. Whether you’re adding a couple of wireless cams to watch the front porch or setting up a wired system for full-perimeter
coverage, you can get a reliable setup with a little planning and a few smart shortcuts.
This guide walks you through simple, practical ways to install security cameras: where to place them, how to mount them, how to power them,
and how to configure them so they’re actually secure (because a camera that’s easy to hack is just an expensive live-streaming service for strangers).
Before You Start: Decide What “Security” Means for Your Home
The easiest installs happen when you’re clear on what you want your cameras to do. “Catch everything” is not a planit’s a vibe.
A plan looks like this:
- Deterrence: visible cameras, good lighting, and signs that say “Hi, you’re on camera.”
- Identification: clear facial detail at entry points (front door, back door, garage).
- Evidence: recordings stored safely (cloud, local storage, or both) and easy to export if needed.
- Awareness: motion alerts that are useful, not “a leaf movedpanic!”
Do a quick “walk-around audit.” Stand where a visitor would stand. Where would someone approach? Where is lighting bad at night?
Where would a camera get blocked by a plant that grows like it’s training for a marathon?
Step 1: Pick Your Camera Type (This Choice Makes Installation Easyor Not)
Wireless (Battery or Plug-In): The “Weekend Project” Option
Wireless cameras are the simplest to install because you’re not running cables through walls. You mount the camera, connect it to your app,
and you’re off to the races. These are ideal if you rent, don’t want to drill much, or want quick coverage.
- Battery-powered: easiest placement, but you’ll need to recharge or swap batteries.
- Plug-in: steady power, but you’ll need a nearby outlet and a plan for hiding the cable.
Wired (Traditional DVR/NVR): The “I Want Rock-Solid” Option
Wired systems can be extremely reliable, especially when you want multiple cameras recording continuously. The tradeoff is installation effort:
you’ll route cables through walls, attic space, or exterior conduit. It’s still DIY-friendly, but it’s less “stick and go” and more
“measure twice, drill once.”
PoE (Power over Ethernet): The Sweet Spot for Many Homes
PoE cameras use a single Ethernet cable for both power and data. If your home layout supports it, PoE can be cleaner and more dependable than Wi-Fi.
It’s also great for areas where Wi-Fi is weak (like garages, detached structures, or that one corner of your yard where your router signal goes to die).
Solar: Great in Sun, Not in Shade
Solar panels can keep outdoor battery cameras topped up. They’re simple, but they depend on good sunlight and sensible placement.
If your “sunny spot” is actually a leafy cave from April to October, you’ll be recharging anyway.
Step 2: Choose Camera Locations That Make Sense (and Actually Capture Useful Video)
You don’t need cameras everywhere. You need cameras where people enter, where valuables sit, and where visibility matters.
Most homes get strong coverage with a few well-placed cameras:
- Front door / porch: faces, packages, and visitors.
- Back door / patio: common entry point, especially with fences or hedges.
- Driveway / garage: vehicles, garage door activity, and approach paths.
- Side gate / side path: “hidden” access that’s easy to overlook.
- Indoor common area (optional): entry hallway or main living spaceavoid private areas.
A Simple Placement Rule: High Enough to Prevent Tampering, Low Enough to See Faces
Many manufacturers recommend mounting outdoor cameras roughly 7–10 feet high and angling them slightly downward.
Too low, and someone can grab it. Too high, and you get a beautiful cinematic shot of hats and hairlines.
A slight downward tilt also helps motion sensors and keeps the “action zone” in frame.
Mind the Distance: Closer Usually Means Better Detail
If you want identification-level detail, don’t place your camera so far away that people look like a few confident pixels.
Aim for a view where a person is relatively close in the frame when they’re at the point you care about (like the doorstep).
Respect Privacy (and Avoid a Neighbor Feud)
Point cameras at your property, not at a neighbor’s windows. Use privacy zones (most camera apps offer them) to mask areas you shouldn’t record.
Also think carefully about indoor cameras: avoid bedrooms and bathrooms, and be transparent with household members and guests.
Audio Recording: Check Your State Rules
Video rules and audio rules can differ. In many places, recording audio without appropriate consent can be restricted.
If your camera supports audio, review your local and state laws and consider disabling audio if you’re unsure.
Step 3: Do a Quick Wi-Fi and Power Check (This Prevents 80% of Installation Regret)
Wi-Fi Strength Test
If you’re using Wi-Fi cameras, test the signal where the camera will livebefore you mount it.
Stand in that spot with your phone and check whether the connection is stable. If it’s weak, consider:
- Moving the router slightly (sometimes 3 feet makes a big difference).
- Adding a mesh node or extender closer to the camera location.
- Switching that camera to a plug-in or PoE option for reliability.
Power Options Checklist
- Battery: easiest install, but plan a recharge schedule.
- Outlet power: choose a route to hide the cable (clips, raceways, or conduit).
- Hardwired: best done with cautionif you’re unsure, use a qualified electrician.
Step 4: Gather Tools (You Don’t Need a Garage FullJust the Right Few)
Most installs require a short list of basics:
- Drill + appropriate drill bits (wood, masonry, or stucco-specific if needed)
- Screwdriver set
- Level (or a phone leveling app)
- Stud finder (helpful for secure mounting)
- Exterior-rated anchors (if mounting into masonry or siding)
- Weatherproof sealant (for exterior holes and cable entries)
- Cable clips or exterior-rated conduit (for neat, protected cable runs)
If you’re doing a wired or PoE install, add fish tape, a cable tester, and a plan for routing (attic, crawlspace, or exterior conduit).
Step 5: Mount the Camera (Simple Method: Template, Pilot Hole, Secure Mount)
Mounting on Wood or Solid Trim
- Hold the mounting plate where you want it and confirm the angle.
- Mark screw holes (many kits include a paper templateuse it).
- Drill small pilot holes to prevent splitting.
- Screw in the mount firmly and attach the camera.
- Adjust angle, then tighten the set screw (if your mount has one).
Mounting on Brick, Stucco, or Masonry
Use the correct masonry bit and anchors rated for exterior conditions. Drill slowly and steadily.
If you’re mounting on stucco, try to anchor into solid backing when possible (not just the surface layer).
Weatherproofing (Don’t Skip This)
Any hole you drill outdoors should be sealed. Use exterior-grade sealant around cable entry points and mounting areas where water could seep in.
Water damage is not the fun “surprise upgrade” you want.
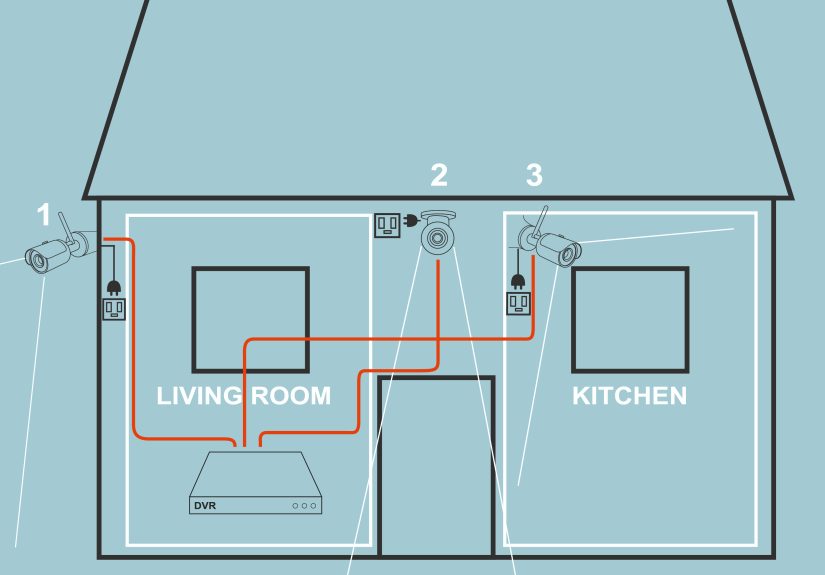
Step 6: Power and Connect the Camera
Wireless Setup Basics
Most smart cameras follow a similar flow: charge or plug in the camera, open the app, scan a QR code, connect to Wi-Fi, and name the camera.
Do setup near your router first if the app suggests it, then move the camera to the mounting location.
Wired / PoE Setup Basics
For wired cameras, the “simple way” is to plan cable routes that avoid fishing through finished walls when possible:
attic drops, crawlspace routes, or exterior conduit runs are often easiest. PoE cameras typically run back to a PoE switch or NVR.
Label both ends of each cable as you gofuture you will be deeply grateful.
Neat Cable Management (Because You’ll Look at It Every Day)
- Use cable clips to keep lines tight and tidy.
- Use exterior conduit where cables are exposed (it also protects from weather and curious critters).
- Avoid running cables where they can be easily grabbed or cut.
Step 7: Tune the Settings So the Camera Is Helpful (Not Annoying)
Set Motion Zones and Sensitivity
If your camera flags every car on the street, you’ll start ignoring alertswhich defeats the point.
Use motion zones to focus on your walkway, porch steps, driveway entrance, or gate.
Then adjust sensitivity until you get alerts for people, not for every enthusiastic shadow.
Check Night Vision and Lighting
Test at night. Look for glare from porch lights, reflections from windows, or headlights washing out the image.
Sometimes moving the camera a foot to the left fixes everything. Other times, a motion-activated light makes the whole setup dramatically better.
Choose Recording Style
- Event-based recording: saves storage, good for most homes.
- 24/7 recording: great for high-activity zones, usually needs wired power and robust storage.
- Local storage: avoids cloud dependency but must be secured (and backed up if possible).
- Cloud storage: convenient, often subscription-based, and helpful if a camera is stolen.
Step 8: Secure the Camera System (Yes, Your Security Camera Needs Security)
A camera that’s easy to access without permission isn’t “security”it’s a risk. Basic steps make a big difference:
Use Strong, Unique Passwords (and Change Defaults)
Change default logins immediately. Use a unique password for your camera account and your Wi-Fi network.
If you can turn on two-factor authentication (2FA), do it. It’s one of the simplest ways to stop account takeovers.
Update Firmware and Apps
Keep the camera firmware and the mobile app updated. Updates often patch security issues and improve reliability.
Harden Your Home Network
- Use WPA2 or WPA3 Wi-Fi encryption (WPA3 if your router supports it).
- Change the router admin password (not just the Wi-Fi password).
- Disable features you don’t use (like remote admin access, WPS, or UPnPif you don’t need them).
- Consider a guest or separate network/VLAN for smart devices, so they’re isolated from computers and sensitive devices.
Share Access Carefully
Only share camera access with trusted people, and use roles/permissions if your platform supports them.
Periodically review who has accessbecause “temporary” access has a way of becoming “forever.”
Step 9: Test, Adjust, and “Future-Proof” the Setup
After installation, do a real test: walk up to the doors, open the gate, pull into the driveway, and check footage.
Confirm:
- Faces are visible at the key points you care about.
- Motion alerts trigger on time (not five seconds after someone leaves).
- Night video is clear enough to be useful.
- Recordings save properly and are easy to find in the app.
Then do a quick maintenance plan: wipe lenses occasionally, check mounts after storms, and review battery schedules if applicable.
A camera with a spiderweb moustache is… charming, but not optimal.
Common Installation Mistakes (and the Simple Fixes)
Mistake: Mounting Too High
Fix: Lower the camera into the recommended range and angle it downward slightly so it captures faces and approaches clearly.
Mistake: Ignoring Wi-Fi Reality
Fix: Test signal first. Add mesh/extenders or switch to wired/PoE for problem zones.
Mistake: Aiming Through Glass
Fix: Avoid placing cameras behind windows if you rely on night visioninfrared can reflect off glass and ruin the view.
Mistake: Leaving Default Settings
Fix: Change passwords, enable 2FA, update firmware, and configure motion zones on day one.
Real-World Installation Experiences (What People Actually Run Into)
Here’s the part nobody tells you: installing security cameras is less about the camera and more about your house’s personality.
Some homes are cooperative. Others behave like they’re auditioning for a home-improvement reality show.
Based on common DIY reports and typical homeowner troubleshooting, these are the experiences you’re most likely to faceand how to handle them.
Experience #1: “The Perfect Camera Spot Has Terrible Wi-Fi”
This is the classic. You find the ideal angle: front walkway, driveway, side gateall in one view. You mount the camera, feel proud,
open the app… and the live feed loads like it’s using dial-up. The simple fix is planning connectivity the same way you plan placement.
Many homeowners end up adding a mesh node near the front of the house (especially if the router lives in a back bedroom),
or switching the farthest camera to a wired/PoE model. If you’re committed to wireless, even moving the router to a more central location
can help more than you’d expect.
Experience #2: “Night Glare Turns Everything Into a UFO Sighting”
You test during the day and everything looks crisp. Then nighttime arrives and your porch light creates a bright halo that washes out the image,
or headlights flash and the exposure swings wildly. In many cases, shifting the camera a foot to the side, angling slightly downward,
or moving the light source solves it. Some households add motion-activated lighting positioned to illuminate the approach rather than shine straight
into the lens. The biggest lesson: always do a night test before you declare victory.
Experience #3: “Drilling Is Easy… Until Your Wall Isn’t”
On paper, you drill two holes, insert anchors, mount the bracketdone. In real life, you discover you’re drilling into
surprise layers (siding, sheathing, maybe brick), or you hit a spot that’s harder than expected. The simple way to reduce stress is using the right
bit, drilling slowly, and anchoring into solid structure whenever possible. If you’re routing wires, many DIYers find that attic or crawlspace runs
are easier than fishing through finished walls, and exterior conduit can make the whole thing cleaner and more protected.
Experience #4: “Motion Alerts Are Either Too Quiet or Too Dramatic”
Early on, motion alerts are often useless: either they don’t trigger when someone walks up, or they trigger every time a tree thinks about moving.
The fix is almost always a combination of motion zones, sensitivity tuning, and camera angle. People commonly discover that aiming the camera so
motion occurs in the lower part of the frame improves detection. And if your camera supports person detection, turning it on can cut down
“false alarms” dramaticallymeaning you’ll actually pay attention when your phone buzzes.
Experience #5: “Security Isn’t Just MountingIt’s Settings”
One of the most important real-world lessons is that the install isn’t finished when the screws are tight.
The smartest DIYers treat security settings as part of installation: strong passwords, 2FA, firmware updates, and careful sharing permissions.
Some even set up a separate guest network for smart devices, so cameras aren’t on the same network as laptops and sensitive accounts.
It’s not complicatedit’s just the step that’s easiest to skip when you’re tired and holding a ladder.
Bottom line: the “simple ways” work best when you expect a little trial-and-adjustment. Mount, test, tweak, repeat.
And once it’s dialed in, you’ll wonder why you waitedespecially the first time you check a clean, clear clip instead of playing
the game of “Was that a person or a confident raccoon?”