Table of Contents >> Show >> Hide
- What You’re Making (and Why It Works)
- Materials and Tools
- Plan First: The Two Decisions That Prevent Regret
- Step-by-Step: String Art Growth Chart Build
- Step 1: Prep the board like you mean it
- Step 2: Paint or stain (optional, but it helps)
- Step 3: Seal it so it survives childhood
- Step 4: Mark the growth chart ruler accurately
- Step 5: Create and place your string art template
- Step 6: Hammer nails along the outline
- Step 7: String it up
- Step 8: Final protection and cleanup
- Design Ideas That Look Custom (Because They Are)
- Mistakes to Avoid (So You Don’t Have to “Redo It On Sunday”)
- How to Use Your Growth Chart Like a Family Heirloom
- Conclusion
- Real-World Experiences: Living With a String Art Growth Chart
Some DIY projects are cute for a weekend and then quietly disappear into the closet of Forgotten Crafts.
A string art growth chart is not that project. This one earns wall space.
It’s part kids’ room decor, part family tradition, and part “How are you taller again? I swear I fed you yesterday.”
The idea is simple: combine a classic DIY growth chart ruler (so you can track height milestones)
with name string art (so it feels personalized and intentional, not like you measured your child on the pantry door out of desperation).
The result looks like boutique nursery wall decorexcept you made it yourself and didn’t pay “handcrafted heirloom pricing.”
What You’re Making (and Why It Works)
A growth chart should be accurate and easy to read. String art should be bold, textured, and fun.
Together, they balance each other: the ruler markings keep the piece practical, and the string art turns it into a statement.
Done right, it fits almost any stylemodern, farmhouse, colorful, minimalist, you-name-it (literally, because you’ll string-art the name).
Materials and Tools
You can keep this project beginner-friendly, or you can go full “I own three types of levels” mode.
Here’s the sweet spot that works for most homes.
Wood + finishing
- Wood board: a 1×8 or 1×10 pine board around 6 feet long (or a 6″ x 6′ board if you want a chunky ruler look)
- Sandpaper: 120 grit and 220 grit (plus 180 grit if you’re feeling fancy)
- Stain or paint (optional): stain for warm “heirloom,” paint for bold kid-friendly color
- Clear topcoat: polyurethane (oil- or water-based) or polycrylic
- Rags or tack cloth, disposable gloves, and a brush/foam brush
Growth chart marking
- Tape measure (a reliable oneno “estimate-ish” measuring today)
- Speed square or a sturdy ruler/straightedge
- Pencil and eraser
- Paint pen, permanent marker, or thin brush + paint for the ruler lines
- Optional: stencils, vinyl decals, or a cutting machine for crisp numbers
String art supplies
- Small nails: wire brads or finishing nails (about 3/4″ to 1″)
- Embroidery floss or cotton string (floss is easiest for detailed letters)
- Scissors
- Painter’s tape
- Printed name template (regular printer paper)
- Hammer (or a small tack hammer)
Hanging hardware
- D-rings, sawtooth hanger, keyhole hangers, or sturdy Command strips (depending on weight)
- Level
- Wall anchors (if you’re not hitting studs)
Plan First: The Two Decisions That Prevent Regret
1) Decide how high it will hang
Most DIY ruler growth charts are designed so the bottom of the board sits about 6 inches above the floor.
That clears baseboards and keeps the board from getting kicked, vacuumed, and generally bullied by daily life.
If your baseboards are taller (or you want a different look), adjust the starting point.
The key: a growth chart is only “cute decor” if it’s inaccurate. If you want it to actually work,
you must plan the measurement marks based on the board’s hanging height.
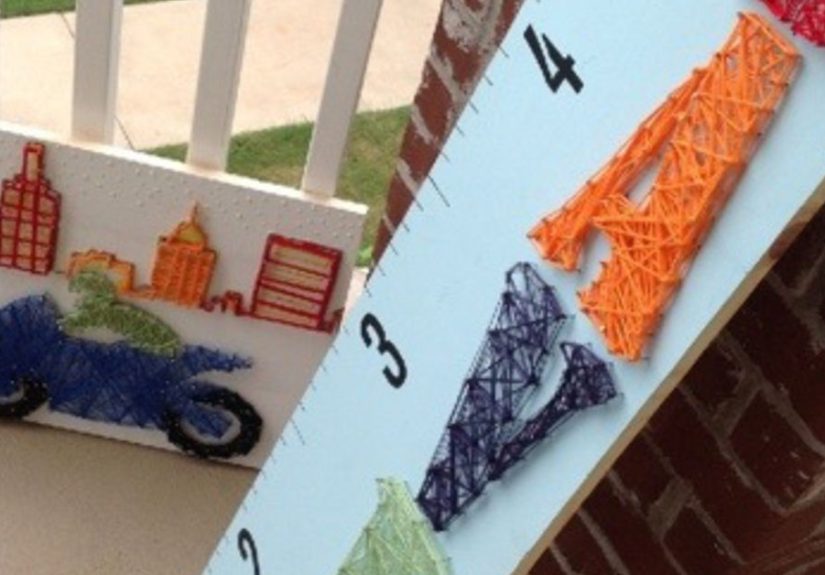
2) Choose your layout: where does the string art go?
Two popular designs:
- Name at the top, ruler marks running down the length (clean and classic)
- Name centered, with ruler marks on one edge (more “art piece,” still readable)
If you’re making it for a child’s room, the “name at the top” layout reads instantly from across the room.
Also, it’s very satisfying to point at it dramatically when guests ask, “Is that custom?”
Step-by-Step: String Art Growth Chart Build
Step 1: Prep the board like you mean it
Sand the board with 120 grit to knock down rough spots, then finish with 220 grit for a smoother surface.
Lightly sand the edges toosplinters are not a charming rustic detail.
Wipe off dust thoroughly before finishing.
Step 2: Paint or stain (optional, but it helps)
If you stain, you’ll get that warm wood tone that looks great in farmhouse decor and neutral nurseries.
If you paint, you can match a kids’ room theme (navy, sage green, blush, or even bright primary colors).
Let it dry fully before moving on.
Step 3: Seal it so it survives childhood
Apply a thin coat of clear finish. Thin coats win. Thick coats drip, bubble, and teach you new words.
Let it dry according to the product directions, then lightly sand between coats with fine grit (180–220),
wipe the dust off, and repeat. Two coats is usually good; three is “I want this to last through college.”
Step 4: Mark the growth chart ruler accurately
Now the “growth chart” part. Decide where your 1-foot mark will land based on how high you’ll hang the board.
Example: If the bottom of the board will hang 6 inches above the floor, the 6-inch point on the board effectively becomes “0.”
That means the first full foot marker should appear 6 inches above the bottom edge.
Use your tape measure and pencil to mark every inch along the edge where your ruler marks will go.
Use a speed square or straightedge to draw consistent lines.
A common ruler style looks like this:
- Foot marks: longest lines (e.g., 3 inches wide)
- Half-foot marks: slightly shorter
- Quarter-foot marks: medium
- Each inch: short tick
Once the pencil layout looks right, trace over it with a paint pen, permanent marker, or thin brush.
Add the numbers (1, 2, 3…) at each foot mark. Keep the typography simple so it’s readable fast.
Step 5: Create and place your string art template
Pick a font that matches your style. Blocky sans-serif fonts are easiest for beginners because the angles are clean
and the spacing between nails is forgiving. Print the name large enough to feel balanced on the board.
Tape the paper template onto the board exactly where you want it. Stand back. Squint like a designer.
If it looks slightly crooked now, it will look extremely crooked later. Adjust before you commit.
Step 6: Hammer nails along the outline
Hammer nails along the outline of the letters, spacing them evenly (often around 1/2″ apart, depending on font size).
Keep nail height consistentleave enough nail head exposed to wrap floss around it.
For harder woods or if you’re worried about splitting, you can pre-poke holes with an awl or tiny drill bit.
When the nails are in, carefully tear away the paper template. Tweezers help if paper gets trapped under nail heads.
(This is the moment you’ll either feel like a crafty genius or realize your “A” looks like a haunted tent.
Either outcome is fixable.)
Step 7: String it up
Tie a knot around a nail head to start, then begin wrapping and weaving.
There are two popular approaches:
- Outline wrap: follow the letter edges for a crisp look
- Fill weave: crisscross across the letter to create a dense, textured fill
Keep consistent tension so the floss doesn’t sag. When changing colors, tie off on the back side of a nail
and begin again with a new strand. If you’re using multiple colors, alternate in small sections so it looks intentional,
not like a rainbow accidentally exploded.
Step 8: Final protection and cleanup
If your ruler marks are painted or inked, you may want a final protective coat over the whole board.
If you do, use a light handheavy brushing over string can make it look fuzzy or gluey.
Some makers stop the topcoat before stringing, which is totally fine as long as the markings are sealed.
Design Ideas That Look Custom (Because They Are)
Kindergarten milestone vibe
If this project is for a big school milestone, add a tiny detail: “Class of 20XX,” a small star, or a simple apple icon near the name.
Keep it small so the growth chart stays the main event.
Farmhouse nursery wall decor
Stained wood + white ruler marks + black or navy string art is a classic combo.
It blends into neutral interiors while still feeling kid-specific.
Modern minimal
Use a pale wood finish, thin black ruler marks, and a single string color.
Choose a clean font and leave extra negative space.
It’ll look like something you found in a minimalist home decor shopwithout the minimalist price tag.
Sibling-friendly chart
Put the family last name or a simple shape (like a mountain, heart, or initial) in string art at the top,
then use the chart for multiple kids. Use different marker colors for each child’s height notes.
Mistakes to Avoid (So You Don’t Have to “Redo It On Sunday”)
- Forgetting baseboards: plan your starting point so the measurements are accurate once hung.
- Marking inches without a square: freehand lines drift. Drift becomes chaos by Year Two.
- Using nails that are too thick: thick nails split cheap pine. Choose slender brads/finishing nails.
- Uneven nail heights: it makes the string pattern look lumpy and the letters less crisp.
- Too much topcoat at once: drips happen, and then you’re sanding forever.
- Stringing before the finish cures: tacky finish grabs floss like Velcro. Let it fully cure.
How to Use Your Growth Chart Like a Family Heirloom
Mark heights in a way Future You will appreciate
Write the date and the child’s initials (or age) next to the tick mark.
Keep the handwriting neat-ish. It doesn’t need to be calligraphy, but it should not look like you wrote it while holding a wriggling toddler.
Take a yearly photo
Same spot, same chart, same time each year (birthday, first day of school, or New Year’s Day).
In ten years, you’ll be shocked. In fifteen years, you’ll be emotionally unprepared.
Make it movable
If you rent or plan to move, mount it with sturdy picture hardware so it can come down easily.
A portable growth chart is one of those “I’m glad we did that” choices.
Conclusion
A string art meets growth chart build is the kind of project that hits the DIY jackpot:
it’s practical, personal, and honestly pretty impressive on the wall. You get real measurement function,
real kids room decor style, and a tradition that will quietly outlast most of the toys
currently living on your floor.
Take your time on the layout, measure like you’re building a spaceship (not a snack shelf), and keep your finish coats thin.
Then enjoy the best part: watching the marks climb year after yearand pretending you’re totally fine about it.
Real-World Experiences: Living With a String Art Growth Chart
The first time we hung the board, I thought, “Great, we’re done.” That’s the adorable lie every DIY project tells you right before
it introduces a surprise. The surprise, in this case, was the baseboard. Even though I knew the bottom needed to float above the floor,
I still underestimated how much the trim visually “pushes” the board upward. The fix was easyadjust the starting point so the
measurements stayed accuratebut it taught me a lesson: a growth chart isn’t just a craft, it’s a tiny math project that lives on your wall.
The second surprise was the string art itself. On paper, it’s just nails and thread. In real life, it’s nails and thread plus the
undeniable truth that embroidery floss can tangle faster than headphones in a pocket. What helped most was cutting shorter strands,
working in sections, and accepting that the back of the piece would look like a spaghetti documentary. The front, thankfully, turned out crisp.
I also learned that letter choice matters. Rounded fonts feel friendly, but they can get fiddly. A clean, blocky font made the name readable
from the hallway and made the weaving more forgiving when the string wanted to do its own thing.
The payoff didn’t arrive all at onceit showed up in tiny moments. The first time a kid stood straight, heels to the wall,
and asked for “another mark,” it felt like the board immediately became part of the home, not just decoration.
The ruler marks did what they were supposed to do, but the string name at the top gave the whole thing personality.
Guests noticed it, kids pointed at it, and suddenly measuring height turned into a ritual instead of a chore.
The most unexpectedly helpful part was durability. A sealed board wipes clean, and a quick dusting keeps the string from looking tired.
What I didn’t expect was how often life bumps the chart: vacuum handles, backpacks, the occasional toy that “slipped” out of someone’s hand.
That’s why I’m now a big believer in at least two protective coats. If you want the ruler lines to stay sharp, protection is not optional.
And if you’re worried about the markings smudging, test your marker or paint pen on a scrap first and seal it once it’s fully dry.
Over time, the chart becomes a timeline. You’ll see growth spurts, you’ll see the year they suddenly shot up,
and you’ll see the little notes you wrote without thinking much about them at the time.
That’s the magic: the project starts as “DIY wall art,” but it ends up as a family record that can move with you from house to house.
The string art makes it feel special, and the growth chart makes it meaningful. If you’re debating whether it’s worth the effort,
it isbecause the effort is a one-time thing, and the memories keep showing up for years.