Table of Contents >> Show >> Hide
- What makes a room feel “custom” (even when your budget says “nice try”)
- Before you start: the DIY sanity checklist
- Entryway & Hallway Upgrades
- Living Room Upgrades
- Kitchen & Dining Upgrades
- 11) Swap cabinet hardware (and align it like you mean it)
- 12) Paint cabinetsor just the islandfor a custom two-tone look
- 13) Add under-cabinet LED lighting
- 14) Install a backsplash: peel-and-stick now, tile later
- 15) Add cabinet crown molding or a light rail to “finish” the edges
- 16) Build a pull-out tray for trash, spices, or baking sheets
- 17) Add a cookbook picture ledge on the island side or a blank wall
- 18) Build a banquette bench with lift-up storage
- Bedroom Upgrades
- 19) DIY an upholstered headboard that looks boutique-hotel expensive
- 20) Paint or paper the “fifth wall” (ceiling) or behind the bed
- 21) Upgrade closet storage with shelves and rods
- 22) Make hollow-core doors look fancy with trim squares + paint
- 23) Hang curtains high and wide, then add simple window trim
- Bathroom Upgrades
- Conclusion: the “custom” formula you can repeat in every room
- DIY Experiences: What These Projects Feel Like in Real Life (Extra )
- SEO Tags
“Custom” is a spicy word in home design. Sometimes it means handcrafted millwork and a contractor who texts you invoices like they’re memes. But most of the time, what we really want is simpler: a home that looks intentionallike the choices were made on purpose, not by whatever came in the builder package.
The good news: you can fake that custom feel with budget-friendly DIY projects that rely on three things you can actually controlclean edges (trim, molding, crisp paint lines), layered lighting (not just one overhead glare-fest), and smart storage (the “built-in” look without the built-in price). Pick one project per room, and suddenly your home starts acting like it hired a designer.
What makes a room feel “custom” (even when your budget says “nice try”)
High-end spaces share a few signals: finished transitions, thoughtful proportions, and details that repeat (matching finishes, consistent trim profiles, hardware that looks chosennot random). You don’t need expensive materials to get those signals. You need:
- Edges that look finished: caulked seams, painted trim, aligned hardware, clean corners.
- Light that’s layered: ambient + task + accent. (Translation: more than one light source.)
- Storage that looks planned: shelves, cabinets, hooks, basketsanything that says “this belongs here.”
Before you start: the DIY sanity checklist
- Measure twice, cut once. Measure three times if you’re tired. Measure four times if you’re confident.
- Prep is the cheat code. Clean, sand, fill, and caulk before paint. Skipping prep is how DIY turns into “abstract texture.”
- Go slow on the visible stuff. Anything at eye levelbacksplashes, molding grids, hardware alignmentdeserves your patience.
- Safety is part of the aesthetic. Turn off power at the breaker for electrical work. Shut off water for plumbing swaps and check for leaks.
Entryway & Hallway Upgrades
1) Paint your front door (and maybe the inside, too)
A bold door color reads “designer choice,” not “I panicked at the paint aisle.” Go classic (black, deep navy, forest green) or cheerful (red, warm yellow). Clean up the edges, polish the hardware, and your entry instantly looks more intentional.
2) Swap house numbers, porch light, and mailbox for a matching set
This is curb appeal on easy mode. Choose one finish family (matte black, brushed nickel, aged brass) and repeat it across numbers, lighting, and mailbox. It’s a small change that makes the whole exterior feel curatedlike the house “came like this.”
3) Build a narrow “drop zone” shelf with hooks
A slim wall-mounted ledge (6–10 inches deep) plus hooks turns even a tiny entry into a custom mudroom moment. Add a tray for keys, a basket for mail, and one hook that’s supposedly “temporary” (it will not be temporary).
4) Create a hallway picture-ledge gallery
Instead of drilling a zillion holes for frames, install one or two picture ledges and layer art, photos, and a tiny plant. The ledge adds depth, feels architectural, and lets you swap pieces whenever you’re bored (or avoiding laundry).
Living Room Upgrades
5) DIY a board-and-batten accent wall
Board-and-batten adds structure to a blank wall and screams “custom” because it looks built in. Use inexpensive trim or MDF strips, plan spacing with painter’s tape, then caulk seams and paint. It’s perfect behind a sofa or media setup.
6) Add picture-frame molding for faux wall paneling
Picture-frame molding is basically geometry for your wallsin a good way. Mark a simple grid, attach trim rectangles, fill nail holes, and paint everything one color. The result reads like classic millwork, even in a builder-basic room.
7) Upgrade trim the cheap way: fill, caulk, repaint
Before you replace baseboards, try this: scrape rough paint, fill dents, caulk gaps, and repaint in crisp semi-gloss. Tight lines around floors and doors make a room feel cleaner, newer, and more “finished”which is the secret sauce of custom.
8) Fake built-ins with bookcases and trim
Start with matching bookcases (or two identical units), anchor them safely, then add a face frame with trim and a top piece that mimics crown. Paint everything the same color so it reads as one intentional wall instead of “furniture lined up.”
9) Install floating shelves (aka the no-bracket magic trick)
Floating shelves add storage and styling space without visual clutter. Hit studs or use heavy-duty anchors, keep spacing consistent, and choose fewer longer shelves for a more custom look. Then style like a designer: leave breathing room.
10) Add plug-in sconces and hide the cords
Wall sconces instantly raise the vibe, but hardwiring can be a pain. Use plug-in sconces and conceal cords with paintable cord covers. Add a dimmer plug for cozy evening light, and your living room suddenly feels “high-end hotel.”
Kitchen & Dining Upgrades
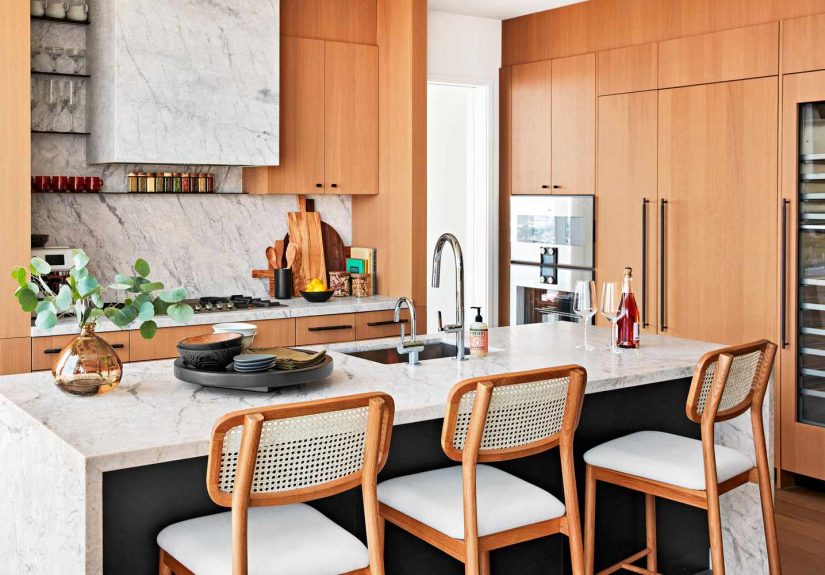
11) Swap cabinet hardware (and align it like you mean it)
New pulls and knobs are one of the quickest kitchen upgrades. Use a jig or template so every handle is perfectly aligned. Matching hardware finish to lighting or faucet makes the kitchen feel planned, not pieced together over five chaotic shopping trips.
12) Paint cabinetsor just the islandfor a custom two-tone look
Two-tone cabinets look expensive because they add contrast and depth. If painting everything feels like a novel-length project, paint only the island or lower cabinets. Proper prep (clean, sand, prime) is what keeps the finish looking pro.
13) Add under-cabinet LED lighting
Under-cabinet lighting makes kitchens feel finishedlike someone cared about cooking there. Choose LED strips or puck lights (plug-in, hardwired, or rechargeable). Warm light feels cozy; super-cool light can feel like you’re prepping food in a lab.
14) Install a backsplash: peel-and-stick now, tile later
The space between countertop and cabinets is a high-impact zone. Peel-and-stick tile is fast and renter-friendly. Traditional tile is still DIY-able with careful layout and patience. Either way, keep everything level so it reads intentional, not “close enough.”
15) Add cabinet crown molding or a light rail to “finish” the edges
That gap above cabinets often screams builder-grade. A strip of crown (or a simple trim build-up) makes cabinets look taller and more custom. A light rail along the bottom can hide fixtures and add another layer of polish.
16) Build a pull-out tray for trash, spices, or baking sheets
Pull-outs are the kind of detail people assume you paid for. With basic drawer slides and a simple plywood box, you can create a trash pull-out or spice organizer that makes your kitchen feel smarterand keeps counters calmer.
17) Add a cookbook picture ledge on the island side or a blank wall
Blank island panels are basically missed opportunities. Mount a picture ledge to hold cookbooks, cutting boards, or framed art. It’s small, affordable, and oddly transformativelike your kitchen suddenly has a personality beyond “appliance storage.”
18) Build a banquette bench with lift-up storage
A banquette turns a dining corner into a built-in moment. Build a simple bench box, add a hinged lid for storage, and top it with a cushion. The “custom” magic comes from the fit: it looks like it was always meant to live there.
Bedroom Upgrades
19) DIY an upholstered headboard that looks boutique-hotel expensive
Plywood + foam + batting + fabric = a headboard that reads custom without a custom bill. Choose a textured neutral for timeless vibes or a bold fabric if you want drama. Mounted securely, it anchors the whole room like a grown-up decision.
20) Paint or paper the “fifth wall” (ceiling) or behind the bed
A colored ceiling or wallpapered headboard wall looks like a designer move because it changes the room’s proportions and mood. If you’re cautious, go tone-on-tone. If you’re brave, pick a big pattern and commit like you own a beret.
21) Upgrade closet storage with shelves and rods
Closets feel custom when they’re planned. Add a top shelf for bins, a second rod for short items, and dividers for stacks. Matching hangers and labeled bins are cheap “luxury” touches that make the whole system feel intentional.
22) Make hollow-core doors look fancy with trim squares + paint
Flat doors can look upgraded with thin molding arranged into simple rectangles. Fill seams, sand lightly, then paint the door (and trim) for a clean architectural look. Finish with a new knob or lever, and the door suddenly feels “chosen.”
23) Hang curtains high and wide, then add simple window trim
Mount curtain rods close to the ceiling and extend past the window frame so drapes stack off the glass. It makes windows look bigger and ceilings feel higher. Add inexpensive casing trim (or even crisp painted borders) for a more built-in finish.
Bathroom Upgrades
24) Frame a builder-grade mirror
The giant glued-on mirror is a classic bathroom “before” feature. Add a simple frame kit or DIY trim border and match the finish to your faucet or lights. It’s one of the highest wow-per-dollar upgrades in the entire house.
25) Swap vanity lighting (and/or the faucet) for a modern finish
Bathroom lighting is basically your face’s PR team. A new fixture modernizes the space instantly, and a faucet swap can do the same. Keep finishes consistent (black, nickel, brass) and choose the right scale so it looks balancednot overwhelming.
26) Add peel-and-stick wallpaper in a powder room for commitment-free drama
Small bathrooms are perfect for bold style because you don’t have to live in it for eight hours a day. Removable wallpaper adds a custom punch without a full reno. Pair it with simple paint and a clean mirror frame so the pattern feels intentional.
27) Add vertical storage with over-toilet shelves or a built-in-look cabinet
Bathrooms feel custom when they have smart storage that doesn’t look like an afterthought. Install two sturdy shelves with brackets, or trim out a slim cabinet so it reads built-in. Style lightly: towels, a basket, and one heroic plant.
Conclusion: the “custom” formula you can repeat in every room
If you only remember one thing, remember this: finish the edges, upgrade the light, and make storage look planned. Do those three thingsone budget-friendly DIY at a timeand your rooms start feeling custom because they look complete. Not perfect. Complete.
DIY Experiences: What These Projects Feel Like in Real Life (Extra )
Here’s what glossy before-and-after photos don’t show: every DIY project has a personality. Some are friendly golden retrievers (paint a door, swap hardware). Others are cats that knock a glass off the counter while maintaining eye contact (cabinet painting, I’m looking at you).
The most surprising lesson is how much small details compound. The first time you caulk a trim seam and paint it smooth, you’ll wonder why you ever tolerated gaps big enough to draft a tiny kite. Clean lines change the “age” of a room. Even if the materials are inexpensive, the space looks higher-end because it stops broadcasting unfinished transitions. That’s why molding and wall paneling read expensive: not because wood is magical, but because the room suddenly has intentional geometry. And if your cuts aren’t perfect? Caulk and wood filler are the shapewear of home improvementsupportive, forgiving, and best applied with a little patience.
Lighting is the other upgrade that feels like cheating. Plenty of rooms look fine during the day, then feel harsh or flat at night. The moment you add a second light sourceplug-in sconces, a lamp, under-cabinet LEDsthe whole vibe softens. Task lighting makes kitchens look finished. A dimmer turns “interrogation” into “cozy.” And when light lands on texture (like board-and-batten, wallpaper, or even crisp trim), everything looks more layered and custom. It’s one of the fastest ways to make a space feel designed for living, not just existing.
Budget-wise, it helps to think like a designer and shop like someone who enjoys paying rent. Spend on what you touch daily: drawer pulls that feel solid, a faucet handle that doesn’t wobble, shelf brackets that don’t flex under a stack of cookbooks. Save on the big visual stuff: paint, primed trim, peel-and-stick finishes, and ready-made furniture that you can customize with hardware, feet, or a color change. The goal isn’t to build everything from scratchit’s to make the final result look cohesive. “Custom” is often just consistency wearing a nice outfit.
Also: pace matters. Doing 27 projects in one weekend sounds fun until you realize you’re eating cereal out of a mixing bowl because the kitchen is “in progress.” A more realistic plan is one weekend project per month, plus one micro-upgrade in between (new switch plates, a picture ledge, a fresh coat of paint on one door). That rhythm keeps momentum without turning your home into a permanent construction zone.
Finally, celebrate the tiny wins. The first shelf you hang level. The first door you paint without drips. The first time you step back and think, “Oh… this looks like a real choice.” That’s the custom feeling you’re chasingand you don’t need a designer budget to get it. You just need a plan, a little patience, and the courage to stop sanding when “good enough” is, in fact, good enough.