Table of Contents >> Show >> Hide
- What the 10-Year Test Actually Changed
- Why Old Plastics Turn Yellow in the First Place
- Why Retrobright Can Look Brilliant and Still Be a Bad Bet
- What Damage Are Restorers Actually Worried About?
- The Museum Lesson: Preserve First, Beautify Second
- So Should Anyone Use Retrobright Now?
- Smarter Alternatives to Aggressive Whitening
- Experiences After Years of Watching Retrobright Results
- Final Verdict
Retrobright used to feel like wizardry for vintage tech fans. You took a yellowed old console or computer, brushed on a peroxide-based mixture, added UV light or sunshine, waited a few hours, and suddenly your sad beige relic looked ready to star in a 1993 catalog. It was the kind of restoration trick that made people feel like they had personally defeated time, oxidation, and bad childhood storage decisions.
Then came the ten-year reality check.
A long-term test that resurfaced after a decade threw cold water on the hobby’s favorite whitening ritual. Instead of proving that Retrobright preserved old plastics, the results suggested the opposite: the treated plastic aged worse than the untreated section sitting right beside it. For collectors, restorers, and anyone who has ever pointed a UV lamp at a yellowed shell with the confidence of a garage chemist, that is a big deal.
This matters because Retrobright has always been sold as a cosmetic fix with a preservation halo. The promise was simple: make old plastics white again without sanding, painting, or replacing the shell. But if the process speeds up future discoloration, increases blotching, or contributes to brittleness, then the hobby is not restoring history. It is just borrowing a prettier present from an uglier future.
What the 10-Year Test Actually Changed
The warning that shook the retro scene did not come from a sterile lab with white coats and intimidating charts. It came from a decade-spanning real-world comparison on a vintage console shell. That is precisely why it hit so hard. Hobbyists are used to seeing immediate before-and-after shots. What they rarely get is the same plastic revisited ten years later under normal aging conditions.
That long view changed the conversation. The treated plastic did not simply drift back toward its original yellow tone. It reportedly looked more uneven, more blotchy, and in at least one direct comparison more yellow than the untreated plastic beside it. That is not a tiny footnote. That is the difference between a temporary cosmetic lift and a process that may accelerate the very aging it claims to fix.
To be fair, one long-term case does not settle every chemical question forever. Plastics vary. Formulations vary. Storage conditions vary. Some cases sat in sunlight, some sat in basements, and some apparently spent their lives being roasted by attic heat like forgotten lasagna. But the test was still powerful because it matched what many collectors had quietly reported for years: Retrobright can look fantastic at first, then get weird later.
That “weird later” is the part people used to ignore. It is harder to turn into a viral restoration post.
Why Old Plastics Turn Yellow in the First Place
It Is Not Just Dirt, Grime, or Bad Vibes
Yellowing in old computer and console plastics is not usually a simple surface stain. On many vintage housings, especially ABS plastics used in older electronics, the color change is tied to aging chemistry. Flame-retardant additives, heat, oxygen, and light all play a role. Over time, the material and its additives change, and the visible result can be yellowing, darkening, or uneven discoloration.
That is one reason early do-it-yourself explanations for Retrobright sounded so appealing. If yellowing is caused by oxidized compounds near the surface, then maybe a peroxide-based treatment can reverse or hide that color change. And visually, at least in the short term, it often can. The trouble is that “making the yellow go away” is not the same thing as returning the plastic to its original condition.
Think of it like whitening a weathered old photograph with a filter. It may look cleaner, but the damage underneath has not politely packed up and gone home.
Why the Same Console Can Yellow Unevenly
Anyone who has seen a Super Nintendo with one panel looking tan and another still gray already knows the mystery. If sunlight alone were the whole story, the entire shell should age more evenly. But many classic machines show wildly inconsistent discoloration across parts that lived in the same room for the same number of years.
That points to something more complicated than simple sun exposure. Different batches of plastic, different additive mixes, different flame-retardant levels, and different heat histories can all influence how a shell ages. In plain English: two pieces that looked identical at the factory may not age like twins. One grows old gracefully. The other turns the color of over-steeped tea.
This is also why restoration advice copied from one machine to another can fail spectacularly. A method that seems to work on one keyboard case may produce streaks, cloudiness, or re-yellowing on another. Vintage plastics are less like a uniform material and more like a family reunion: related, recognizable, and full of unpredictable behavior.
Why Retrobright Can Look Brilliant and Still Be a Bad Bet
The Cosmetic Win Is Real
Let’s be honest: Retrobright became popular for a reason. It works visually, especially at first. Yellowed housings can brighten dramatically. Collectors who want a display piece that looks closer to “factory fresh” are not imagining the improvement. The transformation can be striking, and that instant gratification helped turn the method into restoration folklore.
That early success also explains why the process spread so quickly in the late 2000s and early 2010s. The internet loves a miracle. Put peroxide on sad plastic, add UV, reveal dramatic before-and-after photos, and suddenly everyone with a beige computer case becomes a part-time chemist.
The problem is that immediate appearance is a terrible way to judge long-term preservation.
The Long-Term Cost May Show Up Later
Peroxide is an oxidizer. UV light is not exactly a spa day for aging plastics either. Museum preservation guidance has long warned that visible and especially ultraviolet light can discolor plastics and accelerate degradation. Light damage is cumulative, and once chemical and structural changes happen, they are often not fully reversible. That should already make any collector pause before combining a reactive chemical with deliberate UV exposure and calling it “gentle restoration.”
Now add what polymer-aging research tells us: plastics can undergo oxidation, free-radical reactions, chain scission, crosslinking, and other age-related changes that affect both appearance and structure. In materials like ABS and HIPS, vulnerable phases can degrade first, producing the familiar combination of color change and mechanical decline. So even if peroxide is not solely responsible for every brittle shell, the bigger picture is clear enough: aged plastic plus more oxidative stress is a risky recipe.
That is the nuance many discussions miss. The issue is not necessarily “peroxide instantly destroys all plastics on contact.” The stronger warning is that already-aged plastics are chemically complicated, UV exposure is known to be damaging, and aggressive whitening may trade short-term beauty for long-term stability.
What Damage Are Restorers Actually Worried About?
The visible problems are the easiest to spot. Streaking is common when application is uneven. Blotchy patches can appear where the gel dries, pools, or reacts inconsistently. Some surfaces end up looking too white in one area and still nicotine-beige in another. Others look fine until they are reassembled under normal lighting, at which point the shell suddenly resembles a patchwork quilt made of mildly offended plastics.
The less visible concern is structural change. Collectors often report chalkier texture, a drier feel, or increased fragility afterward. Not every shell turns brittle immediately, and there is still debate over whether Retrobright causes embrittlement directly or simply reveals that the plastic was already compromised. Either way, the practical outcome is the same: once rare housings crack, chip, or craze, there is no magical whitening pass that puts that plastic back together.
And then there is the most annoying outcome of all: faster re-yellowing. Nothing stings quite like spending a weekend whitening a cherished shell only to watch it age back into a strange banana tint in a few years, sometimes with more drama than before. That is the kind of result that turns restoration joy into a very specific kind of collector heartbreak.
The Museum Lesson: Preserve First, Beautify Second
Museum and archival preservation offers a useful reality check. Conservators generally do not start with “How do we make this look brand-new by Saturday?” They start with “How do we prevent more damage?” That difference in mindset matters.
When institutions care for vulnerable plastics, the first priorities are usually environment, handling, and storage. Limit UV. Control heat. Reduce unnecessary light exposure. Avoid amateur treatments on objects with historical value. If an item is rare, fragile, or important, preservation practice often leans toward stabilization rather than aggressive cosmetic intervention.
That may sound less exciting than a dramatic whitening montage, but it is probably the wiser model for vintage tech. A console shell is not less authentic because it shows age. In some cases, a yellowed case is simply an honest record of the materials and manufacturing choices of its time. Erasing that record at chemical speed is not always restoration. Sometimes it is overcorrection in a lab coat made of YouTube confidence.
So Should Anyone Use Retrobright Now?
That depends on what the goal is.
If the goal is strict preservation, especially for rare or historically meaningful hardware, the safest answer is usually no. The ten-year warning, museum guidance on light damage, and broader polymer-aging science all point in the same direction: adding oxidative stress to old plastics is not a low-risk move.
If the goal is cosmetic improvement on a common, low-value shell, some hobbyists will still decide the risk is worth it. But even then, the method should be approached as a gamble, not a cure. Test hidden areas. Expect uneven results. Do not assume the color change will last. Do not treat it like a scientifically settled preservation technique. And definitely do not experiment first on your rarest machine just because a stranger online achieved one glorious before-and-after photo with dramatic lighting and suspicious optimism.
Smarter Alternatives to Aggressive Whitening
For many collectors, the better strategy is boring on paper and excellent in practice. Start with a careful cleaning using mild, plastic-safe methods. Remove grime, sticker residue, and surface dirt without chasing showroom perfection. Improve storage conditions so the item is kept away from strong sunlight, heat, and excessive humidity. Handle it gently. Display it thoughtfully. If you use the machine often, consider a reproduction shell for daily wear while the original rests in safer conditions.
And yes, sometimes the best option is to accept the patina. That is not laziness. That is restraint. A slightly yellowed original shell may be far preferable to a brightened shell that later turns blotchy, brittle, or oddly patchy. Preservation is often the art of deciding which imperfections are safer than the “fix.”
Experiences After Years of Watching Retrobright Results
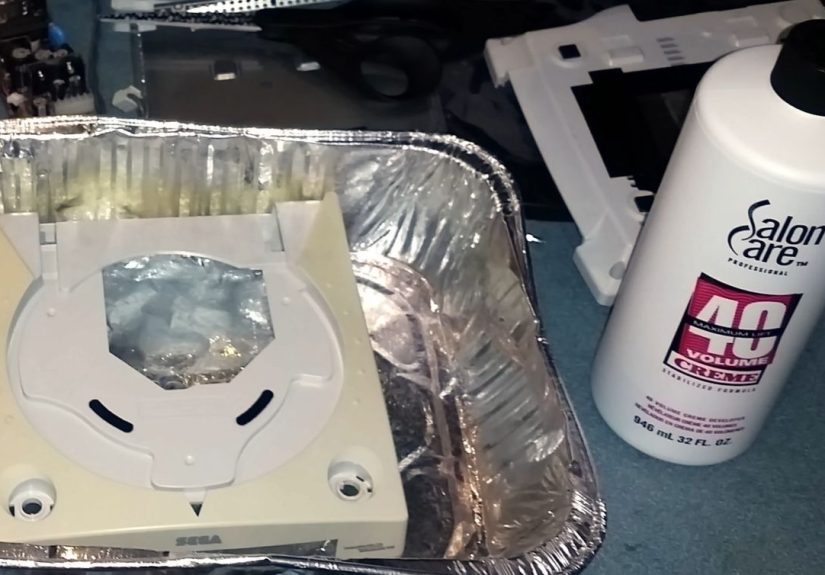
Across the retro-computing and console restoration world, the experiences tied to Retrobright tend to follow a familiar emotional arc. First comes excitement. Someone finds an old keyboard, Dreamcast, SNES, Macintosh case, or peripheral that looks like it spent two decades marinating in weak tea. They clean it, mix a peroxide solution or use developer cream, set up UV lamps or sunlight, and watch the plastic brighten hour by hour. It feels amazing. Suddenly the machine looks younger, cleaner, and more display-worthy. The photos are glorious. Friends say it looks factory fresh. The restorer feels like they just performed CPR on the 1990s.
Then comes the second phase: the tiny compromises people ignore because the overall result is still impressive. Maybe the shell is slightly streaky under strong light. Maybe one corner turned lighter than the rest. Maybe the inside of the case still tells a different color story than the outside. Maybe a logo badge, sticker area, or masked section now shows a faint halo. None of that seems like a dealbreaker in the moment, because the machine still looks much better than before.
The third phase arrives later, and this is where opinions really change. After months or years, some restorers notice that the whitened plastic does not age gracefully. It may begin yellowing again, sometimes faster than expected. Some pieces return to a warmer cream tone, while others come back with a stranger look: uneven, blotchy, or slightly sickly, as if the color no longer belongs to one consistent plastic surface. A few people describe shells that feel drier or less resilient when reopened for repairs. Tabs seem more fragile. Screw posts feel less trustworthy. Hinges inspire less confidence than they used to.
That does not happen to every part in the same way, and that inconsistency is part of the frustration. Two items treated with similar methods can age very differently. One stays presentable for a long time. Another becomes a cautionary tale hiding in plain sight on a shelf. That unpredictability is exactly what makes the process so risky for collectors who care about original materials. You are not just whitening plastic. You are making a bet on a chemical future you cannot fully see.
There is also an emotional shift that happens after people have restored enough hardware. Early on, the goal is usually to make everything look new. Later, many collectors become more conservative. They start caring less about “perfect beige” and more about honest condition, stable materials, and reversibility. They stop asking, “Can I make this look younger?” and start asking, “Will I regret this in five years?” That is a much better question.
So the shared experience around Retrobright is not just about chemistry. It is about maturity in restoration. Many hobbyists begin by chasing dramatic transformations and end by learning the value of restraint. They realize that yellowing can be ugly, sure, but damaged original plastic is uglier. And once you understand that, the old shell on the shelf starts to look less like a problem to erase and more like a survivor that deserves careful treatment.
Final Verdict
The ten-year Retrobright warning does not mean every peroxide-treated shell will instantly crumble into historic confetti. But it does destroy the comforting myth that whitening old plastics is a harmless reset button. The better reading of the evidence is this: Retrobright can deliver a short-term cosmetic improvement, yet it may also worsen long-term yellowing, create uneven appearance, and add risk to already-aging materials.
For collectors, that changes the standard. The question is no longer “Can Retrobright make this look better today?” Of course it can. The real question is “What will this shell look like in ten years, and will I still be glad I did it?” If you cannot answer that confidently, the smartest move may be the least flashy one of all: clean gently, store well, block UV, and let history keep a little of its color.