
Table of Contents >> Show >> Hide
- Introduction: When a Plastic Gas Tank Starts Acting Like a Watering Can
- Before You Seal Anything: Safety Comes First
- Way 1: Seal Small Damage With a Fuel-Compatible Plastic Tank Repair Kit
- Way 2: Use Plastic Welding for Certain Tank Materials
- Way 3: Replace the Tank or Damaged Component
- How to Choose the Best Method
- Common Mistakes to Avoid
- Practical Examples
- Maintenance Tips to Prevent Future Leaks
- Experience-Based Notes: What People Learn After Dealing With Plastic Gas Tank Leaks
- Conclusion: Seal Smart, Not Sorry
Note: A leaking fuel tank is never a “we’ll get to it after lunch” problem. Gasoline vapor is highly flammable, and even a tank that looks empty can still be dangerous. This article is for educational, safety-first guidance. For vehicle tanks, large cracks, active dripping, strong fuel odor, or any repair near exhaust, wiring, fuel lines, or the fuel pump module, the smartest move is professional inspection or tank replacement.
Introduction: When a Plastic Gas Tank Starts Acting Like a Watering Can
A plastic gas tank is supposed to do one boring job: hold fuel quietly and without drama. When it begins leaking, sweating, smelling like gasoline, or leaving mysterious wet spots under your vehicle, motorcycle, ATV, lawn equipment, boat, or generator, the tank has officially resigned from “boring” and entered “dangerous.”
The good news is that plastic fuel tanks can sometimes be sealed, depending on the size, location, material, and cause of the leak. The not-so-good news is that plastic is not one universal material. Many fuel tanks are made from high-density polyethylene, cross-linked polyethylene, polypropylene, or other fuel-resistant plastics. These materials are tough, flexible, and great at resisting gasolinebut they are also notoriously stubborn when you try to glue them. Basically, they are the cats of the plastic world: useful, durable, and deeply unimpressed by your plans.
This guide explains 3 ways to seal a plastic gas tank: using a fuel-compatible repair kit, having the tank plastic-welded by a qualified repairer, and replacing the damaged tank or fuel-system component when sealing is not safe. We will cover when each option makes sense, what to avoid, and how to think like a careful mechanic instead of a person holding a tube of mystery adhesive and hoping for a miracle.
Before You Seal Anything: Safety Comes First
Before choosing a repair method, understand the risk. Gasoline does not need a dramatic Hollywood fireball to cause trouble. Vapors can ignite from sparks, hot surfaces, static electricity, power tools, cigarettes, heaters, pilot lights, and other ignition sources. A leak near a hot exhaust pipe or electrical connector is especially serious.
Signs of a Plastic Gas Tank Leak
A damaged plastic gas tank may show several warning signs:
- A strong gasoline smell around the vehicle or equipment
- Wet stains, drips, or shiny patches under the tank
- Fuel level dropping faster than normal
- Cracks, punctures, scraped areas, or melted-looking plastic
- Fuel odor after filling the tank
- Check-engine light related to the evaporative emissions system on vehicles
If fuel is actively dripping, do not drive the vehicle or run the equipment. A “small leak” can become a large safety problem faster than you can say, “I probably should have called a professional.”
What Not to Use on a Plastic Fuel Tank
Not every sealant belongs near gasoline. Ordinary household glue, bathroom silicone, hot glue, duct tape, random epoxy, body filler, and “my neighbor said this works” products are poor choices. Gasoline can soften many adhesives, and some plastics reject bonding unless the product is specifically designed for them.
Also avoid open flame, torch work, grinding, drilling, or heat-based repairs unless the tank has been professionally emptied, cleaned, and made safe. A fuel tank can hold flammable vapor even after liquid fuel is removed. That is why repair shops treat fuel tanks with real caution, not backyard confidence and a playlist.
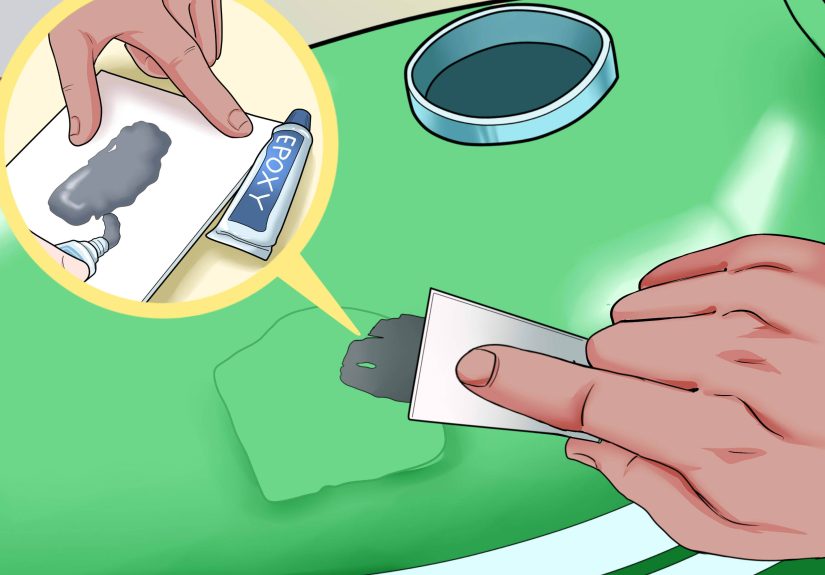
Way 1: Seal Small Damage With a Fuel-Compatible Plastic Tank Repair Kit
The most approachable method for minor damage is a plastic gas tank repair kit made for fuel exposure and compatible with the tank material. These kits may include two-part resin, mesh or patch material, applicators, surface-prep materials, and instructions. Some are designed for plastic tanks generally, while others are made for metal fuel tanks only. Read that label carefully. “Fuel tank repair” does not always mean “plastic fuel tank repair.”
When This Method Makes Sense
A repair kit may be reasonable for a small, accessible, non-structural crack or pinhole on the outside of a removable plastic tank. It is more likely to work on lawn equipment, small engines, ATVs, utility equipment, or older tanks where replacement is difficult but the damage is limited.
This method is not ideal for large splits, mounting-point damage, seams, fuel pump openings, filler neck areas, heavily stressed corners, or tanks that are warped, brittle, softened, or melted. If the tank flexes around the crack, a patch may fail because the plastic keeps moving underneath it. Think of it like putting a tiny bandage on a trampoline. Technically possible, emotionally optimistic.
How the Repair Usually Works
Most fuel-compatible plastic tank kits rely on careful surface preparation and chemical bonding. The damaged area must be clean, dry, and free from fuel residue on the outside. The surrounding surface is usually lightly roughened so the repair material has texture to grip. Then the resin or putty is mixed according to the manufacturer’s ratio and applied over the damaged area, often with reinforcing mesh or layered material for strength.
The important phrase is according to the manufacturer’s instructions. Mixing time, working time, curing time, temperature range, and surface prep all matter. Guessing with two-part chemicals is how good intentions become crunchy regrets.
Pros of a Plastic Tank Repair Kit
- Usually affordable compared with replacement
- Designed for small leaks and punctures
- May include all needed patch materials
- Useful for non-pressurized small-engine tanks
- Can be a practical temporary repair when replacement parts are hard to find
Cons of a Plastic Tank Repair Kit
- Not all kits work on polyethylene or polypropylene
- Not all “fuel tank” kits are safe for plastic
- Repair strength depends heavily on surface prep
- May fail on flexible, stressed, or contaminated areas
- Usually not recommended for major automotive fuel tank damage
Best Practice
Use only a product that clearly states it is compatible with plastic fuel tanks and gasoline exposure. If the product says it is for metal tanks, radiators, water tanks, or general plastic only, do not assume it will survive fuel. Gasoline is not impressed by optimism. It has dissolved many dreams, along with many adhesives.
Way 2: Use Plastic Welding for Certain Tank Materials
The second way to seal a plastic gas tank is plastic welding. This method uses compatible plastic filler material and controlled heat or specialized equipment to bond damaged plastic. In the right hands, plastic welding can be stronger and more durable than surface adhesive patches. In the wrong hands, it can become a dangerous science fair project with a very bad ending.
Why Plastic Welding Is Tricky
Plastic welding is not the same as gluing. The repair material must match or work with the tank material. Many automotive and powersport fuel tanks are made from forms of polyethylene, including high-density polyethylene or cross-linked polyethylene. Some plastics can be fusion-welded; others may require specialty methods because they do not melt and flow like ordinary thermoplastic.
This is why identifying the tank material matters. Some tanks have molded markings such as HDPE, PE, PP, PA, or similar codes. If the tank does not show a clear material code, the service manual, manufacturer, or a professional repair shop may be needed to identify it.
When Plastic Welding Makes Sense
Plastic welding may be suitable when the damage is in a repairable area, the material is known, and the tank can be safely removed and prepared by someone qualified. It is often considered for ATV tanks, motorcycle tanks, marine tanks, lawn equipment tanks, and some specialty fuel containers when replacement is expensive or unavailable.
For modern vehicle tanks, however, welding is often not the best answer. Vehicle fuel tanks are part of a larger fuel and vapor-control system. They may include rollover valves, evaporative emissions components, internal baffles, fuel pump modules, venting passages, and molded fittings. A patch on the outside may not solve hidden damage or vapor leaks.
Why Professional Handling Matters
Plastic welding uses heat, and heat around fuel vapor is a serious hazard. A qualified repairer knows how to remove the tank, make it safe, identify the plastic, select compatible welding rod or repair material, and test the repair afterward. This is not the moment for a random soldering iron, a garage full of fumes, and the phrase “How hard can it be?” That phrase has a long history of arriving just before bad decisions.
Pros of Plastic Welding
- Can create a stronger bond than many adhesives
- Works well on some plastic materials when properly matched
- Useful for cracks, gouges, and certain punctures
- May preserve rare or hard-to-find tanks
Cons of Plastic Welding
- Requires correct material identification
- Requires safe tank removal and vapor control
- Not all plastics can be fusion-welded
- Improper welding can weaken or deform the tank
- Not ideal for many automotive fuel tank repairs
Best Practice
Choose plastic welding only when the tank is safely handled by a qualified person and the material is suitable. If the tank has damage near seams, mounting points, valves, fuel pump openings, or pressure/vapor-control areas, replacement is usually the safer and cleaner answer.
Way 3: Replace the Tank or Damaged Component
The third way to “seal” a plastic gas tank is the least glamorous but often the best: replace the tank or the failing component. Yes, replacement does not sound as satisfying as a clever repair. There is no heroic soundtrack. No magical putty. No “I fixed it with stuff from Drawer Number Three.” But when fuel is involved, boring is beautiful.
When Replacement Is the Right Choice
Replacement is usually the safest option when the tank has large cracks, seam leaks, impact damage, melted plastic, damaged mounting points, distorted shape, stripped inserts, broken rollover valves, cracked filler necks, or leaks around the fuel pump module area. It is also the right choice when the tank is part of a road vehicle’s emissions and safety system.
For cars and trucks, the fuel tank is more than a bucket with ambition. It may be designed to pass rollover leakage requirements, manage fuel vapor, support the fuel pump module, and work with the evaporative emissions system. A poor repair can cause fuel odor, check-engine lights, failed emissions inspection, vapor leaks, or fire risk.
Sometimes the Tank Is Not the Actual Problem
Before blaming the entire tank, a professional may inspect connected parts. Fuel odor or leakage can come from a cracked filler neck, loose fuel pump lock ring, damaged gasket, brittle vapor hose, broken vent valve, failed fuel line, corroded strap, or loose connection. Replacing a gasket or hose is very different from patching a tank wall.
This is especially common when the smell appears after filling up. The tank may leak only near the top, where the filler neck, pump module seal, vent lines, or evaporative emissions connections sit. In other words, the tank may not be leaking from the bottom at all; it may simply be wearing a gasoline-scented hat.
Pros of Replacement
- Safest long-term solution for major fuel tank damage
- Restores original shape, fittings, and sealing points
- Reduces risk of repeat leaks
- Better for road vehicles and emissions-controlled systems
- May prevent damage to fuel pump, vapor lines, and surrounding parts
Cons of Replacement
- More expensive than a small patch
- May require labor to remove straps, shields, lines, and pump module
- Parts availability can be challenging for older equipment
- Professional installation is often recommended
Best Practice
Replace the tank when the damage affects strength, safety, mounting, emissions components, or any area that is difficult to inspect after repair. A replacement tank may cost more upfront, but it can be cheaper than repeated failed repairs, fuel smell, towing, or a preventable fire hazard.
How to Choose the Best Method
Choosing the right plastic gas tank repair method depends on five big questions:
1. What Type of Plastic Is the Tank Made From?
Polyethylene and polypropylene are difficult to bond with ordinary adhesives. Some repair products specifically exclude these plastics. If the product is not compatible with your tank material, the repair may peel off like a bad sticker on a dusty bumper.
2. How Large Is the Damage?
A tiny puncture on a flat, low-stress area is very different from a long crack across a corner. Long cracks, holes, seam leaks, and crushed areas usually call for professional evaluation or replacement.
3. Where Is the Leak?
Leaks near the fuel pump module, filler neck, vent lines, rollover valves, mounting points, or seams are more serious than a small surface puncture. These areas deal with movement, pressure changes, vapor control, and structural stress.
4. Is the Tank on a Road Vehicle?
Road vehicles have safety and emissions requirements. A patch that might be acceptable on a small lawn mower tank may be a poor choice for a car or truck. When the tank is under a vehicle, exposed to road debris, temperature changes, vibration, and crash forces, reliability matters more than saving a few dollars.
5. Is the Repair Temporary or Long-Term?
A temporary seal may help move equipment safely out of service, but it should not be treated as a lifetime repair unless the product and repair conditions support that use. If you would not trust the patch on a hot day, near traffic, with a full tank, it is not a real fix.
Common Mistakes to Avoid
Using the Wrong Epoxy
Many epoxies are strong in the right environment but weak against fuel or poor at bonding to polyethylene. Always check fuel resistance and plastic compatibility.
Patching Over Dirty or Fuel-Soaked Plastic
Adhesives need clean surfaces. Fuel residue, oil, road grime, dust, and plastic oxidation can ruin a repair before it begins.
Ignoring Vapor Leaks
A tank does not need to drip liquid fuel to be unsafe. Fuel odor can indicate vapor leakage, which can still be flammable and may also cause emissions problems.
Repairing Structural Damage
If the tank is cracked near a support area, strap, bracket, seam, or molded fitting, patching the surface may not restore strength.
Assuming “Dry” Means “Safe”
A tank can look dry but still contain vapor. This is why professional repair practices matter around fuel systems.
Practical Examples
Example 1: Small Lawn Mower Tank Pinhole
A small-engine plastic fuel tank has a tiny puncture on a flat side from rubbing against a bracket. The tank is removable, replacement is delayed, and the plastic repair kit is labeled for fuel-resistant plastic tank repair. In this case, a compatible kit may be a reasonable repair, provided the tank is handled safely and the patch cures fully before use.
Example 2: ATV Tank Crack Near Mounting Tab
An ATV tank cracks near a mounting tab after trail impact. Because the area flexes and carries stress, a surface patch may fail. Plastic welding by a professional may work if the material is suitable, but replacement may be better if the mounting point is compromised.
Example 3: Car Smells Like Gas After Filling Up
A car smells strongly of gasoline only after the tank is full. The leak may be near the top of the tank, filler neck, fuel pump seal, vent hose, or evaporative emissions line. This is not a good candidate for blind patching. A professional inspection is the better route.
Maintenance Tips to Prevent Future Leaks
Plastic fuel tanks last longer when surrounding parts are kept in good shape. Check for loose straps, sharp brackets, rubbing points, missing shields, cracked hoses, and damaged caps. On small equipment, avoid storing the tank where it can sit in direct sun, get crushed by tools, or rub against metal edges during vibration.
Do not overfill fuel tanks. Leaving room for expansion and vapor control helps reduce pressure and spills. For vehicles, stop when the gas pump clicks off instead of “topping off.” That last little squeeze of fuel can create bigger problems than it solves. Your tank is not a Thanksgiving plate; it does not need one more scoop.
Experience-Based Notes: What People Learn After Dealing With Plastic Gas Tank Leaks
Anyone who has dealt with a leaking plastic gas tank usually learns the same lesson: the leak is rarely as simple as it first looks. At first, it may seem like a tiny wet spot, a faint smell, or a little stain on the garage floor. Then you wipe it clean, come back later, and there it is again, quietly judging you. Plastic tanks can leak from obvious punctures, but they can also leak from hidden stress cracks, fittings, seams, grommets, or vapor connections that only act up when the tank is full, warm, or vibrating.
One common experience is discovering that the “tank leak” is actually a hose, seal, or filler-neck problem. This happens a lot with vehicles and powersport equipment. Someone sees fuel near the tank and assumes the tank itself is cracked. After inspection, the real problem turns out to be a dried gasket, loose clamp, cracked vent line, or damaged fuel cap seal. That is why careful diagnosis matters. Replacing or patching the wrong part is like buying new shoes because your sock has a hole. Technically related, but not exactly brilliant.
Another lesson is that surface preparation makes or breaks any adhesive repair. People often want the fastest fix, but repair materials do not bond well to dirty, oily, glossy, or fuel-contaminated plastic. A patch placed over residue may look strong for a day, then lift at the edges once fuel and vibration return. The repair may fail slowly, which is even more annoying because it gives you false hope first. With fuel systems, false hope has terrible customer service.
People also learn that not all plastic tanks behave the same. A repair that works on one small equipment tank may fail completely on a different tank made from another plastic. Polyethylene is especially difficult because many adhesives do not chemically grip it well. Some fuel tanks are flexible by design, and that flexing can break rigid patches. This is why product compatibility matters more than brand confidence, online comments, or the phrase “I used this once and it held.”
Another real-world experience is that replacement often feels expensive until a failed repair wastes time, money, and patience. A new tank may seem like the boring option, but it removes uncertainty. For cars and trucks, replacement also protects the fuel pump seal, EVAP system, rollover protection, and mounting integrity. A patched tank under a road vehicle has to survive heat, cold, road debris, potholes, fuel expansion, and constant vibration. That is a rough life for a repair that started as a Saturday experiment.
Finally, the biggest lesson is respect. Gasoline leaks are not just messy; they are safety problems. A person may be comfortable fixing brakes, changing oil, rebuilding carburetors, or replacing belts, but fuel leaks deserve extra caution. If the repair involves uncertainty, strong fumes, major damage, or a vehicle used on public roads, professional help is not a defeat. It is the adult version of winning.
Conclusion: Seal Smart, Not Sorry
There are three main ways to seal a plastic gas tank: use a compatible plastic fuel tank repair kit for small non-structural damage, choose professional plastic welding when the tank material and damage allow it, or replace the tank or failing component when safety, strength, or emissions reliability are at stake.
The best repair is not always the cheapest or fastest. It is the one that keeps fuel where it belongs, prevents vapor leaks, and does not turn your garage, vehicle, or equipment into a nervous situation with wheels. If the damage is minor and the repair product is clearly compatible, a careful patch may work. If the crack is bigger, stressed, hidden, or connected to a vehicle fuel system, replacement or professional repair is the safer call.
In short: plastic gas tank repair is possible, but gasoline gets the final vote. Choose the method that respects the material, the fuel, and the risk. Your future selfand your nosewill thank you.


