Table of Contents >> Show >> Hide
- Yes, You Can Freeze Pears (But Here’s the Honest Part)
- Pick the Right Pears: Freeze Them at the Sweet Spot
- What You’ll Need (Nothing Fancy, Just Smart)
- Prevent Browning: Your Pears Don’t Need to Tan in the Freezer
- Method 1: Syrup Pack (Best for Flavor and Texture)
- Method 2: Dry Pack (Tray-Freeze) for Smoothies, Baking, and Snacking-ish
- Method 3: Sugar Pack or Juice Pack (A Sweet-but-Not-Syrupy Middle Ground)
- Method 4: Freeze Pear Purée (When Pears Are Extra-Ripe)
- How Long Do Frozen Pears Last?
- Thawing Pears Without Turning Them to Instant Mush
- What to Make With Frozen Pears (A Few Delicious Ideas)
- Troubleshooting: When Frozen Pears Get Weird
- Food Safety Notes (Quick and Practical)
- Freezer Diaries: of Pear-Freezing Experience
- Conclusion: Freeze Pears Now, Thank Yourself Later
Pear season is basically nature’s limited-time offer: sweet, fragrant, and gone before you’ve finished saying “I should make a tart.” The good news? You can freeze pears. The even better news? If you do it the right way, you’ll open your freezer in February and feel like you just found a tiny fruit time machine.
Yes, You Can Freeze Pears (But Here’s the Honest Part)
Freezing pears is absolutely doable, but it helps to know what you’re signing up for. Pears have a high water content, and freezing turns that water into ice crystals. When the pears thaw, the texture softenssometimes a lot. That doesn’t mean they’re ruined. It just means frozen pears shine best in cooked dishes (crisps, pies, muffins, sauces) and blended things (smoothies) rather than as a crisp, fresh snack.
If your dream is “snappy pear slices like a fresh fruit tray,” the freezer may disappoint. If your dream is “pear crumble on a Tuesday,” congratulationsyou’re about to win.
Pick the Right Pears: Freeze Them at the Sweet Spot
The secret to freezing pears that taste great later is freezing them at the right ripeness. Aim for pears that are firm-ripe: fragrant and flavorful, but still holding their shape. Overripe pears can get extra-mushy after thawing (still tasty, but more “sauce vibes” than “slice vibes”).
Which pears freeze well?
Common varieties like Bartlett, Anjou, and Bosc all freeze well when they’re in good condition. What matters most is quality: skip bruised, badly soft, or damaged fruit. Those “I’ll just cut around it” pears are better cooked immediately rather than frozen.
How much fruit do you need?
A practical planning note: about 2 to 3 pounds of pears typically yields roughly 1 quart of frozen pears, depending on how much you trim and how thick you slice.
What You’ll Need (Nothing Fancy, Just Smart)
- Pears (firm-ripe, unbruised)
- Knife + cutting board
- Peeler (optional, but recommended for best texture)
- Large bowl for holding solution
- Freezer-safe containers (rigid containers, wide-mouth freezer jars, or heavy-duty freezer bags)
- Sheet pan + parchment (if doing the dry-pack method)
- Anti-browning option: ascorbic acid powder, lemon juice, or citric acid
- Optional: sugar for syrup, labels/marker
Prevent Browning: Your Pears Don’t Need to Tan in the Freezer
Pears brown from enzymatic reactions once cut. Freezing slows things down, but the browning can still happen during prep and sometimes shows up after thawing. That’s why a quick anti-browning step helps.
Anti-browning choices (pick one)
- Ascorbic acid (vitamin C): The gold standard for keeping light-colored fruit looking fresh. Many home preservation guides use it because it’s effective and doesn’t add a strong flavor.
- Lemon juice: Handy, accessible, and helpful. It can slightly affect flavor (often in a good way), but it’s not always as effective as ascorbic acid.
- Citric acid: Also works, especially if you already keep it around for canning and preserving.
Easy lemon holding solution: Mix bottled lemon juice with cold water (you’ll see common ratios like a few tablespoons per quart of water). Dip or soak slices briefly, then drain well before packing.
Method 1: Syrup Pack (Best for Flavor and Texture)
If you want the highest-quality frozen pearsespecially for bakinggo with a syrup pack. Sugar syrup helps protect texture, reduces freezer burn, and keeps the fruit more pleasant after thawing.
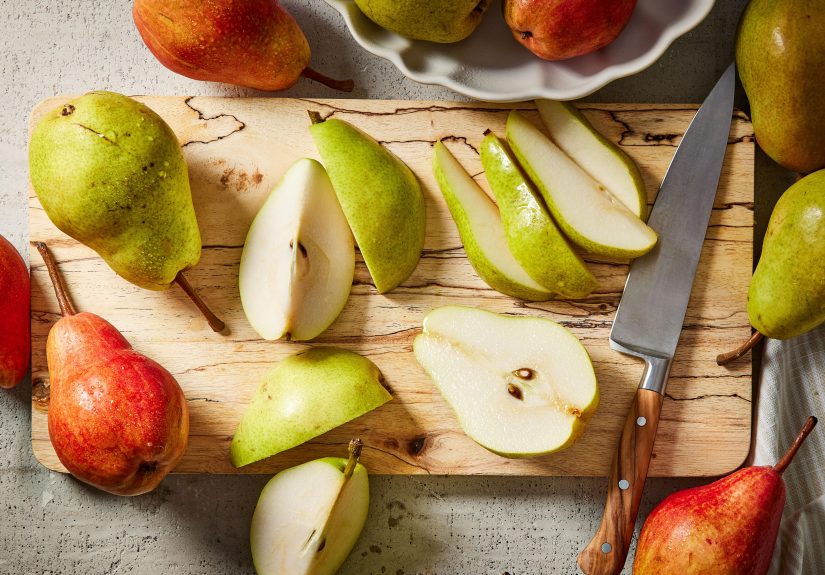
Step 1: Wash, peel, core, and slice
- Wash pears under cool running water and dry.
- Peel (recommended), then cut in halves and remove cores.
- Slice into wedges or slices. Medium pears often get cut into smaller wedges; large pears into slightly thinner pieces.
Step 2: Make a 40% (medium) syrup and chill it
A classic home-freezing syrup for pears is around 40% sugar syrup. One common formula: about 2 3/4 cups sugar + 4 cups water. Stir until dissolved, then chill the syrup completely.
Want it less sweet? You can use lighter syrup, fruit juice, or a dry-pack method instead. But for pears, medium syrup is the “best overall” choice if you’re chasing quality.
Step 3: Briefly heat pears in boiling syrup (1–2 minutes)
This quick hot step helps pears freeze better. Bring syrup to a boil, add pear slices, and simmer for about 1 to 2 minutes depending on slice size. Drain and cool the pears.
Step 4: Pack pears and cover with cold syrup
- Add a small amount of cold syrup to the container first.
- Add cooled pear pieces, pressing down gently.
- Pour in more cold syrup to fully cover the pears.
- Optional color helper: Add ascorbic acid to the syrup according to package directions, or use a common home-preservation guideline such as 3/4 teaspoon ascorbic acid per quart of syrup for pears.
- Leave headspace (often about 1/2 inch for many rigid containers) so liquid can expand as it freezes.
- If using rigid containers, place a small piece of crumpled water-resistant paper on top to keep fruit submerged.
Step 5: Seal, label, and freeze fast
Seal tightly, label with contents and date, and freeze in a single layer if possible at first (so everything freezes quickly). Once solid, you can stack. Quick freezing = smaller ice crystals = better texture.
Method 2: Dry Pack (Tray-Freeze) for Smoothies, Baking, and Snacking-ish
Dry-pack pears are great when you want free-flowing pieces (not a frozen fruit brick). This method is also less sweetperfect for smoothies, oatmeal, and baking where you’d rather control sugar later.
- Wash, peel, core, and slice pears.
- Treat slices to prevent browning: brief soak in an acidulated water solution (ascorbic acid, lemon juice, or citric acid), then drain thoroughly.
- Arrange slices in a single layer on a parchment-lined sheet pan.
- Freeze until solid (usually a few hours).
- Transfer frozen slices to freezer bags. Press out as much air as possible, seal, label, and return to freezer.
Pro tip: Dry-pack is the freezer-burn magnet if you leave air in the bag. Squeeze it, press it, remove itget the air out. Your future self will thank you with pie.
Method 3: Sugar Pack or Juice Pack (A Sweet-but-Not-Syrupy Middle Ground)
If you like the protective benefits of sugar but don’t want syrup, a sugar pack can work: toss slices with sugar until they get glossy and a little syrupy from their own juices, then pack and freeze. Another option is packing pears in 100% fruit juice (like apple or white grape) for a no-added-sugar approach that still covers the fruit.
These methods land between syrup pack (best quality, sweetest) and dry pack (least sweet, most “free-flowing”).
Method 4: Freeze Pear Purée (When Pears Are Extra-Ripe)
If your pears are heading into “soft and dramatic” territory, purée is a smart save. Puréed pears are fantastic for smoothies, baby food, sauces, baking, and even stirring into yogurt.
- Peel and core pears.
- Blend until smooth (add a splash of water or juice if needed).
- Portion into freezer-safe containers or ice cube trays (then transfer cubes to a freezer bag once frozen).
- Leave headspace and label.
How Long Do Frozen Pears Last?
Frozen fruit kept consistently at 0°F (-18°C) or colder stays safe for a long time, but quality declines gradually. For the best taste and texture, many kitchen and preservation guides suggest using frozen pears within about 8 to 12 months, with some sources recommending the sweet spot around 8 to 10 months.
Thawing Pears Without Turning Them to Instant Mush
Pears soften when thawed, so your thawing method matters.
- Best for baking: Use pears partially thawed, or even still frozen, in pies, crisps, and muffins.
- Best for eating: Thaw in the refrigerator in the container so juices stay with the fruit.
- Fast option: Set the sealed container in a bowl of cool water.
Try not to thaw pears at warm room temperature for long periods. Also, avoid refreezing thawed fruit repeatedlyquality drops fast, and texture gets sad.
What to Make With Frozen Pears (A Few Delicious Ideas)
Frozen pears are culinary shape-shifters. Here are crowd-pleasers:
- Pear crisp: Toss frozen slices with cinnamon and a touch of sugar, top with oat crumble, bake until bubbly.
- Smoothies: Blend frozen pear with spinach, banana, ginger, and yogurt for a “green smoothie that doesn’t taste green.”
- Quick compote: Simmer pears with a splash of water, lemon, and warm spices; spoon over pancakes or ice cream.
- Muffins or quick bread: Fold chopped frozen pears into batter (no need to thaw completely).
- Oatmeal upgrade: Stir frozen pear pieces into oats while they cookinstant cozy.
A specific example: 10-minute cinnamon pear topping
Put 2 cups frozen pears in a saucepan with 2 tablespoons water, 1–2 teaspoons sugar (optional), 1/2 teaspoon cinnamon, and a pinch of salt. Simmer 6–10 minutes until saucy. Finish with a tiny squeeze of lemon. Spoon over yogurt, waffles, or vanilla ice cream and pretend you’re at a brunch place that charges $18 for this.
Troubleshooting: When Frozen Pears Get Weird
Problem: Pears turned brown
This is usually enzymatic browning. Next time, use ascorbic acid or an acidulated water dip, and keep cut pears from sitting out too long. A little browning is mostly cosmetic, but anti-browning steps keep your pears looking fresher.
Problem: Pears are mushy after thawing
That’s common, especially if pears were very ripe or sliced thick. Use syrup pack for better texture, freeze at firm-ripe stage, and use thawed pears in cooked dishes instead of trying to eat them like fresh slices.
Problem: Freezer burn
Air is the villain. Use moisture-vapor-proof packaging, press out air in bags, keep fruit covered in syrup (if syrup-packed), and avoid leaving containers unsealed or half-full in the freezer.
Food Safety Notes (Quick and Practical)
Freezing slows microbial growth but doesn’t “sanitize” food. Start with clean fruit and clean tools, work efficiently, and keep pears cold if you’re prepping a large batch. If something smells off after thawing, or you see mold, it’s not a “character-building snack.” Toss it.
Freezer Diaries: of Pear-Freezing Experience
Here’s what tends to happen in real kitchens (where the freezer is packed, the cutting board is slightly too small, and someone always needs the sink exactly when you’re in your fruit-prep era). First: pears bruise if you look at them too intensely. So if you’re buying pears to freeze, treat them like they’re carrying a tiny secret. Set them down gently, don’t stack heavy bags on top, and sort them when you get home. The ones with bruises are the “use tonight” pears; the unblemished ones are your freezer candidates.
Second: timing matters more than heroics. People often wait for pears to get super soft because that’s when they smell amazing. But for freezing, that’s the moment when texture takes a nosedive after thawing. A better move is to freeze when pears are fragrant and tasty but still firm. If you miss that window (life happens), don’t panicjust pivot. Overripe pears make excellent purée. Freeze it in ice cube trays and you’ve got smoothie boosters, baking add-ins, and instant pear sauce portions that thaw in minutes.
Third: the anti-browning step is not “extra.” It’s like brushing your teeth: you can skip it once and survive, but you’ll probably regret it. If you’ve ever thawed pears and wondered why they look like they spent the weekend in a sepia filter, that’s oxidation doing its thing. A quick vitamin C (ascorbic acid) solution is the cleanest fix. Lemon juice works too, and it’s very “I’m a resourceful adult who keeps lemons around” energy. Either way, drain your pears well before packingextra water becomes extra ice crystals, and extra ice crystals become extra mush.
Fourth: syrup pack is underrated. Yes, it’s sweeter. But if your goal is a better pear later, syrup is like a comfy winter coat for fruit. It reduces freezer burn and helps pears taste more like pears when thawed. And you can always rinse or drain syrup when you use the fruit. On the other hand, if you know your pears are destined for smoothies or oatmeal, dry-pack is the low-maintenance champion. Tray-freeze the slices, bag them once they’re solid, and you’ll be able to pour out a handful whenever you need a “healthier than a cookie” moment.
Fifth: label like your future self is a stranger. Because future-you is a stranger. You won’t remember if that bag contains pears or pale peaches or “mystery fruit, 2024-ish.” Write the date and method: “Pears, syrup pack, Oct 24” or “Pears, dry pack, lemon dip.” Bonus points if you add the intended use: “for crisps” or “for smoothies.” It sounds silly until you’re trying to decide what to bake at 9 p.m. while holding a frozen bag up to the light like it’s evidence in a courtroom drama.
Finally: plan for softness and you’ll be delighted. Frozen pears are rarely “snack pears.” They’re “warm dessert pears,” “breakfast upgrade pears,” and “blender pears.” Once you treat them like an ingredient (not a raw produce replacement), they become one of the most useful freezer staples you can makeespecially when pear season is long gone and you’re craving something that tastes like sunshine and good decisions.
Conclusion: Freeze Pears Now, Thank Yourself Later
So, can you freeze pears? Absolutely. Choose firm-ripe fruit, prevent browning with a quick acid treatment, and pick a packing method that matches how you’ll use them later. Syrup pack is the quality king for baking and desserts, dry pack is the flexible favorite for smoothies and quick portioning, and purée is the smart rescue when pears are extra ripe. Label, freeze fast, and use within the best-quality window for the tastiest results. Your future cobbler (and future-you) will be very proud.