Table of Contents >> Show >> Hide
- Why a Cheap Compost Bin Is Worth Making
- What You’ll Need for a $10 DIY Compost Bin
- Step-by-Step: How To Make A $10 DIY Compost Bin
- What to Compost in Your Homemade Compost Bin
- What Not to Compost
- How Long Does Composting Take?
- Troubleshooting a $10 DIY Compost Bin
- How to Use Finished Compost
- Why This Budget Compost Bin Actually Works
- Common Real-Life Experiences With a $10 DIY Compost Bin
- Conclusion
If you have a plastic tote, a lid, and a heroic amount of cardboard hanging around your house, congratulations: you are already halfway to becoming the kind of person who casually says things like, “Oh, I’ll just compost that.” The good news is that making a $10 DIY compost bin is not some mysterious homesteading ritual that requires overalls, a pitchfork, and a close personal friendship with a chicken. It’s a practical, low-cost project that helps you recycle kitchen scraps, cut down on trash, and make rich compost for your garden.
The even better news? A simple homemade compost bin works surprisingly well when you get a few basics right: airflow, moisture, and the balance between “greens” and “browns.” In other words, your banana peels need dry, papery friends. A cheap backyard composting setup will not look fancy on Instagram, but it can absolutely turn food scraps and yard waste into dark, crumbly compost that your plants will love.
In this guide, you’ll learn exactly how to make a compost bin for around ten bucks, what materials to use, what to avoid tossing in, how to fix common problems, and how to get from “random bucket of scraps” to “black gold” without losing your sanity. Let’s build the bin and save your coffee grounds from a tragic landfill destiny.
Why a Cheap Compost Bin Is Worth Making
A budget compost bin does more than save money. It gives food scraps and yard waste a second life instead of sending them to the trash. When you compost at home, you create a useful soil amendment that can improve texture, help soil hold moisture, and support healthy plant growth. That means fewer sad flower beds, fewer weak vegetables, and fewer moments where you stare at dry dirt and whisper, “Why are you like this?”
A homemade compost bin is also one of the easiest eco-friendly garden projects for beginners. You do not need a fancy tumbler, a huge yard, or a complicated system. A small bin is especially helpful if you mostly want to compost fruit scraps, vegetable peels, coffee grounds, shredded paper, and a modest amount of dry yard material. For many households, that is more than enough to make composting feel useful without turning the backyard into an experimental science fair.
What You’ll Need for a $10 DIY Compost Bin
The secret to staying near the ten-dollar mark is simple: reuse whatever you already have, then buy only the one or two things you truly need. A brand-new heavy-duty compost tumbler is nice, but it is not required. A lidded tote or used plastic trash can is perfectly fine for a beginner setup.
Basic Materials
- One plastic storage tote or plastic trash can with a lid
- A drill or utility tool to make air holes
- Zip ties or a bit of screen material if you want to cover larger holes
- Shredded cardboard, dry leaves, or newspaper for browns
- Kitchen scraps for greens
- A small garden fork, stick, or hand trowel for mixing
Sample Budget
- Used or discount tote with lid: $5 to $8
- Zip ties or scrap mesh: $1 to $2
- Cardboard and dry leaves: free
- Kitchen scraps: also free, unless your avocado habit is getting out of hand
If you already own the tote, this project can cost almost nothing. If you need to buy one, check thrift stores, yard sales, discount stores, or your garage before spending more.
Step-by-Step: How To Make A $10 DIY Compost Bin
1. Choose the Right Container
Pick a sturdy tote or plastic trash can with a lid. A container in the 18- to 32-gallon range works well for a small household. It should be large enough to hold a useful amount of material but small enough to manage easily. A bin this size is ideal for a simple backyard composting system, especially if your main goal is to compost kitchen scraps and light yard waste.
If you are using a tote, make sure the lid fits well. If you are using a trash can, choose one that is easy to open and close. Fancy is optional. Functional is king.
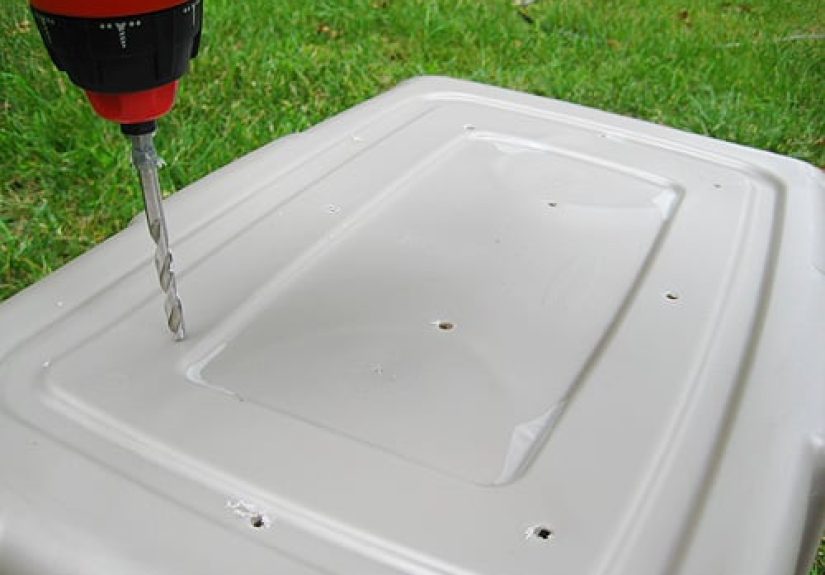
2. Drill Air Holes
Compost needs oxygen. Without airflow, the pile can go soggy, smelly, and weird in a hurry. Drill small holes around the upper sides of the container and in the lid to help air circulate. If your container tends to trap water, add a few drainage holes near the lower sides or base. Keep the holes modest in size so you do not accidentally build a luxury condo for pests.
If the openings seem too large, cover them from the inside with a little scrap mesh and secure it with zip ties. This is optional, but helpful if you are worried about flies or curious critters.
3. Put the Bin in a Good Spot
Set the compost bin in a level, well-drained area that is easy to reach. If possible, place it on bare soil rather than concrete so helpful organisms can naturally move in. Partial shade is great, especially in hot weather, because it helps keep the contents from drying out too fast. The best compost bin location is the one you will actually use. If you hide it in the farthest corner of the yard behind three garden hoses and a rusty chair, you will forget it exists by next Tuesday.
4. Start with a Brown Layer
Add a few inches of dry browns to the bottom. Good browns include shredded cardboard, dry leaves, torn paper, small twigs, or untreated straw. This bottom layer helps with airflow and absorbs moisture from the first round of food scraps. Think of it as the compost bin’s mattress. Nobody wants to sleep directly on a puddle.
5. Add Greens, Then Cover Them
Now add your kitchen scraps. Fruit peels, vegetable trimmings, coffee grounds, tea leaves, and crushed eggshells are great choices. After each layer of greens, add a layer of browns. That cover layer matters. It helps reduce odors, discourages pests, and keeps the composting process balanced.
A simple rule for beginners is this: every time you add wet, fresh scraps, follow them with a generous handful or two of dry material. If your bin starts looking like a salad bar, it needs more cardboard.
6. Keep the Moisture Right
Your compost should feel like a wrung-out sponge: damp, but not dripping. If it is too dry, decomposition slows way down. If it is too wet, the pile can turn slimy and smell bad. Add water lightly only when the contents seem dry. If the mixture gets too wet, stir in more shredded paper, dry leaves, or cardboard.
This is where many beginners go wrong. Compost is not supposed to be soup. If it makes a squishing sound that feels emotionally threatening, add browns immediately.
7. Stir or Turn the Contents Regularly
Once or twice a week, mix the contents with a small garden fork, stick, or hand trowel. This adds oxygen and helps materials break down more evenly. A small bin will usually compost more slowly than a big hot pile, so steady mixing is your best shortcut. Chop large scraps into smaller pieces before adding them if you want things to move faster.
8. Watch for Finished Compost
Your compost is ready when it looks dark and crumbly, smells earthy, and no longer resembles the original ingredients. You should not be able to identify last month’s lettuce as lettuce. Finished compost should look more like rich soil than trash. That transformation is the whole magic of the process, and honestly, it never stops being a little satisfying.
What to Compost in Your Homemade Compost Bin
Greens (Nitrogen-Rich Materials)
- Fruit and vegetable scraps
- Coffee grounds and paper filters
- Tea leaves and tea bags without plastic components
- Fresh grass clippings in small amounts
- Plant trimmings from healthy garden plants
- Crushed eggshells
Browns (Carbon-Rich Materials)
- Dry leaves
- Shredded cardboard
- Newspaper or non-glossy paper
- Small twigs
- Untreated straw or hay
- Sawdust from untreated wood in small amounts
The best compost bins are not fed randomly. They work best when greens and browns are layered or mixed so the pile has enough nitrogen to decompose and enough carbon to stay airy and balanced.
What Not to Compost
If you want your DIY compost bin to stay low-drama, do not toss in everything that once had a pulse. Some items attract pests, smell awful, or create food-safety issues in a basic backyard system.
- Meat, bones, and fish scraps
- Dairy products
- Grease, oil, or fatty foods
- Pet waste or cat litter
- Diseased or insect-ridden plants
- Weeds with mature seed heads
- Glossy paper or heavily treated materials
- Charcoal ash or chemically treated wood waste
In a larger managed system, some of these materials may be handled differently, but a simple home compost bin is not the place to test your courage.
How Long Does Composting Take?
In a small backyard composting bin, expect the process to take a few months, sometimes longer, depending on what you add and how often you mix it. Small bins usually behave more like steady “cold compost” systems than fast hot piles. That is normal. You are not failing. Your bin is just choosing a calmer pace.
Compost happens faster when:
- Materials are chopped into smaller pieces
- You mix the pile regularly
- The moisture stays in the right range
- You use enough browns to keep airflow moving
- You do not overload the bin with soggy scraps all at once
Troubleshooting a $10 DIY Compost Bin
If It Smells Bad
The most common cause is too much moisture or too many greens. Add shredded cardboard, dry leaves, or paper, then stir the pile well. Also make sure your air holes are not blocked. Bad smells are usually the bin’s way of saying, “I asked for balance, not a swamp.”
If It Is Too Dry
Add a little water while mixing. You want the material moist, not drenched. Dry piles decompose slowly and may seem like nothing is happening.
If You See Flies
Always bury or cover fresh kitchen scraps with browns. Keep the lid closed, avoid adding meat or oily foods, and do not leave fruit scraps exposed on top like a buffet invitation.
If Critters Get Interested
Again, cover food scraps well and avoid problem items like meat, dairy, and grease. A secure lid and a cleaner feeding routine help a lot.
If the Pile Is Not Breaking Down
You may need more greens, more moisture, or more mixing. Composting is a balancing act. Too many dry materials slow the process, but so does too much wet material. The fix is usually not dramatic. It is usually just cardboard, air, and patience.
How to Use Finished Compost
Once your compost is dark, crumbly, and earthy-smelling, it is ready to improve your soil. Here are easy ways to use it:
- Mix it into garden beds before planting
- Top-dress around flowers, vegetables, or shrubs
- Blend a small amount into potting soil for containers
- Use it as a soil booster around tired lawn edges or bare patches
Do not think of compost as a harsh fertilizer. Think of it as a gentle upgrade for your soil. It helps the whole system function better, which is exactly what stressed-out plants need.
Why This Budget Compost Bin Actually Works
A lot of beginners assume a cheap compost bin will be messy, ineffective, or not worth the effort. In reality, a simple bin works because composting is a biological process, not a luxury hobby. Microorganisms do not care whether your container cost two hundred dollars or came from the back of your closet. They care about oxygen, moisture, and the right organic materials.
That is why a $10 compost bin can succeed where expensive setups sometimes fail. When the basics are right, the process works. Your job is mostly to create a decent home for decomposition and avoid sabotaging it with laziness, overfeeding, or an alarming amount of watermelon rind in one sitting.
Common Real-Life Experiences With a $10 DIY Compost Bin
One of the most common beginner experiences is realizing that composting changes the way you look at kitchen waste almost immediately. The first time you set up a bin, you may still think of banana peels, onion skins, coffee grounds, and wilted lettuce as trash. Then, within a week or two, your brain quietly rewires itself. You stop seeing scraps as garbage and start seeing them as ingredients. It is a strange and slightly nerdy transformation, but a useful one.
Another very common experience is overfeeding the bin during the first few days. New composters get excited. Suddenly every apple core becomes an event. The bin gets stuffed with wet fruit scraps, and thensurpriseit starts looking soggy and smelling funky. This is usually the moment people learn the golden lesson of backyard composting: browns are not optional. A handful of shredded cardboard or dry leaves can rescue a compost bin faster than most beginners expect.
Many people also notice that a small homemade compost bin teaches patience. A cheap tote composter is not a magic portal where breakfast scraps turn into finished compost by dinner. It moves at a human-garden rhythm. You add material, stir it, forget about it for two days, remember it again, add more cardboard, and gradually notice that the pile is shrinking. That slow change is part of the experience. Composting is practical, but it is also oddly calming. There is something reassuring about watching disorder turn into usefulness.
Smell is another thing beginners worry about, and that fear is understandable. Nobody wants the yard to smell like a failed casserole. In real life, though, a well-managed bin usually smells earthy rather than nasty. When it does smell bad, the cause is often obvious in hindsight: too much wet food, not enough dry material, or not enough air. Most people who stick with composting discover that odor problems are not signs of disaster. They are simple maintenance cues, like your bin gently clearing its throat.
Then there is the seasonal learning curve. In warm weather, the bin seems lively and cooperative. In cooler or drier seasons, it may slow down so much that you wonder whether it has gone on strike. This is normal. Composting is influenced by temperature, moisture, and the mix of ingredients. A beginner who expects the same speed year-round often learns to adjust expectations rather than force the process. That lesson alone makes future gardening projects easier, because it builds the habit of working with natural systems instead of trying to bully them.
One of the best experiences, though, happens several weeks or months later, when you reach into the bottom of the bin and find dark, crumbly material that no longer looks anything like scraps. It feels like a tiny domestic miracle. The cardboard is gone. The coffee grounds are unrecognizable. The old produce scraps have become something rich, useful, and clean-smelling. That first handful of finished compost tends to convert people for good. Suddenly the cheap bin no longer looks cheap. It looks smart.
Many gardeners also report that once they start composting, they become more aware of waste in general. They waste less food, save more cardboard, pay more attention to yard debris, and become more intentional about what goes in the trash. In that way, a DIY compost bin is not just a container. It is a small system that quietly improves how a household thinks about materials, gardening, and everyday habits. Not bad for a project that can start with a plastic tote, a drill, and a pile of leaves.
Conclusion
Learning how to make a $10 DIY compost bin is one of the easiest ways to start composting at home without overcomplicating the process. You do not need expensive gear or a huge backyard. You just need a basic container, some air holes, a mix of greens and browns, and the willingness to make small adjustments as you go.
A simple compost bin will not make you a master gardener overnight, but it will absolutely help you recycle kitchen scraps, reduce waste, and build healthier soil over time. And once you see your first batch of finished compost, chances are good you will start looking at every cardboard box and coffee filter like it has a bright, earthy future ahead of it.