Table of Contents >> Show >> Hide
- Why Braising Works So Well for Short Ribs
- Choose the Right Short Ribs First
- The Basic Formula for Braising Short Ribs
- Step-by-Step: How to Braise Short Ribs for Tender Results
- How Long Should You Braise Short Ribs?
- Common Mistakes That Make Short Ribs Tough
- Best Braising Liquids and Flavor Variations
- What to Serve with Braised Short Ribs
- How to Store and Reheat Braised Short Ribs
- Kitchen Experience: What Braising Short Ribs Teaches You After a Few Batches
- Final Thoughts
There are two kinds of short ribs in this world: the kind that make you feel like a kitchen genius, and the kind that chew back like they have unfinished business. The good news is that braising tilts the odds heavily in your favor. Done right, it turns a tough, deeply marbled cut into spoon-soft beef with a glossy sauce that tastes like it took all day and a tiny bit of your soul. In the best way.
If you have ever wondered why restaurant short ribs seem silky, rich, and almost suspiciously tender, the answer is not culinary wizardry. It is method. A proper braise uses steady heat, a little liquid, a covered pot, and enough patience to let time do the heavy lifting. This guide walks you through exactly how to braise short ribs for consistently tender results, plus the common mistakes that turn a dinner flex into a meat-based cardio workout.
Why Braising Works So Well for Short Ribs
Short ribs come from hardworking parts of the animal, which means they are loaded with flavor, connective tissue, and fat. Translation: they are not weeknight steak material, but they are absolute superstars for slow cooking. Braising softens those tough fibers over time while the fat enriches the sauce and the meat becomes succulent instead of stubborn.
That is why braised short ribs taste so luxurious even though the technique itself is wonderfully unfussy. You brown the meat, build a flavor base, add liquid, cover the pot, and let the oven do its quiet little miracle. This is comfort food with a graduate degree.
Choose the Right Short Ribs First
Bone-In vs. Boneless
Bone-in short ribs are the classic choice for braising. The bones help the ribs hold their shape during a long cook, and they make the final dish look dramatic in a very “Yes, I absolutely meant to impress you” kind of way. Boneless short ribs can also work well, especially if you want easier serving, but they are more likely to slump into shreddable territory if you overcook them.
English Cut vs. Flanken Cut
For braising, English-cut short ribs are usually the best pick. These are cut parallel to the bone into thick, meaty pieces. Flanken-cut ribs are sliced across the bones into thinner strips and are better known for grilling or Korean-style dishes. If your goal is rich, oven-braised short ribs with a deep sauce, English cut is your friend.
What to Look for at the Store
Choose ribs with a generous amount of meat on top of the bone, good marbling, and no excessive outer fat cap. Some fat is flavor. Too much fat is just a future skimming project wearing a disguise. Try to buy pieces of similar size so they cook evenly.
The Basic Formula for Braising Short Ribs
If you remember nothing else, remember this: dry the meat, season it well, brown it deeply, add aromatics, pour in enough liquid to braise rather than boil, cover tightly, and cook low and slow until the ribs yield easily when pierced.
That is the whole show. Everything else is styling.
Step-by-Step: How to Braise Short Ribs for Tender Results
1. Pat the Ribs Dry and Season Aggressively
Moisture is the enemy of browning. Use paper towels and dry the ribs well before seasoning them with kosher salt and black pepper. You can add garlic powder, smoked paprika, or a touch of onion powder, but the core seasoning should stay simple at first. The braising liquid will bring the extra personality.
2. Brown the Meat Like You Mean It
Heat a Dutch oven or heavy oven-safe pot over medium-high heat, add a neutral oil, and sear the short ribs on all sides until they develop a dark brown crust. Not beige. Not “lightly golden.” Brown. This step builds the meaty flavor that makes the finished sauce taste layered and savory instead of flat and watery.
Do not crowd the pan. Brown in batches if needed. Yes, it takes longer. Yes, it matters. Browning six ribs at once in a too-small pot is basically steaming with ambition.
3. Build a Flavor Base
Once the ribs are browned, remove them and pour off most of the excess fat, leaving a little behind for the vegetables. Add chopped onion, carrot, celery, and garlic. This classic mix gives the braise sweetness, depth, and backbone. Cook until the vegetables soften and start to color. A spoonful of tomato paste is a smart move here too; it adds savory depth and helps the sauce taste fuller and richer.
4. Deglaze the Pot
Pour in wine, broth, beer, or a combination, then scrape up the browned bits stuck to the bottom of the pot. Those caramelized bits are flavor gold. Dry red wine is the most classic option for red wine braised short ribs, but beef stock, stout, balsamic-splashed broth, and even tomato-forward braising liquids can all work beautifully.
The liquid should come partway up the ribs, not bury them completely. You are braising, not sending them snorkeling. Keeping the tops exposed helps the meat roast and braise at the same time, which creates better flavor and texture.
5. Add Herbs and Return the Ribs to the Pot
Thyme, rosemary, bay leaf, parsley stems, and a few smashed garlic cloves all play nicely here. Nestle the ribs back into the pot, meat side mostly up if possible. Bring the liquid to a gentle simmer on the stovetop before covering.
6. Cover Tightly and Cook Low and Slow
A tight lid is not optional. If steam escapes too quickly, the liquid reduces too fast and the meat can dry out before it becomes tender. Braise the ribs in a 325°F to 350°F oven until they are very tender, which usually lands somewhere around 2 1/2 to 3 1/2 hours depending on size, cut, and how crowded the pot is.
The real doneness test is not the clock. It is the fork. When a fork slides in with very little resistance and the meat feels relaxed rather than tight, the ribs are ready. If they still seem chewy, they probably need more time. Tough short ribs are often undercooked, not overcooked.
7. Rest, Skim, and Finish the Sauce
Once the ribs are done, you can serve them right away, but braised short ribs are often even better after a rest. If you cool them in their liquid and refrigerate overnight, the fat firms up on top and becomes easy to remove. That gives you a richer-tasting sauce without the greasy finish.
For serving, gently reheat the ribs in the sauce. If the sauce seems thin, remove the ribs and simmer the liquid until it reduces to a glossy, spoon-coating consistency. Taste and adjust the seasoning before serving. This is the part where dinner stops being “pretty good” and starts being “please hand me more mashed potatoes immediately.”
How Long Should You Braise Short Ribs?
The honest answer is: long enough. Most oven-braised short ribs take at least 2 hours, and larger or meatier pieces can take 3 hours or more. A common mistake is pulling them too soon because they look done. Short ribs are sneaky like that. They may look tender before they actually are.
Here is a good rule: start checking around the 2-hour mark, but do not expect miracles that early unless the ribs are especially small. If the meat is still clinging to the fork like it has trust issues, give it another 20 to 30 minutes and check again.
Common Mistakes That Make Short Ribs Tough
Skipping the Sear
You can technically do it, but you will leave a lot of flavor on the table. Browning builds the savory foundation that makes the whole braise taste finished.
Using Too Much Liquid
If the ribs are fully submerged, the meat can taste boiled instead of braised. You want enough liquid to create steam and gentle heat, but not so much that you lose concentration and texture.
Cooking at Too High a Temperature
A raging oven can tighten the meat and reduce the sauce too quickly. Braising is a low-and-slow situation. The ribs are not in a race.
Stopping Too Early
This is the biggest one. If the ribs are tough, do not panic and assume dinner is ruined. More often than not, they simply need more time.
Letting the Sauce Get Greasy
Short ribs throw off a good amount of fat. Skim it before serving, or better yet, chill the braise overnight and remove the solidified fat the next day.
Best Braising Liquids and Flavor Variations
Once you know the technique, you can play. Red wine and beef stock are the old-school power couple, but they are not the only option.
Classic Red Wine
Use dry red wine plus stock, tomato paste, onion, carrot, celery, garlic, and thyme. This version is rich, savory, and deeply dinner-party friendly.
Beer-Braised
Use stout or porter with broth for darker, toastier flavor. Great with mashed potatoes, buttered noodles, or crusty bread.
Tomato-Braised
Add crushed tomatoes or tomato paste for a brighter, more robust sauce that pairs well with polenta.
Balsamic or Vinegar-Boosted
A splash of balsamic vinegar or sherry vinegar can brighten all that richness and keep the sauce from tasting heavy.
Soy-Ginger Style
Swap in soy sauce, ginger, garlic, scallions, a little brown sugar, and stock for a sweet-savory profile that loves rice.
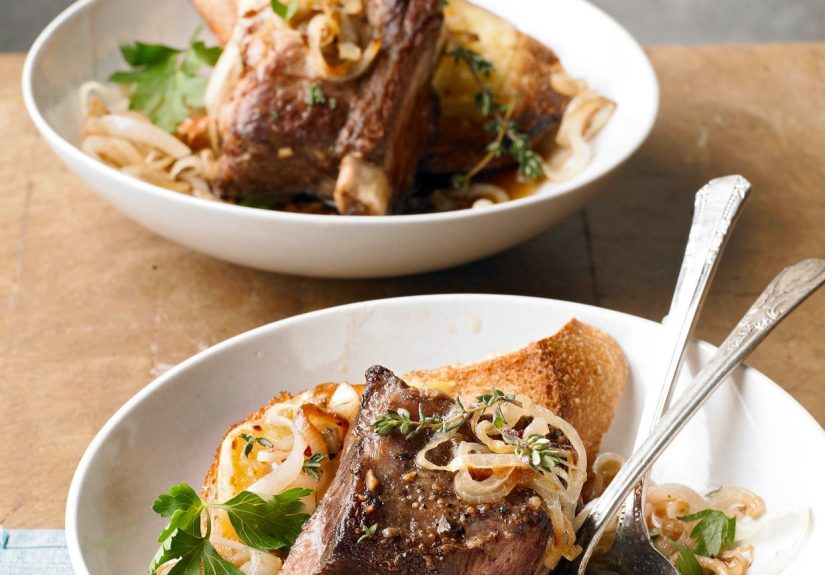
What to Serve with Braised Short Ribs
Braised short ribs need a side that can handle the sauce. Mashed potatoes are the obvious classic because they are excellent sauce sponges. Polenta is silky and elegant. Buttered egg noodles are comforting. Crusty bread is never wrong. Roasted carrots, green beans, sautéed greens, or a crisp salad help cut through the richness so the plate feels balanced.
How to Store and Reheat Braised Short Ribs
Store the ribs in their sauce so they stay moist. In the refrigerator, they keep well for several days. Reheat them gently over low heat on the stovetop or covered in a low oven until warmed through. Microwaving works in a pinch, but the sauce can separate and the meat can go from luxurious to grumpy in a hurry.
If you are planning ahead for guests, this dish is almost perfect. Make it a day in advance, chill it, remove the fat, and reheat before serving. The flavor often improves overnight, which feels unfair to many other recipes, but we are not complaining.
Kitchen Experience: What Braising Short Ribs Teaches You After a Few Batches
The first time you braise short ribs, you tend to hover. You peek into the oven too often. You wonder whether the sauce is reducing too fast, whether the lid is tight enough, whether the ribs should already be tender, whether you somehow angered the beef gods. Then, somewhere around the second or third batch, you start to relax. You realize braising is less about micromanaging and more about paying attention to a few key signals.
One of the biggest lessons is that short ribs rarely reward impatience. They teach you to stop worshipping the timer and start trusting texture. I have seen ribs at the 2-hour mark that looked gorgeous, smelled incredible, and still chewed like a leather wallet. Give them another 30 minutes, though, and suddenly they transform. That moment feels almost magical every time. Not because it is mysterious, but because it reminds you that some cooking wins come from restraint rather than intervention.
Another lesson is that browning is where confidence starts. When the ribs go into the pot pale, the final braise almost always tastes like something is missing. When they go in properly browned, the sauce tastes rounder, deeper, and more complete. It is the difference between “nice homemade dinner” and “why does this taste like a restaurant?” Once you learn that, you stop rushing the sear.
You also learn that a braise improves when you treat it like tomorrow’s dinner on purpose, even if you serve it tonight. Cooling the ribs in their liquid changes the whole experience. The meat settles. The flavors mingle. The fat rises and becomes easy to remove. Reheating the next day makes the sauce taste more cohesive, almost polished. This is one of those rare dishes that rewards procrastination with elegance.
Short ribs also teach humility about liquid. Too much broth and the sauce tastes washed out. Too little and you risk scorching before the meat relaxes. After a few rounds, you stop measuring obsessively and start looking instead. The liquid should support the ribs, not drown them. That visual cue matters more than clinging to a single number.
Then there is the matter of serving. Braised short ribs look fancy, but they are secretly generous, forgiving food. You can plate them neatly over mashed potatoes for a holiday dinner, or you can pile them over polenta on a Tuesday and call it self-care. You can garnish them with parsley and lemon zest if you want brightness, or just hand someone a fork and watch them fall quiet after the first bite. That kind of silence is the highest compliment.
Most of all, braising short ribs teaches you that great cooking is often less about complexity than consistency. Dry the meat. Brown it well. Build the base. Cover tightly. Cook gently. Check tenderness honestly. Skim the fat. Reduce the sauce. These are not flashy secrets. They are repeatable habits. And once those habits click, always-tender short ribs stop feeling like a special occasion gamble and start feeling like something you actually know how to do.
Final Thoughts
If you want short ribs that are tender every single time, do not chase fancy tricks. Chase good braising habits. Buy meaty ribs, brown them thoroughly, keep the liquid modest, cover the pot tightly, and cook until the meat truly yields. Then let the sauce shine. Whether you go classic with red wine or lean into beer, stock, tomato, or soy-based flavors, the method is what delivers the payoff.
And that payoff is glorious: rich sauce, soft beef, deep flavor, and the deeply satisfying feeling that your Dutch oven just carried dinner across the finish line like a champ.