
Table of Contents >> Show >> Hide
- Why Cleaning Refrigerator Coils Matters
- Where Refrigerator Coils Are Located
- How Often Should You Clean Refrigerator Coils?
- Tools You Need for DIY Refrigerator Coil Cleaning
- How To Clean Refrigerator Coils (DIY): Step by Step
- Step 1: Turn Off the Power
- Step 2: Move the Refrigerator if Needed
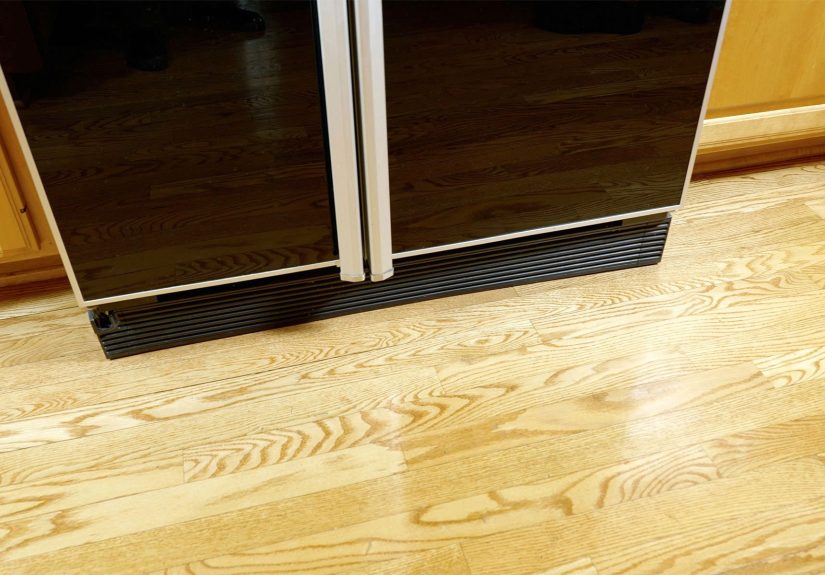
- Step 3: Remove the Base Grille or Access Panel
- Step 4: Inspect the Coils with a Flashlight
- Step 5: Brush the Coils Gently
- Step 6: Vacuum Up the Debris
- Step 7: Wipe the Area Around the Coils
- Step 8: Reinstall the Grille or Panel
- Step 9: Return the Refrigerator to Position
- Step 10: Plug It Back In and Monitor Performance
- Mistakes to Avoid
- What if Cleaning the Coils Does Not Fix the Problem?
- DIY Refrigerator Coil Cleaning Tips for Pet Owners
- Is It Worth Cleaning Refrigerator Coils Yourself?
- Real-World DIY Experiences: What People Learn After Cleaning Refrigerator Coils
- Final Thoughts
- SEO Metadata
Your refrigerator is one of the hardest-working machines in your home. It never clocks out, never takes a lunch break, and somehow still gets blamed when the lettuce turns into green confetti. So when your fridge starts running hotter, louder, or just a little moodier than usual, the fix might not be dramatic. It might just be dirty coils.
Cleaning refrigerator coils is one of those gloriously unglamorous DIY jobs that can improve airflow, help your appliance run more efficiently, and reduce strain on the system. In plain English: your fridge breathes easier, and you get to feel like the kind of person who “does maintenance” instead of “waits for catastrophe.”
This guide walks you through exactly how to clean refrigerator coils yourself, what tools you need, where the coils are usually hiding, and what mistakes to avoid. It also covers how often to do it, when to skip the job because your model may not need it, and what real-life DIYers learn after crawling around on the kitchen floor with a vacuum hose and a coil brush.
Why Cleaning Refrigerator Coils Matters
Refrigerator coils release heat pulled from inside the appliance. When those coils get coated with dust, lint, grease, and pet hair, heat transfer gets harder. That forces the refrigerator to work longer and harder to maintain the right temperature. In a perfect world, your fridge would simply chill. In the real world, it is apparently battling tumbleweeds made of Labrador fur.
Dirty coils can contribute to:
- Longer run times
- Reduced cooling efficiency
- Extra wear on the compressor
- Higher energy use
- Warm spots in the fridge or freezer
This does not mean every cooling problem comes down to the coils. A bad door gasket, blocked vents, overloaded shelves, or a thermostat issue can also cause trouble. But cleaning the coils is one of the easiest and lowest-cost maintenance steps you can take before assuming something expensive is about to happen.
Where Refrigerator Coils Are Located
On many refrigerators, the condenser coils are found in one of two places:
- Underneath the refrigerator, usually behind a front toe-kick or base grille
- On the back of the refrigerator, exposed or lightly covered
There is one important twist: some newer refrigerators have enclosed or so-called “never-clean” condenser designs. In those models, the coils may be sealed inside the compressor area and are not intended for routine homeowner cleaning. So before you go full DIY raccoon under the fridge, check your owner’s manual or manufacturer support page for your exact model.
How Often Should You Clean Refrigerator Coils?
A good rule of thumb is every six to twelve months. If you have pets, lots of dust, a busy kitchen, or a fridge located near the floor-level chaos zone where crumbs go to begin a second life, aim closer to every six months. In especially furry households, even quarterly checks are smart.
Here are signs it may be time sooner:
- You notice visible dust or pet hair around the grille or back panel
- The refrigerator seems to run constantly
- The appliance feels hotter than usual around the bottom or back
- Your energy bill creeps up for no obvious reason
- The fridge is cooling unevenly
Tools You Need for DIY Refrigerator Coil Cleaning
You do not need a contractor van or a utility belt that makes you feel like Batman. You just need a few basic tools:
- Vacuum with hose attachment
- Soft brush attachment for the vacuum
- Refrigerator coil cleaning brush
- Flashlight
- Microfiber cloth or rag
- Work gloves
- Dust mask, if you are sensitive to dust
A coil brush is especially helpful because it reaches into narrow spaces that a vacuum nozzle cannot. Just be gentle. The goal is to remove debris, not start an accidental sculpture project with the coil fins or tubing.
How To Clean Refrigerator Coils (DIY): Step by Step
Step 1: Turn Off the Power
Unplug the refrigerator or disconnect power before doing anything else. This is not the moment to test your reflexes. If the outlet is hard to reach, carefully pull the unit forward enough to access it.
Step 2: Move the Refrigerator if Needed
If your coils are on the back, gently slide the refrigerator away from the wall. If the coils are underneath, you may only need access to the front grille. Move slowly and avoid tugging too hard on the cord, water line, or floor beneath the appliance. If you have delicate floors, place cardboard or a protective mat under the front edge before shifting it.
Step 3: Remove the Base Grille or Access Panel
For bottom-mounted coils, remove the toe-kick or base grille. Some pop off by hand. Others use clips or screws. If screws are involved, keep them in a bowl or cup so they do not roll off into that strange under-appliance dimension where missing hardware lives forever.
Step 4: Inspect the Coils with a Flashlight
Take a good look before cleaning. You may see a layer of dust, lint, and pet hair wrapped around the coils like an ugly sweater. This is normal. Gross, but normal.
Step 5: Brush the Coils Gently
Use the refrigerator coil brush to loosen buildup. Work slowly and use long, gentle strokes. Do not jab, bend, or force the brush between delicate components. The dirt usually loosens faster than expected, especially if you have not cleaned the coils in a while.
Step 6: Vacuum Up the Debris
Use a vacuum hose with a soft brush attachment to remove dust and loosened debris from the coils, surrounding surfaces, and floor. Reach underneath and around the compressor area if accessible. If you are dealing with a heroic amount of pet hair, you may need to alternate between the coil brush and vacuum a few times.
Step 7: Wipe the Area Around the Coils
Use a dry or slightly damp microfiber cloth to wipe accessible surfaces around the coil area, grille, and nearby floor. Avoid spraying liquid directly onto the coils or electrical parts. This is a dry-cleaning kind of party.
Step 8: Reinstall the Grille or Panel
Once everything looks clean, reinstall the grille or access panel. Make sure it snaps or screws back in securely and evenly.
Step 9: Return the Refrigerator to Position
If you moved the fridge, carefully slide it back into place. Leave enough clearance for airflow according to the manufacturer’s recommendations. Do not crush the power cord or kink the water line behind the appliance.
Step 10: Plug It Back In and Monitor Performance
Reconnect power and let the refrigerator settle back into normal operation. You may not hear trumpets, but over the next several hours or days, you may notice steadier operation and fewer marathon compressor cycles.
Mistakes to Avoid
DIY refrigerator coil cleaning is simple, but a few mistakes can turn “responsible homeowner” into “person googling appliance repair at midnight.” Avoid these:
- Skipping the manual: Some models do not require routine coil cleaning.
- Using too much force: Coils and nearby parts can be damaged if you scrub like you are removing barnacles from a ship.
- Using lots of liquid: Keep moisture away from wiring and electrical components.
- Ignoring the floor under the fridge: Dust and debris down there do not improve anything.
- Forgetting the power cord or water line when pushing the fridge back: This is a classic DIY own goal.
What if Cleaning the Coils Does Not Fix the Problem?
If your refrigerator still runs too warm, too long, or too loudly after a proper cleaning, the issue may be something else. Common possibilities include:
- Dirty or weak door gaskets
- Poor air circulation due to overpacking
- Incorrect temperature settings
- Frost buildup
- A faulty condenser fan or evaporator fan
- A thermostat, sensor, or sealed-system problem
At that point, coil cleaning is still worth doing because it eliminates one obvious variable. But if food is spoiling, temperatures are unstable, or the compressor seems unusually hot or noisy, it may be time for professional diagnosis.
DIY Refrigerator Coil Cleaning Tips for Pet Owners
Pet hair is the overachiever of household mess. It finds your socks, your couch, your coffee somehow, and yes, your refrigerator coils. If you have dogs or cats, check the coil area more often than you think you need to. A quick flashlight inspection every few months can save you from discovering an entire secondary pet living behind the grille.
For homes with pets:
- Check coils every 3 to 6 months
- Vacuum the floor around the fridge regularly
- Clean nearby vents and baseboards too
- Consider setting a recurring reminder so the task actually happens
Is It Worth Cleaning Refrigerator Coils Yourself?
Absolutely. This is one of the best small DIY maintenance tasks because it is cheap, quick, and realistic for most homeowners or renters. You do not need advanced mechanical skills. You need patience, a vacuum, and the willingness to spend a few minutes in a position that yoga instructors might politely describe as “deeply committed.”
Even if the performance difference is subtle, routine coil cleaning supports better airflow and reduces unnecessary strain. For an appliance that runs all day, every day, that is a pretty smart trade for 15 to 30 minutes of effort.
Real-World DIY Experiences: What People Learn After Cleaning Refrigerator Coils
The funniest part about cleaning refrigerator coils is that almost nobody expects it to be satisfying. It sounds like one of those chores you do strictly out of guilt, like organizing the junk drawer or pretending you enjoy folding fitted sheets. But once people actually do it, the reaction is usually some version of: “Well, that was disgusting… and kind of amazing.”
A common first-time experience is shock. You remove the grille or pull the refrigerator away from the wall expecting a little dust, and instead discover a miniature ecosystem. There is lint, hair, crumbs, maybe a twist tie from 2022, and one mystery item you decide not to identify because life is short. For many DIYers, the biggest lesson is simple: the coil area gets dirty much faster than expected, especially in homes with kids, pets, or kitchens that see real daily use.
Another lesson is that access matters more than skill. The job itself is easy. The awkward part is reaching the coils without scratching the floor, pulling the water line, or inventing new curse words while trying to reattach the grille. People with older refrigerators often find the back-mounted coils easier to understand but harder to reach. People with bottom coils usually appreciate that the task is faster, but they also learn that the narrow gap under the fridge is apparently a magnet for every dust bunny in the county.
Many homeowners also notice that the refrigerator sounds a little different afterward. Sometimes it runs quieter. Sometimes it simply stops running as often. The change is not always dramatic, but it is often enough to make people realize the appliance had been working harder than necessary for a long time. That is especially true during warm weather or in homes where the fridge door gets opened every seven minutes by someone “just looking.”
Pet owners tend to have the most dramatic stories. A household with one golden retriever can produce enough hair near the coils to make the refrigerator look like it is wearing a sweater. Cat owners are not off the hook either. Fine hair and dust love to collect where airflow is constant, which makes the coil area a prime target. After one serious cleaning, many pet owners start treating coil maintenance like changing an HVAC filter: not exciting, but obviously worth it.
There is also a sneaky psychological benefit. Small maintenance jobs make people feel more in control of the house. Cleaning refrigerator coils does not just help the appliance; it shifts your mindset. You stop seeing the fridge as a big mysterious box and start seeing it as a machine with a few basic needs. Keep it clean. Give it airflow. Do not block the door seals. Do not ignore weird noises for six months and then act surprised.
The best real-world takeaway is this: DIY coil cleaning is one of those rare home tasks that delivers a nice combination of low cost, low risk, and real value. It may not be glamorous, but it is practical. And practical wins a lot of battles in home maintenance. So yes, you may spend twenty minutes on the kitchen floor with a flashlight in your mouth like a suburban detective. But afterward, your refrigerator gets a cleaner workspace, and you get the smug satisfaction of knowing you handled a legit maintenance task without calling for help. Honestly, that is a pretty good deal.
Final Thoughts
If you want a simple DIY task that supports refrigerator efficiency and long-term performance, cleaning the coils is a solid choice. It is quick, inexpensive, and genuinely useful. Just unplug the unit, confirm where the coils are located, clean gently with the right tools, and repeat on a sensible schedule.
And remember: if your model has an enclosed condenser or the manual says not to clean the coils routinely, listen to the manual, not the internet guy with a leaf blower and too much confidence. Smart DIY is not about doing the most. It is about doing the right thing at the right time without turning your kitchen into a repair documentary.


