
Table of Contents >> Show >> Hide
- Why a tiny crack can drain a big chunk of cash
- Find the leaks before you buy all the tubes of caulk
- Pick the right “seal” for the job
- Tools and materials that make the job easier
- Step-by-step: seal windows the right way
- 1) Prep like a pro (because caulk hates dirt)
- 2) Caulk the stationary gaps (trim, frame joints, small cracks)
- 3) Use backer rod for bigger gaps (then seal over it)
- 4) Weatherstrip the parts that move (sashes, stops, tracks)
- 5) Seal behind interior trim (big comfort boost, still DIY-friendly)
- 6) Temporary seasonal boosters (fast wins for winter or hot summers)
- 7) Check your work (and prove it wasn’t “vibes-based DIY”)
- Common mistakes (and how to avoid them)
- How much can you really save?
- When sealing isn’t enough (and what to do next)
- Experiences related to sealing windows to cut energy bills (real-world patterns)
- Conclusion
- SEO tags
If your home feels like it’s auditioning for a role in “The Wind: The Musical”, your windows may be leaking
airand your moneythrough gaps you can’t even see. The good news: sealing windows is one of the rare home projects
where a small weekend effort can pay you back with real comfort and lower heating and cooling costs.
This guide walks you through how to find window drafts, choose the right sealing materials (so you don’t smear caulk
where it doesn’t belong), and seal windows the smart waystep by step. Expect practical tips, a few “learn-from-my-mistakes”
stories (the safe kind), and specific examples you can copy in your own home.
Why a tiny crack can drain a big chunk of cash
Heating and cooling typically take the biggest bite out of a household energy bill. When outside air sneaks in and
conditioned air sneaks out, your HVAC system has to work harder to keep you comfortable. The U.S. Department of Energy
notes that air leakage can account for 30% or more of a home’s heating and cooling costsso tightening up
the “building envelope” can matter a lot.
The goal isn’t to turn your house into a sealed jar of pickles. The goal is to block random, uncontrolled airflow
(drafts) and rely on controlled ventilation (bath fans, range hoods, HVAC ventilation, or deliberate window opening)
for fresh air. In other words: stop paying to condition the outdoors.
Find the leaks before you buy all the tubes of caulk
Sealing works best when you target the biggest and most obvious leaks first. A quick “draft audit” keeps you from
wasting time on tiny gaps while ignoring the window that’s basically a polite suggestion of a barrier.
Easy draft-hunting methods (no fancy gadgets required)
-
The hand test: On a windy or cold day, run your hand slowly around the window frame, trim,
and where the sash meets the frame. - The tissue test: Hold a tissue near edges and joints. If it flutters like it’s waving hello, you’ve found a leak.
-
The incense test: Carefully hold a stick of incense near suspected gaps. Smoke that streams sideways points to airflow.
(Use common sense: keep away from curtains and anything flammable.) -
Night flashlight check: At night, have someone shine a bright flashlight around the exterior window perimeter while you
look from inside for light sneaking through gaps in trim or frame connections. -
Condensation clues: Chronic interior condensation can signal comfort/air leakage issues (and humidity management needs),
though it’s not a draft detector by itself.
Don’t ignore the “not-a-window” leaks nearby
Sometimes the draft you feel “at the window” is actually coming from outlets on exterior walls, baseboards, or the
joint where trim meets drywall. You can still start at windows, but keep a mental note: air leaks travel and love
misdirection.
Quick ventilation reality check
After you improve air sealing, your home may hold humidity and indoor pollutants more easilyespecially in smaller
or already-tight homes. If you notice lingering cooking smells, more condensation, or stuffiness, it may be time to
use (or upgrade) mechanical ventilation like bathroom exhaust fans, range hoods, or an HVAC ventilation strategy.
Pick the right “seal” for the job
Here’s the rule that prevents 90% of DIY regret: use caulk on parts that don’t move, and
use weatherstripping on parts that do. Many windows have both types of gaps.
| Problem / Gap Location | Best Fix | Why It Works |
|---|---|---|
| Trim-to-wall cracks (interior or exterior) | Paintable caulk (latex/acrylic) | Stationary joint; caulk bridges small cracks and stays flexible |
| Frame-to-siding gaps (exterior perimeter) | Exterior-rated sealant (often silicone or hybrid) | Handles weather exposure and movement better than cheap interior caulk |
| Sash edges on operable windows | Weatherstripping (foam tape, V-strip, spring bronze) | Compresses and rebounds as the window opens/closes |
| Large, consistent gap (about 1/4" or more) | Backer rod + sealant | Backer rod supports the sealant so it flexes instead of cracking |
| Hidden gap behind interior trim | Low-expansion foam (window/door rated) or backer rod + sealant | Stops big air leaks without bowing the frame (when used correctly) |
| Seasonal draft, quick temporary fix | Removable rope caulk or interior window film kit | Fast and cheap; great for renters or harsh seasons |
Tools and materials that make the job easier
- Caulk + caulk gun: Choose paintable for interior, exterior-rated for outdoor joints.
- Backer rod: Foam “rope” that fills deeper gaps before sealant.
- Weatherstripping: Foam tape, V-strip, rubber, felt, or spring bronze (best choice depends on window type).
- Low-expansion foam: Only if it’s labeled for windows/doors; high-expansion foam can warp frames.
- Cleaning supplies: Mild soap, a rag, a scraper/putty knife, and (when label-approved) a little solvent for old residue.
- Utility knife + scissors + tape measure: For trimming weatherstrips cleanly.
Step-by-step: seal windows the right way
1) Prep like a pro (because caulk hates dirt)
Before sealing anything, remove loose paint and failing caulk. Clean the surface so your new seal actually sticks.
Let it dry. If you’re applying adhesive weatherstripping or tape, the surface should be clean and dry, and the
product label may specify a minimum temperature for proper adhesion.
Tip: If your home was built before 1978, be cautious about disturbing old paint that could contain lead.
If you’re scraping or sanding, follow lead-safe practices or consider hiring a pro for that part.
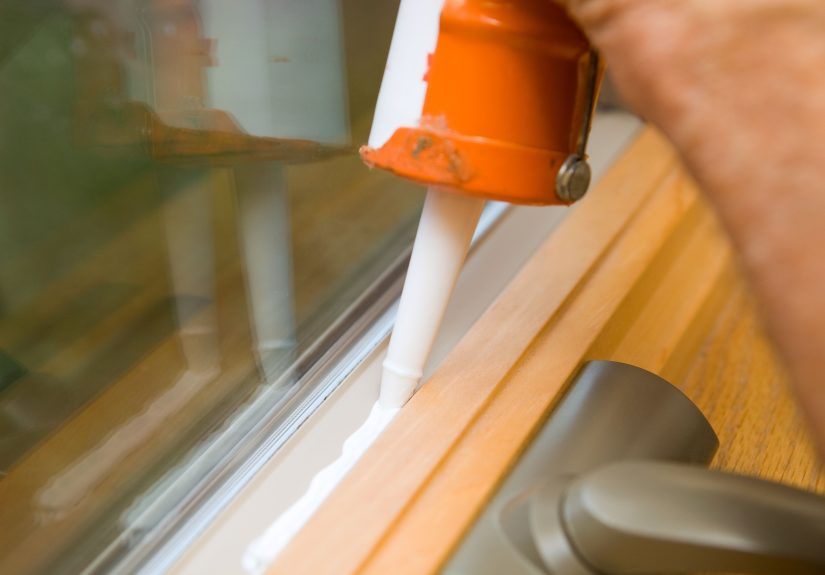
2) Caulk the stationary gaps (trim, frame joints, small cracks)
Caulk is best for cracks and joints typically under about 1/4 inch. Common targets:
- The seam where interior trim meets drywall
- The seam where exterior trim/frame meets siding or masonry
- Small cracks in casing corners or joints
- Cut the tip of the caulk tube at an angle (smaller opening than you think you need).
- Run a steady bead along the crack, keeping consistent pressure.
- Tool the bead (smooth it) with a damp finger or caulk tool for a tighter seal and cleaner finish.
- Let it cure based on the label (some need paint waiting time).
Important: Don’t caulk weep holes or designed drainage paths on certain window frames. If you’re not sure,
look for small exterior openings meant to drain waterthose should stay open.
3) Use backer rod for bigger gaps (then seal over it)
If you have a larger, deeper gap (especially a consistent one), shove in backer rod first. It reduces how much sealant you
need and helps the sealant flex instead of cracking. Then apply sealant over the backer rod, tool it smooth, and let it cure.
4) Weatherstrip the parts that move (sashes, stops, tracks)
Weatherstripping is your MVP for operable windows. The best type depends on your window style:
Double-hung windows
- V-strip along the sides where the sash slides in the channel
- Foam tape on the meeting rail if there’s a small gap when closed
- Spring bronze for durable, long-term sealing (more effort, excellent results)
Casement windows
- Compression weatherstripping around the closing edge (it squishes tight when latched)
- Check that the latch pulls the sash snuglyhardware adjustment sometimes solves “mystery drafts”
Sliding windows
- Brush or fin weatherstripping in tracks and along meeting stiles
- Clean tracks thoroughly before applying anythinggrit ruins seals fast
After installing, open and close the window a few times. The window should move without heroic effort.
If it suddenly feels like a medieval drawbridge, your weatherstrip is too thick or placed incorrectly.
5) Seal behind interior trim (big comfort boost, still DIY-friendly)
A surprisingly leaky spot is the hidden gap between the window frame and the rough openingoften covered by trim.
If you’re comfortable removing interior casing carefully, you can air seal this area and then reinstall the trim.
- Score paint lines with a utility knife and gently pry trim off.
- Inspect the gap around the window frame.
-
If the gap is small/consistent: backer rod + sealant works well.
If the gap is irregular: use low-expansion foam labeled for windows/doorssparingly. - Let it cure, trim excess if needed, then reinstall trim with minimal nails first.
Foam caution: Too much foam can bow frames or interfere with window operation. Go slow, test in one spot, and
use window/door-rated low-expansion products only.
6) Temporary seasonal boosters (fast wins for winter or hot summers)
- Removable rope caulk: Press into gaps around sash edges for a peel-off seal. Great for renters or older windows.
- Interior window film kits: Creates an insulating air pocket over the whole window. Helpful when glass is cold and drafty.
- Draft stoppers: Not a true seal, but useful at leaky sillsespecially if you can’t modify the window yet.
7) Check your work (and prove it wasn’t “vibes-based DIY”)
Repeat the tissue or incense test in the same spots you checked before. You’re aiming for a measurable difference:
less flutter, less smoke movement, fewer cold “rivers” of air near the frame.
Common mistakes (and how to avoid them)
- Caulking moving joints: If it moves, weatherstrip it. Caulk will crack and fall out eventually.
- Blocking drainage: Avoid sealing weep holes or drainage channels designed into the window system.
- Over-foaming: More foam doesn’t mean more savings. It can mean a window that won’t openor worse, a warped frame.
- Skipping cleaning: Adhesives and sealants need clean, dry surfaces. Dirt = early failure.
- Ignoring moisture clues: If you see staining, soft wood, or peeling paint outside, investigate water intrusion before sealing everything up.
How much can you really save?
Savings vary by climate, energy prices, and how drafty your home is to begin with. As a general ballpark,
tightening up drafts can reduce energy use meaningfullyespecially when it reduces heating and cooling run time.
Some estimates suggest that reducing drafts can save roughly 10%–20% per year in many homes, and broader air-sealing plus
insulation strategies can yield average savings on heating and cooling costs in the teens.
A simple “is it worth it?” example
Let’s say your household spends $250/month during peak heating or cooling months. If sealing drafts and improving window
sealing trims even 10%, that’s $25/month during those months. A DIY kitcaulk, backer rod, and weatherstrippingmight cost
$30–$80 for a handful of windows. That can pay for itself quickly, and the comfort upgrade often feels immediate.
When sealing isn’t enough (and what to do next)
Sometimes a window isn’t just leakyit’s failing. Consider next steps if you see:
- Rotten or soft wood around the frame
- Persistent water leaks during rain
- Failed insulated glass (fogging between panes)
- Severely warped frames or windows that won’t close properly
In those cases, sealing may still help temporarily, but you might get better results from repair, adding storm windows,
or replacementespecially if comfort and moisture problems persist.
Experiences related to sealing windows to cut energy bills (real-world patterns)
Ask ten homeowners what changed after sealing drafty windows and you’ll get ten different storiesbut the same themes
pop up again and again. One common experience is the “quiet surprise.” People expect lower bills, but what they notice
first is that the room feels calmer: fewer cold gusts, fewer rattling sashes, and less of that constant “why is it chilly
when the thermostat says 72?” confusion. It’s not dramatic like new countertops; it’s more like turning down background
noise you didn’t realize you were living with.
Another pattern shows up in older homes with double-hung windows: homeowners often start with the obvious fixesfoam tape
and a couple tubes of caulkand see an improvement, but the big leap happens when they seal behind the interior trim.
That hidden gap between the window frame and the rough opening can act like a tiny wind tunnel. Once it’s sealed with backer rod
and sealant (or carefully applied low-expansion foam), people report that the window area stops feeling like a cold “zone,” and the
HVAC cycles a bit less often. Many also say they stop avoiding that one chair near the window. The chair gets to rejoin society.
Renters and apartment dwellers tend to have a different experience: the favorite tools are usually removable rope caulk and
interior window film. The payoff is often fast comfort, especially during extreme weather, but the lesson is that temporary fixes
work best when the window can stay closed for a season. People who try to open and close the window daily often get frustratedbecause
the best temporary seals are meant to stay put. The win here is “seasonal strategy”: seal tight for the worst months, then remove and
reset when the weather eases.
There’s also the classic DIY learning moment: someone buys a can of foam that’s not labeled for windows and doors, enthusiastically
fills every gap, and then discovers their window sash now moves like it’s stuck in syrup. The good news is that most people recover by
trimming excess foam and switching to the correct low-expansion productbut the takeaway is universal: more isn’t better with foam;
controlled is better. The same goes for weatherstripping: too thick can prevent proper latching, which ironically creates more leaks.
Finally, many homeowners notice something unexpected: after air sealing, they become more aware of humidity. A tighter home can hold
moisture longer. Some people love this in winter because the house feels less dry; others notice condensation on glass and realize they need
better bathroom fan use, kitchen ventilation, or a dehumidifier in certain seasons. The experience here is less “oops” and more “oh, the house
is behaving differently now.” Sealing windows is often the first step toward a more comfortable homebut comfort is a system, and air sealing
works best when ventilation habits keep pace.
Conclusion
Sealing windows is one of the most practical ways to reduce drafts, improve comfort, and lower heating and cooling costswithout taking out a
second mortgage. Start by finding the biggest leaks, then match the fix to the gap: caulk for stationary cracks, weatherstripping for moving
parts, backer rod for larger gaps, and low-expansion foam only where appropriate (and carefully). Test before and after, avoid blocking drainage,
and remember: a tighter home is best paired with smart ventilation.


