Table of Contents >> Show >> Hide
- What Is a Halloween Miniature Garden?
- Plan the Vibe Before You Touch the Soil
- Supplies Checklist
- Step-by-Step: Build Your Halloween Miniature Garden
- Step 1: Choose a Container That Won’t Betray Your Plants
- Step 2: Build the Base the Right Way
- Step 3: Create “Hardscape” First (Paths, Hills, Tiny Drama)
- Step 4: Pick Plants That Match Each Other (and Your Light)
- Step 5: Add Halloween Details (Without Turning It Into a Toy Box)
- Step 6: Finish Like a Miniature Landscape Designer
- 3 Halloween Mini Garden Design Recipes (Copy-Paste Ideas)
- Care & Maintenance (So Your Tiny Graveyard Doesn’t Become a Tiny Swamp)
- Troubleshooting Common Mini Garden Problems
- Mini FAQ
- Conclusion
- Experience Notes: What It’s Like to Build a Halloween Miniature Garden (and What You Learn Fast)
Halloween decor usually comes in two flavors: “tastefully spooky” and “my front yard is a jump-scare.” A Halloween miniature garden lets you live happily in the middlecreepy-cute, charming, and surprisingly calming to build. Think of it as a tiny outdoor (or tabletop) movie set: little plants, little paths, little props… and a whole lot of personality.
In this guide, you’ll learn how to design and build a miniature Halloween garden that looks intentional (not like your craft bin exploded), stays healthy (not swampy), and feels magical from every anglewhether you’re going for “haunted cottagecore” or “mini graveyard chic.”
What Is a Halloween Miniature Garden?
A Halloween miniature garden is basically a themed container garden (often inspired by fairy gardens and terrariums) styled with Halloween detailstiny tombstones, mini pumpkins, little lanterns, maybe a suspiciously judgmental owl figurine. It can be:
- Outdoor (porch pot, raised bed corner, patio planter)
- Indoor (dish garden, open terrarium, glass cloche-style display)
- Short-term seasonal (perfect for October)
- Year-round (swap Halloween props for winter/holiday/ spring themes later)
Plan the Vibe Before You Touch the Soil
Miniature gardens are small, but the decisions aren’t. The trick is to choose a story and stick to itotherwise you’ll end up with a pirate ship next to a witch’s cauldron next to a tiny taco truck. (Fun! But confusing.)
Pick a Theme (Steal These “Tiny Movie Plots”)
- Mini Graveyard: mossy “grass,” pebble paths, tiny headstones, a crooked fence, and one dramatic raven.
- Witch Cottage: a little house, herbs as “spell ingredients,” a mini broom, and a lantern glow.
- Haunted Pumpkin House: a pumpkin cottage centerpiece with tiny windows and warm lighting.
- Goth Garden: dark foliage, black stones, moody accents, and minimalist spooky elegance.
- Not-So-Scary Monster Park: goofy mini monsters, bright plants, and playful signs (“Beware: Tiny Teeth”).
Choose Indoor vs. Outdoor (Because Weather Has Opinions)
Outdoors gives you room and natural light, but your accessories must be weather-friendly. Indoors lets you get delicate with details (tiny paper signs! mini fabric “curtains”!) but you’ll need to manage light and watering carefully so your display doesn’t turn into a mold museum.
Decide Scale (This Prevents “Giant Chair Syndrome”)
Choose one scale and commit: if your “tiny” chair looks like it belongs to a six-foot skeleton, it will overpower the scene. A helpful test: place one focal accessory first (a house, a tombstone set, or a pumpkin cottage), then choose plants that look proportionate.
Supplies Checklist
You can build a Halloween miniature garden with thrifted containers and a few basics. Here’s a practical shopping list:
Container + Base
- A planter with drainage holes (best for most living mini gardens)
- OR a glass container for an open terrarium (no drainage holes, different layering method)
- Optional: pot feet, bricks, or slats to lift outdoor containers off flat surfaces
Soil + Layers
- Quality potting mix (not soil from your yard)
- Coffee filter or mesh screen (to cover drainage holes if they’re large)
- For terrariums: aquarium gravel, activated charcoal, sheet moss
Mini Plants (Choose Based on Light + Water Needs)
- Groundcovers: creeping thyme, Irish moss, baby tears
- Texture plants: small sedums, hens and chicks, compact ferns (for humid setups)
- Color pops: polka-dot plant, purple oxalis (false shamrock), small-leaf coleus
- Mini “trees”: dwarf ficus varieties, small evergreen-style plants (if suited to your conditions)
Halloween Decor + “Hardscape”
- Mini tombstones, tiny skeletons, little fence sections, miniature pumpkins
- Small pebbles, bark chips, or sand for paths
- Twigs, pinecones, moss for natural realism
- Battery-operated micro lights or LED tea lights (safer than real flames)
Tools
- Hand trowel or spoon, scissors/snips, small paintbrush (for sweeping soil off props)
- Optional: hot glue for outdoor-stable accessory placement (use carefully; adult help for kids/teens)
Step-by-Step: Build Your Halloween Miniature Garden
Step 1: Choose a Container That Won’t Betray Your Plants
If you’re using live plants, drainage mattersbecause roots like air as much as they like water. Pick a container with drainage holes, or be ready to create them if the material allows. If you’re using a glass container with no holes, treat it like a terrarium build (different layers, lighter watering).
Step 2: Build the Base the Right Way
If your container has drainage holes:
- Cover the hole with a coffee filter or mesh if it’s large (to keep mix from washing out).
- Fill with quality potting mix, leaving 1–2 inches of headspace for styling.
- Avoid packing the soil down hardroots like a fluffy, airy mix.
If your container has no drainage holes (open terrarium style):
- Add a layer of clean gravel for drainage.
- Add a thin layer of activated charcoal (helps with freshness and moisture management).
- Add sheet moss as a barrier layer.
- Top with sterile potting mix, then plant.
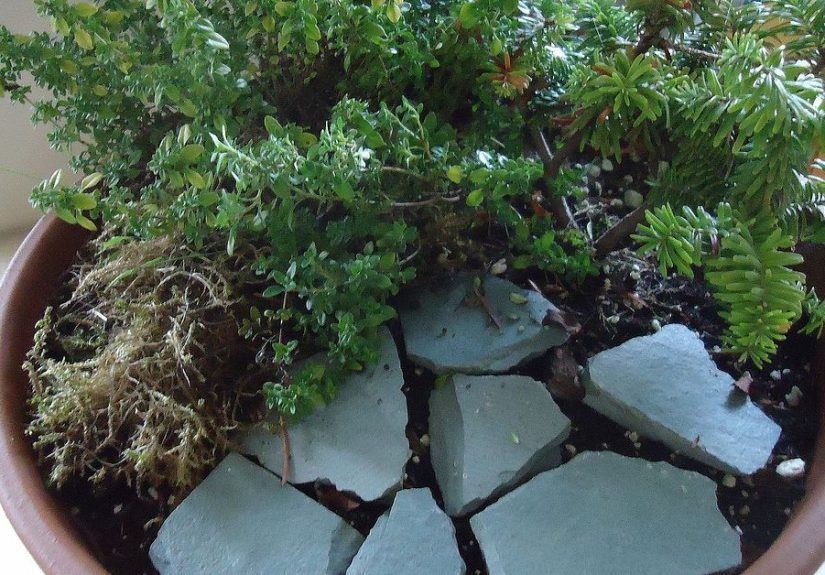
Step 3: Create “Hardscape” First (Paths, Hills, Tiny Drama)
Hardscape is the non-living structurepaths, little rock borders, a “graveyard hill,” or a pumpkin cottage foundation. Do this before you plant so you’re not awkwardly shoving pebbles between roots later like you’re defusing a botanical bomb.
- Paths: use pebbles, sand, or fine gravel.
- Edges: use bark chips, stones, or small twigs like a rustic border.
- Focal point: place the “main character” (cottage, graveyard gate, cauldron scene) slightly off-center for a natural look.
Step 4: Pick Plants That Match Each Other (and Your Light)
Mini gardens look best when plants stay proportional. Choose slow-growing options and group plants with similar needs (same light, same watering rhythm). Here are easy plant “casting calls” by vibe:
Creepy-Cute Groundcover (Your “Mini Lawn”)
- Baby tears for a soft, mossy look
- Irish moss for a bright green carpet effect
- Elfin/creeping thyme for a low mat that can handle outdoor settings in many regions
Texture + Shape (The “Spooky Forest” Layer)
- Spike moss (great for humid terrarium-style displays)
- Miniature fig/ficus varieties for tiny “trees” in the background
- Small sedums or hens and chicks for hardy structure (especially in open, bright setups)
Color That Feels Halloween Without Screaming Neon
- Polka-dot plant for speckled leaves and bold accent color
- Purple oxalis (false shamrock) for dramatic purple foliage
- Small-leaf coleus for moody color blocks
Plant your tallest pieces toward the back (or the center if it’s viewable from all sides), tuck groundcovers around edges, and leave open space for accessories. “More plants” is not always “more better.”
Step 5: Add Halloween Details (Without Turning It Into a Toy Box)
Accessories are where the Halloween magic happensjust use them like seasoning. You want “spooky,” not “everything from aisle nine.”
- Mini graveyard: 3–5 tombstones, one fence line, one “feature” (lantern, raven, skeletal hand)
- Witch corner: tiny cauldron, pebble “fire pit,” mini broom, herbs like thyme or small-leaf rosemary (if outdoor)
- Spider vibes: a single web tucked into twigs looks more realistic than covering the whole scene in cotton fluff
- Lighting: micro battery lights give the best haunted glowespecially at dusk
Step 6: Finish Like a Miniature Landscape Designer
- Top-dress bare soil with fine gravel, bark, or moss so it looks “finished.”
- Use a paintbrush to sweep soil off stones and props (tiny gardens show everything).
- Add one “unexpected” detail: a tiny sign (“Potion Pickup”), a mini ladder, or a hidden ghost.
3 Halloween Mini Garden Design Recipes (Copy-Paste Ideas)
1) The Pumpkin Cottage Centerpiece
Use a pumpkin as a Halloween “house” display (great for porches and party tables). Carve simple windows/door shapes, add miniature doors or frames, and place a warm LED light inside for glow. Style it with moss “bedding,” twig furniture, and tiny natural details like pine garlandsjust keep anything fabric-like away from moisture. This is best as a short-term seasonal decor build (pumpkins eventually soften), but it’s a showstopper while it lasts.
2) The Broken Pot “Haunted Hillside”
If you have a cracked terracotta pot, turn it into a tiered mini landscape. Use the broken pieces like little retaining walls to create levels, then plant succulents and mossy textures between the “steps.” Add a tiny staircase vibe and place tombstones on the upper tier like an old hillside cemetery. Safety note: handle sharp edges carefully; gloves are a smart idea.
3) The “Under Glass” Spooky Terrarium
Build an open terrarium with gravel, charcoal, moss, and potting mix, then choose humidity-friendly plants (like small ferns, nerve plant types, or polka-dot plant). Add miniature mushrooms, a tiny lantern, and a pebble path. Keep it open (not sealed) for fewer condensation issues, and water lightlyterrariums don’t forgive overwatering.
Care & Maintenance (So Your Tiny Graveyard Doesn’t Become a Tiny Swamp)
Watering
- Check soil before watering. If the top couple inches feel dry, water slowly.
- Avoid watering on a strict scheduleyour mini garden wants observation, not a spreadsheet.
- Terrariums need less water than open pots. Too much = soggy soil + fungus problems.
Light
- Match plants to your location: sun-lovers in bright light, shade-lovers in indirect light.
- If indoors, rotate the container occasionally so plants don’t lean like they’re trying to escape.
Trimming + Refreshing
- Pinch or snip fast growers to keep scale.
- Swap seasonal props as Halloween passesyour mini garden can become a winter village with almost no effort.
Troubleshooting Common Mini Garden Problems
Problem: Mold or Mushy Soil
- Cut back watering immediately.
- Increase airflow (especially indoors).
- Remove decaying leaves and refresh top dressing with dry gravel.
Problem: Plants Look Stretched (Leggy)
- Increase light exposure gradually.
- Rotate container weekly.
- Choose plants better suited to your available light next time.
Problem: Gnats Indoors
- Let soil dry slightly between watering.
- Use a gravel top dressing to discourage egg-laying.
- Remove any decaying plant matter.
Mini FAQ
How long does a Halloween miniature garden last?
A planted container can last for months or longer if you choose slow-growing plants and care for them well. A pumpkin cottage setup is usually a short-term seasonal star (great through Halloween with good conditions).
Can kids/teens make this?
Absolutelythis is one of the most fun “creative gardening” projects around. For carving, drilling holes, or using hot glue, adult help is recommended. The rest is basically landscaping… in miniature… which is objectively adorable.
Conclusion
A Halloween miniature garden is the rare DIY that’s equal parts craft, design, and plant parenting. Start with a simple theme, build a smart base (drainage and potting mix matter), choose plants that match your light, and decorate like a stylist: one focal point, a few details, and plenty of breathing room.
Best part? When Halloween ends, your tiny world doesn’t have to. Swap the tombstones for tiny pinecones, add a little winter sparkle, and let your miniature garden live onbecause the plants didn’t sign up to be seasonal.
Experience Notes: What It’s Like to Build a Halloween Miniature Garden (and What You Learn Fast)
The first time you build a Halloween miniature garden, you’ll probably have a moment where you stare at the container and think, “This is tiny… I need tiny everything.” That’s truebut the real lesson is that tiny doesn’t mean crowded. Many people start by piling in plants and props because each individual piece is small. Then they step back and realize their “mini graveyard” looks like a Halloween clearance aisle got tipped over. The fix is simple: pull out half the accessories, pick one hero item (a cottage, a gate, a pumpkin house), and let the scene breathe. Negative space is not emptyit’s atmosphere.
Another common surprise: scale is a sneaky villain. A single oversized chair or a too-tall fence can make your plants look like they’re in the wrong universe. A good trick is to place your focal item first, then set plants around it like you’re casting actors around a lead character. Groundcovers become your “lawn,” taller plants become your “trees,” and mid-height plants are your “shrubs.” Once you start thinking like a set designer, decisions get easierand your miniature garden starts looking intentional instead of accidental.
Watering is where beginners learn the quickest. People often assume small containers need constant watering, but miniature gardens can swing from dry to soggy faster than a full-size planter. In real life, many gardeners end up overwatering once or twice (it’s practically a rite of passage), then discover the golden rule: check the soil before you water. If it’s still moist, wait. If you’re building a terrarium-style display, the lesson gets even louder: too much water means condensation, mold, and a smell that does not match the “cozy haunted cottage” theme you were going for.
On the fun side, most people report the best part is the finishing phaseadding the path stones, tucking in moss, placing the lantern, and adjusting tiny details until the whole thing “clicks.” It becomes weirdly relaxing. You’ll also notice you start saving “future miniature supplies” without meaning to: a cool pebble from the driveway, a twisty twig from a walk, a bottle cap that suddenly screams “mini cauldron base.” That’s when you know the hobby has you.
Finally, the biggest experience-based win: a Halloween miniature garden isn’t just decorit’s reusable creative infrastructure. After Halloween, people often swap props and keep the planting. Tiny pumpkins become pinecones, tombstones become mini gift boxes, and orange accents turn into winter sparkle. Once you build one good base, you can redecorate it all year. Your plants stay put; the story changes. And that’s a pretty great deal for something that fits on a porch corner.