Table of Contents >> Show >> Hide
- Before You Start: The Safety Stuff (Non-Negotiable)
- Why the Potato Trick Works (Yes, Really)
- Tools & Materials
- How to Remove a Broken Light Bulb with a Potato: 9 Steps
- Step 1: Turn Off Power at the Breaker
- Step 2: Let Everything Cool Down
- Step 3: Suit Up (Gloves + Eye Protection)
- Step 4: Prep the Area Like You’re Expecting a Mess (Because You Are)
- Step 5: Remove Loose Glass Carefully
- Step 6: Cut the Potato (Flat, Fresh Face)
- Step 7: Press the Potato Firmly into the Bulb Base
- Step 8: Twist Counterclockwise (Slow, Steady, Confident)
- Step 9: Clean the Socket, Dispose Safely, Replace the Bulb
- Troubleshooting: When the Potato Slips (or the Bulb Base Won’t Budge)
- What Not to Do (Unless You Enjoy Regret)
- When to Call an Electrician
- FAQ
- Real-World Experiences & Lessons Learned (500+ Words)
You know that tiny “tink!” sound a light bulb makes right before it betrays you? One second you’re simply replacing a bulb, the next you’re staring at a jagged, glassy crown stuck in the socket like it’s auditioning for a villain role in a home-improvement movie.
The good news: there’s a surprisingly old-school, oddly satisfying trick that can helpusing a raw potato. The better news: you can do it without donating your fingers to the “sharp objects” gods, as long as you take safety seriously. This guide walks you through the potato method in nine clear steps, plus pro-level tips if your bulb base is being extra stubborn.
Before You Start: The Safety Stuff (Non-Negotiable)
- Kill the power. Don’t rely on the wall switch aloneturn off the correct breaker whenever possible.
- Let the bulb cool. A recently lit bulb can be hot enough to burn you and soften the socket insulation.
- Wear protection. Thick gloves and safety glasses are the difference between “DIY win” and “urgent care speed-run.”
- Know when to stop. If the socket is cracked, scorched, loose, or sparkingpause and call a licensed electrician.
Why the Potato Trick Works (Yes, Really)
A raw potato is firm, slightly grippy, and just soft enough to bite into leftover glass edges or grab the metal shell of the bulb base. When you press it into the broken bulb base, it creates friction and a snug “custom fit” that lets you twist the base out without putting bare skin anywhere near sharp glass.
Think of it as a temporary, edible rubberized tool handleexcept you absolutely should not eat it afterward. (This is a “tool potato,” not a “mashed potato.”)
Tools & Materials
- 1 raw potato (medium to largebigger gives you a better grip)
- Knife (to cut the potato)
- Thick gloves (leather or heavy work gloves)
- Safety glasses
- Needle-nose pliers (optional but helpful for removing loose glass)
- Trash bag or sturdy container (for broken glass)
- Cardboard or newspaper (to protect the floor)
- Flashlight (optional, if you’re working in a dark fixture)
How to Remove a Broken Light Bulb with a Potato: 9 Steps
Step 1: Turn Off Power at the Breaker
Go to your electrical panel and switch off the breaker for the light fixture. If it’s a plug-in lamp, unplug it. Then flip the wall switch off, toobelt and suspenders. If you have a non-contact voltage tester, this is a perfect moment to use it.
Step 2: Let Everything Cool Down
If the bulb was on recently, wait at least 10–15 minutes. Hot glass can shatter further, and a warm socket can be easier to damage. Patience here is cheaper than replacing a fixture later.
Step 3: Suit Up (Gloves + Eye Protection)
Put on thick gloves and safety glasses. If the bulb is overhead, eye protection is especially important because tiny shards love gravity and drama.
Step 4: Prep the Area Like You’re Expecting a Mess (Because You Are)
Lay cardboard or newspaper under the fixture to catch falling glass. If it’s a table lamp, move it to a stable surface with good lighting. Keep kids and pets awaybroken glass is basically a magnet for curious paws and bare feet.
Step 5: Remove Loose Glass Carefully
If there are dangling shards, gently pull them away using gloved hands or needle-nose pliers. Work slowly. Don’t pry against the socket. Place glass directly into a sturdy container or wrap it in thick paper before tossing.
If the broken bulb is a CFL (spiral fluorescent) or another bulb type that may contain mercury: ventilate the area and clean up carefully. Avoid vacuuming glass dust; follow safe cleanup guidance for that bulb type before proceeding.
Step 6: Cut the Potato (Flat, Fresh Face)
Cut the potato in half crosswise. You want a flat, moist surfacethis is your “grip pad.” A larger potato gives you more control and a better handle.
Pro tweak: If the bulb base is very hollow and has little glass left to “bite,” you can carve a slight nub (a short cylinder) on the cut face to fit deeper into the base for more traction.
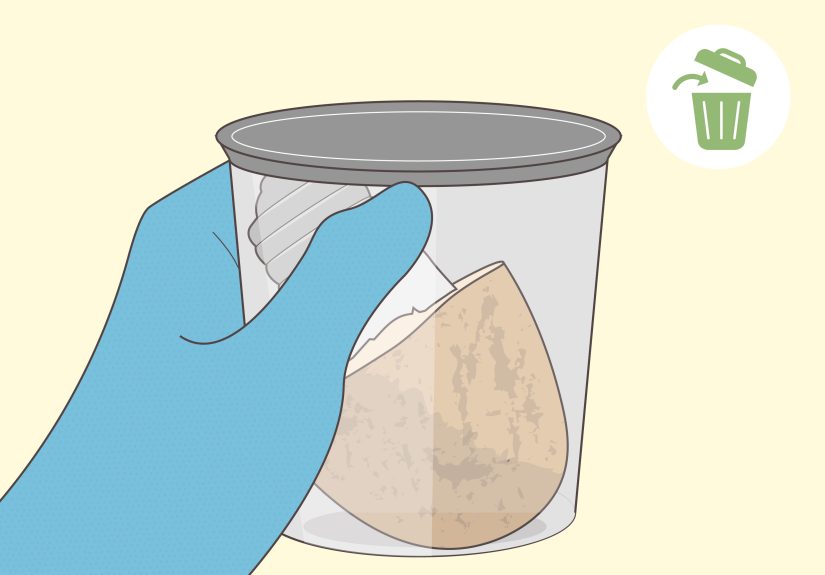
Step 7: Press the Potato Firmly into the Bulb Base
With one hand stabilizing the fixture (or lamp), press the cut side of the potato straight into the broken bulb base. You want it snugfirm enough to embed into jagged edges or grip the inner metal. Don’t jab wildly; controlled pressure wins.
Step 8: Twist Counterclockwise (Slow, Steady, Confident)
Turn the potato counterclockwise (lefty-loosey). Apply steady pressure inward while twisting. If it slips, press more firmly and try again. If the base begins to move, keep turning until it unthreads fully.
If the base fights back: stop and reassess rather than muscling it. Excess force can bend the socket’s center contact or crack a brittle fixture.
Step 9: Clean the Socket, Dispose Safely, Replace the Bulb
Once the base is out, inspect the socket for tiny glass bits or potato residue. Wipe gently with a dry cloth (power still off). Check that the socket’s center tab isn’t flattened or damaged. Then install a new bulb, restore power at the breaker, and test.
Troubleshooting: When the Potato Slips (or the Bulb Base Won’t Budge)
If the potato keeps slipping
- Use a bigger potato for more grip and leverage.
- Re-cut a fresh surface (a dry potato face grips worse).
- Press inward harder while twisting slowlyfriction needs contact.
- Try the “carved nub” trick so the potato fits deeper into the base.
If the metal base is crushed or deformed
Sometimes the metal shell warps and binds against the socket threads. If that happens, a pair of needle-nose pliers inserted into the base (opened slightly for grip) can help rotate it outstill with power off and full protection.
If the base is totally stuck
A commercial broken-bulb extractor (a small specialty tool made for this exact problem) can be safer and more effective than improvising. If the socket shows heat damage, corrosion, or looseness, it’s smarter to stop and call a pro.
What Not to Do (Unless You Enjoy Regret)
- Don’t work with power on. Not “probably off.” Not “I think it’s the right switch.” Off at the breaker.
- Don’t use bare hands. Even tiny shards can cut deeply.
- Don’t pry with a metal screwdriver inside a live socket. That’s how you create a new problem called “arc flash.”
- Don’t over-torque. Cracking the socket or fixture turns a quick fix into a replacement project.
- Don’t vacuum fine debris from certain bulb types. Follow the proper cleanup method for the bulb you broke.
When to Call an Electrician
The potato trick is great for a standard broken incandescent-style bulb base. But call a professional if:
- The socket is cracked, scorched, melted, or smells burnt.
- The fixture is loose, wobbly, or the wiring looks damaged.
- You can’t confidently shut off power to that fixture.
- The base won’t move after careful attempts (forcing it can damage the socket contacts).
FAQ
Does the potato method work on every broken bulb?
It works best when there’s enough edge inside the base for the potato to grip. If the bulb snapped cleanly and the base is smooth, you may need to carve the potato to fit deeper or switch to a bulb extractor or pliers method.
Can I use something other than a potato?
Sometimes a bar of soap can work similarly (firm, grippy, press-to-fit). In a pinch, certain sticky or molded methods can work, but the safest “household item” options are typically potato, soap, or a proper extractoralways with the power off.
What direction do I turn?
Counterclockwise to loosen (lefty-loosey). If you’re upside down on a ladder questioning reality, remember: you’re turning the bulb base out of the socket, just like removing a normal bulb.
Real-World Experiences & Lessons Learned (500+ Words)
If you ask a room full of homeowners about broken bulbs, you’ll hear the same theme: it’s never convenient. It happens right when you’re rushing out the door, hosting guests, or trying to finish “one last thing” before bed. And that’s exactly why the potato trick has survived for so longbecause it’s a low-drama solution to a high-annoyance problem.
One common scenario: the overhead dome light that’s just high enough to require a chair (which you know you shouldn’t use) but not high enough to justify a ladder (which you definitely own, but it’s in the garage behind fifteen boxes of “seasonal optimism”). The bulb breaks, and suddenly you’re doing the world’s least fun balancing act while shards threaten to rain down like glitter’s evil cousin. The lesson here is simple: grab the ladder. The extra two minutes is worth the stability, especially when your hands are occupied and your eyes are trying to stay shard-free.
Another classic: the porch light that’s been through three summers, two winters, and one ambitious spider civilization. Outdoor fixtures tend to create “stuck bulb” situations because temperature swings and moisture can make threads stubborn. When that bulb breaks, the base can cling like it pays rent. This is where people learn the difference between “steady pressure” and “I am about to Hulk this fixture off the wall.” In real life, the winning move is controlled force: press the potato in firmly, twist slowly, and stop if the base deforms. If you feel the fixture flexing or the socket shifting, that’s your cue to switch strategies or call in helpbecause ripping a fixture loose is not a fun weekend.
Then there’s the lamp incidentusually involving a tipped table, a pet tail, or a gravity misunderstanding. The upside of lamps is you can unplug them and move them to a bright workspace. The downside is that many lamp sockets are older, softer, and easier to damage if you torque too hard. People who’ve been through this once tend to develop a “lamp ritual”: unplug, wait for cool-down, gloves on, glass out, potato in, twist. It sounds dramatic, but it prevents that second problem where the bulb base comes out… and the socket contact tab inside is bent flat, so the new bulb doesn’t work. The fix might be minor, but avoiding the damage is even better.
There’s also a funny psychological moment: the first time someone hears “use a potato,” they assume it’s internet nonsenseright up until the base turns and backs out like it suddenly remembered it had somewhere else to be. That little victory is oddly satisfying. It’s the same satisfaction as finding the right size Allen key on the first try: small, rare, and worth savoring.
The bigger takeaway from all these experiences is that the “potato method” isn’t magic; it’s friction plus control. It’s a safe way to get grip without putting skin near glass. When people struggle, it’s usually because they skipped a safety step (working with power not fully off), rushed the cleanup (leaving shards that prevent a snug potato fit), or used a tiny potato that offers zero leverage. Use a bigger potato, re-cut a fresh flat face, press in firmly, and twist slowlythose small details are what turn a folk trick into a reliable technique.
And finally, a little wisdom that experienced DIYers love: if the situation looks wrongburn marks, melted plastic, a loose socket, or anything that makes you think “huh, that seems bad”trust that instinct. A broken bulb is annoying, but electrical hazards are serious. The smartest “experience” is knowing when the fix is a potato… and when the fix is a professional.