Table of Contents >> Show >> Hide
- What Is Prepackaged Concrete Mix?
- Best Projects for Prepackaged Concrete Mix
- Tools and Materials You Need
- Step 1: Plan the Project and Estimate the Concrete
- Step 2: Prepare the Site
- Step 3: Read the Bag Instructions
- Step 4: Mix the Concrete by Hand
- Step 5: Mix Concrete With a Mixer
- Step 6: Place the Concrete
- Step 7: Consolidate and Level the Surface
- Step 8: Finish the Concrete at the Right Time
- Step 9: Cure the Concrete Properly
- Common Mistakes to Avoid
- Practical Example: Pouring a Small Shed Pad
- How Long Does Prepackaged Concrete Take to Set?
- Cleanup Tips
- Experience-Based Tips for Better Results
- Conclusion
Prepackaged concrete mix is one of those humble home-improvement products that looks boring on the shelf and then quietly becomes a patio, a fence post footing, a shed pad, a mailbox base, or the heroic little repair that saves your driveway from looking like it lost a fight with winter. The beauty of bagged concrete is simple: the cement, sand, and gravel are already proportioned for you. Your job is to add the right amount of clean water, mix it properly, place it before it stiffens, finish it neatly, and let it cure like the tiny rock science project it is.
That sounds easyand it can bebut concrete is not pancake batter. Too much water weakens it. Too little water leaves dry pockets. Poor curing can make a promising slab crack, dust, scale, or crumble. The good news? With a wheelbarrow, hoe, gloves, eye protection, a little patience, and a healthy respect for the bag instructions, most DIYers can use prepackaged concrete mix successfully for small projects around the home.
This guide explains how to use prepackaged concrete mix from planning to cleanup, with practical examples, safety tips, and real-world experience so your project ends in “nice job” instead of “well, that’s modern art.”
What Is Prepackaged Concrete Mix?
Prepackaged concrete mix, often called bagged concrete mix or ready-mix concrete in a bag, is a dry blend of Portland cement, sand, gravel or stone aggregate, and sometimes performance additives. Unlike mortar mix, which is usually used for brick and block work, concrete mix contains coarse aggregate, making it suitable for structural and semi-structural jobs such as slabs, footings, steps, ramps, and post holes.
The biggest advantage is consistency. Instead of buying cement, sand, and gravel separately and guessing ratios in the driveway, you open one bag and follow the water instructions. Common bag sizes include 40-pound, 50-pound, 60-pound, and 80-pound bags. An 80-pound bag typically produces about 0.6 cubic feet of concrete, though yield varies by product. For larger projects, calculate your volume carefully and add extra for spillage, uneven excavation, and the mysterious way concrete always seems to disappear right when you need one more shovel-full.
Best Projects for Prepackaged Concrete Mix
Bagged concrete mix is ideal for small to medium DIY projects where ordering a ready-mix truck would be overkill. It works well for setting fence posts, repairing small sections of walkways, pouring deck footings, anchoring mailbox posts, creating small pads, filling forms, and making simple concrete steps.
However, it may not be the best choice for large driveways, major foundations, or big slabs unless you have enough help, equipment, and time. Mixing dozens of bags by hand is possible, but so is carrying groceries in one trip: technically impressive, physically questionable, and not always wise. For large pours, consider renting a mixer or hiring a concrete supplier.
Tools and Materials You Need
Basic Supplies
Before opening the first bag, gather everything. Concrete waits for no one, especially not someone searching the garage for a missing trowel.
- Prepackaged concrete mix
- Clean water
- Wheelbarrow, mortar tub, or concrete mixer
- Hoe, shovel, or mixing paddle
- Measuring bucket or marked water container
- Concrete forms, stakes, and screws if pouring a slab
- Trowel, float, screed board, or edger
- Level and tape measure
- Plastic sheeting, curing compound, or damp burlap for curing
Safety Gear
Dry concrete mix contains cement and fine particles that can irritate your eyes, lungs, and skin. Wet concrete is highly alkaline and can cause burns with prolonged contact. Wear safety glasses, waterproof gloves, long sleeves, long pants, and waterproof boots. Use a dust mask or respirator when pouring dry mix, especially in poorly ventilated areas. Stand upwind when emptying bags and avoid dumping the powder from shoulder height like you are feeding a dusty volcano.
Step 1: Plan the Project and Estimate the Concrete
Start by measuring the area. For a slab, multiply length by width by thickness. Convert inches to feet before calculating. For example, a 4-foot by 4-foot slab that is 4 inches thick is:
4 ft × 4 ft × 0.33 ft = about 5.28 cubic feet
If each 80-pound bag yields about 0.6 cubic feet, divide 5.28 by 0.6. That gives you 8.8 bags, so you would buy at least 10 bags. For post holes, calculate the hole volume based on diameter and depth, then subtract the approximate volume of the post. When in doubt, buy slightly more than the exact math suggests. Running out of concrete halfway through a pour is the DIY version of a cliffhanger, except nobody enjoys the sequel.
Step 2: Prepare the Site
Good concrete starts below the concrete. Remove grass, loose soil, roots, debris, and anything soft or unstable. For slabs, dig to the proper depth, allowing room for compacted gravel base and the concrete thickness. A small walkway or pad often uses several inches of compacted gravel under the concrete to improve drainage and reduce movement.
Build forms from straight lumber and stake them securely. Check that forms are square, level where needed, and pitched slightly if water must drain away from a house, garage, or shed. For post holes, dig below the frost line where required by local code and make the hole wide enough for proper support. A common rule for posts is to make the hole roughly three times the width of the post, but local soil conditions and codes matter.
Step 3: Read the Bag Instructions
Different concrete mixes require different water amounts and working times. Standard concrete mix, high-strength mix, crack-resistant mix, fast-setting concrete, and specialty repair mixes do not behave exactly the same. The bag is not just decorative packaging; it is your recipe card.
Many standard 80-pound concrete mixes use roughly 6 to 9 pints of clean water per bag, but always follow the specific product instructions. Add water gradually. The target is a stiff, workable, moldable consistency. Properly mixed concrete should hold together without dry pockets or standing puddles. If it looks like soup, you have gone too far. Concrete soup may be easy to pour, but it often cures weaker and more prone to cracking.
Step 4: Mix the Concrete by Hand
For small batches, hand mixing in a wheelbarrow or mortar tub works well. Place the bag in the wheelbarrow, cut it open low to reduce dust, and empty it carefully. Some people add most of the water first, then the dry mix; others place dry mix first and form a crater for water. Either method can work if you mix thoroughly and avoid overwatering.
Hand-Mixing Method
- Measure the recommended water amount in a bucket.
- Add about three-quarters of the water to the wheelbarrow or tub.
- Add the dry concrete mix slowly.
- Pull dry material into the water with a hoe or shovel.
- Chop, fold, and scrape the corners until the mix is even.
- Add small amounts of remaining water only as needed.
- Check for dry pockets before placing.
The mixture should resemble thick oatmeal or heavy peanut butter with gravel in it. That description may ruin lunch, but it helps. When squeezed in a gloved hand, it should hold its shape without water running out.
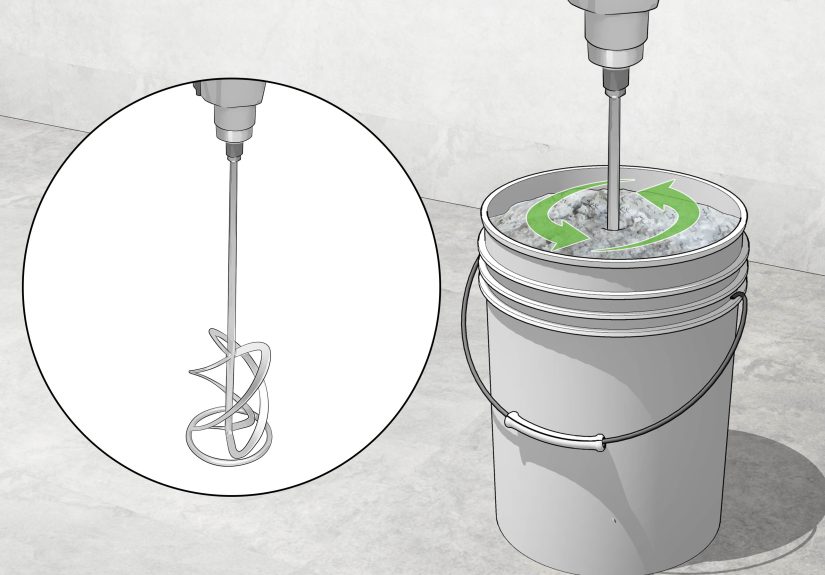
Step 5: Mix Concrete With a Mixer
A rented concrete mixer is worth considering if you are using more than a few bags. It saves your back, improves consistency, and helps you work faster. Check the mixer’s capacity before loading it. A small mixer may only handle one or two bags at a time, and overloading it can leave dry clumps tumbling around like sad gray laundry.
Pour most of the measured water into the mixer first, start the drum, and gradually add the dry concrete. Let the mixer run until the material is uniform. Add tiny amounts of water if the mix is too stiff, but do not chase easy pouring by making it watery. Once mixed, place the concrete promptly. Standard concrete gives you more working time than fast-setting products, but heat, wind, and low humidity can shorten that window.
Step 6: Place the Concrete
Move the mixed concrete into the form, hole, or repair area right away. For slabs, shovel or pour the concrete evenly across the form. Use a shovel or rake to push it into corners and along edges. Avoid dumping one mountain in the middle and trying to drag it everywhere; that makes extra work and can disturb the base.
For post holes, follow the product directions. Some fast-setting mixes are designed to be poured dry into the hole around the post and then saturated with water. Standard concrete mixes are usually mixed with water before placement. Brace posts carefully so they remain plumb while the concrete sets.
Step 7: Consolidate and Level the Surface
After placing concrete in forms, tap the sides with a hammer or work a shovel along the edges to reduce air pockets. For a slab, use a straight board called a screed. Rest it on the forms and move it back and forth in a sawing motion while pulling it toward you. This levels the surface and removes excess concrete.
Fill low spots immediately and screed again. The goal is a flat, even surface before finishing. Do not overwork the surface. Too much troweling can bring excess water and cement paste to the top, creating a weak, dusty layer.
Step 8: Finish the Concrete at the Right Time
Concrete finishing is part skill, part timing, and part resisting the urge to poke it every thirty seconds. After screeding, let bleed water rise and evaporate before final finishing. If you trowel while water is still sitting on the surface, you can trap water under the paste and weaken the top layer.
Common Finish Options
- Broom finish: Drag a broom lightly across the surface for traction on walkways, pads, and exterior slabs.
- Smooth trowel finish: Use for indoor or covered surfaces where traction is less important.
- Edged finish: Run an edging tool along forms to create rounded edges that resist chipping.
- Control joints: Cut or tool joints into slabs to encourage cracking in planned lines instead of random lightning bolts.
For outdoor surfaces, a broom finish is usually smarter than a glass-smooth finish. Smooth concrete can become slippery when wet, and nobody wants a backyard walkway that doubles as a low-budget ice rink.
Step 9: Cure the Concrete Properly
Concrete does not simply dry; it cures through a chemical reaction called hydration. Moisture helps cement continue reacting and gaining strength. If fresh concrete dries too quickly, especially in sun or wind, it can crack, dust, or lose durability.
After the surface is hard enough not to be damaged, keep it damp or covered. You can mist it lightly, cover it with plastic sheeting, use damp burlap, or apply a curing compound if appropriate. Keep the concrete protected from freezing during early curing. In hot weather, avoid pouring during the hottest part of the day if possible. In cold weather, use products and protection suitable for low temperatures.
Concrete may be firm after a day, but that does not mean it has reached full strength. Avoid heavy loads too soon. Many concrete products continue gaining strength for weeks. For DIY projects, patience is cheaper than repairs.
Common Mistakes to Avoid
Adding Too Much Water
This is the classic mistake. Extra water makes concrete easier to place, but it weakens the cured result. If the mix slumps like melted ice cream, stop adding water. Use the minimum amount needed for workability.
Skipping Site Preparation
Concrete placed over soft soil, organic material, or a poorly compacted base is more likely to settle and crack. Spend time on the base before you brag about the finish.
Mixing Too Much at Once
A full wheelbarrow of wet concrete is heavy and hard to mix evenly. Start with one bag until you know your pace. Larger batches can be mixed in a mechanical mixer.
Finishing Too Early
Wait for bleed water to evaporate. Finishing too soon can damage the surface and reduce durability.
Ignoring Safety
Concrete dust and wet cement are not friendly to lungs, eyes, or skin. Wear protection. Wash wet concrete off skin quickly. Do not kneel in wet concrete unless you enjoy explaining preventable injuries to medical professionals.
Practical Example: Pouring a Small Shed Pad
Imagine you need a 4-foot by 4-foot pad for a small garden shed or trash-can area. You want the concrete 4 inches thick. First, remove grass and soil to allow room for a compacted gravel base and concrete. Build a square form from 2×4 lumber, stake it securely, and check for square by measuring diagonally from corner to corner. Add and compact gravel, then dampen it slightly before pouring.
Calculate the concrete volume: 4 × 4 × 0.33 = 5.28 cubic feet. If using 80-pound bags yielding about 0.6 cubic feet each, buy around 10 bags. Mix one or two bags at a time, place the concrete in the form, screed it level, wait for bleed water to disappear, edge the sides, add control joints if needed, and broom the surface for traction. Cover and cure it. The result is a sturdy little pad that looks intentional instead of like a gray pancake escaped from the kitchen.
How Long Does Prepackaged Concrete Take to Set?
Setting time depends on the product, temperature, water amount, humidity, and wind. Fast-setting concrete can firm up quickly, sometimes within minutes, while standard concrete typically gives more working time. Most projects should be protected from disturbance for at least the first day, and heavier loads should wait longer. Always check the bag for walk-on, load, and curing recommendations.
Remember: set time and cure time are not the same. “Set” means it has hardened enough to hold shape. “Cure” means it is continuing to gain strength. Treat young concrete with respect, even if it looks tough.
Cleanup Tips
Clean tools before the concrete hardens. Rinse wheelbarrows, hoes, shovels, and trowels in a safe area where runoff will not clog drains or damage landscaping. Never wash concrete slurry into storm drains. Let leftover concrete harden, then dispose of it according to local rules.
Store unused dry bags off the ground in a dry place. Moisture can cause lumps or partial hardening inside the bag. If the mix has hardened into a brick before you open it, congratulations: you own an inconvenient paper-wrapped rock, not usable concrete.
Experience-Based Tips for Better Results
The first lesson most people learn with prepackaged concrete mix is that the bag feels lighter in the store than it does beside the project. Plan your staging. Place bags close to the work area before mixing, but keep them dry and out of the way. If you are pouring a slab, stack the bags where you will not trip over them while carrying wet concrete. A clean, organized setup makes the job feel half as hard.
The second lesson is to measure water instead of guessing. Many beginners pour water from a hose until the mix “looks right,” then wonder why the finished concrete is dusty or cracked. A marked bucket is your best friend. Add most of the recommended water first, mix thoroughly, and then adjust with small splashes. Concrete often looks too dry before it suddenly becomes too wet. The difference between perfect and soupy can be one careless pour.
Another field-tested tip: scrape the bottom and corners of the wheelbarrow constantly. Dry powder likes to hide there. If you dump concrete into the form with dry clumps still inside, those weak pockets can show up later as rough spots or crumbly areas. Mixing should feel repetitive because it is. Fold, chop, scrape, turn, repeat. When the color and texture are consistent, you are ready.
Work in manageable batches. One 80-pound bag is easy enough for many DIYers to mix by hand, but two or three bags can become a wrestling match. If the project requires many bags, rent a mixer or recruit help. Concrete work has a rhythm: one person mixes, one places, one screeds, and one handles tools, water, and cleanup. Even a small team can produce a cleaner result because nobody is rushing every step.
Pay attention to weather. Hot sun and wind can dry the surface faster than the concrete can cure properly. Shade the work area when possible, have curing materials ready, and avoid starting late in the day if you will lose light before finishing. On the other hand, cold weather slows curing and can damage fresh concrete if it freezes. The best concrete day is mild, calm, and boring. Exciting weather is for movies, not slab work.
Finishing takes restraint. Many beginners keep troweling because a smooth surface looks satisfying. But overworking the top can weaken it, especially if bleed water is present. For outdoor concrete, a simple broom finish usually performs better. It hides small imperfections, improves traction, and looks professional when done in straight, even strokes. Pull the broom once, confidently, like you meant it. Going back over it ten times rarely improves the result.
Finally, do not neglect curing. After all the lifting, mixing, and finishing, it is tempting to walk away and admire your new creation. Admire it, yesbut cover it, mist it, or protect it according to the product instructions. Curing is where concrete earns its strength. A few days of moisture control can make the difference between a durable project and a disappointing one. Concrete rewards patience, preparation, and clean technique. Treat it well early, and it will quietly do its job for years.
Conclusion
Using prepackaged concrete mix is one of the most approachable ways to tackle small concrete projects without hiring a truck or becoming a full-time mason. The process is straightforward: plan the amount, prepare a solid base, follow the bag’s water instructions, mix to a stiff workable consistency, place the concrete promptly, finish at the right time, and cure it properly.
The secret is not brute strength; it is control. Control the water. Control the timing. Control the surface. Control the curing conditions. Do that, and a simple bag of dry mix can become a clean pad, a strong post footing, a tidy repair, or the foundation for your next backyard upgrade. Concrete may be gray, but the satisfaction of doing it right is surprisingly colorful.