
Table of Contents >> Show >> Hide
- Why Grocery Store Flowers Make Great Bouquets
- What You Need to Wrap Flowers Beautifully
- How to Choose the Best Grocery Store Flowers
- Step-by-Step: How to Wrap Grocery Store Flowers for a Beautiful Bouquet
- Five Easy Bouquet Wrap Ideas That Always Look Good
- Common Mistakes That Ruin a Wrapped Bouquet
- How to Make the Bouquet Last Longer After It Is Unwrapped
- Best Flower Combinations for Grocery Store Bouquets
- Real-Life Bouquet Lessons From Trial, Error, and the Grocery Store Flower Aisle
- Final Thoughts
There are two kinds of people in the flower aisle: the ones who grab a plastic-wrapped bunch and head for checkout, and the ones who stare at $9.99 carnations like they’re one ribbon away from becoming a rom-com moment. This article is for the second group. The good news? Grocery store flowers can look surprisingly elegant with a little trimming, a little styling, and a wrapping job that says, “I absolutely meant to make this look this good.”
If you have ever wondered how to wrap grocery store flowers for a beautiful bouquet, you do not need a flower shop, a design degree, or a suspiciously expensive pair of gold scissors. You just need fresh blooms, a few simple materials, and a plan. Once you know how to choose stems, shape the bouquet, and wrap it neatly, even a humble supermarket bunch can look polished, giftable, and genuinely thoughtful.
This guide walks you through the entire process, from shopping smarter in the floral aisle to tying the final ribbon. Along the way, you will also learn how to make your bouquet last longer, which flowers mix well together, and how to avoid the classic mistakes that make a bouquet look less “chic market flowers” and more “I fought the cellophane and the cellophane won.”
Why Grocery Store Flowers Make Great Bouquets
Let’s give supermarket flowers a little credit. They are affordable, easy to find, and often fresher than people expect. Many grocery stores carry roses, tulips, lilies, carnations, mums, alstroemeria, eucalyptus, baby’s breath, and seasonal filler stems that can be combined into something that looks far more expensive than it was. That is the magic of a DIY bouquet: the flowers do not have to be luxury flowers if the styling feels intentional.
Another advantage is flexibility. Instead of buying one prearranged bunch and hoping for the best, you can mix two or three smaller bundles to control the color palette, shape, and mood. Want a soft spring bouquet? Pair pale tulips with white mums and eucalyptus. Going for something bold? Use red roses, purple filler, and deep green foliage. Prefer a more natural, just-picked look? Choose one focal flower and let airy greenery do the rest.
The point is simple: wrapping grocery store flowers beautifully is less about spending more and more about editing better.
What You Need to Wrap Flowers Beautifully
Before you start, gather your bouquet-wrapping supplies. You likely already have most of them at home.
- 2 to 4 bunches of grocery store flowers
- Greenery or filler stems, such as eucalyptus, ruscus, or baby’s breath
- Sharp floral shears or clean kitchen scissors
- Kraft paper, tissue paper, fabric, or decorative wrapping paper
- Ribbon, twine, or raffia
- Rubber band or floral tape
- Damp paper towel
- Plastic wrap or a small plastic sleeve for the stem ends
- Optional gift tag
If you are making a wrapped bouquet for gifting, kraft paper is the easiest and most versatile option. It looks classic, hides the mechanics well, and works with almost any flower style. Tissue paper adds softness, while fabric creates a more rustic or elevated look. If you want that florist-style bouquet wrap, layer tissue paper inside kraft paper for a fuller, more finished presentation.
How to Choose the Best Grocery Store Flowers
A beautiful bouquet starts before you ever get home. In other words, do not let the prettiest color distract you from a tired bunch with floppy stems and petals that already look emotionally exhausted.
Look for freshness first
Choose flowers with firm stems, healthy leaves, and blooms that are either just opening or partially open. Flowers that are fully blown open may look dramatic today, but they often fade faster. Avoid bunches with slimy stems, browning petals, cloudy water in sleeves, or crushed leaves.
Use the simple bouquet formula
A balanced grocery store bouquet usually looks best with three parts:
- Focal flowers: the stars of the show, such as roses, lilies, tulips, or hydrangeas
- Secondary flowers: the supporting cast, such as spray roses, carnations, alstroemeria, or mums
- Filler or greenery: eucalyptus, ruscus, baby’s breath, or other airy stems that soften the design
If you are unsure how much to buy, a safe beginner formula is one bunch of focal flowers, one bunch of secondary flowers, and one bunch of greenery. That is usually enough for a hand-tied bouquet that feels full without turning into a botanical wrestling match.
Keep the color palette focused
The easiest way to make grocery store flowers look expensive is to avoid chaos. Choose one of these simple color directions:
- Monochromatic: shades of one color, such as blush, cream, and soft pink
- Complementary: colors that contrast in a lively way, like yellow and purple
- Classic neutral: white, green, cream, and a hint of blush
Too many colors can make a bouquet feel busy. A tighter palette makes it look edited and intentional, which is exactly what you want.
Step-by-Step: How to Wrap Grocery Store Flowers for a Beautiful Bouquet
Step 1: Unwrap and prep the stems
Remove all plastic sleeves, rubber bands, and price tags. Lay the flowers on a table and separate them by type. Strip off any leaves that would sit below the eventual tie point or waterline. If you are working with roses, remove any bruised outer guard petals. Those tougher petals are protective, but they can make the rose look tired before the bouquet even gets started.
Next, trim the stems at an angle with sharp shears. This helps the flowers take up water more effectively and gives you a cleaner starting point. If you are not gifting the bouquet immediately, place the prepped flowers in fresh water for a few hours before arranging them. Hydrated flowers are easier to style and less likely to droop halfway through your masterpiece.
Step 2: Start with greenery
Build your bouquet in your hand, not on the table. Begin with greenery to create the outline and overall shape. Think of it as the frame around a picture. Rotate the bouquet slightly as you add stems so it develops a rounded, hand-tied form instead of a flat front-facing clump.
Do not pack in too much greenery. A loose collar around the flowers looks elegant; a jungle in a ribbon belt does not.
Step 3: Add focal flowers in odd numbers
Place your largest blooms next. Use odd numbers when possible because they tend to look more natural and less stiff. Space them out rather than bunching them into one heavy cluster. You want the eye to travel around the bouquet, not land in one overcrowded corner and stay there.
Vary the heights slightly so the bouquet has movement. Flowers cut to the exact same height can look flat and formal. A little variation makes the arrangement feel softer and more organic.
Step 4: Tuck in secondary flowers and filler
Now fill the gaps with your secondary flowers and airy filler stems. This is the stage where the bouquet starts to look finished. Small flowers soften the edges, break up large bloom shapes, and add texture. If your bouquet still feels stiff, a few light filler stems can make it feel relaxed and garden-inspired.
Keep checking the bouquet from different angles. A beautiful hand-tied bouquet should look good from the front, sides, and back. If one side looks heavy, adjust before you tie it off.
Step 5: Secure the stems
Once the bouquet shape looks right, hold the stems firmly at the binding point and secure them with a rubber band, floral tape, or twine. Tie tightly enough to keep the bouquet from shifting, but not so tightly that you crush the stems. If the bouquet feels wobbly, add a second tie a little lower down the stems.
This is also the moment to decide how long the stems should be. If you are gifting the bouquet, leaving the stems slightly long is smart. It gives the recipient room to trim them later to fit the vase they want to use.
Step 6: Trim for balance
Set the bouquet down and even out the stem ends. Clean, aligned stems instantly make the bouquet look more polished. You do not need laser precision, but you do want the base to look neat enough that it seems deliberate rather than accidental.
Step 7: Wrap the bouquet
Place your wrapping material flat on a table, ideally on a diagonal so you can create a cone-like shape. Put the bouquet slightly off-center, with the flower heads extending above the top edge. Fold one side over the stems, then overlap the other side. Tuck, roll, or fold the bottom as needed to suit the stem length and the style you want.
For a more structured florist-style bouquet wrap, use two layers: soft tissue paper inside and kraft paper outside. For a casual market-bouquet look, a single sheet of kraft paper tied with twine works beautifully. For a more romantic presentation, use fabric or a paper gift bag that has been folded creatively around the stems.
Step 8: Protect the stems for gifting
If the bouquet will be out of water for any length of time, wrap the cut stem ends in a damp paper towel and cover that with plastic wrap. This small step keeps the bouquet fresher during transport and prevents water from dripping all over your car, your clothes, or your dignity.
Step 9: Finish with ribbon or twine
Tie the wrap with ribbon, raffia, or simple twine. A bow is lovely, but a clean knot with trailing ends can look just as stylish. Add a gift tag if you want. Suddenly, those grocery store flowers are no longer “something I grabbed while buying avocados.” They are a bouquet.
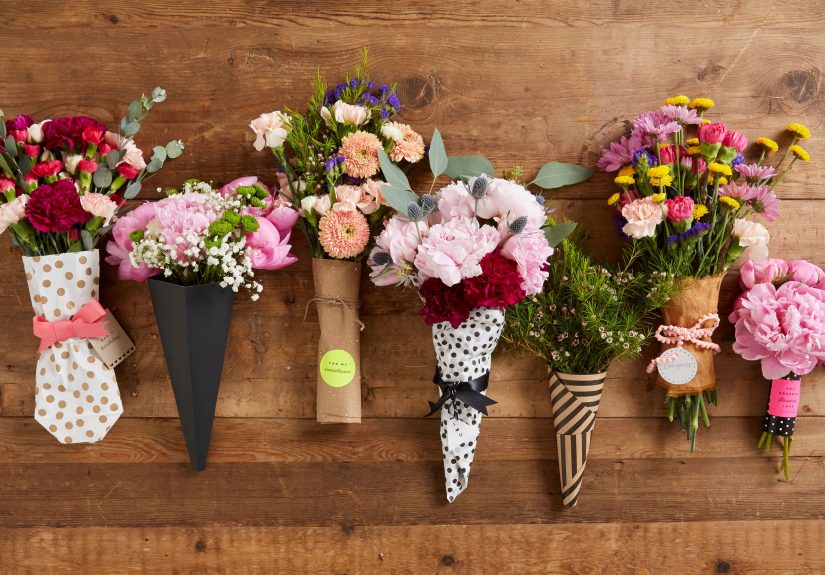
Five Easy Bouquet Wrap Ideas That Always Look Good
1. Classic kraft paper wrap
This is the easiest and most foolproof option. It works for almost every bouquet style and makes even inexpensive flowers feel elevated. Pair it with twine for a rustic look or satin ribbon for something a little more polished.
2. Tissue-and-kraft double wrap
Add one sheet of tissue paper inside a kraft paper outer wrap for extra volume and softness. This works especially well for gift bouquets and Mother’s Day flowers.
3. Fabric wrap
Burlap, linen, or cotton scraps can create a charming, textured presentation. This style looks especially good with wildflower-style bouquets, sunflowers, daisies, or garden roses.
4. Paper gift bag bouquet
A folded paper gift bag can become a surprisingly cute bouquet holder. It is budget-friendly, easy to customize, and handy when you need a fast last-minute wrap that still feels thoughtful.
5. Minimalist stem wrap
For smaller bouquets, skip the large paper cone and simply bind the stems with a strip of decorative paper, ribbon, or washi tape. This style feels modern, clean, and great for a few standout blooms.
Common Mistakes That Ruin a Wrapped Bouquet
Even pretty flowers can look awkward when a few small details go wrong. Watch out for these common bouquet mistakes:
- Too many flower types: More is not always more. Limit the bouquet to a few coordinated elements.
- No greenery or filler: Without a little softness, bouquets can look stiff and unfinished.
- Leaves left on lower stems: This makes the bouquet messy and shortens vase life later.
- Wrapping too tightly at the bloom heads: Cramped flowers do not look luxurious; they look stressed.
- Ignoring stem hydration: A beautiful wrap will not save thirsty flowers.
- Going overboard with ribbon: The flowers are the main event. The bow is the backup singer.
How to Make the Bouquet Last Longer After It Is Unwrapped
A beautiful wrapped bouquet should still look good once it lands in a vase. Include a quick care tip if you are gifting it, or follow this advice yourself:
- Use a clean vase
- Trim the stems again at an angle before placing in water
- Remove any leaves that would sit below the waterline
- Add flower food if you have it
- Change the water every 2 to 3 days
- Re-trim the stems with each water change
- Keep the bouquet away from direct sun, heat vents, and ripening fruit
If your bouquet includes lilies, it is wise to remove pollen as the blooms open to reduce staining and help the petals last longer. And if the recipient has curious pets, especially cats, be thoughtful about flower selection and placement. Pretty should not become problematic.
Best Flower Combinations for Grocery Store Bouquets
Need a few ready-made ideas? These combinations are easy to recreate with supermarket flowers:
Soft and romantic
Pink roses, white carnations, eucalyptus, and baby’s breath.
Fresh and modern
White tulips, green mums, seeded eucalyptus, and a simple kraft wrap.
Bright and cheerful
Yellow roses, purple alstroemeria, solidago, and glossy greenery.
Rustic garden style
Sunflowers, spray roses, ruscus, and a fabric wrap tied with raffia.
Classic red bouquet
Red roses, white filler flowers, dark greenery, and black or natural kraft paper for contrast.
Real-Life Bouquet Lessons From Trial, Error, and the Grocery Store Flower Aisle
One of the most interesting things about learning how to wrap grocery store flowers is that it quickly stops being just a craft project and starts feeling like a tiny design lesson in real life. The first time many people make a bouquet, they assume the flowers themselves do all the work. Then they get home, set the bunch on the counter, wrap it in paper, and wonder why it still looks like exactly what it is: a grocery store bunch in a paper jacket. The difference almost always comes down to editing, shaping, and restraint.
A common experience is realizing that fewer flower types usually look better. When beginners buy one bunch of roses, one bunch of tulips, one bunch of daisies, one bunch of lilies, and one random glittery filler stem that seemed fun at the time, the result can feel busy instead of beautiful. But when they buy three coordinated bunches in a tight color palette, the bouquet suddenly looks intentional. That is a useful lesson beyond flowers, honestly. Editing is the secret sauce.
Another experience people often have is discovering that greenery matters more than they expected. Without it, flowers can look like they are hovering in space. With even a few well-placed stems of eucalyptus or ruscus, the bouquet gets shape, softness, and movement. It starts to look like something made by a person with a plan instead of someone sprinting through aisle twelve at 6:42 p.m.
There is also the very practical lesson that wrapping paper is not magic. If the bouquet underneath is off-balance, too tight, or awkwardly cut, no amount of pretty ribbon will fix it. People usually learn this after making one bouquet that looks amazing from the front and deeply confusing from every other angle. Hand-tied bouquets need to be rotated as they are built. That small habit changes everything. It helps distribute the flowers more evenly and gives the bouquet that rounded, generous shape people associate with florist work.
Then there is the hydration lesson, which arrives the hard way. Anyone who has ever made a bouquet, wrapped it beautifully, and left it sitting dry on the counter while answering texts, finding scissors, and looking for ribbon has probably watched the flowers begin to sag before the gift was even delivered. It is humbling. It is also avoidable. Fresh cuts, clean water, and a damp wrap around the stems make a noticeable difference.
Perhaps the nicest experience tied to grocery store bouquets is that they often feel more personal than expensive arrangements. There is thought in choosing each stem, shaping the bouquet by hand, and picking the paper and ribbon to match the mood. A wrapped supermarket bouquet can feel charming in a way that a generic pre-made arrangement sometimes does not. It says, “I made this for you,” even if the roses technically came from the same store where you also bought pasta and dish soap.
That may be the real appeal of the whole thing. Learning how to wrap grocery store flowers for a beautiful bouquet is not just about saving money or making flowers look nicer. It is about turning an everyday purchase into a small act of creativity. And that is a pretty great return on a paper wrap, a little twine, and ten minutes at the kitchen table.
Final Thoughts
Once you know the basics, wrapping grocery store flowers becomes one of those surprisingly useful life skills. It is practical, affordable, and charmingly impressive. With fresh flowers, a balanced mix of stems, a neat hand-tied shape, and the right wrapping material, you can transform ordinary supermarket blooms into a bouquet that looks thoughtful, stylish, and gift-ready.
So the next time you pass the flower section during a grocery run, do not underestimate it. A beautiful bouquet might be sitting between the bakery and the sparkling water, just waiting for better paper and a little confidence.


