
Table of Contents >> Show >> Hide
- Why These Creme Brulee Cheesecake Bars Work
- Ingredients for Creme Brulee Cheesecake Bars
- Equipment You’ll Need
- How to Make Creme Brulee Cheesecake Bars
- Pro Tips for Smooth Cheesecake and a Perfect Brûlée Top
- Troubleshooting Common Creme Brulee Cheesecake Bar Problems
- Storage, Make-Ahead, and Food Safety
- Easy Variations You Can Try
- Serving Ideas
- Conclusion
- Research & Editorial Note
- Real-World Baking Experiences With Creme Brulee Cheesecake Bars (Extended Notes)
If classic cheesecake and crème brûlée had a delicious little plot twist, these bars would be the ending. You get a buttery cookie-crumb crust, a creamy vanilla cheesecake center, and that signature crackly sugar top that shatters when your fork taps it. It is elegant enough for holidays, birthdays, and “I brought dessert, so I am now the favorite” moments, but easy enough for a weekend baking project.
This Creme Brulee Cheesecake Bars Recipe is designed for real home kitchens: no complicated pastry-school drama, no mystery ingredients, and no panicked “why is my cheesecake sweating?” moments. The method below blends the best parts of cheesecake bar recipes and crème brûlée techniques into one practical, reliable approach. The result is rich, creamy, and just fancy enough to make people assume you own a tiny blowtorch (which, honestly, you might after this).
Whether you are new to cheesecake bars or already have a favorite springform pan, this guide walks you through ingredients, step-by-step instructions, baking science, troubleshooting, storage, and a few fun variations. Let’s make a pan of bars that look bakery-level and taste like a celebration.
Why These Creme Brulee Cheesecake Bars Work
The magic of this dessert is contrast. Cheesecake is soft and creamy. Crème brûlée is known for that crisp, caramelized sugar top. Cheesecake bars make slicing and serving easier than a full cake. Put all three together, and you get the best of every dessert world.
What makes this version extra good
- Bar format = easier baking and serving: You skip the stress of unmolding a full cheesecake and can slice neat squares for parties.
- Graham-style crust: It gives a buttery, toasty base that balances the creamy filling.
- Vanilla-forward filling: Cream cheese, sugar, eggs, and a little cream or sour cream create a smooth, rich texture.
- Brûlée sugar topping: The thin caramel shell adds crunch and makes these bars feel restaurant-worthy.
- Make-ahead friendly: Bake and chill the bars first, then torch the sugar shortly before serving for the best crackly top.
In other words: these bars are practical, pretty, and dangerously easy to “test” more than once.
Ingredients for Creme Brulee Cheesecake Bars
For the crust
- 1 1/2 cups graham cracker crumbs (about 10 to 12 full sheets)
- 1/4 cup granulated sugar
- 6 tablespoons unsalted butter, melted
- Pinch of salt
For the cheesecake filling
- 16 ounces cream cheese, fully softened
- 3/4 cup granulated sugar
- 2 large eggs, room temperature
- 1 large egg yolk, room temperature
- 1/4 cup sour cream (or heavy cream)
- 2 teaspoons vanilla extract or vanilla bean paste
- 1 tablespoon all-purpose flour (optional, but helps structure)
- Pinch of fine salt
For the crème brûlée topping
- 1/4 to 1/3 cup granulated sugar (for a thin, even layer)
Optional garnish
- Fresh raspberries
- Whipped cream
- Mint leaves
Ingredient notes (the important stuff)
Use block cream cheese, not tub-style spread. Block cream cheese gives better texture and structure for baking. Also, let it soften fully before mixing. Cold cream cheese is the fastest route to lumpy batter and unnecessary emotional damage.
Room-temperature eggs matter. They blend in more smoothly and reduce overmixing. Overmixing adds too much air, which can lead to puffing and cracking.
Granulated sugar is best for brûlée topping. It melts evenly and creates a crisp shell. A fine, even layer works better than a thick pile of sugar.
Equipment You’ll Need
- 8-inch square baking pan (metal preferred for even baking)
- Parchment paper or foil sling (for easy lifting)
- Mixing bowls
- Hand mixer or stand mixer
- Spatula
- Kitchen torch (best option) or broiler (backup option)
- Sharp knife for slicing
If you do not have a kitchen torch, the broiler still works. Just watch it closely. Sugar under a broiler can go from “gorgeous amber” to “campfire memory” very fast.
How to Make Creme Brulee Cheesecake Bars
Step 1: Prep the pan and oven
Preheat your oven to 325°F. Line an 8-inch square pan with parchment paper or foil, leaving overhang on two sides so you can lift the bars out later. Lightly grease the lining and any exposed pan edges.
Step 2: Make the crust
In a bowl, stir together graham cracker crumbs, sugar, salt, and melted butter until the crumbs look evenly moistened. Press the mixture firmly into the bottom of the pan in an even layer.
Bake for 8 to 10 minutes, then remove and let it cool slightly while you make the filling. A short pre-bake helps the crust hold its shape and stay crisp under the cheesecake layer.
Step 3: Mix the cheesecake filling
In a large bowl, beat the softened cream cheese on low to medium-low speed until smooth. Add the sugar and mix until combined and creamy. Scrape the bowl well.
Add the eggs and egg yolk one at a time, mixing on low just until incorporated after each addition. Mix in the sour cream, vanilla, flour (if using), and salt until smooth.
Do not whip the batter. This is cheesecake, not a mousse. Too much air can create bubbles, puffing, and cracks. If you see bubbles, tap the bowl a few times on the counter.
Step 4: Fill and bake
Pour the cheesecake filling over the crust and smooth the top. Bake for 32 to 40 minutes, depending on your pan and oven.
The bars are done when the edges look set but the center still has a slight jiggle. Think “gentle wobble,” not “tiny ocean.” If you like using a thermometer, the center should be around the low 150s°F for a baked cheesecake-style set.
Step 5: Cool gradually
Turn off the oven and crack the door slightly. Let the pan sit inside for about 10 to 15 minutes. Then move it to a wire rack and cool at room temperature for about 1 hour.
Gradual cooling helps reduce cracks and keeps the texture silky. Once mostly cool, cover and refrigerate for at least 4 hours, preferably overnight.
Step 6: Chill, lift, and slice
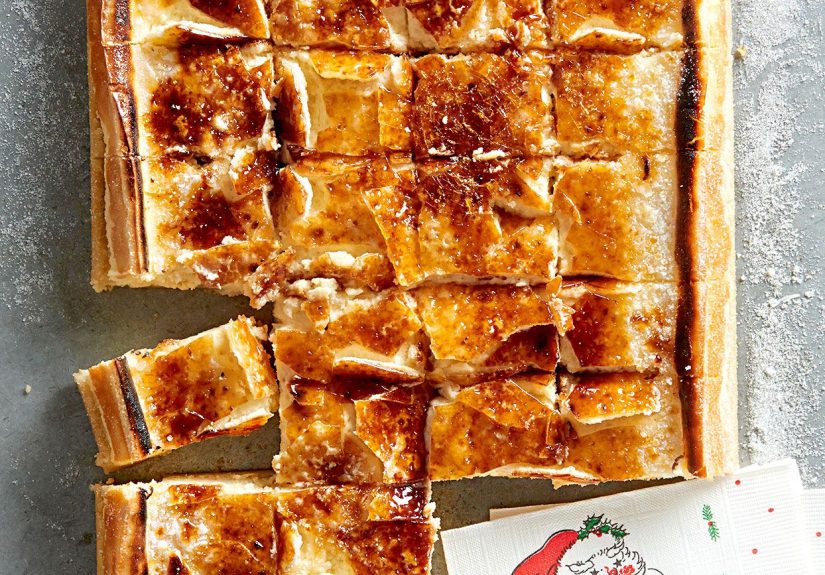
When fully chilled, use the parchment or foil overhang to lift the cheesecake slab from the pan. Place it on a cutting board and slice into bars. For extra-clean cuts, dip your knife in hot water, wipe it dry, and repeat between slices.
Step 7: Add the brûlée topping
Right before serving, sprinkle a thin, even layer of granulated sugar over each bar (or over the whole slab, then slice again if needed). Use a kitchen torch to caramelize the sugar until it melts, bubbles, and turns deep amber.
Let the sugar set for 1 to 3 minutes. It will harden into that signature crisp shell. Tap it lightly with a spoon and enjoy the tiny moment of drama.
Pro Tips for Smooth Cheesecake and a Perfect Brûlée Top
1) Start with room-temperature ingredients
This is not a suggestion. It is a public service announcement. Soft cream cheese and room-temp eggs blend smoothly, which means fewer lumps and less overmixing.
2) Mix on low speed
Cheesecake batter should be smooth, not whipped. Low speed keeps excess air out, which helps prevent puffing and cracks during baking.
3) Don’t overbake
Cheesecake continues setting as it cools. Pull the bars when the center is still slightly jiggly. Overbaking leads to a dry texture and can cause surface cracks.
4) Cool slowly, then chill thoroughly
Cheesecake bars need time to set properly. Chilling makes the texture firm enough to slice cleanly, and the flavor actually improves after a few hours in the fridge.
5) Brûlée the sugar just before serving
The caramelized sugar top is at its best soon after torching. If it sits too long, humidity and fridge moisture can soften the shell and steal the crunch.
6) Use a thin sugar layer
Too much sugar can burn before it melts evenly. A light, even coating gives you the best glassy top.
7) Broiler backup method (if no torch)
Place sugared bars on a chilled tray and broil briefly, watching constantly. Rotate as needed for even caramelization. This works, but a torch gives you more control and less panic.
Troubleshooting Common Creme Brulee Cheesecake Bar Problems
Why did my cheesecake bars crack?
- Overmixed batter (too much air)
- Overbaked center
- Cooled too quickly
- Ingredients were too cold and needed extra mixing
Good news: the brûlée sugar topping hides a lot. This dessert is very forgiving. A crack under caramelized sugar still tastes fantastic.
Why is my filling lumpy?
The cream cheese was likely too cold. Next time, let it soften completely and beat it by itself before adding sugar and eggs.
Why didn’t my sugar harden?
You may have used too much sugar, torched unevenly, or the bars were too warm. Chill the bars well, use a thin sugar layer, and torch until the sugar is fully melted and amber.
Why is my crust soggy?
Usually this happens when the crust was not pre-baked, the bars were stored while still warm, or condensation formed in the container. Always cool completely before covering and refrigerating.
Storage, Make-Ahead, and Food Safety
How to store
Store the bars covered in the refrigerator. For the best texture, keep the cheesecake bars plain and add the brûlée topping just before serving. The untopped bars stay great for about 3 to 4 days.
Can you make them ahead?
Yes, and they are excellent for make-ahead baking. Bake the bars the day before, chill overnight, then torch the sugar shortly before serving. This gives you better texture and cleaner slices.
Can you freeze them?
Yes. Freeze the bars without the brûlée topping. Wrap tightly and store in an airtight container. Thaw in the refrigerator overnight, then add sugar and torch before serving.
Food safety notes (worth repeating)
Because this dessert contains cream cheese, eggs, and dairy, keep it refrigerated and avoid leaving it out too long. If the bars sit at room temperature for a party, follow the usual dairy-dessert safety rule: do not leave them out for more than about 2 hours (or 1 hour in very hot conditions). Keep your refrigerator at 40°F or below.
Easy Variations You Can Try
Vanilla Bean Luxe
Use vanilla bean paste instead of extract for a deeper flavor and those pretty vanilla specks.
Espresso Creme Brulee Cheesecake Bars
Add 1 to 2 teaspoons espresso powder to the filling. Coffee and caramelized sugar are best friends.
Citrus Twist
Add 1 teaspoon finely grated orange zest or lemon zest to the filling for brightness.
Berry Finish
Top with fresh raspberries or strawberries after torching. The tart fruit cuts the richness beautifully.
Shortcut Version
If you want an ultra-fast version, some bakers use a cookie-mix crust and toffee topping instead of torching sugar. It is less traditional, but still delicious and party-friendly.
Serving Ideas
These bars are rich, so smaller squares are usually perfect. Serve them:
- At holiday dessert tables
- For birthdays and dinner parties
- As a make-ahead dessert for potlucks
- With coffee or espresso after dinner
- With a spoonful of whipped cream and fresh berries
If you want to be extra dramatic (recommended), torch the sugar in front of guests. It is dessert and a tiny cooking show.
Conclusion
This Creme Brulee Cheesecake Bars Recipe is the kind of dessert that feels fancy without being fussy. You get the creamy tang of cheesecake, the buttery crust of classic bars, and the crackly caramel top of crème brûlée in one easy-to-serve pan. It is a crowd-pleaser, a make-ahead hero, and a very convincing argument for owning a kitchen torch.
The biggest secrets are simple: soften your ingredients, mix gently, don’t overbake, chill thoroughly, and brûlée the sugar right before serving. Do that, and you will get clean slices, smooth filling, and that satisfying caramel crunch every time.
Bake a batch once, and you will understand why people suddenly volunteer to “help” in the kitchen when dessert is involved.
Research & Editorial Note
This article was written by synthesizing techniques and recipe patterns from multiple reputable U.S. cooking and food-safety sources, including Allrecipes, Food Network, Sally’s Baking Addiction, Better Homes & Gardens, Martha Stewart, Betty Crocker, Cooking Classy, Handle the Heat, Serious Eats, Simply Recipes, Southern Living, FoodSafety.gov, and Ask USDA. The recipe here is an original, practical home-baker version based on those shared best practices.
Real-World Baking Experiences With Creme Brulee Cheesecake Bars (Extended Notes)
One of the most common experiences people have with Creme Brulee Cheesecake Bars is being surprised by how manageable they are. “Cheesecake” sounds like a project. “Crème brûlée” sounds like a second project. Put them together and it sounds like a weekend retreat with a pastry chef and a soundtrack of dramatic violin music. But in bar form, the process is much friendlier. The crust is quick, the filling is simple, and the torching step feels more fun than difficult once you try it.
Another very relatable experience: the first batch teaches patience. Home bakers often want to slice too soon because the bars look set after cooling on the counter. Then they lift the slab and realize the middle is still a little too soft. Chilling makes all the difference. After a full chill, the texture transforms from “cheesecake pudding” to “clean, creamy bars.” This is one of those recipes that rewards waiting, even if your kitchen smells incredible and your willpower is being tested.
There is also the torch moment, which tends to create instant kitchen confidence. Even people who feel nervous about baking usually enjoy this part. You sprinkle on sugar, pass the flame over the top, and suddenly the surface goes glossy, bubbly, and amber. It feels like a magic trick the first time. Then the sugar hardens, and you realize you just made something that looks like it came from a bakery display case. It is a great “I can actually do this” recipe for newer bakers.
Experienced bakers, on the other hand, usually start tweaking after the first successful batch. Vanilla bean paste becomes a favorite swap. Some add citrus zest for brightness. Others slice the bars smaller and serve them on a platter with berries for a party. A few people even make a “dessert board” with these bars, chocolate-covered strawberries, and mini cookies. They are versatile enough to be dressed up or kept simple.
One practical lesson people learn quickly is to torch only what they plan to serve. The caramel top is best fresh. If you brûlée the whole batch and refrigerate it overnight, the sugar can soften. It still tastes great, but that crisp crack may fade. A smarter move is to keep the bars chilled, torch a few at a time, and bring out fresh ones as needed. That way every serving gets the full crème brûlée experience.
These bars also tend to become a “signature dessert” for people. They travel well, slice neatly, and feel more special than standard brownies or cookies. Once someone brings them to a holiday dinner or office party, they usually get requests to bring them again. That is both a compliment and a trap, because now you are the crème brûlée cheesecake bar person. (Not the worst reputation, honestly.)
Finally, the biggest experience shared by almost everyone is this: the recipe gets easier and better the second time. The first batch teaches the texture cues. The second batch gives you confidence. By the third batch, you are casually caramelizing sugar like it is no big deal and explaining to other people why room-temperature cream cheese matters. That is when you know a recipe has truly earned a place in your rotation.


