Table of Contents >> Show >> Hide
- Why an Old Bunk Bed Makes a Great DIY Bench
- What Parts of the Bunk Bed Can Be Reused?
- Before You Start: Smart Planning Matters
- Tools and Materials You May Need
- How to Build a Bench From an Old Bunk Bed
- Best Finishes for a Bunk Bed Bench
- Where This Bench Works Best
- Common Mistakes to Avoid
- Experience and Lessons Learned From Making a Bench From an Old Bunk Bed
- Conclusion
Some DIY projects are practical. Some are charming. And some let you look at a bulky old piece of furniture and say, “Nice try, landfill, but not today.” Turning a bench from an old bunk bed is one of those rare upcycling wins that checks every box: it saves wood, creates useful seating, and gives a once-forgotten frame a second life with a lot more personality than it had when it was busy hosting top-bunk arguments.
If you have an old wooden bunk bed tucked in a garage, leaning dramatically in a basement, or taking up precious square footage in a spare room, you may already own most of the material needed for a beautiful bench. Headboards, footboards, side rails, ladder pieces, and slats can all be repurposed into a sturdy seat for an entryway, mudroom, porch, covered patio, or even the foot of a bed. With smart planning and a little sanding dust in your hair, you can create a custom piece that feels intentional rather than improvised.
This guide walks through how to transform a bunk bed into a bench, what parts are worth saving, how to make the final piece strong and comfortable, and what finishing options work best. It also covers the little decisions that separate a bench with “rustic charm” from one that looks like it lost a fight with a circular saw.
Why an Old Bunk Bed Makes a Great DIY Bench
A bunk bed is basically a furniture kit waiting for a better life. Most wooden models already include long rails, vertical posts, slats, and decorative panels. Those components naturally lend themselves to bench building because you already have structural pieces for a back, arms, supports, and seat framing.
One of the biggest advantages of using an old bunk bed is that the design can guide the style of the finished bench. If the bed has turned spindles, carved posts, beadboard panels, or simple shaker lines, those details can become the character of the bench. A plain pine bunk bed can become a clean farmhouse bench. A more traditional frame can turn into an entry bench with cottage charm. And if the bed is worn in a good way, you may end up with a reclaimed wood bench that looks delightfully collected rather than freshly assembled.
There is also the budget factor. Since the main lumber is already in your possession, the cost often comes down to screws, wood glue, sandpaper, filler, primer or stain, and maybe a cushion. In other words, this project is very friendly to people who enjoy making furniture but do not enjoy making repeated trips to the lumber aisle while holding a phone calculator and whispering, “Why is oak acting like it owns the place?”
What Parts of the Bunk Bed Can Be Reused?
Headboards and Footboards
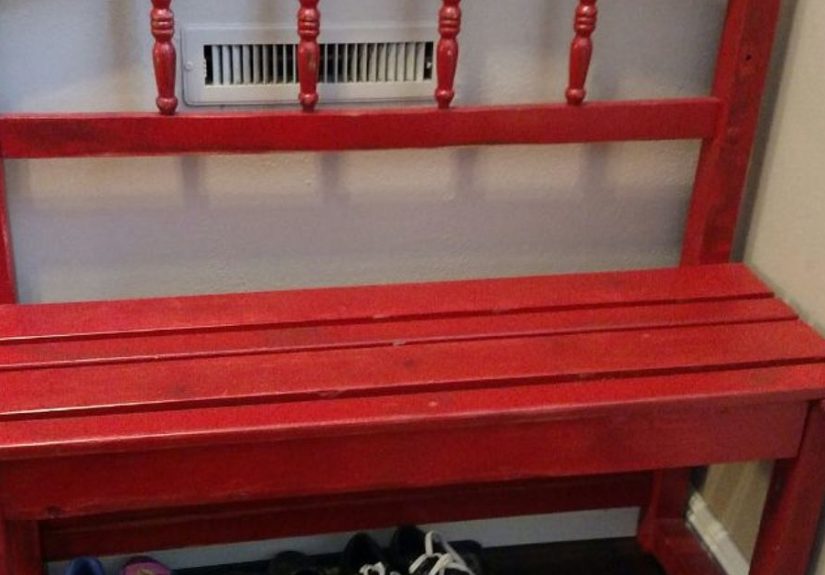
These are the stars of the project. A headboard often becomes the back of the bench, while a footboard can be cut and reused as the sides or arms. If the bunk bed has two matching end panels, you have even more flexibility. One panel can become the bench back and the other can be trimmed into two arm sections.
Side Rails
Long side rails are ideal for creating the seat frame, lower stretchers, or hidden structural supports. They are already designed to span a distance and handle weight, which makes them valuable in a bench conversion.
Slats
Slats can become the bench seat, a lower shelf, or backing supports beneath a cushion. They are especially useful if you want a slatted bench design or a quick way to fill the seat area without buying additional boards.
Ladder Pieces and Guardrails
These smaller parts can be reused as braces, arm details, or decorative trim. Sometimes the ladder rungs can even become a lower shoe shelf if you are building a mudroom bench.
Before You Start: Smart Planning Matters
Before you unscrew everything like a reality-show carpenter with five minutes left on the clock, inspect the bunk bed carefully. Check for cracks, rot, warping, insect damage, and loose joints. If the frame wobbled back when it was still a bed, it will not magically become trustworthy because you call it a bench.
Measure every part before disassembly and sketch a plan. Most DIY bunk bed bench projects work best at roughly these dimensions:
- Seat height: about 17 to 18 inches
- Seat depth: about 16 to 20 inches
- Bench width: depends on your available bed parts, but 36 to 60 inches is common
- Back height above the seat: usually 14 to 20 inches for comfort and proportion
If the bunk bed is painted and may date back to before 1978, pause and think safety first. Older painted furniture may contain lead-based paint. That means you should test first or use lead-safe work practices instead of jumping straight into aggressive sanding. A stylish bench is great. A cloud of dangerous dust is not a design trend.
Tools and Materials You May Need
- Drill and driver bits
- Circular saw, miter saw, or jigsaw as needed
- Orbital sander and sanding blocks
- Wood screws
- Wood glue
- Clamps
- Wood filler
- Primer and paint, or stain and clear topcoat
- Measuring tape and square
- Safety glasses, hearing protection, and dust mask or respirator
If the original hardware is in good condition, you may be able to reuse some of it. Still, fresh fasteners are often worth it for long-term stability. Pilot holes are also your friend, especially with older wood that can split if you bully it with screws.
How to Build a Bench From an Old Bunk Bed
1. Disassemble the Bed Carefully
Take the bunk bed apart slowly and label pieces as you go. Separate the best boards from the merely “interesting” ones. Keep all hardware until the project is complete because sometimes a bracket or bolt turns out to be surprisingly useful.
2. Choose the Best Back Panel
Select the most attractive headboard or end panel for the bench back. This piece will define the look of the finished project. If it has decorative spindles or panels, center them visually so the bench feels balanced.
3. Create the Bench Sides
Cut a footboard or second end panel into two matching side sections. These become the bench arms and side supports. Dry-fit them against the back panel to make sure the proportions feel right. Too tall, and the bench looks stiff. Too short, and it starts to resemble a furniture misunderstanding.
4. Build a Strong Seat Frame
Use side rails or other solid lumber from the bunk bed to build a rectangular seat frame. Attach it securely between the two side pieces and the back. This is the structural heart of the bench, so do not rely on decorative pieces alone. Use glue plus screws for strength, and check for square before fully tightening everything.
5. Add Seat Supports
Install cross braces beneath the seat area. Depending on the width of your bench, you may need one center support or more. This step matters because a bench is supposed to hold people, not merely inspire them.
6. Install the Seat
You can top the frame with slats from the bunk bed, a solid wood panel, or several boards fastened side by side. A slatted seat feels more casual and cottage-like. A solid seat looks more polished and works especially well if you plan to add a cushion.
7. Reinforce the Lower Structure
Add stretchers near the bottom front and bottom sides if the design allows. These low horizontal supports reduce wobble and make the bench feel planted. If you want extra storage, this is the perfect time to add a lower shelf for baskets, shoes, or folded throws.
8. Fill, Sand, and Smooth
Fill old bolt holes, dents, and mismatched hardware openings with wood filler if you want a cleaner finish. Then sand thoroughly. For most projects, start with a medium grit to remove roughness and old finish, then work toward a finer grit for a smooth final surface. Sand with the grain where possible, and switch to hand sanding for grooves, spindles, and details.
9. Finish the Bench
For a painted bench, use primer first, especially if the wood has knots, uneven coloration, or old stain. For a stained bench, make sure the surface is stripped and sanded evenly so the stain absorbs consistently. Then protect the piece with an appropriate topcoat. Indoor benches can use furniture-grade clear finishes, while outdoor or porch benches need products rated for exterior exposure.
10. Add Comfort and Style
A bench cushion instantly changes the vibe. A thick neutral cushion makes the piece feel polished and inviting, while a patterned fabric can lean coastal, farmhouse, vintage, or traditional. Add pillows if you want, but maybe stop before the bench becomes emotionally unavailable as a seating option.
Best Finishes for a Bunk Bed Bench
Painted Finish
A painted bench is great for mixed wood, patched areas, or heavily repaired surfaces. White, black, sage green, navy, and warm greige all work beautifully. Paint also helps unify parts if your bunk bed includes wood pieces with slightly different tones.
Stained Finish
If the wood grain is attractive, staining is worth considering. Medium walnut, provincial, weathered oak, and natural finishes are popular choices. A clear protective coat on top helps the bench stand up to everyday wear.
Distressed or Layered Finish
If your project leans vintage or farmhouse, a lightly distressed paint treatment can enhance the repurposed look. The key word is lightly. You want “character,” not “survived a barn collapse.”
Exterior Finish
If the bench will live on a covered porch or in an outdoor zone, use exterior-rated primer, paint, stain, or topcoat. Moisture, temperature swings, and sunlight are tough on wood furniture, and the wrong finish will fail faster than a folding chair at a family reunion.
Where This Bench Works Best
- Entryway: Perfect for putting on shoes and dropping bags
- Mudroom: Add baskets underneath for practical storage
- Foot of the bed: A stylish way to reuse bedroom furniture in the same room
- Covered porch: Charming and functional with the right finish
- Reading nook: Add cushions and make it cozy
- Garden room or sunroom: A reclaimed bench feels right at home here
Common Mistakes to Avoid
Ignoring Structural Support
A bed frame can provide beautiful parts, but you still need bench-specific support beneath the seat. Add braces, stretchers, and center support where needed.
Skipping Surface Prep
Old furniture almost always needs more prep than expected. If you rush past cleaning, sanding, or filling, the final finish will tell on you.
Using Interior Finish Outdoors
If the bench is going near moisture or sun, choose products made for exterior use. Indoor finishes often break down too quickly outside.
Forgetting Comfort
A beautiful bench that is awkward to sit on becomes decor with commitment issues. Keep seat height, depth, and back angle in mind.
Experience and Lessons Learned From Making a Bench From an Old Bunk Bed
One of the most interesting things about making a bench from an old bunk bed is how quickly the project shifts from demolition to design. At first, the frame just looks like a pile of outdated parts with too many bolts and not enough dignity. Then you start laying the pieces on the floor, turning the headboard sideways, holding a rail under it, and suddenly you can see the bench hiding in plain sight. That moment is one of the best parts of the whole project.
In real-world DIY experience, the biggest surprise is usually not the cutting or assembly. It is the prep work. Old bunk beds have stories, and those stories tend to show up as scratches, sticker residue, mystery dents, uneven finish, and hardware holes in places that make absolutely no sense for a bench. Good results come from accepting that prep is not the boring part of the project. Prep is the project. Once you clean the wood, repair damage, sand everything evenly, and test the layout, the build becomes much more straightforward.
Another lesson people often learn is that reclaimed furniture wood has personality. Some boards are perfectly straight. Others behave like they have been storing grudges since 2009. That means flexibility matters. Maybe the original plan called for using slats as the seat, but one is warped beyond reason. Fine. Use the best two for a lower shelf and cut a new seat panel instead. A successful upcycling project is not about forcing every original part back into service. It is about using the best parts wisely and letting the finished piece look intentional.
There is also a certain satisfaction in preserving familiar details. Maybe the bed had rounded posts, beadboard, or simple rails that remind you of a childhood room, a lake house, or your first apartment with furniture that had already lived several lives. When those features show up in the finished bench, the piece feels layered and personal. It is no longer just a DIY bench. It is a transformation with a backstory.
Practical experience also teaches that comfort matters more than expected. It is easy to focus on getting the back panel attached and the finish just right, but the seat depth and height determine whether people actually use the bench. A difference of an inch or two can change everything. The best outcome is a bench that looks custom and also gets used every day, whether for pulling on boots, stacking throw pillows, or catching that one quiet cup of coffee before the house wakes up.
Finally, this project tends to remind people that the most memorable furniture is not always the most expensive. A bench from an old bunk bed has texture, history, and a handmade quality that store-bought pieces often struggle to imitate. It proves that with patience, thoughtful design, and a willingness to sand just a little more than you originally planned, discarded furniture can become something beautiful, durable, and genuinely useful.
Conclusion
Building a bench from an old bunk bed is one of those DIY furniture projects that feels practical and creative at the same time. You reduce waste, save money, and end up with a custom bench that can fit your style far better than many off-the-shelf options. The key is to combine the charm of the original bed parts with solid bench construction, careful surface prep, and a finish that suits where the piece will live. Whether you prefer a painted cottage look, a stained farmhouse finish, or a porch-ready outdoor bench, this project can turn old lumber into something worth keeping for years.