
Table of Contents >> Show >> Hide
- Quick Jump
- Before you start: the “pro” formula in one minute
- Step 1: Pick a vibe (and a simple color plan)
- Step 2: Gather the right tools (no, you don’t need 47 gadgets)
- Step 3: Prep your vase and condition your stems
- Step 4: Build a “stay-put” foundation
- Step 5: Start with greenery to set the shape
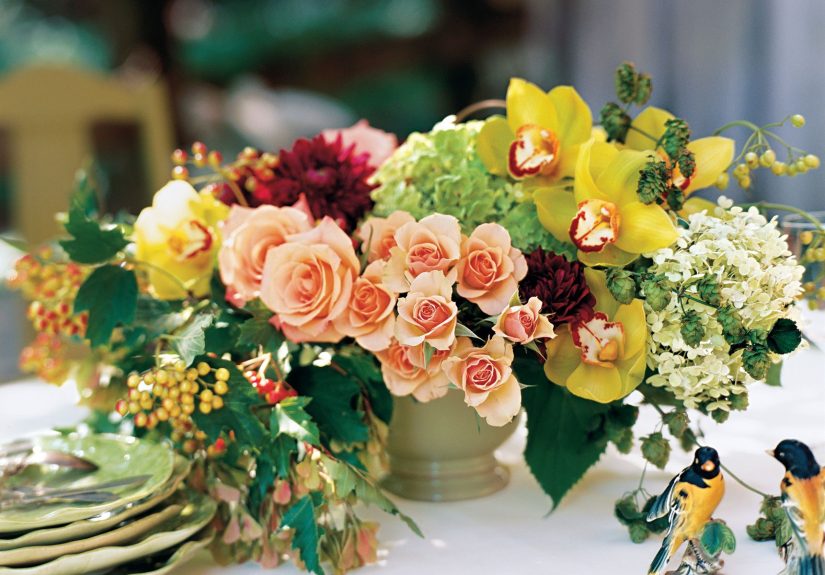
- Step 6: Place your focal flowers like anchors
- Step 7: Add texture, then filler (and protect your negative space)
- Step 8: Finish with a 360° checkand keep it fresh
- Two fast examples (grocery store edition)
- Conclusion: You’re eight steps away from “Who made this?!”
You don’t need a flower shop apron, a dramatic slow-motion montage, or a secret handshake with the roses.
You just need a plan, a little stem prep, and a few “pro” tricks that make grocery-store blooms look like
they have a talent agent.
Below are eight simple steps for a polished vase arrangement (plus the real-life lessons people learn the
hard wayso you don’t have to).
Before you start: the “pro” formula in one minute
Professional-looking flower arranging is less about “having an eye” and more about making a few smart
decisions on purpose:
- Structure: Something holds stems where you place them (tape grid, frog, or a tight opening).
- Hierarchy: Big showy blooms (focal) get the starring roles; everything else supports them.
- Balance: Even distribution, varied height, and a little breathing room (a.k.a. negative space).
- Longevity: Clean water + fresh cuts + cool placement = flowers that don’t quit early.
Keep those four ideas in your back pocket and you’ll be “accidentally” good at floral design.
Step 1: Pick a vibe (and a simple color plan)
Decide what you want the arrangement to do: feel bright and casual, moody and modern, romantic,
or “I definitely have my life together.” When in doubt, use one of these foolproof color strategies:
- Monochrome: Different shades of one color (all whites, all pinks, all yellow).
- Analogous: Neighbor colors (peach + coral + soft pink, or lavender + blue + periwinkle).
- High-contrast: Two opposites with restraint (white + deep purple, yellow + navy accents).
Pro tip: Limit yourself to 2–3 flower types plus greenery. The minute you add “just one more”
variety, your bouquet can start to look like it’s trying out for a reality show.
Step 2: Gather the right tools (no, you don’t need 47 gadgets)
Here’s the short list that makes arranging easier and your flowers last longer:
- A clean vase (the unsung hero of long-lasting blooms)
- Sharp snips or pruners (dull scissors can crush stemsrude)
- Floral tape (optional, but it’s basically “training wheels” for perfect spacing)
- Flower food (the packet is great; DIY is fine if you mix correctly)
- A bucket or deep container for conditioning stems
Optional upgrades: a flower frog (great for low, modern designs) or a simple
straight-sided vase when stems need support.
Step 3: Prep your vase and condition your stems
If flower arranging had a “secret,” it would be this step. Great arrangements start with flowers that can drink.
Do this first (it’s quick, promise)
- Wash the vase with hot soapy water and rinse well.
- Strip leaves below the waterline (submerged leaves rot and cloud the water faster).
- Recut stems 1/2–1 inch at a diagonal. If you can, cut under running water or in a bowl of water.
- Hydrate in a deep bucket for 20–60 minutes before arrangingespecially if flowers traveled far.
- Add flower food to the vase water per instructions.
The payoff: cleaner water, less bacteria, and blooms that stay perky long enough to earn compliments from
people who don’t usually compliment anything.
Step 4: Build a “stay-put” foundation
Pros rarely just drop flowers into a wide-open vase and hope for the best. Give your stems a little structure:
Option A: The floral tape grid (easy and shockingly effective)
Crisscross floral tape over the vase opening to create little squares (like tic-tac-toe, but prettier).
Each stem gets its own “parking spot,” so the arrangement stays balanced instead of collapsing into a floral pile-up.
Option B: A flower frog or pin holder
Perfect for low, modern arrangements and heavier blooms. It’s also the closest you’ll get to feeling like a
floral architect.
If you’re using floral foam for a specific design, soak it properly and use it thoughtfullyespecially for
arrangements meant to last more than a day.
Step 5: Start with greenery to set the shape
Greenery is your framework. It’s the difference between “a bouquet in a vase” and “a composed arrangement.”
- Create your outline: Decide if you want a rounded dome, a loose meadow look, or something tall and airy.
- Use a crisscross approach: Cross stems as you place them to create an internal “net” that supports everything else.
- Vary direction: A little asymmetry looks natural; perfect symmetry can look stiff.
Good beginner greenery: eucalyptus, ruscus, salal, or fern. If you can’t pronounce it at the store,
it will probably look great in your vase.
Step 6: Place your focal flowers like anchors
Focal flowers are the “main characters.” Think roses, peonies, hydrangea, lilies, sunflowers, or big dahlias.
Place them strategically instead of randomly.
Anchor placement that works
- Start around the perimeter: Add a few focal blooms near the edges to establish width.
- Keep heights varied: One a bit taller, one medium, one slightly lowerinstant depth.
- Use odd numbers: Three or five focal blooms often looks more organic than two or four.
If your vase is for a dining table, keep the overall height low enough that people can still see each other
without playing floral peekaboo.
Step 7: Add texture, then filler (and protect your negative space)
This is where your arrangement becomes “pro.” Supporting blooms add movement; filler makes it feel full without
feeling heavy.
Texture flowers (the style assistants)
Examples: snapdragons, lisianthus, alstroemeria, stock, mums, scabiosa. Add them between focal flowers to
break up big shapes and create rhythm.
Filler flowers (the soft background)
Examples: baby’s breath, waxflower, Queen Anne’s lace, small asters. Use them to fill small gapsnot to bury
the stars.
A simple shopping shortcut
If you like formulas, try a ratio approach like 3 focal + 5 texture + 8 filler (adjust up or down
based on your vase size). It’s not about perfect mathit’s about balanced variety.
Finally: step back and look for negative space. That little bit of open air is what keeps the
arrangement from looking like it’s wearing five sweaters at once.
Step 8: Finish with a 360° checkand keep it fresh
Pros don’t arrange from one angle and call it a day. Do a quick “spin test.”
The 60-second finishing routine
- Rotate the vase: Balance the distribution so one side isn’t doing all the work.
- Adjust height: Trim one or two stems if the silhouette feels lopsided.
- Clean the rim: Wipe stray leaves or drips (tiny detail, big upgrade).
How to make the arrangement last longer
- Keep it away from direct sun, heaters, and drafts.
- Refresh water and recut stems every couple of days if possible.
- Remove fading blooms promptly (one wilted flower can make the whole thing look tired).
- Keep flowers away from ripening fruit (ethylene gas can speed aging in many blooms).
Two fast examples (grocery store edition)
Example 1: Bright, happy, “kitchen counter glow-up”
- Focal: 5 yellow roses
- Texture: 5 white mums or alstroemeria
- Filler: 1–2 stems waxflower
- Greenery: 4–6 eucalyptus stems
Shape: rounded, slightly loose. Start with eucalyptus, anchor roses around the perimeter, then tuck in
mums and waxflower to soften gaps.
Example 2: Modern and minimal (looks expensive, costs less)
- Focal: 3–5 white lilies or big blooms (your choice)
- Line/structure: 3 stems snapdragons or branches
- Greenery: 3–5 ruscus or fern fronds
Shape: taller, airy, with intentional negative space. Use a tape grid or a narrow vase opening so stems
stay where you place them.
Conclusion: You’re eight steps away from “Who made this?!”
Arranging flowers like a pro isn’t magicit’s structure, layering, and a little stem care. Pick a clear color
vibe, prep your vase and flowers so they can hydrate, build a simple foundation (tape grid is the MVP),
then arrange in layers: greenery first, focal blooms next, texture for movement, filler for softness.
Finish with a 360° check, keep it cool, and refresh water to extend vase life.
Real-world experience (the part tutorials don’t always warn you about)
The first time most people try a “pro” flower arrangement, it usually starts with confidence and ends with
one suspiciously short stem and a vase that looks like it’s having an identity crisis. That’s normal.
The biggest lesson is that planning beats improvising. If you buy too many different flower
types, your arrangement can look busy fastlike it can’t decide whether it’s elegant, wild, or headed to
prom. The simple fix is choosing fewer varieties and repeating them throughout the design. Repetition reads
as “intentional,” which is fancy code for “I meant to do that.”
Another real-life moment: the “why are my flowers flopping?” mystery. Usually it’s not the flowers’
faultit’s the container. Wide-mouth vases are beautiful, but they’re also chaos magnets. A tape grid (or even
a tighter opening) changes everything because it keeps stems separated and supported. People also discover
the hard truth that flowers are basically tiny athletes: if you don’t hydrate and recut them, they can’t perform.
That quick diagonal trim and a clean vase with fresh water is the difference between “lasting all week” and
“looking dramatic by tomorrow afternoon.”
There’s also the “one-side wonder” problem: you arrange the front perfectly, then someone walks around the
island and sees the backaka the floral equivalent of an unfinished closet. The fix is simple: rotate as you
build. Add a stem, turn the vase a little, add the next stem, turn again. Even a quarter turn every few stems
helps distribute weight and color.
Finally, most beginners learn to stop stuffing every gap. It’s tempting to fill every open space, but a little
negative space is what makes an arrangement look professional and breathable. Think of it like good interior
design: you don’t push all the furniture against one wall and call it cozy. Give the blooms room to be themselves.
If you do end up with awkward gaps, use filler lightly and place it in multiple small spots rather than one giant
“filler cloud.” With a couple tries, you’ll start seeing shapes and balance fasterand suddenly you’ll be the person
friends text when they want centerpieces that look “effortless.”


