
Table of Contents >> Show >> Hide
- Why a DIY Table Centerpiece Works So Well
- Step 1: Decide What Your Centerpiece Needs to Do
- Step 2: Pick a Style Direction Before You Start Shopping
- Step 3: Shop Your House First
- Step 4: Gather the Right Materials
- Step 5: Build the Centerpiece in This Simple Order
- Five Easy DIY Table Centerpiece Ideas Anyone Can Pull Off
- How to Make Your DIY Centerpiece Look More Expensive
- Common DIY Table Centerpiece Mistakes to Avoid
- Centerpiece Safety and Care Tips
- My Real-Life Experience With DIY Table Centerpieces
- Final Thoughts
If your table looks a little too “waiting room” and not nearly enough “wow, you really have your life together,” a DIY table centerpiece can fix that fast. The good news? You do not need a florist’s degree, an unlimited craft budget, or the patience of a monk. You just need a few smart styling choices, a container that is not sad, and the confidence to put a lemon next to a candle and call it intentional.
A beautiful DIY table centerpiece does more than decorate a dining table. It sets the mood, gives your room personality, and tells guests, “Yes, I did think about this, and yes, you should be impressed.” Whether you are decorating for a dinner party, holiday meal, bridal shower, birthday brunch, or just a Tuesday night when your takeout deserves better, the right centerpiece can make your whole space feel polished.
In this guide, I’ll walk you through simple, practical steps to create a centerpiece that looks stylish without becoming a full-time job. We’ll cover how to choose a concept, gather materials, build the arrangement, avoid common mistakes, and stretch a small budget into something that looks delightfully expensive. Think of it as centerpiece confidence training, minus the awkward trust fall.
Why a DIY Table Centerpiece Works So Well
A table centerpiece creates an instant focal point. It gives the eye somewhere to land and makes the table feel finished, even if the rest of the room is still doing its best impression of “organized chaos.” That is why centerpiece ideas work so well across seasons and styles. You can go floral, rustic, modern, minimal, festive, edible, or wildly creative and still end up with something charming.
Another reason DIY table centerpiece ideas are so popular is flexibility. You can make one from fresh flowers, branches, fruit, herbs, candles, bowls, trays, vases, or objects you already own. A centerpiece can be dramatic and lush, or quiet and elegant. It can run down the full length of the table or sit neatly in one low container. It can whisper sophistication or shout, “I glued pinecones to a wreath base and somehow made it fashionable.”
Most importantly, making your own centerpiece means you control the budget. Grocery store flowers, clipped greenery, thrifted vessels, and seasonal produce can go a very long way when arranged thoughtfully. Fancy is often less about price and more about editing.
Step 1: Decide What Your Centerpiece Needs to Do
Start with the occasion
Before you buy a single stem or candle, ask yourself one basic question: what is this centerpiece for? A holiday table centerpiece might call for warm textures, layered color, and seasonal materials. A summer dinner party might look better with light greenery, citrus, and airy glassware. A wedding shower may want softer tones and flowers. A casual weeknight dining table might only need a small arrangement that adds color without taking over the room like an attention-seeking peacock.
Think about table shape and size
A round table usually looks best with one centered arrangement. A rectangular table gives you more freedom: one larger piece, a row of bud vases, a tray with candles, or a garland-style centerpiece that runs down the middle. For smaller tables, keep the centerpiece compact. For long tables, use repetition rather than making one enormous arrangement that looks like it is applying for its own zip code.
Protect the conversation
One of the smartest decorating rules is also the simplest: do not block people from seeing each other. If guests have to lean left, right, and possibly sideways just to make eye contact, the centerpiece is too tall or too dense. Low and layered is often the sweet spot. It feels intentional, elegant, and much less likely to cause someone to knock over a water glass while trying to say hello.
Step 2: Pick a Style Direction Before You Start Shopping
When people say they are “bad at decorating,” what they usually mean is they started buying random pretty things with no plan. The fix is choosing a style direction first. You do not need a complex design thesis. You just need a lane.
- Modern: clean lines, sculptural branches, neutral vessels, fewer elements, strong shapes.
- Rustic: wood, herbs, greenery, baskets, stoneware, dried textures, natural tones.
- Classic floral: fresh flowers, greenery, candles, balanced symmetry, soft layering.
- Seasonal: lemons in summer, pumpkins in fall, evergreens in winter, tulips in spring.
- Minimal: one statement vase, a few stems, or grouped bud vases for quiet elegance.
Color matters too. Choose two or three dominant tones so the arrangement feels cohesive. Too many competing colors can make your table centerpiece look like it lost a fight with a craft store clearance bin. A limited palette almost always looks more expensive.
Step 3: Shop Your House First
Before heading to the store, do a quick “treasure hunt” around your home. Some of the best DIY table centerpiece ideas start with objects you already own.
Containers that work beautifully
- Glass vases
- Ceramic pitchers
- Bowls and compotes
- Wooden trays
- Mason jars
- Footed dishes
- Small planters
- Vintage tins or crocks
Fillers and decorative accents
- Fresh greenery from the yard
- Herbs like rosemary, mint, sage, or thyme
- Lemons, pears, apples, or artichokes
- Pinecones, acorns, branches, or moss
- Candlesticks or lanterns
- Fabric runners or linen napkins
- Books, risers, or trays for height
This step saves money, but it also gives your centerpiece character. A basic bouquet in a basic vase is nice. A loose bouquet in a ceramic pitcher on a tray with herbs and taper candles? That has a point of view. Suddenly your dining table decor says “stylish host” instead of “I panic-bought flowers at 4:47 p.m.”
Step 4: Gather the Right Materials
Now that you know your style, collect your materials. For a floral centerpiece, you usually need a vessel, flowers, greenery, scissors or floral snips, water, and optional support materials like floral tape or a grid across the vase opening. For a non-floral centerpiece, you might need a tray, candles, fruit, moss, decorative objects, or small bowls.
A smart beginner move is to mix one focal flower with filler flowers and greenery. For example, roses plus baby’s breath and eucalyptus. Or tulips with herbs and little bud vases. Or hydrangeas with branches and candles. If you are new to arranging, sticking to one color family keeps the whole centerpiece looking cohesive and calm.
Step 5: Build the Centerpiece in This Simple Order
- Place the vessel first. Set your vase, bowl, tray, or container in the center of the table and view it from all sides. This sounds obvious, but it saves you from building an arrangement that only looks good from one angle.
- Create the base. Add greenery, herbs, or branches first. This gives structure, volume, and shape without forcing your flowers to do all the heavy lifting.
- Add focal elements. Insert your largest blooms, candles, fruit, or statement objects next. These pieces create the main visual rhythm.
- Fill the gaps. Use smaller flowers, leaves, moss, or supporting pieces to soften transitions and hide awkward empty spots.
- Edit ruthlessly. Step back. Remove anything that feels random, too tall, or too crowded. Good centerpieces are arranged, but great centerpieces are edited.
That last step matters more than people think. Many DIY centerpieces go wrong because the maker keeps adding “just one more thing.” Friend, one more thing is often the villain.
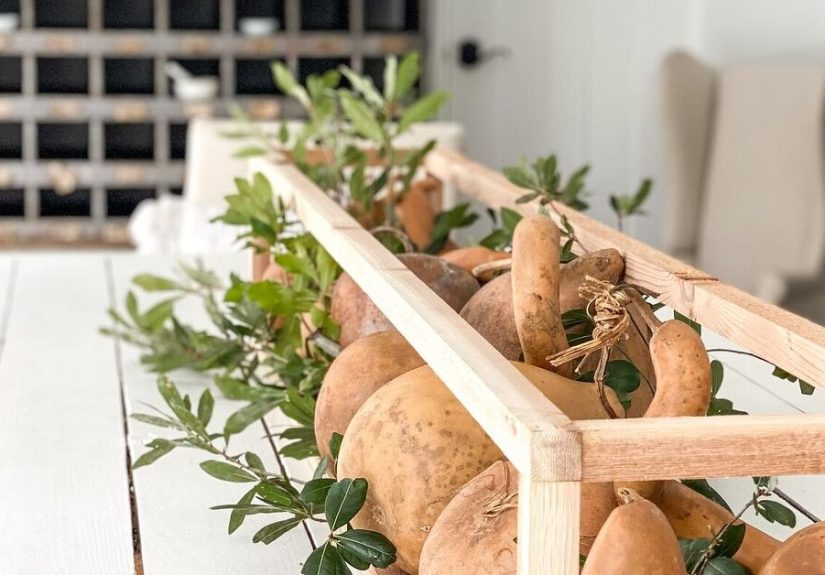
Five Easy DIY Table Centerpiece Ideas Anyone Can Pull Off
1. Grocery Store Flowers + Greenery
This is the easiest floral centerpiece formula and one of the most reliable. Pick one bunch of flowers, one bunch of greenery, and one simple container. Trim the stems, remove leaves below the water line, arrange the greenery first, then place the flowers in a loose shape. Done. It is budget-friendly, quick, and far more polished than shoving flowers straight into the vase and hoping for emotional support.
2. Candles + Fruit on a Tray
Take a long tray, add a mix of candleholders, then tuck lemons, pears, or seasonal produce around them. This style works especially well for casual entertaining because it feels lush without being fussy. Keep the arrangement low, leave breathing room, and do not overcrowd the tray.
3. Herb Garland Centerpiece
For a natural look, make a simple garland with rosemary, eucalyptus, sage, or other fresh herbs. Lay it down the center of the table and weave in a few candles or tiny flowers. It smells amazing, looks organic, and feels effortlessly charming. It is one of those centerpiece ideas that quietly wins the room.
4. Grouped Bud Vases
If one large arrangement feels intimidating, use several small bud vases. Line them up, cluster them on a tray, or space them evenly down a long table. Bud vases are especially great for intimate dinners because they add color without blocking conversation. They are also forgiving. If one little vase looks odd, just pretend it is “part of the composition.”
5. Bowl of Seasonal Objects
A beautiful bowl can do a lot of work. Fill it with moss balls, mini pumpkins, artichokes, citrus, ornaments, pinecones, or flowering bulbs depending on the season. This is a strong option when you want a centerpiece that lasts longer than fresh flowers and requires almost no maintenance.
How to Make Your DIY Centerpiece Look More Expensive
You do not need luxury materials. You need restraint and contrast.
- Repeat elements: repeating color, vessel shape, or flower type makes the arrangement feel intentional.
- Mix textures: pair smooth glass with rough greenery, soft flowers with structured branches, or polished metal with fruit and foliage.
- Use negative space: not every inch needs filling. Breathing room adds sophistication.
- Group smaller objects: three bud vases on a tray often look better than one mediocre bouquet.
- Choose one standout feature: maybe it is the fruit, the colored glass, the dramatic branches, or the candlelight. Let one idea lead.
Also, clean your containers. Truly. Nothing ruins “elevated tablescape” energy faster than a cloudy vase or a tray wearing a visible dust layer like a sweater.
Common DIY Table Centerpiece Mistakes to Avoid
- Making it too tall: beautiful in photos, annoying in real life.
- Using too many colors: chaos is not a color palette.
- Overfilling the vase: crowded stems can look stiff and heavy.
- Ignoring scale: tiny centerpiece on a huge table equals visual loneliness.
- Forgetting practicality: a centerpiece should not interfere with serving dishes, place settings, or human beings.
- Skipping maintenance: wilted stems and murky water are not part of the design story.
Centerpiece Safety and Care Tips
If you use real candles, keep them well away from greenery, paper, linens, and anything else flammable. Never leave them burning unattended. If kids, pets, or trailing leaves are part of the scene, battery-operated candles are your best friend and honestly a lot less stressful.
For fresh flower centerpieces, change the water regularly, trim stems if needed, and remove any leaves that sit below the water line. If you are building ahead of an event, prep the vessel and decorative elements first, then add the freshest flowers closer to serving time. A centerpiece should look like it just arrived, not like it fought through a long emotional week.
My Real-Life Experience With DIY Table Centerpieces
I learned to love DIY table centerpieces the same way many people do: by underestimating them. Years ago, I thought a centerpiece was just a “nice extra,” something for people who fold cloth napkins into swans and casually own twelve matching candlesticks. Then I hosted a small dinner, stared at my empty table, and realized the room looked unfinished. Not messy, not ugly, just oddly blank. I grabbed a ceramic pitcher, clipped a few branches from the yard, added grocery store flowers, and lit a pair of candles. The difference was ridiculous. Same food, same table, same chairs, same mildly overcooked chicken. But suddenly the whole evening felt intentional.
Since then, I have made centerpieces for birthdays, holiday meals, spring brunches, and one highly ambitious dinner party where I briefly believed I could create a “simple elegant tablescape” in under ten minutes. Reader, I could not. But I did learn something useful: the best centerpieces are rarely the most complicated ones. The arrangements that got the most compliments were usually the easiest. A row of bud vases with single stems. A bowl of lemons and eucalyptus. A tray with glass hurricanes, rosemary, and pears. Meanwhile, the arrangement I once spent forever perfecting looked so overworked it practically needed a nap.
I also learned that materials behave differently in real homes than they do in dreamy inspiration photos. Tulips get dramatic. Branches have opinions. Candles drip when they feel like it. Herbs smell wonderful but can wilt faster than your confidence if you make them too far in advance. This is why I now build centerpieces in layers and leave myself room to adjust. I put down the tray first, test the scale, then add the bigger pieces before the delicate ones. It is less glamorous than dramatically tossing stems into a vase, but it works.
Another thing experience taught me is that guests notice warmth more than perfection. They do not inspect the symmetry of your flower angles like judges at a floral Olympics. They respond to mood. Candlelight, color, scent, texture, and a centerpiece that fits the table all make people feel welcome. That is the real magic. A good centerpiece is not just décor; it is atmosphere. It tells people they are somewhere cared for.
And yes, I have absolutely made mistakes. I have made centerpieces too tall, too busy, too fragile, too wide, and once so packed with leaves that the serving bowls had nowhere to land. But every bad arrangement taught me the same lesson: start simpler than you think you need to. You can always add one more stem. You can always tuck in another sprig of greenery. It is much harder to rescue a centerpiece that already looks like it swallowed the entire garden center.
Now my favorite approach is this: choose one clear idea, repeat it with confidence, and stop while it still looks fresh. That formula has saved me time, money, and a surprising amount of unnecessary hot glue. If you remember nothing else, remember this: the centerpiece that impresses people most is the one that feels relaxed, thoughtful, and perfectly at home on your table.
Final Thoughts
If you want your table to look more inviting, a DIY table centerpiece is one of the easiest wins in home decor. You do not need a giant budget or a professional setup. You need a clear idea, a few good materials, a practical sense of scale, and the willingness to stop before your arrangement turns into a very leafy cry for help.
Start simple. Shop your house. Mix natural texture with one or two statement details. Keep the centerpiece low enough for conversation, polished enough to feel special, and flexible enough to suit the season. Do that, and your dining table decor will look intentional, personal, and ready to impress.
In other words: your table is ready for its main character moment.


