
Table of Contents >> Show >> Hide
- Why a Birdbath Makes Such a Great Succulent Planter
- Before You Plant: The One Issue You Cannot Ignore
- Supplies You’ll Need
- How to Transform a Birdbath Into an Amazing Succulent Planter: Step by Step
- Where to Place Your Birdbath Succulent Planter
- Design Ideas That Make a Birdbath Planter Look Amazing
- Common Mistakes to Avoid
- How to Care for Your Succulent Birdbath Planter
- Example Planting Recipe
- Extra Experiences and Real-World Tips From Gardeners Who Try This Project
- Final Thoughts
There are two kinds of old birdbaths in this world: the ones still charming birds with splashy spa days, and the ones sitting in the yard looking like they’ve seen some things. If your birdbath belongs to the second group, congratulationsyou’re holding prime real estate for a gorgeous succulent planter.
A birdbath is almost weirdly perfect for succulents. It’s shallow, wide, sculptural, and already knows how to look dramatic in the garden. With the right prep, you can turn that faded basin into a low-maintenance showpiece packed with texture, color, and personality. Think rosettes, trailing stems, pebbled top dressing, and the kind of arrangement that makes visitors ask, “Wait… that used to be a birdbath?”
In this guide, you’ll learn exactly how to transform a birdbath into an amazing succulent planter, from choosing the right container setup to planting, styling, and keeping everything alive without turning your masterpiece into a mushy botanical tragedy.
Why a Birdbath Makes Such a Great Succulent Planter
Succulents and birdbaths are a surprisingly good match. Most succulents prefer fast-draining soil, modest watering, and containers that do not stay soggy. A birdbath’s shallow bowl naturally encourages a compact planting design, which works especially well for small rosette succulents, sedums, hens-and-chicks, and other shallow-rooted varieties.
The wide surface area also gives you room to create a miniature landscape instead of a plain old pot of plants. You can layer heights, mix shapes, add rock mulch, and create a centerpiece that looks part sculpture, part desert garden, part “I absolutely did mean to make my yard look this stylish.”
Another bonus is visibility. A birdbath sits up high, so your arrangement is easy to admire without crouching like you’re apologizing to your knees. On a patio, near an entryway, or tucked into a garden bed, it instantly becomes a focal point.
Before You Plant: The One Issue You Cannot Ignore
Drainage Is Everything
If you remember only one thing from this article, make it this: succulents hate wet feet. A birdbath may look like a dream planter, but if it holds water like, well, a birdbath, your succulents are headed for a soggy ending.
That means your first job is figuring out drainage. If the bowl already has a drainage hole, you’re in business. If it does not, you have two smart options.
Option 1: Drill Drainage Holes
If your birdbath is concrete, stone-like composite, or ceramic, you can often add drainage holes with the correct drill bit. A masonry or concrete bit is usually the right choice for these materials. Work slowly, support the bowl, and avoid rushing the process. One or more drainage holes in the lowest part of the basin can make the difference between thriving succulents and a tiny rot festival.
Option 2: Create a Hidden Pot-Within-a-Birdbath Setup
If drilling is not practical, use small nursery pots with drainage holes inside the birdbath basin. Nestle them in place, then disguise the setup with gravel, pebbles, or decorative stone. This gives your succulents proper drainage while preserving the look of a planted birdbath. It is also a great choice for renters, collectors of vintage pieces, or anyone who does not want to attack antique concrete with power tools on a Saturday afternoon.
What you should not do is rely on a thick layer of rocks alone at the bottom and hope for the best. Rocks may look helpful, but they do not replace true drainage.
Supplies You’ll Need
- An old or new birdbath
- Drill and masonry bit, if adding drainage holes
- Cactus or succulent potting mix
- Optional amendments like pumice, perlite, or coarse sand
- Small succulent plants
- Decorative gravel, pea gravel, or small stones
- Work gloves
- Trowel or scoop
- Screen mesh or landscape fabric to keep soil from washing out of the holes
How to Transform a Birdbath Into an Amazing Succulent Planter: Step by Step
1. Clean the Birdbath Thoroughly
Start by scrubbing away algae, dirt, mineral buildup, and anything else that suggests your birdbath has been moonlighting as a science experiment. Use water, a stiff brush, and mild soap if needed. Rinse well and let it dry fully.
If the birdbath is painted or sealed and the finish is flaking, remove loose material before planting. You want a stable, clean container, not one that sheds into the soil every time the weather changes moods.
2. Fix the Drainage Situation
Now deal with the non-negotiable part. Drill holes if you can. If you cannot, set up hidden nursery pots or inserts inside the basin. For drilled birdbaths, place a small piece of mesh over the hole so potting mix stays in place while water can still escape.
3. Add the Right Soil Mix
Standard potting soil is usually too dense for succulents. Use a cactus or succulent mix, or improve drainage by blending in perlite, pumice, or coarse sand. You want a gritty, airy mix that dries reasonably fast. Succulents are not looking for a spa mud treatment. They want a quick-draining home.
Fill the birdbath basin, leaving enough space at the top for planting and a decorative layer of gravel. If your basin is very shallow, do not overfill it. A little room helps you arrange plants without spilling soil everywhere like you’re on a chaotic gardening show.
4. Choose the Right Succulents
The best birdbath succulent planters usually combine plants with similar light and water needs. A few reliable choices include:
- Hens-and-chicks (Sempervivum): Great for shallow bowls and easy to divide.
- Sedum: Excellent for color, texture, and trailing edges.
- Echeveria: Rosette-shaped and beautiful, though some need winter protection.
- Jade-type succulents: Good for a little height in the center.
- Haworthia: Useful in bright light with some protection from harsh midday exposure.
- Kalanchoe and small aloe varieties: Great texture, but protect from cold.
For a balanced design, use the classic container formula: a taller centerpiece, a few mounding plants, and spillers around the edges. In succulent terms, that could mean a slightly upright aloe or jade in the middle, echeverias or hens-and-chicks around it, and sedum trailing near the rim.
5. Arrange Before Planting
Before you dig a single hole, set the plants on top of the soil to preview the design. This is where the magic happens. Move them around until the composition feels full but not crowded. Leave enough space for growth, especially if you are using varieties that produce offsets or spread outward over time.
A birdbath planter often looks best when it resembles a miniature landscape rather than a packed salad bar. Give each plant room to show off its shape.
6. Plant Carefully
Remove each succulent from its nursery pot, loosen the roots lightly if they are packed tight, and plant at the same depth it was growing before. Firm the soil gently around each plant. Do not bury the leaves, crowns, or stems more deeply than necessary.
If you’re working with cuttings, allow fresh cut ends to callus before planting. That extra patience helps reduce rot risk. Succulents are not in a hurry. They invented chill.
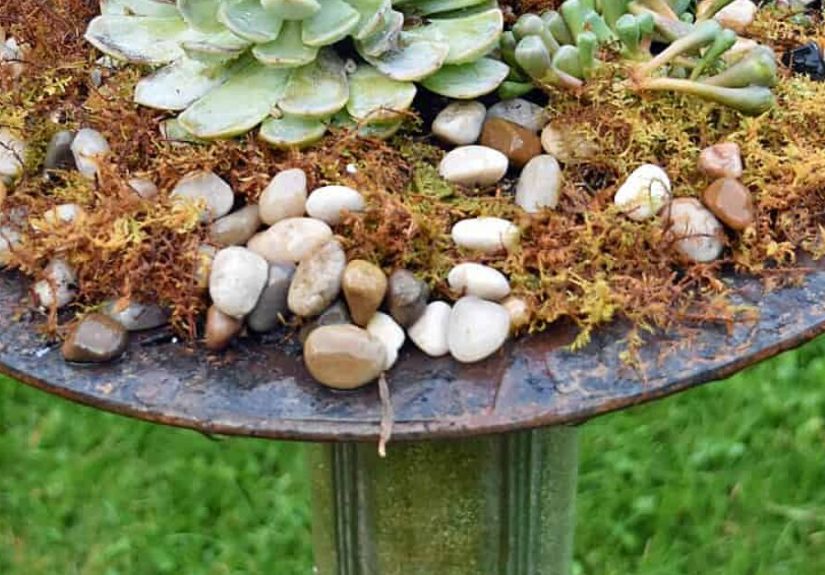
7. Top-Dress for Style and Function
Once planted, add a layer of pea gravel, crushed stone, or decorative pebbles over the soil surface. Top dressing makes the planter look polished, helps keep leaves from sitting directly on damp soil, and reduces soil splash during watering or rain.
This finishing layer is what pushes the project from “repurposed yard item” to “tiny designer desert garden.”
8. Wait Before Watering Heavily
After planting, resist the urge to drench everything like you’re blessing a ship at launch. If you disturbed roots or used cuttings, wait a short period before watering heavily. Then water lightly and let the mix dry before watering again.
Where to Place Your Birdbath Succulent Planter
Most succulents like abundant light, and many do best with around six hours of sun or bright conditions. But there is a catch: if your plants were grown in gentler nursery conditions or indoors, you need to acclimate them gradually to stronger outdoor sun. Move them into brighter light a little at a time to avoid scorch.
An ideal location is a bright patio, porch, courtyard, or garden bed where the planter gets morning sun and some protection from brutal afternoon heat, especially in very hot climates. In cooler climates, more sun may be perfect. In intense summer conditions, a little midday shade can save your arrangement from looking toasted.
Design Ideas That Make a Birdbath Planter Look Amazing
Create a Rosette Bowl
Fill the basin primarily with echeverias and hens-and-chicks in different sizes and colors. The repeated rosette shapes create a calm, intentional design that looks elegant and expensive, even if your birdbath came from the yard equivalent of a clearance bin.
Use a Desert Palette
Mix blue-green, silvery, dusty lavender, and chartreuse succulents for a soft Southwestern feel. Add pale gravel or decomposed granite-style top dressing for a clean finish.
Add a Cascading Edge
Use trailing sedum or string-like succulents along the rim so the planter softens over time. This is especially effective on pedestal birdbaths because the trailing plants draw the eye down and emphasize the shape.
Go Rustic and Weathered
If the birdbath is chipped or aged, lean into that vintage character. Pair it with weathered stone, moss-free gravel, and sculptural succulents. Not every garden project needs to look factory-fresh. Some of the best ones look like they have stories.
Common Mistakes to Avoid
Overwatering
This is the big one. Water thoroughly, then let the soil dry. Do not keep the mix constantly damp. If rain is frequent in your climate, move the planter to a more protected spot when possible.
Using Regular Garden Soil
Garden soil can compact in containers and hold too much moisture. Stick with a gritty succulent mix.
Skipping Drainage
If the birdbath cannot drain, you need an insert system or a new plan. Pretty containers do not get to break the laws of plant physics.
Choosing Plants With Different Needs
Do not combine thirstier shade-loving plants with sun-loving drought-tolerant succulents and expect peaceful coexistence. That is less “container design” and more “horticultural roommate drama.”
Ignoring Winter Weather
Some succulents tolerate cold better than others. Sempervivum and certain sedums can be more forgiving, while many echeverias, kalanchoes, jades, and tropical succulents need protection from frost. If freezing weather is expected, move tender plants indoors or treat the birdbath as a seasonal display.
How to Care for Your Succulent Birdbath Planter
Once established, care is refreshingly simple. Water when the soil has dried out, not according to a rigid calendar. During very hot weather, you may water a little more often. During cool or rainy periods, you may barely water at all.
Remove dead leaves, trim leggy growth if needed, and replant offsets when the arrangement gets crowded. If one plant starts to dominate the bowl like it just won a reality show, divide it and restore balance.
You can fertilize lightly during active growth, but do not overdo it. Too much fertilizer can encourage weak, overly soft growth. With succulents, restraint usually wins.
Example Planting Recipe
Here’s one simple formula for a medium-size birdbath:
- 1 upright accent succulent in the center
- 3 to 5 echeverias or hens-and-chicks around the middle zone
- 2 to 4 trailing sedums near the edge
- Gravel top dressing throughout
The result is layered, balanced, and easy to maintain. It also photographs extremely well, which is not technically required for gardening success, but it certainly doesn’t hurt.
Extra Experiences and Real-World Tips From Gardeners Who Try This Project
One of the most satisfying parts of turning a birdbath into a succulent planter is how personal the project becomes. No two birdbaths are exactly the same, and no two succulent combinations age in quite the same way. That means your planter starts as a DIY project but quickly becomes a little living sculpture with its own personality.
A lot of gardeners say they first try this project because they have an old birdbath they do not want to throw away. Maybe it was cracked, maybe birds stopped using it, or maybe it simply no longer matched the yard. Instead of hauling it off, they gave it a second life. What surprises many people is that the finished planter often looks more stylish than the original birdbath ever did.
Another common experience is learning just how much placement matters. A birdbath succulent planter can thrive beautifully in one corner of a yard and struggle miserably ten feet away. A spot with gentle morning sun and airflow might create perfect color and compact growth, while a blazing afternoon hotspot can leave leaves bleached or stressed. Gardeners often say the biggest upgrade was not buying more plants, but moving the planter to a smarter location.
There is also a design lesson that comes up again and again: less is usually more. Beginners tend to buy every cute succulent they see and cram them all into one bowl. It is understandable. Succulents are charming little weirdos. But the best birdbath planters usually rely on repetition, contrast, and breathing room. A few strong rosettes, one trailing edge, and a clean stone top dressing can look far better than fifteen tiny plants fighting for elbow room.
Many gardeners also discover that a birdbath planter changes with the seasons in satisfying ways. In spring, fresh growth appears. In summer, colors intensify. In fall, offsets fill in gaps. Even a minor pruning session can feel rewarding because the arrangement is small enough to manage easily. And if a cutting breaks off, that is often not a disaster. With succulents, breakage can become propagation, which is one of the rare gardening moments where an accident can honestly end well.
There is usually a learning curve with watering, too. Almost everyone overwaters at first. Then they realize succulents are happier when they are not fussed over every other day. Once that lesson clicks, the planter often becomes one of the easiest features in the yard. For busy homeowners, apartment dwellers with patios, or anyone who wants a high-impact display without constant maintenance, this is a huge win.
Perhaps the best part, though, is the reaction from other people. Repurposed birdbath planters tend to get noticed. Visitors pause. Neighbors ask questions. Someone always says, “I have an old birdbath too…” and suddenly your weekend project becomes neighborhood inspiration. Not bad for something that started out as a tired basin and a few thirsty little plants.
Final Thoughts
If you’ve been staring at an old birdbath and wondering whether it deserves retirement, the answer is no. It deserves a comeback. With proper drainage, gritty soil, the right succulent mix, and a bit of design restraint, you can transform a forgotten garden feature into a striking planter that looks intentional, artistic, and wonderfully low maintenance.
That is the real beauty of learning how to transform a birdbath into an amazing succulent planter. You are not just recycling an object. You are creating a centerpiece that combines texture, structure, and resilience in one very good-looking package. And unlike some home and garden projects, this one does not require a contractor, a permit, or emotional recovery afterward.


