Table of Contents >> Show >> Hide
- Why Rust Forms on Cars in the First Place
- Know the Three Main Types of Car Rust
- How to Stop Rust on a Car: Step-by-Step Rust Repair
- Step 1: Wash and Dry the Area Thoroughly
- Step 2: Gather the Right Rust-Repair Supplies
- Step 3: Mask Off the Surrounding Paint
- Step 4: Remove All Visible Rust
- Step 5: Treat Remaining Corrosion
- Step 6: Fill Low Spots if Needed
- Step 7: Prime the Repair
- Step 8: Paint and Clear Coat
- Step 9: Protect the Area So Rust Does Not Return
- When DIY Rust Repair Works Best
- When to Call a Professional Body Shop
- How to Prevent Rust from Coming Back
- Common Rust-Repair Mistakes to Avoid
- Is Rust Ever Covered by Insurance?
- Final Thoughts: Stop Rust Early or Pay for It Later
- Experience-Based Lessons from Real-World Rust Problems
Rust has a sneaky personality. It rarely barges in through the front door wearing a name tag. Instead, it creeps in through a tiny paint chip, a scratched wheel well, or that one spot on the rocker panel you swore you would deal with “next weekend.” Then one day, your car starts looking like it lost a bar fight with winter.
The good news is that rust is often manageable when you catch it early. The bad news is that ignoring it is basically sending corrosion an engraved invitation. If you want to stop rust on a car, protect your vehicle’s paint, and avoid bigger repair bills later, you need a smart plan: clean the area, remove the rust completely, seal the metal properly, and prevent moisture and salt from getting a second chance.
This guide breaks down how car rust starts, how to repair minor and moderate rust damage, when DIY rust repair makes sense, and when it is time to let a body shop take over before your wallet starts whimpering.
Why Rust Forms on Cars in the First Place
Rust is what happens when exposed steel meets oxygen and moisture for long enough. Add road salt, coastal air, trapped mud, or clogged drain holes, and the corrosion process speeds up fast. That is why rust loves places like wheel wells, rocker panels, door bottoms, undercarriages, fender edges, and any area where water likes to linger like an unwanted houseguest.
Common Causes of Car Rust
- Road salt and de-icing chemicals: These are rust’s favorite snacks.
- Paint chips and scratches: Once bare metal is exposed, corrosion can begin.
- Moisture trapped under dirt or mud: Grime holds water against the metal.
- Poor storage conditions: A damp garage or long-term outdoor storage can speed things up.
- Clogged drain holes: Water that cannot escape tends to sit and corrode from the inside out.
If you live in a snowy state, near the ocean, or in a humid region, rust prevention is not optional maintenance. It is survival training for your vehicle.
Know the Three Main Types of Car Rust
Before you start sanding like you are auditioning for a home improvement show, identify what kind of rust you are dealing with. The repair method depends on severity.
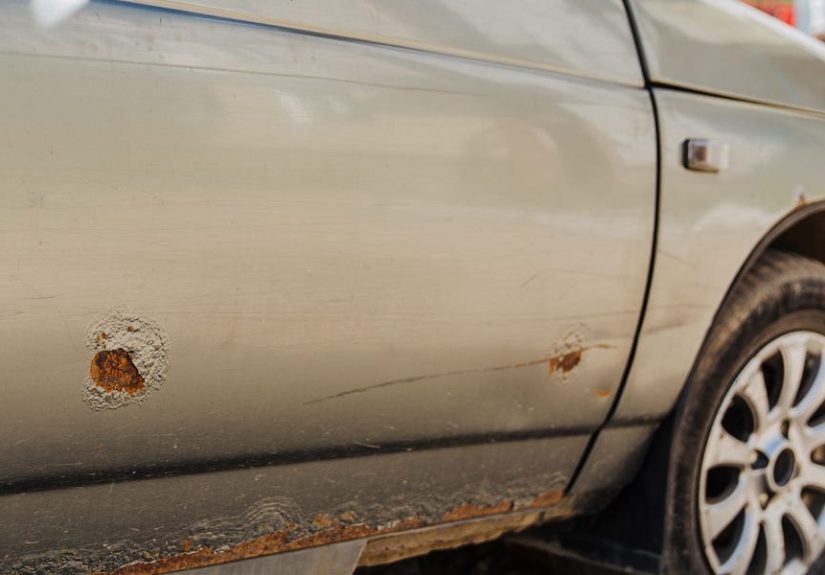
1. Surface Rust
This is the early stage. The paint may bubble, discolor, or show orange-brown staining, but the metal underneath is still mostly intact. Surface rust is the easiest type to fix at home.
2. Scale Rust
At this stage, the corrosion has eaten deeper into the metal. You may see rough flaking, pitting, or small craters. DIY repair is still possible in some cases, but it takes more prep and patience.
3. Penetrating or Structural Rust
This is the ugly stage. The metal is weakened, holes may appear, and structural areas like frame sections, suspension mounting points, brake lines, or floor pans may be compromised. This is not the moment for optimism and a spray can. It is the moment for a professional inspection.
How to Stop Rust on a Car: Step-by-Step Rust Repair
If the rust is limited to a small body panel area and has not eaten through critical metal, here is the general process for DIY car rust repair.
Step 1: Wash and Dry the Area Thoroughly
Start with a clean surface. Wash off dirt, road film, wax, grease, and loose debris. Dry the area completely before you do anything else. Trying to repair rust over contamination is like painting over cookie crumbs: technically possible, but deeply unwise.
Step 2: Gather the Right Rust-Repair Supplies
- Automotive soap and microfiber towels
- Wax and grease remover or automotive surface cleaner
- Masking tape and masking paper
- Wire brush, sanding block, or drill attachment
- Sandpaper in multiple grits, such as 80, 180, 320, and finer finishing grits
- Rust remover or rust converter
- Body filler for pitted or uneven areas
- Automotive primer
- Touch-up paint or matching base coat
- Clear coat
- Safety goggles, gloves, and a respirator or mask suitable for the products used
Step 3: Mask Off the Surrounding Paint
Protect the good paint around the rust spot. Give yourself enough room to feather the edges and work cleanly. This keeps the repair controlled and saves you from turning a quarter-sized rust spot into a weekend-long identity crisis.
Step 4: Remove All Visible Rust
Use a wire brush, abrasive wheel, or coarse sandpaper to remove rust, loose paint, and weakened material. Keep going until you reach clean, solid metal wherever possible. This part matters more than people think. If you leave active rust behind and paint over it, the corrosion can come back under the new finish and ruin your hard work.
Feather the surrounding paint so the transition is smooth. For many small rust repairs, sanding one to two inches beyond the damaged area creates better blending and adhesion.
Step 5: Treat Remaining Corrosion
If light pitting remains and full removal is difficult, apply a rust converter or rust treatment according to the product directions. These products help stabilize remaining corrosion and create a more paintable surface. They are helpful, but they are not magic fairy dust. Loose or flaky rust still needs to be removed first.
Step 6: Fill Low Spots if Needed
If the metal is pitted or uneven, use a thin layer of automotive body filler after proper prep. Once cured, sand it smooth and shape it to match the panel. Thin, even applications usually work better than slapping on a mountain of filler and hoping the paint will develop emotional resilience.
Step 7: Prime the Repair
Apply an automotive primer suited to bare metal and your paint system. Epoxy primer is often preferred for strong corrosion protection and adhesion. Let each coat cure as directed. Do not rush the drying time unless you enjoy sanding things twice.
Step 8: Paint and Clear Coat
Apply the matching paint in light, even coats. Build coverage gradually, then finish with clear coat if your system requires it. Thin coats usually look better and reduce runs. After curing, you can wet-sand and polish the area if needed for a smoother blend.
Step 9: Protect the Area So Rust Does Not Return
Once the repair is fully cured, protect the finish with wax, sealant, or another paint-safe protectant. For hidden areas or underbody sections, use a suitable rust inhibitor, cavity wax, or underbody coating where appropriate.
When DIY Rust Repair Works Best
DIY rust repair makes the most sense when:
- The rust is small and limited to body panels
- The metal is not perforated
- The affected area is cosmetic rather than structural
- You can access the spot easily
- You have enough patience to prep properly
In other words, a small rust bubble on a door edge is a much friendlier project than a crunchy frame rail that sounds like breakfast cereal when tapped.
When to Call a Professional Body Shop
Some rust problems need more than sandpaper and determination. Get a professional opinion if you find rust in any of these areas:
- Frame or subframe components
- Suspension mounting points
- Brake lines or fuel lines
- Floor pans or rocker panels with holes
- Extensive corrosion hidden under trim or undercoating
- Rust spreading from the inside of doors, fenders, or quarter panels
Structural rust is a safety issue, not just a cosmetic one. Severe rust can weaken metal and make repairs far more complex. On modern vehicles, advanced rust repair can get expensive quickly, especially if panel replacement, welding, repainting, or blending is required.
How to Prevent Rust from Coming Back
Fixing rust is only half the battle. Keeping it from returning is where the smart money lives.
Wash Your Car Regularly, Especially the Underside
If you drive on salted roads, wash your vehicle often during winter and include the undercarriage. Wheel wells, suspension parts, rocker panels, and the frame area collect salt and grime that can quietly chew through metal over time. An underbody spray at the car wash is not glamorous, but it is cheaper than welding.
Wax the Paint and Protect the Finish
Wax or paint sealant creates a sacrificial barrier that helps moisture and grime slide off instead of sticking around. It will not make your car invincible, but it does slow the corrosion process and makes cleanup easier.
Repair Chips and Scratches Fast
Small paint damage is a tiny opening for a big problem. Touch up stone chips, door dings, and scratches before bare metal spends weeks outdoors collecting moisture.
Keep Drain Holes Clear
Door bottoms and rocker panels often have drain paths that let water escape. If they clog with debris, moisture can sit inside panels and rust them from within. That kind of hidden rust is especially annoying because by the time you notice it, it has already been busy.
Store the Vehicle in a Dry Place
A dry garage is ideal, but ventilation matters too. A damp, enclosed space can still create condensation problems. If you store a vehicle long term, clean it first, dry it well, and avoid leaving it in conditions where moisture lingers on the body or undercarriage.
Inspect the Trouble Spots
Check wheel arches, door seams, fender lips, rocker panels, trunk edges, and underbody components several times a year. Catching rust early turns a major repair into a minor inconvenience.
Common Rust-Repair Mistakes to Avoid
- Painting over active rust: It will come back.
- Skipping the cleaning step: Paint and filler hate grease, wax, and dust.
- Using household paint instead of automotive products: Your car deserves better.
- Applying thick coats: Heavy primer, paint, or filler can crack, sag, or look rough.
- Ignoring hidden rust: The visible bubble is often only part of the story.
- Assuming every car needs aftermarket undercoating: Many newer vehicles already have corrosion protection, so extra treatment should be chosen carefully based on age, exposure, and condition.
Is Rust Ever Covered by Insurance?
Usually, no. Rust is commonly treated as wear and tear or neglect rather than sudden accidental damage. That means prevention matters even more. If a scratch from a covered event exposes metal, acting quickly may help you avoid a later rust problem that insurance is unlikely to pay for.
Final Thoughts: Stop Rust Early or Pay for It Later
If you want to stop rust on a car, the real trick is speed. Rust loves procrastination. The best strategy is to clean your vehicle regularly, wash away salt, repair paint damage early, remove corrosion completely when it appears, and protect the repaired area properly.
For small spots, DIY car rust repair can work beautifully with the right prep. For deep corrosion or structural damage, a reputable body shop is the safer move. Either way, the biggest mistake is doing nothing and hoping rust gets bored and leaves. It will not. Rust is weirdly committed.
Experience-Based Lessons from Real-World Rust Problems
One of the most useful things drivers learn about rust is that it almost never looks urgent at the beginning. A tiny bubble near the wheel arch seems harmless. A little brown line on the bottom of a door looks cosmetic. A bit of flaking on an older truck frame feels like something to think about “someday.” Then someday arrives wearing work boots and carrying a repair estimate.
A common experience is the post-winter surprise. A driver washes the car in spring, notices a paint blister near the rear wheel, and assumes it is just old paint. Once the sanding begins, the rust patch turns out to be much wider than expected. That happens because corrosion often spreads underneath the paint before it becomes visible. The lesson is simple: when you see rust, inspect beyond the obvious edge.
Another familiar story involves rocker panels and door bottoms. Many owners do a great job washing the exterior but forget the hidden areas where water drains. Dirt collects, moisture stays trapped, and rust starts from the inside out. By the time bubbling appears on the outside, the metal behind it may already be thin. Drivers who regularly flush those areas and keep drain paths clear usually catch problems much earlier.
Truck and SUV owners in snow-belt states often describe the same underbody pattern: the top side looks fine, but the underside tells the real story. Suspension hardware, brackets, weld seams, and frame sections collect salt and grime that stay damp for days. Owners who invest in frequent underbody rinses and periodic inspections usually extend the life of the vehicle noticeably. The ones who skip that step often discover rust only when a mechanic points it out during a brake job or tire rotation.
There is also a strong difference between “I touched it up quickly” and “I repaired it correctly.” People who sand thoroughly, clean the area, use the right primer, and let products cure properly tend to get longer-lasting results. People who rush, spray over questionable metal, or skip surface prep often end up redoing the repair within months. Rust repair rewards patience far more than confidence.
One more pattern shows up again and again: early action saves money. A chip repaired today might cost the price of touch-up materials. The same neglected spot a year later can mean filler, primer, paint blending, or panel work. That is why experienced vehicle owners treat rust like a leaky roof. It is never cheaper tomorrow.
In practical terms, the best real-world rust strategy is not complicated. Wash the car. Rinse the underside. Fix chips fast. Check hidden seams. Store the vehicle dry. Inspect trouble spots before winter and after winter. Rust may be persistent, but drivers who stay a step ahead usually win the long game.