
Table of Contents >> Show >> Hide
- Quick Table of Contents
- What “Mini Orchid” Usually Means (So You’re Not Guessing)
- The Best Setup: Pot, Mix, Placement (Your Orchid’s “Home Base”)
- Light: Bright, Indirect, and Consistent
- Watering: The #1 Make-or-Break Habit (And How to Get It Right)
- Humidity & Airflow: Comfortable, Not Tropical Storm
- Temperature: Keep It Cozy (With One Cool Bloom Trick)
- Fertilizer: How to Feed Without Overfeeding
- Repotting: When, Why, and How (Without Panic)
- How to Rebloom a Mini Orchid (So It’s Not a One-Hit Wonder)
- Troubleshooting: Quick Fixes for Common Mini Orchid Problems
- Beginner Mini Orchid Care Calendar (Simple & Realistic)
- Conclusion: The Mini Orchid Formula (No Drama Required)
- Beginner Experiences (500+ Words): What New Mini Orchid Owners Usually Learn the Fun Way
- 1) “I watered it on a schedule… and it still got mad.”
- 2) “Why does the pot feel lighter than my motivation?”
- 3) “I didn’t realize the decorative pot was a trap.”
- 4) “My orchid came in moss. Moss is either magic or a villain.”
- 5) “The roots are greenwait, now they’re silver. Is it mood lighting?”
- 6) “I got water in the crown once, and my confidence never recovered.”
- 7) “It stopped blooming and I thought it died. It did not.”
- 8) “It finally rebloomed and I became insufferable (briefly).”
- 9) “I over-fertilized because I thought ‘more food’ = ‘more flowers.’”
- 10) “The real secret is consistency, not perfection.”
Mini orchids are the houseplant equivalent of a tiny, fancy dessert: adorable, impressive, and slightly intimidating until you realize it’s mostly about timing and not doing the most. If you’ve ever looked at a mini orchid and thought, “I’m going to love you… please don’t dramatically collapse on my watch,” this guide is for you.
We’ll walk through what mini orchids need (and what they don’t), how to water without guesswork, how to avoid the classic beginner mistakes, and how to get blooms to come backbecause yes, these little show-offs can rebloom.
Quick Table of Contents
- What “mini orchid” usually means
- Best setup: pot, mix, placement
- Light: bright, not blazing
- Watering: the #1 make-or-break habit
- Humidity & airflow: comfy, not swampy
- Temperature: keep it cozy (with one cool trick)
- Fertilizer: “weakly, weekly” without the drama
- Repotting: when, why, and how
- How to rebloom a mini orchid
- Troubleshooting: leaves, roots, buds, pests
- Beginner care calendar
- Beginner experiences: 10 lessons from real-life mini orchid ownership
What “Mini Orchid” Usually Means (So You’re Not Guessing)
In most U.S. stores, a “mini orchid” is typically a mini Phalaenopsis (often called a moth orchid). It’s basically the friendly, reliable beginner optionjust in a smaller package. You might also see miniature varieties of Dendrobium, Oncidium, or Cattleya, but mini Phalaenopsis are the most common starter plant because they’re happy indoors and don’t demand a greenhouse and a personal assistant.
Why mini orchids feel trickier than regular orchids: the pots are smaller, so the potting mix dries faster, roots have less room to breathe, and tiny changes (one extra watering, one hot afternoon) can matter more. The good news? Once you learn to “read” the plant, mini orchids become surprisingly low-maintenance.
The Best Setup: Pot, Mix, Placement (Your Orchid’s “Home Base”)
1) Choose the right pot (bonus points for transparency)
Mini orchids do best in a pot that drains fast and lets you check the roots. A clear plastic orchid pot with lots of holes is ideal. Why clear? Healthy Phalaenopsis roots change color depending on moistureso the plant basically gives you a built-in status update.
- Clear pot + drain holes: lets air in, water out, and your eyeballs do the monitoring.
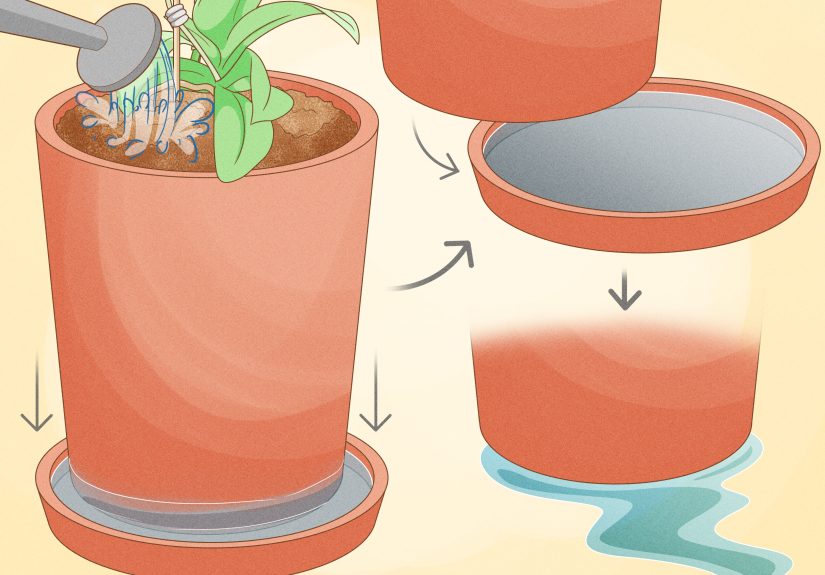
- Decorative outer pot (cachepot): totally fine, but never let the inner pot sit in pooled water.
2) Use orchid mixnot regular potting soil
Orchids are not “dirt plants.” Most Phalaenopsis are epiphytes in nature (they cling to trees), so their roots want air and quick drainage. Use a mix made for orchidscommonly bark-based, sometimes blended with sphagnum moss and perlite for balance.
Mini orchid beginner tip: many minis are sold packed tightly in sphagnum moss (or even a dense plug). That can work in a greenhouse or for growers who water precisely, but indoors it often stays wet too longhello, root rot. If your mini came in a super-tight, soggy moss situation, plan on repotting after blooming (or sooner if the roots look unhappy).
3) Pick the right spot (think: bright shade)
A mini orchid wants bright, indirect light. An east-facing window is often perfect. South or west windows can work if you soften the sun with a sheer curtain. If the plant gets direct midday sun, it can scorchmini orchids are small, not invincible.
Light: Bright, Indirect, and Consistent
Light is the fuel for growth and blooms. Too little light = gorgeous leaves, no flowers. Too much light = leaf burn and stress.
Best light for mini Phalaenopsis
- Ideal: bright, indirect light near an east window or filtered south/west light.
- Too much light signs: yellowing, bleached patches, crispy edges.
- Too little light signs: very dark green leaves and stubborn refusal to bloom.
Quick test: if you can comfortably read a book nearby during the day without squinting or sunglasses, the light is often in the right range.
Watering: The #1 Make-or-Break Habit (And How to Get It Right)
If mini orchids had a motto, it would be: “Soak me… then leave me alone.” Most beginner problems come from watering too often or not letting the pot drain fully.
The “read the roots” method (your easiest cheat code)
Phalaenopsis roots change color with moisture:
- Green roots: wet (no need to water right now).
- Silvery/gray roots: dry-ish and ready for water.
- Brown, mushy roots: rot (usually from staying wet too long).
How to water mini orchids the right way
- Take the inner pot to the sink.
- Use lukewarm water (not cold).
- Water thoroughly so it runs through the pot and out the bottom.
- Let it drain completely (seriouslyno “just a little puddle,” because puddles become problems).
- Return it to its spot.
Mini orchid reality: smaller pots dry faster, especially in bark. Depending on your home’s temperature, light, and humidity, you might water every 5–14 days. Instead of chasing a strict schedule, rely on root color, pot weight, and the feel of the mix.
Bark vs. sphagnum moss: why your watering schedule depends on your potting mix
- Bark mix: drains fast, dries quicker, more forgiving if you tend to overwater (you may water more often).
- Sphagnum moss: holds moisture longer, can be great for dry homes or forgetful waterers, but easier to overdo (especially in tiny pots).
Should you use the “ice cube method”?
You’ve probably seen the advice: “Put three ice cubes on top once a week.” Some mainstream sources say it can work because the ice melts slowly and prevents flooding. Other respected plant authorities warn that orchids are tropical and don’t appreciate cold shockand that a few ice cubes may not hydrate evenly, especially in bark.
Beginner-friendly verdict: if you want the most reliable routine, use lukewarm water and thorough drainage. If you’re tempted by ice cubes because life is busy, consider this compromise: measure a small amount of room-temperature water and pour slowly instead. You’ll get the “controlled amount” benefit without making your orchid feel like it just moved into a walk-in freezer.
Water quality tips
- Avoid softened water if your home uses a water softener (it can add salts).
- If your tap water is very hard, consider filtered water occasionally and flush the pot well to reduce mineral buildup.
Humidity & Airflow: Comfortable, Not Tropical Storm
Mini orchids like moderate humidity and gentle airflow. Many homes sit around 30–50% humidity; Phalaenopsis often prefer higher, but they adapt well if you water correctly and avoid extremes.
Easy humidity upgrades
- Humidity tray: place pebbles in a tray, add water below the top of the pebbles, then set the pot on the pebbles (the pot shouldn’t sit directly in water).
- Group plants together: they create a slightly more humid microclimate.
Important: Don’t let water sit in the crown (the center where leaves meet). That’s one of the quickest ways to trigger crown rot. If water splashes there, dab it dry with a paper towel.
Temperature: Keep It Cozy (With One Cool Bloom Trick)
Phalaenopsis generally enjoy typical indoor temperatures. Aim for warm days and slightly cooler nights, and keep them away from heating vents, AC blasts, and cold window drafts.
- Comfort zone: warm indoor temps (roughly mid-60s and up at night, warmer during the day).
- Bloom trigger: several weeks of slightly cooler night temps in fall can encourage flower spikes (think “sweater weather,” not “arctic expedition”).
If your mini orchid keeps growing leaves but never sends a spike, the fix is often more light and a gentle nighttime temperature dip.
Fertilizer: How to Feed Without Overfeeding
Orchids aren’t heavy eaters, but they do like consistent nutrients. Many growers follow the classic approach: “fertilize weekly, weakly”meaning dilute fertilizer more than the label suggests and use it more often.
Simple feeding plan for beginners
- Spring–early fall (active growth): fertilize every 2–4 weeks with a balanced orchid fertilizer, diluted (often 1/4 to 1/2 strength).
- Late fall–winter (slower growth): reduce frequency.
- Monthly reset: water thoroughly with plain water to flush out salts.
Specific example: If the label says “1 teaspoon per gallon,” try 1/4 teaspoon per gallon for regular use. Your orchid wants steady snacks, not a Thanksgiving buffet every time.
Repotting: When, Why, and How (Without Panic)
Repotting sounds dramatic, but it’s really just freshening the plant’s “root apartment” before the building materials break down. Orchid media decomposes over time, holding more water and less airbad news for roots.
When to repot a mini orchid
- Every 1–2 years as a general rule (sooner if the mix breaks down quickly).
- When the mix smells sour, looks crumbly, or stays wet too long.
- When roots are overcrowded, circling, or spilling out.
- When you see root rot or persistent dehydration despite proper watering.
Best time to repot
For Phalaenopsis, repotting is often easiest after flowering or when new root growth starts. If the plant is actively rotting, repot soonerbecause roots don’t get better by staying in the problem.
Step-by-step repotting (mini orchid edition)
- Gently remove the orchid from its pot.
- Shake off old media and rinse roots if needed.
- Trim dead roots (brown, mushy, hollow). Keep firm, healthy roots.
- Choose a slightly snug pot with good drainage (orchids like cozy, not cramped).
- Set the plant so the base sits at the top of the mixdon’t bury the crown.
- Fill around roots with fresh orchid mix; tap the pot to settle media without packing it tight.
- After repotting, water lightly or wait a short time depending on root condition and how much trimming you did.
Mini orchid pro tip: If your mini came with a tight moss plug, remove it gently during repotting. Those plugs can stay wet in the center and quietly sabotage roots.
How to Rebloom a Mini Orchid (So It’s Not a One-Hit Wonder)
Most mini Phalaenopsis bloom for weeks. After flowers drop, the plant isn’t “done”it’s just switching back to growth mode.
After blooming: what to do with the flower spike
- If the spike turns brown and dry: cut it near the base (it’s finished).
- If the spike stays green: you have options.
- Option A (energy-saving): cut the spike near the base to encourage root/leaf growth and future blooming.
- Option B (chance of quick rebloom): cut above a node (a little bump on the spike) to possibly trigger a side branch.
Most common reasons mini orchids won’t bloom again
- Not enough bright, indirect light
- Too much fertilizer (ironically) or no fertilizer at all
- No gentle nighttime temperature drop in the fall
- Root issues from old media or overwatering
Fix the basicslight, roots, watering rhythmand reblooming becomes much more likely.
Troubleshooting: Quick Fixes for Common Mini Orchid Problems
1) Wrinkly leaves
Usually: dehydration from underwatering or damaged roots. Check the roots first. If roots are firm and silvery, water thoroughly. If roots are mushy, repot and trim rot.
2) Yellow leaves
Sometimes normal: the lowest leaf ages out and yellows. Not normal: several leaves yellowing quicklyoften linked to overwatering, poor drainage, or low light.
3) Bud drop (buds fall off before opening)
Common triggers: sudden temperature swings, drafts, very low humidity, or moving the plant around a lot. Once buds form, keep conditions stable and avoid cold blasts.
4) Root rot
Clues: mushy brown roots, soggy mix, leaves that look limp despite “watering.” Fix it by repotting into fresh, airy mix and letting the pot dry slightly between waterings.
5) Crown rot
Clue: soft, dark tissue in the crown, leaves loosening at the base. Prevention is key: keep water out of the crown and ensure airflow. If suspected, act quicklyremove standing water, improve airflow, and consider targeted treatment advice from a local garden center or extension resource.
6) Pests (mealybugs, scale, spider mites)
Inspect under leaves and along stems. For light infestations, wipe pests off with a cotton swab dipped in rubbing alcohol, then monitor weekly. Isolate the plant until it’s clearly pest-free so you don’t start a tiny bug reality show across your windowsill.
Beginner Mini Orchid Care Calendar (Simple & Realistic)
- Weekly: check roots (green vs. silvery), check pot weight, scan for pests.
- Every watering day: water thoroughly, drain completely, keep water out of the crown.
- Monthly: flush with plain water to reduce fertilizer salts and mineral buildup.
- Seasonally: adjust watering frequency as light/temperature changes.
- Every 12–24 months: repot into fresh orchid mix (or sooner if the media breaks down or root issues appear).
Conclusion: The Mini Orchid Formula (No Drama Required)
Caring for mini orchids isn’t about “perfect.” It’s about consistent basics: bright, indirect light; thorough watering with full drainage; airy orchid mix; gentle humidity and airflow; and occasional feeding without overdoing it. Most mini orchids fail for one reasonroots staying wet too long. Fix the root environment, and you’ve solved the hardest part.
Once you get comfortable reading roots and adjusting to your home, your mini orchid stops feeling like a fragile museum exhibit and starts acting like a long-term houseplant that just happens to look expensive.
Beginner Experiences (500+ Words): What New Mini Orchid Owners Usually Learn the Fun Way
If you want reassurance that you’re not the only person who has stared at an orchid and whispered, “Are you thriving or silently judging me?”welcome. Below are common beginner experiences that show up again and again, especially with mini Phalaenopsis. Think of these as the unofficial field notes of people who learned orchid care one leaf at a time.
1) “I watered it on a schedule… and it still got mad.”
Beginners often start with a rigid routine: every Saturday, no matter what. The mini orchid responds by either staying too wet (hello, rot) or drying too fast (hello, wrinkles). The breakthrough usually comes when people stop chasing the calendar and start watching the plant: root color, pot weight, and how quickly the mix dries in that specific room.
2) “Why does the pot feel lighter than my motivation?”
Mini orchids dry faster because the pot is smaller and the roots have less buffer. Many first-timers are surprised by how quickly bark mix can go from “wet” to “bone dry,” especially near a sunny window. A super common lesson: if the pot feels feather-light and the roots look silvery, it’s not being dramaticit’s being honest.
3) “I didn’t realize the decorative pot was a trap.”
A classic: the orchid lives in a cute ceramic outer pot with no drainage. The inner pot drains… but the water collects in the bottom like a tiny swamp, and the roots sit in it. Once beginners realize the orchid needs to drain completely (and not sit in leftover water), leaf firmness often improves within weeks.
4) “My orchid came in moss. Moss is either magic or a villain.”
People report two very different moss experiences. In dry homes, moss can keep the plant evenly hydrated. In average indoor conditions, tightly packed moss can stay wet too longespecially in a mini potleading to hidden root problems. The lesson many learn: moss isn’t “bad,” but density matters. Air pockets are your friend.
5) “The roots are greenwait, now they’re silver. Is it mood lighting?”
New owners often think something is wrong when roots change color. Later, they realize it’s the plant’s built-in moisture meter. Once people start trusting the green-to-silvery shift, watering becomes less stressful because it’s based on plant signals, not internet arguments.
6) “I got water in the crown once, and my confidence never recovered.”
Many beginners learn (the hard way) that water sitting in the crown can cause serious issues. The good news: it’s easy to prevent. Experienced growers keep a paper towel nearby, dab the center dry if water splashes there, and move on with their livesno guilt spiral required.
7) “It stopped blooming and I thought it died. It did not.”
A mini orchid dropping its flowers is normal. Beginners often assume it’s a failure. The learning moment is realizing orchids have cycles: bloom, rest, grow roots/leaves, bloom again. After flowering, the plant is refuelingnot quitting.
8) “It finally rebloomed and I became insufferable (briefly).”
There’s a special kind of joy when a beginner gets a rebloom. It usually happens after two changes: moving the orchid to brighter indirect light and letting nights get a little cooler for a few weeks (often naturally in fall). Suddenly a spike appears, and the owner becomes the unofficial orchid influencer of their household.
9) “I over-fertilized because I thought ‘more food’ = ‘more flowers.’”
Many newbies learn that orchids don’t want heavy feeding. Diluted fertilizer used occasionally (and flushing monthly) tends to work better than big doses. People often notice that once they ease up, leaf and root health improvesand blooms follow later.
10) “The real secret is consistency, not perfection.”
The most common experience? Beginners succeed when they keep conditions stable: same spot, steady light, careful watering, good drainage. Mini orchids don’t need constant fussingthey need you to avoid the extremes. When that clicks, orchid care becomes less like babysitting and more like a calm routine: check roots, water when needed, enjoy the tiny luxury plant that keeps showing up for you.


